Table of Contents
Advertisement
Quick Links
MP42 / MP42X
User Manual
This User Manual is made available in Adobe Acrobat format.
In order to view or print the manual, and utilize its enhancements we
recommend that you download Adobe Acrobat Reader 4.0 or
greater.
If you do not have this viewer installed on your
computer, or if you have an older version the reader is available
as a free download at http://www.adobe.com.
By going to the table of contents you can directly access any
topic outlined there by simply clicking on the topic heading.
© Phoenix Gold International, Inc. November 2001
Rev. 11.20.01
Advertisement
Table of Contents

Subscribe to Our Youtube Channel
Related Manuals for Phoenix Gold Carver MP42


Summary of Contents for Phoenix Gold Carver MP42
- Page 1 By going to the table of contents you can directly access any topic outlined there by simply clicking on the topic heading. © Phoenix Gold International, Inc. November 2001 Rev. 11.20.01...
- Page 2 SAFETY INFORMATION Caution The exclamation point within an equilateral triangle is intended to alert the user of the presence of important operating and maintenance (servicing) instructions in the Please read this entire manual, especially the Safety Warnings, before operating your amplifier. Table Of Contents JP1, JP2 &...
- Page 3 Professional combined with the performance, manufacturing quality and attention to detail that has defined Phoenix Gold International assures you of the value and integrity you seek in an amplifier product. Thank you for placing your confidence in Carver Professional and Phoenix Gold.
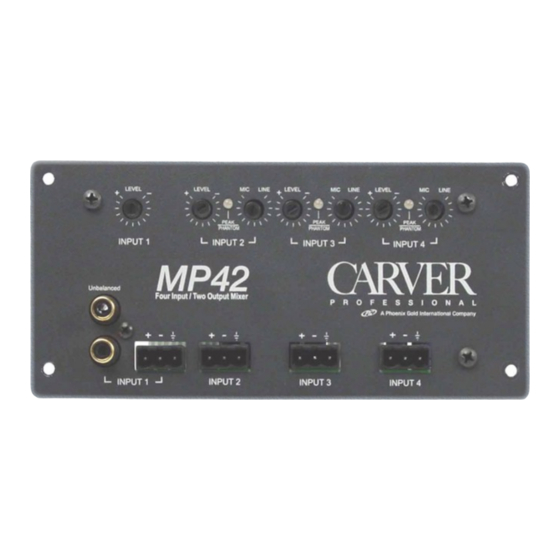
- Page 4 MP42 Features 1. INPUT LEVEL ADJUSTMENT – Sets the level of that input channel into the mix. 2. DIAGNOSTIC LED – Indicates the presence of Phantom Power and / or whether the input s being overdriven. 3. MIC / LINE SENSITIVITY – Sets the sensitivity of the input channels preamp allowing an input of varying level.
- Page 5 Configuring the MP42 / MP42X for Use Before Installation Be sure that you have properly set the following jumpers and configuration switches: 1) JP101 – Input Sensitivity for Input 1 This jumper gives you three selections for the input sensitivity 0dB which is referenced to 0.775Vrms, -6dB which is referenced to 0.3875Vrms and +6dB referenced to 1.55Vrms.
- Page 6 5) SW1 – Eight Position DIP Switch This bank of eight switches are numbered 1 through 8 from left to right. Switch #1 and #2 assign the output from Input #1 to CH2 and CH1 respectively, switch #3 and #4 assign the output from Input #2 to CH2 and CH1 respectively, switch #5 and #6 assign the output from Input #3 to CH2 and CH1 respectively and switch #7 and #8 assign the output from Input #4 to CH2 and CH1 respectively.
- Page 7 Input Adjusments Inputs #2, #3 and #4 are designed to accept a wide range of signal levels, from microphone level inputs to line level inputs. Unlike Input #1, for this group of inputs the sensitivity is set with a variable adjustment on the front panel of the MP42 module.
- Page 8 MP42 Specifications Measurement Conditions (unless otherwise specified): ±15vdc power supply One input selected, Level and Gain @ maximum Source Impedance: Balanced Mic/Line 150ohm, Unbalanced Line 25ohm Output Terminations: 10k ohm 0dB Reference Output Level: 0dBr= 0.775Vrms 1kHz Signal Mic/Line Inputs #2, 3, and 4 Input Type: Euro-block, balanced Voltage Gain: 6dB to 44dB (continually variable from Line to Mic) Mic Input Impedance: Designed for use with: 50 to 600ohm...
Need help?
Do you have a question about the Carver MP42 and is the answer not in the manual?
Questions and answers