Table of Contents
Advertisement
Available languages
Available languages
Quick Links
DD 641 /HA(BK)
DD 642 /HA(BK)
DD 642 /HA(ICE)
English
Operating Instructions
HOB
Contents
Operating Instructions,1
Warnings,2
Assistance,4
Description of the appliance,5
Installation,6
Français
Mode d'emploi
TABLE DE CUISSON
Sommaire
Mode d'emploi,1
Avertissements,2
Assistance,4
Description de l'appareil,5
Advertisement
Table of Contents

Related Manuals for Hotpoint Ariston DD 641/HA BK


Summary of Contents for Hotpoint Ariston DD 641/HA BK
-
Page 1: Table Of Contents
DD 641 /HA(BK) DD 642 /HA(BK) DD 642 /HA(ICE) English Operating Instructions Contents Operating Instructions,1 Warnings,2 Assistance,4 Description of the appliance,5 Installation,6 Start-up and use,10 Precautions and tips,10 Maintenance and care,11 Troubleshooting,11 Français Mode d’emploi TABLE DE CUISSON Sommaire Mode d’emploi,1 Avertissements,2 Assistance,4 Description de l’appareil,5... - Page 2 Warnings Avertissements WARNING: The appliance and its accessible parts ATTENTION : Cet appareil ainsi que ses parties become hot during use. Care should be taken to accessibles deviennent très chauds pendant leur avoid touching heating elements. Children less than 8 fonctionnement.
- Page 3 ATTENTION : si la table en verre est endommagée : - éteindre immédiatement tous les brûleurs et les éventuels éléments chauffants électriques et débrancher l’appareil du réseau électrique - ne pas toucher la surface de l’appareil...
- Page 4 Assistance Communicating: • the type of problem encountered. • appliance model (Mod.) • serial number (S/N) This information is found on the data plate located on the appliance and/or on the packaging. Assistance Indiquez-lui : • le type d’anomalie • le modèle de votre appareil (Mod.) •...
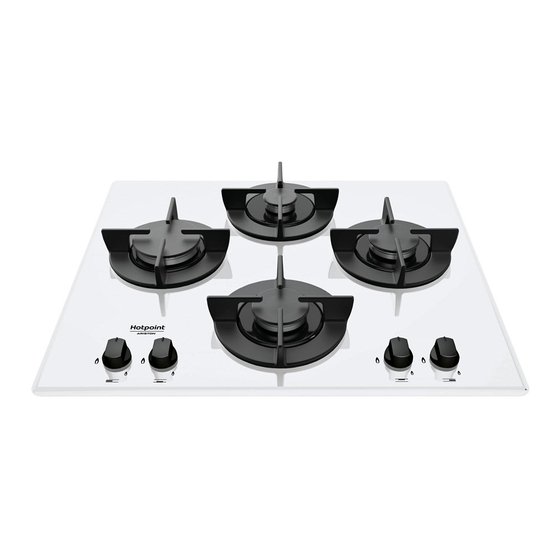
- Page 5 Description of the appliance Overall view 1. Support Grid for COOKWARE 2. GAS BURNERS 3. Control Knobs for GAS BURNERS 4. Ignition for GAS BURNERS 5. SAFETY DEVICES • GAS BURNERS differ in size and power. Use the diameter of the cookware to choose the most appropriate burner to cook with.
- Page 6 Installation Fitting the appliance The following precautions must be taken when installing the hob: • Kitchen cabinets adjacent to the appliance and taller than the top of the ! Before operating your new appliance please read this instruction booklet hob must be at least 200 mm from the edge of the hob. carefully.
- Page 7 ! The manufacturer declines any liability should these safety measures not • Where the hob is not installed over a built-in oven, a wooden panel must be installed as insulation. This must be placed at a minimum distance of be observed. 20 mm from the lower part of the hob.
- Page 8 4. Some appliances have a safety device (thermocouple) fitted. If the device fails to work when the burners are set to the low flame setting, increase this low flame setting using the adjusting screw. 5. Once the adjustment has been made, replace the seals on the by-passes using sealing wax or a similar substance.
- Page 9 Burner and nozzle specifications Table 1 Liquid Gas Natural Gas Burner Diameter Thermal Power By-pass Nozzle Flow* Nozzle Flow* (mm) kW (p.c.s.*) 1/100 1/100 1/100 (mm) (mm) (mm) Nomin. Reduc. Rapid (R) 3.00 0.70 116(Y) 0.40 96(Z) Semi Rapid (S) 1.65 Auxiliary (A) 1.00...
-
Page 10: Start-Up And Use,10
Start-up and use Precautions and tips ! The position of the corresponding gas burner is shown on every knob. ! This appliance has been designed and manufactured in compliance with international safety standards. The following warnings are provided for safety Gas burners reasons and must be read carefully. -
Page 11: Maintenance And Care,11
Respecting and conserving the environment Check these items frequently, and if necessary, clean them with a damp cloth. Any baked-on food should be removed with a toothpick or needle. • Cook your food in closed pots or pans with well-fitting lids and use as little water as possible. -
Page 12: Installation,12
Installation ou une aération plus efficace, en augmentant la puissance d’aspiration mécanique si déjà prédisposée. • Les gaz de pétrole liquéfiés, plus lourds que l’air, se déposent et ! Conservez ce mode d’emploi pour pouvoir le consulter à tout moment. stagnent vers le bas. - Page 13 Devant • la tension d’alimentation est bien comprise entre les valeurs indiquées sur la plaquette signalétique; • la prise est bien compatible avec la fiche de l’appareil. Si ce n’est pas le cas, remplacez la prise ou la fiche, n’utilisez ni rallonges ni prises multiples. ! Après installation de l’appareil, le câble électrique et la prise de courant doivent être facilement accessibles ! Le câble ne doit être ni plié...
- Page 14 3. Remontez les différentes parties en effectuant les opérations dans le sens inverse. 4. En fin d’opération remplacez la vieille étiquette par celle correspondant au nouveau gaz utilisé, disponible dans nos Services Après-vente. • Réglage de l’air primaire des brûleurs Les brûleurs ne nécessitent d’aucun réglage de l’air primaire.
- Page 15 Caractéristiques des brûleurs et des injecteurs Tableau 1 Gaz Liquidés Gaz Naturel Brûleur Diamètre Puissance By-pass Injecteur Débit* Injecteur Débit* Puissance Débit* thermique thermique (mm) 1/100 1/100 1/100 kW (p.c.s.*) kW (p.c.s.*) (mm) (mm) (mm) Nominal Réduit Butane Propane Rapide (R) 3.00 0.70 116(Y)
-
Page 16: Mise En Marche Et Utilisation,16
Mise en marche et utilisation Précautions et conseils ! Cet appareil a été conçu et fabriqué conformément aux normes ! La position du brûleur gaz correspondante est indiquée sur chaque manette. internationales de sécurité. Ces conseils sont fournis pour des raisons de sécurité... -
Page 17: Nettoyage Et Entretien,17
Entretien robinets gaz les autorités locales ou leur revendeur concernant la démarche à suivre pour l’enlèvement de leur vieil appareil. Il peut arriver qu’au bout d’un certain temps, un robinet se bloque ou tourne difficilement. Il faut alors le remplacer. Economies et respect de l’environnement •... - Page 18 ATTENTION...
- Page 20 195145517.00 05/2016 - XEROX FABRIANO Indesit Company S.p.A. Viale Aristide Merloni,47 60044 Fabriano (AN) www.hotpoint.eu...
Need help?
Do you have a question about the DD 641/HA BK and is the answer not in the manual?
Questions and answers