OSD MX 880, MX 1280, MX 1680 - Multiroom Amplifier MX Series Manual
- Owner's manual (5 pages)
Advertisement

- TO PREVENT FIRE OR SHOCK HAZARD, DO NOT USE THIS PLUG WITH AN EXTENSION CORD, RECEPTACLE OR OTHER OUTLET UNLESS THE BLADES CAN BE FULLY INSERTED TO PREVENT BLADE EXPOSURE.
- TO PREVENT FIRE OR SHOCK HAZARD, DO NOT EXPOSE THIS APPLIANCE TO RAIN OR MOISTURE.
- TO PREVENT ELECTRICAL SHOCK, MATCH WIDE BLADE PLUG TO WIDE SLOT, FULLY INSERT.
 |  |  |
| This lighting flash with arrowhead symbol, within an equilateral triangle, is intended to alert the use to the presence of un-insulated dangerous voltage within the products enclosure that may be of sufficient magnitude to constitute a risk of electric shock to persons. | This lighting flash with arrowhead symbol, within an equilateral triangle, is intended to alert the use to the presence of un-insulated dangerous voltage within the products enclosure that may be of sufficient magnitude to constitute a risk of electric shock to persons. | The exclamation point within the equilateral triangle is intended to alert the user to the presence of important operating and maintenance (servicing) instructions in the literature accompanying suppliance. |
IMPORTANT SAFETY INSTRUCTIONS
- Read these instructions.
- Keep these instructions.
- Read all warnings.
- Follow all Instruction.
- Do not use this apparatus near water.
- Clean only with dry cloth.
- Do not block any ventilation openings. Install in accordance with the manufacturers instructions.
- Do not install near heat sources such as radiators, heat registers, stoves, or other apparatus (including amplifiers) that poduce heat.
- Do not defeat the safety purpose of the polarized or grounding type plug. A polarized plug has two blades with one wider than the other. A grounding type plug has two blades and a third grounding prong. If the provided plugs does not fit into your outlet, consult an electrician for replacement of the obsolete outlet.
- Protect the power cord from being walked on or pinched particularly at the plugs, convenience receptacles, and at the point where they exit form the appliance.
- Only use attachments or accessories specified by the manufacturer.
- Unplug the apparatus during lightning storms or when unused for long periods of time.
- Refer all servicing to qualified personnel. Servicing is required when the apparatus has been damaged in anyway, such as power supply cord or plug is damaged, liquid has been spilled or objects have fallen into the apparatus, the apparatus has been exposed to rain or moisture, does not operate normally, or has been dropped.
Introduction
The OSD Audio MX Series Multi-Zone Amplifiers are ideal for adding additional power in distributed audio applications or combining with home theater systems. The MX880 provides 8 channels, MX1280 provides 12 channels and MX1680 provides 16 channels of digital amplification. All MX Series models incorporate features such as bridge mode operation, global and independent zone triggering, audio sense circuitry with delay time per zone, two Bus Inputs/Outputs and independent line inputs per zone to meet the wide range of audio applications and projects. All MX Series amplifiers are rated at 50 watts per channel into 8 ohms and 80 watts per channel into 4 ohms. With the Stereo/Bridge switch in Bridge mode, each zone of channels are combined for a higher powered mono output of 160 watts into 8 ohms. With high performance and ultra-low distortion output, the MX series Multi-Zone Amplifiers provide unmatched sound quality for any audio system.
Thermal Protection
All MX series amplifiers are designed with special circuitry to safeguard the amplifier under a thermal overload condition. Thermal protection mode will only engage when the unit has been run at high volume for extended periods of time without adequate ventilation and/or when speaker impedances are below the minimum levels for the amplifier. In thermal protection mode the amplifier will automatically stop output. If this fault occurs, turn off the amplifier, and check that the speaker impedance rating is above the minimum rating. Also check for adequate ventilation around the amplifier and make adjustments if necessary. Once the unit has cooled to sage operating temperatures, the amplifier may be powered back on.
Protection Circuitry
Special circuitry has been designed into the MX Series Multi-Zone Amplifier to safeguard under a short-circuit condition. A faulty speaker can also cause a short circuit condition. The Zone LED indicator will blink rapidly between red and blue. If this fault condition occurs, turn off the amplifier and check speakers for short circuit conditions when appropriate.
Installation
The MX Series Multi-Zone Amplifiers can be placed on a shelf, as part of an equipment rack, or on a table or cabinet. During installation, keep in mind that the amplifiers require proper clearances for ventilation and heat dissipation. The amplifier will take two rack spaces with the feet removed.
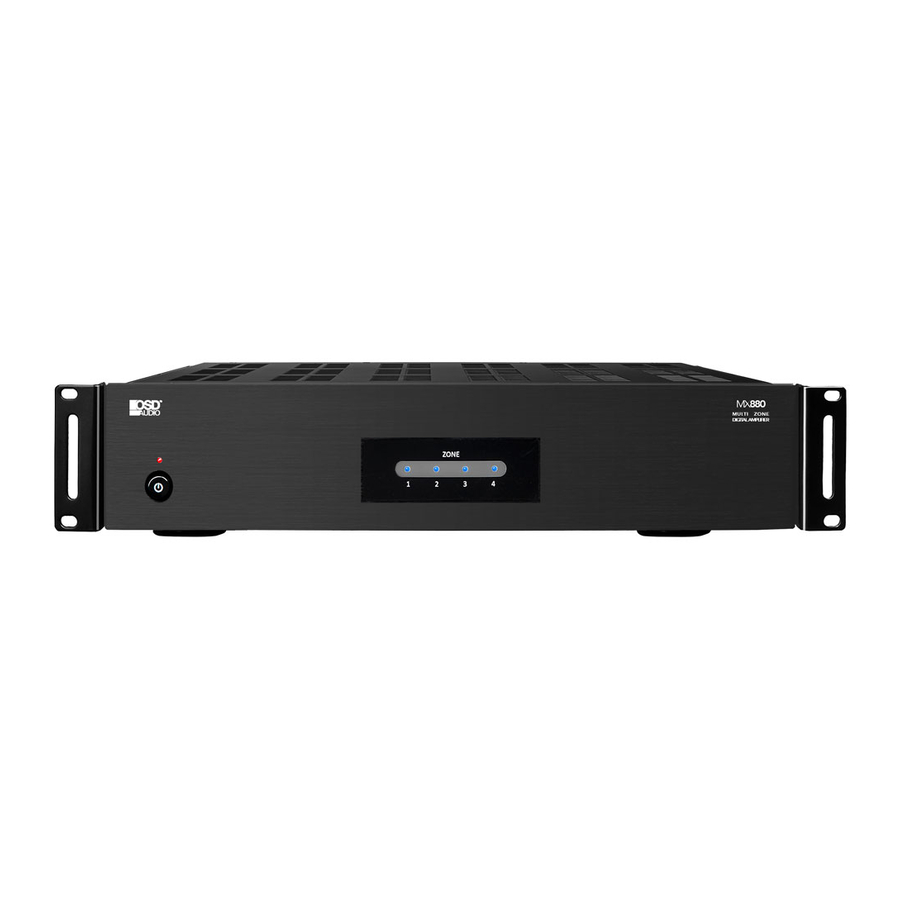
Front Panel

- Power/Standby LED
This LED lights red when any zone is active or the amplifier is in standby mode. - Zone LED
Blue: the corresponding zone is powered on.
OFF: the corresponding zone is off (standby mode).
Red/Blue: A short circuit happens on the speaker outputs
Rear Panel

- Bus 12VDC Trigger In/Out
The Bus 12VDC Trigger In is used to activate all zones that are using the Bus Input and disables other zone triggers or signal sensing on those zones when it is used. When the Bus12VDC Trigger is used, all Bus-controlled zone LEDs will be blue and active. If the Bus Trigger In has 12V applied to it, only the 12V Bus Trigger Out will have 12V and the Zone Trigger Outputs will not. - Bus Inputs/Outputs
The Bus Line Inputs are optional inputs that can be used to connect a single source to multiple zones. The Bus Line Outputs are passive pass through the corresponding of the Bus Inputs and can be used to daisy chain the source to other amplifiers in the system. - Line/Bus Switch
Switches the zone input to the Line Input, Bus Input 1 or Bus Input 2. - Line Input
The Line audio input for each zone is a dedicated sensing input that will activate the zone when an audio signal from a source is present. - 12VDC Trigger In/Out (Each Zone)
The Zone 12V Trigger In is used to activate a specific zone. The Zone Trigger Out can be used to trigger other 12V devices. The delay and audio sensing are bypassed when the 12V Zone Trigger Input is used. When a ZoneTrigger is active, the zone LED will be blue. If no voltage is present in the Zone Trigger, the Zone LED will be off. Standby Mode The amplifier will go into Standby mode when audio signal or trigger is not present after 3 minutes. - Speaker Outputs
The minimum speaker impedance is 4 ohms for Stereo Mode and 8 ohms for Bridge Mode. - Stereo/Bridge Switch
Selects the output mode of each zone for stereo or Bridge operation. - Gain Controls
Left and Right gain controls for each zone adjust the sound level independently. Only using Left control to adjust the sound level when used in Bridge Mode. - Voltage Switch
AC 115V or AC 230V dual voltage selector. - AC Input
Apply the correct voltage before operate the amplifier.
Specifications
Power Output:
80W /Channel, 1KHz into 4 Ohms, One Zone Driven
50W /Channel, 1KHz into 8 Ohms, One Zone Driven
160W, 1KHz into 8 ohms, Bridge
Amplifier Channels:
MX 880: 8 Channels, 4 Zones
MX 1280: 12 Channels, 6 Zones
MX 1680: 16 Channels, 8 Zones
Signal-to-Noise Ratio: >90dB A-weighted
Frequency Response: 20Hz to 20KHz + 1.7/-1dB at 1W output into 8 Ohms
Input Sensitivity:
600 mV for 80W @ 1 KHz 4 Ohm One Zone
700 mV for 50W @ 1 KHz 8 Ohm One Zone
Input Impedance: >22K Ohms Line Input
Trigger Inputs / Outputs: Bus and Zone @12VDC
Zone Line Input: Line In, Bus In 1, Bus In 2 select switch per zone
Bridge Mode: Select Stereo or Bridge mode per zone 8 Ohm only
Speaker Connectors: Detachable speaker terminals support up to 14awg wire
Delay Time: When audio signal or trigger is not present after 5 minutes.
Power Requirements (Switchable):
MX880: 100-120VAC 60Hz 600W Max
220-240VAC 50Hz 600W Max
MX1280: 100-120VAC 60Hz 900W Max
220-240VAC 50Hz 900W Max
MX1680: 100-120VAC 60Hz 1200W Max
220-240VAC 50Hz 1200W Max
Fuse Rating:
MX 880: 100-120V/T5A, 250V
220-240V/T2.5A, 250V
MX 1280: 100-120V/T8A, 250V
220-240V/T4A, 250V
MX 1680: 100-120V/T10A, 250V
220-240V/T5A, 250V
Dimensions (L x W x H): 16.81" x 16.14" x 3.46"
Weight:
MX 880: 19 lbs.
MX 1280: 20.5 lbs.
MX 1680: 22.8 lbs.
System Configuration
Typical Mode

MX Series amplifiers can be configured as the main amplifier for an audio distribution system or home theater system. When used with an audio distribution preamp or matrix processor, each zone can independently drive one of several different sources by using each zone's individual line audio inputs. If the specify zone needs a higher power, please just use Bridged mode.
When MX 1280 or MX 1680 is working as a home theater amplifier, the amplifier could support up to a 7.1 or 5.1surround system, and recommend using the Bridged mode to have the higher outputs.
Bridged Mode

When the amplifier is in Bridged Mode operation, a single channel (the left) is used to provide a higher power mono output. Use one channel pair to amplify the left channel by connecting the left audio signal to the L input of a channel pair, setting the Stereo/Bridge switch to "Bridge" and connecting the speaker as indicated below. Use a second channel pair for the right channel by connecting the right audio signal to the L input of a second channel pair, setting the Stereo/ Bridge switch to "Bridge" and connecting the speaker as indicated above. Note: The three position switch needs to be set to "Line In" on both zones that are wired for Bridged Mode.
Wiring Instructions - Bridged Mode
- Turn off the amplifier and connect an 8-ohm minimum load.
- Set the Stereo/Bridge switch to Bridged Mode.
- Follow the Bridge mode markings on the back of the amplifier:
Connect the negative lead (-) of the speaker cable to the R– terminal.
Connect the positive lead (+) of the speaker cable to the L+ terminal. - Apply the Line In from audio source to the Left Line In connector.
- Power on the amplifier.

Documents / ResourcesDownload manual
Here you can download full pdf version of manual, it may contain additional safety instructions, warranty information, FCC rules, etc.
Download OSD MX 880, MX 1280, MX 1680 - Multiroom Amplifier MX Series Manual
Advertisement


Need help?
Do you have a question about the MX 880 and is the answer not in the manual?
Questions and answers