Advertisement
Quick Links
Advertisement

Related Manuals for SAN HIMA SGBR015


Summary of Contents for SAN HIMA SGBR015
- Page 1 E-BIKE HITCH BIKE RACK SGBR015 INSTALLATION INSTRUCTIONS...
- Page 2 WARNING The rack and its parts must not be modified in any way. Remove this rack before entering an automatic car wash, and when not in use. Ground clearance of 10'' or higher is recommended. Drive slowly over speed bumps, 5-10 mph (8-16 kph) max. The vehicle's total length or height may increase when a rack is mounted.
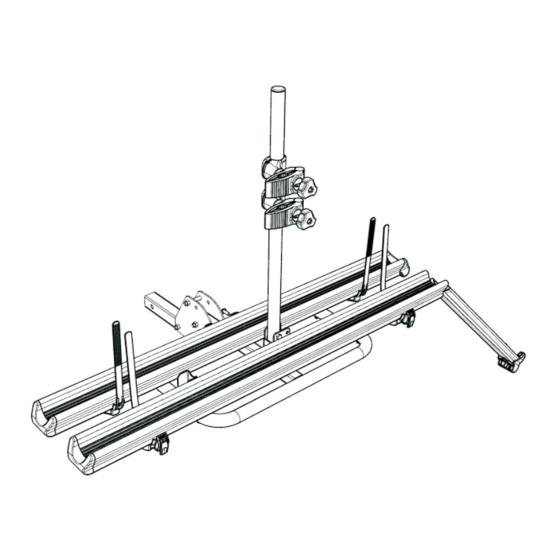
- Page 3 CONTENTS San Hima E-Bike Rack With Ramps Tongue Bolt,Nut & Washer Clevis Pin & R Clip Hitch Bolt & Nut Wrench ② ③ ⑤ ④ ① ⑥ PARAMETER Hitch size: 2'' Maximum load capacity: 2 e-bike capacity, 77lbs (35kg) per bike on road, 46lbs (21kg) per bike off road Tire width: up to 3.35'' (8.5cm)
-
Page 4: Installation
INSTALLATION 1. Assemble the tongue to the rack Align holes on the tongue to those on the rack. Install bolts, washers and nuts, and tighten them with wrenches.(1a) Install the clevis pin & R clip on the tongue.(1b) 2. Install the tongue into your hitch receiver Insert the tongue into the hitch receiver. - Page 5 3. Center the trays Loosen the underside nuts and center the trays. Then tighten the underside nuts. LOADING 1. Prepare for loading Loosen the ramp knobs and pull out the whole ramps. (1a) Unbuckle the strap that secures the mast.(1b) Pull the security pin &...
- Page 6 Note: You can roll your e-bikes onto the trays from either the left or the right by unscrewing the screws under the trays,then lifting and reversing the whole trays. 2. Roll your e-bikes into place Roll your e-bikes up the ramps and onto the trays. Note: E-bikes can be loaded in the same or opposite directions.
- Page 7 3. Secure the e-bikes with the stabilizers Loosen the stabilizer knobs and adjust the height of stabilizers.(3a) Rotate the stabilizers toward the e-bikes and adjust their positions so that they engage with the frames or seat posts of the e-bikes.(3b) Clamp the frames or seat posts.
- Page 8 Store the ramps (see Figure 1.) When the ramps are not in use, push them into the trays and tighten the ramp knobs. Unloading Loosen the ramp knobs and pull out the ramps. Press the gray release tabs on the buckles and release the straps.
- Page 9 Tilt (see Figure 2.) Remove the clevis pin & R clip and install them into the lower hole.(a) Remove the security pin & clip while supporting the load.(b) Slowly and carefully lower the rack.(c) Caution! The tilt feature requires 2 PEOPLE to operate.One person MUST support the load while the other removes the security pin &...
-
Page 10: Warranty
WARRANTY San Hima warrants that each of e-bike rack that is purchased while this Warranty is in effect will be free from defects in materials and workmanship for a period of 5 years from the date of receiving the product from San Hima or its authorized distributor/dealer. If it is believable to be defective during the 5-Year Warranty Period, San Hima will, at its option, repair it, replace it with the same or similar product, or will issue a refund for the defective San Hima product.
Need help?
Do you have a question about the SGBR015 and is the answer not in the manual?
Questions and answers