Hannlomax HX-200 - PLL Alarm Clock Radio Manual
- Instruction manual (2 pages) ,
- Quick start manual (2 pages)
Advertisement
- 1 DEVICE OVERVIEW
- 2 CONNECTING THE UNIT TO POWER
- 3 BATTERY BACKUP
- 4 SETTING THE CLOCK
- 5 SETTING THE ALARMS
- 6 SNOOZE FUNCTION
- 7 TURN OFF THE ALARM
- 8 LISTENING TO THE RADIO
- 9 SAVING A RADIO STATION TO THE MEMORY
- 10 TO LISTEN TO A SAVED RADIO STATION
- 11 SLEEP TO MUSIC FUNCTION
- 12 TURN OFF THE RADIO
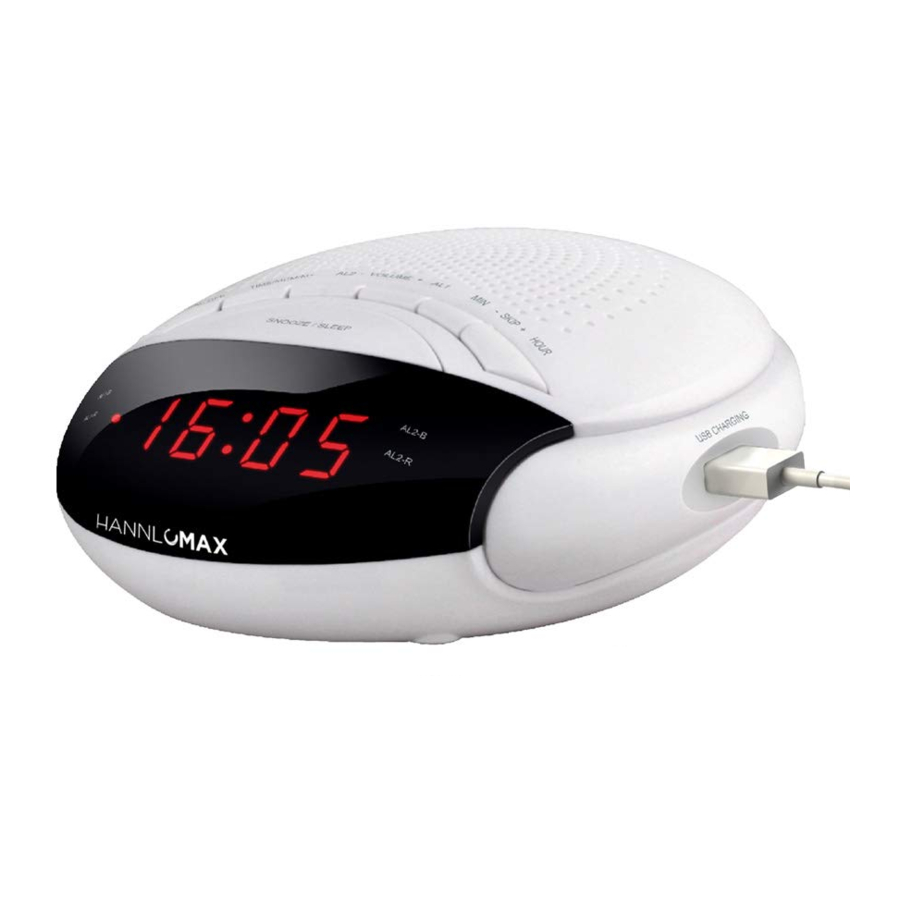
- 13 CHARGE YOUR DEVICES
- 14 SPECIFICATION
- 15 Documents / Resources

TO PREVENT FIRE OR SHOCK HAZARD. DO NOT EXPOSE THIS APPLIANCE TO RAIN OR MOISTURE.
THIS APPLIANCE SHALL NOT BE EXPOSED TO DRIPPING OR SPLASHING WATER AND THAT NO OBJECT FILLED WITH LIQUIDS SUCH AS VASES SHALL BE PLACED ON APPARATUS.
 |  RISK OF ELECTRIC SHOCK DO NOT OPEN |  |
| The lightning flash with arrowhead symbol, within an equilateral triangle, is intended to alert the user to the presence of uninsulated "dangerous voltage" within the products enclosure that may be of sufficient magnitude to constitute a risk of electric shock to persons. | To reduce the rise of electric shock, do not remove cover (or back) no user-serviceable parts inside. Refer servicing to qualified service personnel. | The exclamation point within an equilateral triangle is intended to alert the user to the presence of important operating and maintenance (servicing) instructions in the literature accompanying the appliance. |
DEVICE OVERVIEW

| 1 | /SOURCE / AL.OFF Button | 11 | ALARM2 BUZZER Indicator |
| 2 | TIME / MEM / M+ Button | 12 | ALARM2 RADIO Indicator |
| 3 | AL2 / VOL− Button | 13 | LED Display |
| 4 | AL1 / VOL+ Button | 14 | Speaker |
| 5 | MIN / SKIP− Button | 15 | DC Jack |
| 6 | HOUR / SKIP+ Button | 16 | USB Port |
| 7 | SNOOZE Button | 17 | FM Wire Antenna |
| 8 | PM Indicator | 18 | Battery Compartment |
| 9 | ALARM1 BUZZER Indicator | ||
| 10 | ALARM1 RADIO Indicator |
CONNECTING THE UNIT TO POWER
Plug one end of the AC adaptor into the DC power Input, and then plug the other end into AC wall outlet. Before switching on the unit, make sure that the voltage of your electricity supply is the same as that indicated on the rating plate.
BATTERY BACKUP
Insert two pieces UM-4 batteries into the battery compartment. Be sure to observe the proper polarity (the "+" and "-" signs) as indicated inside the battery compartment.
In case of power failure or interrupted AC power, the current time and alarm time settings, the stored radio stations are preserved in the memory of the unit by means of battery back-up function.
SETTING THE CLOCK
- With the unit in CLOCK mode (RADIO off), press and hold the TIME/MEM/M+ button for about 1 second, the time will begin to flash on the LED display.
- Press the HOUR button to adjust the hour.
- Press the MIN button to adjust the minute.
- When the correct time is selected, press the TIME/MEM/M+ button again to confirm.
SETTING THE ALARMS
- With the unit in CLOCK mode (RADIO off), press and hold the AL1 or AL2 button. The ALARM time will begin to flash on the LED display.
- Press the HOUR button to adjust the alarm hour.
- Press the MIN button to adjust the alarm minute.
- When the correct time is selected, press the AL1 or AL2 button to confirm.
- Press the AL1 or AL2 button to select the ALARM sound mode – [B] buzzer or [R] currently set radio station. The corresponding LED indicator will light up.
SNOOZE FUNCTION
- Whenever the alarm (buzzer or radio) activates, it can be temporarily suspended for a short period of 9 minutes by pressing the SNOOZE button once.
- The buzzer or radio will then automatically activate again after the 9 minutes SNOOZE period has ended.
- This procedure can be repeated for up to approximately one hour.
TURN OFF THE ALARM
When the Alarm activate, press the  /AL OFF button to turn off the Alarm.
LISTENING TO THE RADIO
- Press the
![]() /AL OFF button to select the FM radio mode
/AL OFF button to select the FM radio mode - Press the SKIP+ or SKIP− buttons step by step to tune to the desired radio stations.
- Press and hold the SKIP+ or SKIP− buttons for approx. 1 second, it will start to search the next radio station in the direction of the search. The search operation simply finds stations with strong signals. Stations with weak reception can only be tuned in manually.
- Fully extend the FM wire antenna to obtain the best reception.
- Press the VOL+ or VOL− button to adjust the sound to the desired listening level.
SAVING A RADIO STATION TO THE MEMORY
- Tune the radio to the desired station.
- Press the TIME/MEM/M+ button for approx. 1 second, the LED display will show PXX where 'XX' is the next radio station number in the memory
- Press the SKIP+ or SKIP− button to select the desired station number then press the TIME/MEM/M+ button to store the station in the memory.
- Up to 10 FM radio stations can be stored in the memory.
TO LISTEN TO A SAVED RADIO STATION
Press the TIME/MEM/M+ button to select the stored radio station.
SLEEP TO MUSIC FUNCTION
- This function allows you to listen to the radio while you fall asleep.
- Press the SNOOZE button, the display will show the default sleep time of 90 minutes showing in the display.
- Press the SNOOZE button again to adjust the desired sleep time.
- Now you can enjoy listening to the radio for the pre-set period of sleep time.
- After this pre-set time has elapsed, the unit will switch off automatically.
TURN OFF THE RADIO
Press the /AL OFF button to turn off the radio.
CHARGE YOUR DEVICES
Connect the standard size end of a USB cable (not included) to the USB port on the unit and connect the other end to the charging port your device.
Remarks: Some devices may not support USB charging or may require a higher power rating than this product provides. Observe the charging status on your device. Ensure your device is working properly before attempting to charge. Charging function may not be supported for all phones or electronic devices
SPECIFICATION
| Frequency Range: | FM 88 – 108 MHz |
| Power Supply: | AC 100-240V ~ 60/50 Hz |
| Rated Output: | DC5V ~ 2.1A |
| Nominal voltage (for memory backup): | 3V (2 x UM4 batteries) |
Specifications are subject to change without prior notice.

Documents / ResourcesDownload manual
Here you can download full pdf version of manual, it may contain additional safety instructions, warranty information, FCC rules, etc.
Advertisement


Need help?
Do you have a question about the HX-200 and is the answer not in the manual?
Questions and answers