Table of Contents
Advertisement
Quick Links
A 4510B Yearly Timer with Network Access
Operating Manual
A 4510B
Yearly Timer
Redback® Proudly Made In Australia
Distributed by Altronic Distributors Pty. Ltd.
Phone: 1300 780 999 Fax: 1300 790 999 Internet: www.altronics.com.au
IMPORTANT NOTE:
Please read these instructions carefully from front to back prior to installation.
They include important setup instructions.
Failure to follow these instructions may prevent the unit from working as designed.
User manual revision number: 1.0 31/08/2023
www.altronics.com.au
Redback® Proudly Made In Australia
1
Advertisement
Table of Contents

Related Manuals for Redback A 4510B


Summary of Contents for Redback A 4510B
- Page 1 A 4510B Yearly Timer with Network Access Operating Manual A 4510B Yearly Timer Redback® Proudly Made In Australia Distributed by Altronic Distributors Pty. Ltd. Phone: 1300 780 999 Fax: 1300 790 999 Internet: www.altronics.com.au IMPORTANT NOTE: Please read these instructions carefully from front to back prior to installation.
- Page 2 100% developed, designed & assembled in Australia. Since 1976 we have been manufacturing Redback amplifiers in Perth, Western Australia. With over 40 years experience in the commercial audio industry, we offer consultants, installers and end users reliable products of high build quality with local product support.
-
Page 3: Table Of Contents
A 4510B Yearly Timer with Network Access CONTENTS 1.0 Overview Page 1.1 Introduction 1.2 Features 1.3 What’s in the box 1.4 Front panel guide 1.5 Rear panel connections 2.0 Setup 2.1 Initial Setup 2.2 Setting the current Time 2.3 Setting the current Date 2.4 Audio Connections... -
Page 4: Introduction
1.1 INTRODUCTION The A 4510B is an incredibly versatile, and easily programmed yearly timer housed in a convenient 2RU rack or desk mount chassis. The unit can be programmed for a maximum of 250 timing events for each day of the year. The timing events are programmed with Windows based software via a user friendly calendar layout. -
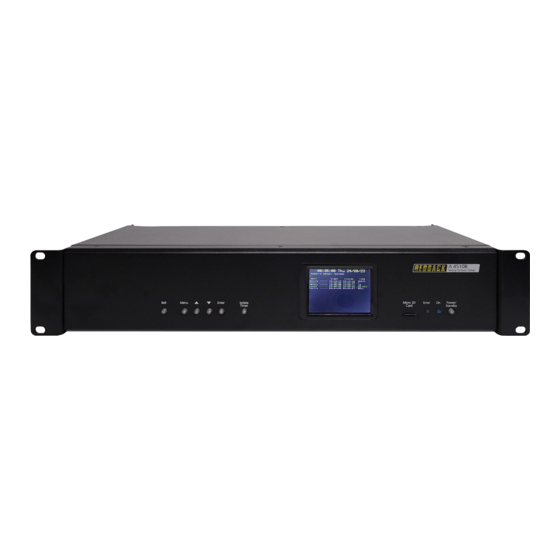
Page 5: Front Panel Guide
A 4510B Yearly Timer with Network Access 1.4 FRONT PANEL GUIDE Figure 1 shows the layout of the A 4510B front panel. A 4510B Yearly School Timer Micro SD Error Power/ Bell Menu Enter Isolate Standby Card Fig 1 Bell Tone Activation Switch This switch is used to manually activate the Bell tone. -
Page 6: Rear Panel Connections
A 4510B Yearly Timer with Network Access 1.5 REAR PANEL CONNECTIONS Figure 2 shows the layout of the A 4510B rear panel. 6 7 8 DIP Switch Settings IMPORTANT NOTE: Switch 1 www.redbackaudio.com.au The Battery Backup is used to backup the internal This switch is used to loop the Bell tone, or play the Bell clock in the event of a power failure. - Page 7 A 4510B Yearly Timer with Network Access RJ45 Adapter This RJ45 port is for future connection of Redback devices. RJ45 Interface This RJ45 port is for future connection of peripheral devices. Bell Trigger Short these contacts to trigger the Bell Function.
-
Page 8: Initial Setup
Apply 24 Volts DC to the unit by connecting the supplied 24V DC plugpack and switch the unit ON. The LCD screen should display “REDBACK A 4510B” for a couple of seconds before it performs an Micro SD card check. -
Page 9: Audio Connections
The output levels of the Prebell, Bell and Music tones can all be adjusted via trimpots located on the rear of the unit. 2.5 DIP SWITCH SETTINGS The A 4510B has optional settings which are set by the DIP switches on the rear of the unit. IMPORTANT NOTE: Ensure power is switched off when adjusting DIP switches. -
Page 10: Battery Backup (Of Time)
3.0 NETWORK ACCESS The Redback® A 4510B has been upgraded from previous versions to now include access via a network connection. The unit is connected with the addition of the Redback® A 4498 Network Connection Pack. With the upgraded PC software all the event timing and audio file selection can be adjusted remotely. -
Page 11: Firmware Update
6) With the power lead removed from the rear of the unit, insert the Micro SD card back into the A 4510B. 7) Reconnect power to the A 4510B and turn ON. The unit will check the Micro SD card and if an update is required the A 4510B will perform the update automatically. -
Page 12: Specifications
A 4510B Yearly Timer with Network Access 6.0 SPECIFICATIONS CONTROLS: OUTPUT LEVEL:...........0dBm Bell:........Rear Volume Prebell:........Rear Volume DISTORTION:..........0.01% Music:........Rear Volume Power:.........On/Off Switch FREQ. RESPONSE:......140Hz - 20kHz Bell Switch:......Push Switch Isolate Switch:......Push Switch OUTPUT CONNECTORS: Audio Output:....RCA Stereo Socket INDICATORS:....... Power on, MP3 error Common 24V DC Out:..Screw Terminals...
Need help?
Do you have a question about the A 4510B and is the answer not in the manual?
Questions and answers