
Summary of Contents for TURF TANK One+
- Page 1 Product Manual - Turf Tank One+ Error in custom placeholder "instance-creation-date" (app: k15t-scroll-document-versions-for-confluence). current...
-
Page 2: Table Of Contents
1.6.1 Product Labeling - Turf Tank One+ ........................38 1.6.2 Product Labeling - Base Station..........................40 1.6.3 Product Labeling - Turf Tank One+ Battery ......................41 1.6.4 Product Labeling - Pole Battery ..........................42 1.6.5 Product Labeling - LP-E6 Battery ........................... 43 Safety ........................44... - Page 3 2.4.5 Stopping While Running a Job..........................53 2.5 Safe Operating Instructions - Turf Tank One+ .................54 2.5.1 Lift the Turf Tank One+ safely with two people..................... 56 2.5.2 The Robot is equipped with a large red Emergency Stop Button................ 56 2.6 Safe Operating Instructions - Base Station................57...
- Page 4 3.6.1 Connecting the Robot to the App......................... 130 3.6.2 Check System Status ............................131 3.7 General Operation........................132 3.7.1 Operation - Turf Tank One+ ..........................132 3.8 Place Field Plans on the Map....................135 3.8.1 Plotting Terminology ............................135 3.8.2 Reference Points ..............................136 3.8.3 Clear Paths ................................
- Page 5 Product Manual - Turf Tank One+ 4.5 Software Updates ........................146 4.5.1 Update Robot Software ............................146 4.5.2 Updating the Turf Tank App ..........................147 4.6 Part Replacement and Repair ....................147 Troubleshooting....................148 5.1 Troubleshooting Introduction....................149 5.1.1 General Troubleshooting............................149 5.2 Troubleshooting Robot......................150 5.2.1 Robot Operation ..............................
- Page 6 Product Manual - Turf Tank One+ Regulatory Information ..................171 9.1 Declaration of Conformity ......................172 9.1.1 Declaration of Conformity ............................ 172 9.2 Applicable to US Market ......................173 9.3 Certification..........................173...
- Page 7 Product Manual - Turf Tank One+...
-
Page 8: Introduction
Product Manual - Turf Tank One+ 1 Introduction Introduction... -
Page 9: My Robot Info
Product Manual - Turf Tank One+ 1.1 My Robot Info Robot Model: _____________________ Robot Serial Number: ___________________________ Robot Name: ____________________________ My Robot Package Outright Purchase Subscription Subscription type Basic Plus Turf Tank App User Access Username: _____________________________ Password: _____________________________ ... - Page 10 Product Manual - Turf Tank One+ For Support contact: Europe: Phone: +45 71 999 401 Address: Turf Tank ApS Lansen 15, 9230 Svenstrup J Nordjylland Denmark North America: Email: support@turftank.com Phone or Text: 1-770-818-6020 Turf Tank, Inc. US 1775 West Oak Parkway, Suite 500...
-
Page 11: Using This Product Manual
Thank you for choosing the Turf Tank System! 1.3.1 About This Manual This Product Manual is designed to be easy to understand so that your Turf Tank Robot is easy to use! Look for helpful formatting and callouts to guide you. -
Page 12: What Comes In The Crate
Product Manual - Turf Tank One+ 1.4 What Comes in the Crate 1.4.1 Main Crate 1x Turf Tank One+ 1x Turf Tank One+ Battery Quantity depends on region and subscription package. 1x Turf Tank Robot Battery Charger Introduction... - Page 13 Product Manual - Turf Tank One+ 1x Turf Tank Robot Battery Charger Adapter Cable (EU) Adapter model based on region. 1x Turf Tank Robot Battery Charger Adapter Cable (US) Adapter model based on region. 1x Turf Tank Robot Battery Charger Adapter Cable (UK) Adapter model based on region.
- Page 14 Product Manual - Turf Tank One+ 1x Samsung Tab Active3 Tablet Computer preloaded with the Turf Tank App 1x Tablet Charger EU Adapter model based on region. 1x Tablet Charger US Adapter model based on region. Introduction...
- Page 15 Product Manual - Turf Tank One+ 1x Tablet Charging Cable Adapter model based on region. 1x Prism Pole 1x Tripod Introduction...
- Page 16 Product Manual - Turf Tank One+ 1x Jug 5.5 Gallon (Large) 1x Jug 2.5 Gallon (Small) Included in the USA. May be ordered from Turf Tank Representatives in other regions. 1x Funnel Introduction...
- Page 17 Product Manual - Turf Tank One+ 1x Ground Spike 2x Robot Decals Introduction...
-
Page 18: Accessory Box
Product Manual - Turf Tank One+ 1.4.2 Accessory Box 1x Base Station 1x Base Station Antenna (large) 1x Pole Battery Your Turf Tank System includes one battery/charger option. Contact your Turf Tank Representative to learn more or to purchase additional batteries. Introduction... - Page 19 Product Manual - Turf Tank One+ 1x Pole Battery Charger Converter Block Your Turf Tank System includes one battery/charger option. Contact your Turf Tank Representative to learn more or to purchase additional batteries. 1x Pole Battery Charger Cable (EU) Adapter model based on region.
- Page 20 Product Manual - Turf Tank One+ 1x Base Station Power Cable 7-pin 1x Base Station Battery LP-E6 1x Battery LP-E6 Charger Adapter model based on region. Introduction...
- Page 21 Product Manual - Turf Tank One+ 1x Battery LP-E6 Charger Adapter Cable (EU) Adapter model based on region. 1x Battery LP-E6 Charger Adapter Cable (US) Adapter model based on region. Introduction...
-
Page 22: Turf Tank System Overview
Product Manual - Turf Tank One+ 1.5 Turf Tank System Overview The Turf Tank is an autonomous line-marking system. It accurately and efficiently paints lines on grass, turf, dirt, or other surfaces, most commonly for sports fields. The Turf Tank system consists of: •... -
Page 23: Product Description
Product Manual - Turf Tank One+ 1.5.1 Product Description The Turf Tank System paints lines for sports fields, logos, messages, and more, quickly, easily, and accurately, using less paint than conventional line-marking systems. Powered by a removable 12V Lithium-Ion Battery, the Turf Tank Robot will paint sharp lines precisely and quickly. - Page 24 The Robot and Base Station communicate via UHF antenna connection. The Turf Tank App can be used to drive the Robot and operate its spray system manually. The App also provides guidance for maintenance and cleaning of the Robot.
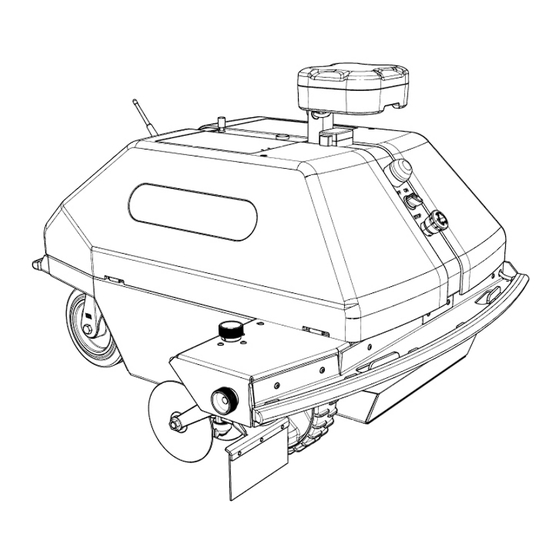
- Page 25 Product Manual - Turf Tank One+ Turf Tank One+ Exterior Your Robot may vary slightly in appearance based on configuration On/Off Switch (Ignition Switch) Emergency Stop Button Main Indicator Light Front Bumper Back Bumper Rover Rover Indicator Light (on bottom of Rover)
- Page 26 Product Manual - Turf Tank One+ Battery/Paint Compartment Battery Compartment Battery Lock Battery Connector Suction Rod and Tube Assembly Introduction...
- Page 27 Product Manual - Turf Tank One+ Interior Power Breaker Switch Control Unit ID Box containing digital identification tag with serial number Pump Fuse Box Introduction...
- Page 28 Product Manual - Turf Tank One+ Paint Sprayer Assembly Sprayer Body Sprayer Knob for Height Adjustment Spray Discs Spray Discs Knob for Width Adjustment Spray Disc Width Measuring Guide (cm) Spray Guard Spray Guard Knob for Height Adjustment ...
- Page 29 The Base Station saves its geographical location, called the Saved Position in this manual, as a reference point for the Turf Tank Robot to paint precise and accurate layouts/fields/plans/whatever. The Base Station can operate with a long-life external Pole Battery or two internal LP-E6 camera-style batteries (see “TECHNICAL DATA”...
- Page 30 Product Manual - Turf Tank One+ Parts of the Base Station Power Button Position Button Information Panel Charging Port Antenna Port Prism Pole Attachment Port (5/8-inch Threaded Mount) Battery Cover A Battery Cover B Back Plate Introduction...
- Page 31 Product Manual - Turf Tank One+ Information Panel Diagram Position Light (orange) Transmission Light (blue) Satellite Light (green) Internet Light (white) Battery A Light (red) Battery B Light (red) A key explaining the lights on the Information Panel appears on the Back Plate.
- Page 32 Product Manual - Turf Tank One+ Overview of the Base Station assembly with Pole Battery Base Station Pole Battery Power Cable Antenna Introduction...
- Page 33 Product Manual - Turf Tank One+ Overview of the Base Station assembly with LP-E6 Batteries Base Station LP-E6 Battery (inserted) LP-E6 Battery (inserted) Antenna Introduction...
- Page 34 Robot, you must set up a plan within the App, Turf Tank will provide you with login information for the App. Record this information in a place you can find easily, such as the Support page of this manual.
- Page 35 Product Description - Turf Tank App The Turf Tank App allows you to create sports fields and other features in your specific location for the Robot to paint. The App itself will guide you through tutorials and provide help along the way.
- Page 36 Product description - Samsung Tab Active3 The Samsung Tab Active3 tablet computer (the “Tablet”) ships with the Robot and Base Station and comes pre- loaded with the Turf Tank App. Please consult the Samsung documentation, included in the Tablet’s box, for complete operation instructions.
- Page 37 Product Manual - Turf Tank One+ Tablet back Rear Camera Introduction...
-
Page 38: Product Labeling
Product Manual - Turf Tank One+ 1.6 Product Labeling 1.6.1 Product Labeling - Turf Tank One+ The following symbols appear on the Robot. They convey essential safety and regulatory information. Study them carefully. This product conforms to applicable European Union directives. - Page 39 The Serial Number is a unique identification number for the Turf Tank One+. The WiFi Name is the identifying name of the Turf Tank One+'s WiFi connection, also known as the SSID. The WiFi Name is unique to the individual Robot.
-
Page 40: Product Labeling - Base Station
Product Manual - Turf Tank One+ 1.6.2 Product Labeling - Base Station The following symbols appear on the Base Station. They convey essential safety and regulatory information. Study them carefully. This product conforms to applicable European Union directives. ... -
Page 41: Product Labeling - Turf Tank One+ Battery
Product Manual - Turf Tank One+ 1.6.3 Product Labeling - Turf Tank One+ Battery The following symbols appear on the Turf Tank One+ battery. They convey essential safety and regulatory information. Study them carefully. This product conforms to applicable European Union directives. -
Page 42: Product Labeling - Pole Battery
Product Manual - Turf Tank One+ 1.6.4 Product Labeling - Pole Battery These symbols can be found on the product. Study them carefully. This product conforms to applicable European Union directives. DO NOT dispose of this Robot as normal household waste. The Robot must be recycled in accordance with local legal requirements. -
Page 43: Product Labeling - Lp-E6 Battery
Product Manual - Turf Tank One+ 1.6.5 Product Labeling - LP-E6 Battery These symbols can be found on the product. Study them carefully. This product conforms to applicable European Union directives. DO NOT dispose of this Robot as normal household waste. The Robot must be recycled in accordance with local legal requirements. -
Page 44: Safety
Product Manual - Turf Tank One+ 2 Safety Safety... -
Page 45: Safety Information Overview
2.2.1 Main Indicator Light The light on the front of the Turf Tank One+ indicates its state and mode of operation. Please refer to the section “SAFETY WARNINGS AND MESSAGES” for a detailed description of the blink patterns' meanings. -
Page 46: Ignition Switch
Product Manual - Turf Tank One+ 2.2.2 Ignition Switch Directly under the Main Indicator Light on the front of the Robot is the Ignition Switch. A quarter turn clockwise (to the “ON” position) powers on the Robot. A quarter turn counterclockwise (to the “OFF” position) turns off the power to the robot. ... -
Page 47: Power Breaker Switch
Product Manual - Turf Tank One+ 2.2.3 Power Breaker Switch The Power Breaker Switch (or just “Breaker Switch” or “Breaker”) is located under the right-side cover (when viewed from the front) on the front wall of the Battery/Paint Compartment. Flipping this switch to the ON position (indicated by a l) will power the Robot’s control unit. -
Page 48: Emergency Stop Button
2.2.4 Emergency Stop Button The Emergency Stop Button, located on the front of the Turf Tank One+, stops all Robot operation when pressed. When active, the Emergency Stop Button lights up. Normal operation cannot resume until the Emergency Stop Button is released. Release the Emergency Stop Button by turning it counter clockwise. -
Page 49: Front And Rear Bumpers
Front Bumper: The Turf Tank One+ is equipped with front and rear bumpers made of metal plates faced with soft rubber safety sensors that activate when the Robot encounters an obstacle. When the Bumper sensor activates, the Robot immediately pauses all operations and stops the motors. -
Page 50: Safety Warnings
Heed all warnings. Use only attachments/accessories specified by Turf Tank. Below is a list of potential risks that may arise while operating the Turf Tank Robot and how to avoid or minimize them. 2.3.1.1 Collision Because the Turf Tank Robot can be operated autonomously, it is mandatory that the Robot is visible to the operator at all times during use. ... - Page 51 Robot stored safely away from non-operators and make sure the Main (Breaker) Switch and the Ignition Switch are both off. Hackers cannot pair foreign devices with the Turf Tank Robot if they cannot physically access it and its power is completely off.
-
Page 52: Safety Messages In The Turf Tank App
2.4 Safety Messages in the Turf Tank App Some Robot safety messages are conveyed through the Turf Tank mobile software application (the “Turf Tank App” or the “App”). This section provides an overview of these messages, some generic, others errors, and some specific to a particular module of the App. -
Page 53: Rear Bumper
Product Manual - Turf Tank One+ 2.4.4 Rear Bumper Disengaged: The Robot is functioning normally. Engaged: The Robot is stopped. The Bumper has encountered an obstacle. If bumpers are activated while driving manually, the bumper button in the App will turn red with an alert symbol, the Robot will stop moving, and Manual mode will be turned off. -
Page 54: Safe Operating Instructions - Turf Tank One
Because the Robot and the Base Station use Lithium-Ion batteries, a Dangerous Goods Note must be completed when hiring a freight company to transport the Robot. Turf Tank cannot be held liable for any failure to abide by international transportation laws. •... - Page 55 OFF before performing any maintenance or installing any part or accessory. • This directive does not apply to Hot Swap-enabled units (Turf Tank Lite). For such units, it is not necessary to power down ONLY when Hot Swapping the battery. For all other maintenance or part installation, power down the Robot, including the Power Breaker Switch.
-
Page 56: Lift The Turf Tank One+ Safely With Two People
2.5.1 Lift the Turf Tank One+ safely with two people. • Lift the the Turf Tank One+ using the handholds built into its front and back bumpers. 2.5.2 The Robot is equipped with a large red Emergency Stop Button. •... -
Page 57: Safe Operating Instructions - Base Station
Product Manual - Turf Tank One+ 2.6 Safe Operating Instructions - Base Station 2.6.1 Use Ensure that the Base Station is installed securely. Do not extend the Base Station to too great a height. The Base Station should always be in arm’s reach. -
Page 58: Safe Operating Instructions - Batteries
Charge batteries in storage to approximately 50% of capacity at least once every six months. Use only the supplied batteries, chargers, and charging methods for Turf Tank equipment, except for LP-E6 batteries (see below). Should a charger become damaged or broken, contact Turf Tank for a replacement. - Page 59 Product Manual - Turf Tank One+ Allow time for cooling before charging a battery that is still warm from usage and using a battery that is still warm from charging. Safety...
-
Page 60: Installation And Operation
Product Manual - Turf Tank One+ 3 Installation and Operation Installation and Operation... -
Page 61: Installation Introduction
To ensure maximum understanding and safety, as well as to prevent potential damage to the System components, please do not attempt to use the Robot or the Base Station in any way before instructed to do so by your Turf Tank Representative. -
Page 62: Charge Batteries
Product Manual - Turf Tank One+ 3.2 Charge Batteries DO NOT charge batteries for the first time until you have consulted with an authorized Turf Tank Representative to prevent any damage to the batteries or chargers. 3.2.1 Charge Robot Battery 3.2.1.1 Overview of the Turf Tank Robot Battery-charging system. - Page 63 Product Manual - Turf Tank One+ 3.2.1.2 Step-by-Step Robot Battery Charging 1. Connect the Power Cable to the Battery Charger. 2. Connect the Power Cable to a power outlet. 3. Connect the Charging Cable to the Battery. Installation and Operation...
-
Page 64: Check Robot Battery Status
• Red: Charge level is low or battery is bad. • Flashing Red: Battery connected in the wrong polarity. 3.2.2.2 Checking Battery Status in the Turf Tank App To check Battery status in the Turf Tank App: • Battery MUST BE inserted into the Robot. - Page 65 Product Manual - Turf Tank One+ If a Base Station or Robot Battery drains completely, it can cause permanent damage to the device. Installation and Operation...
-
Page 66: Charge Pole Battery
Product Manual - Turf Tank One+ 3.2.3 Charge Pole Battery 3.2.3.1 Charge the Pole Battery Overview of the Pole Battery-charging system. Power Outlet Charger Adapter Cable Charger Block Charging Cable Pole Battery Installation and Operation... - Page 67 Product Manual - Turf Tank One+ 3.2.3.2 Step-by-Step Pole Battery Charging 1. Connect the Charger Adapter Cable to the Charger Block. 2. Connect the Power Cable to a power outlet. 3. Remove the Protective Cap from the port on the side of the Pole Battery.
- Page 68 Product Manual - Turf Tank One+ 4. Connect the Charging Cable to the Pole Battery. 3.2.3.3 Check Pole Battery Status The Pole Battery has indicator lights on the body to display capacity. Press the lightning button to view the capacity. All lights are illuminated when Pole Battery is fully charged.
-
Page 69: Charge Lp-E6 Battery
Product Manual - Turf Tank One+ 3.2.4 Charge LP-E6 Battery 3.2.4.1 Charge LP-E6 Battery Overview of the LP-E6 Battery-charging system. Power Outlet Charger Adapter Cable LP-E6 Battery Charger LP-E6 Battery Installation and Operation... - Page 70 Product Manual - Turf Tank One+ 3.2.4.2 Step-by-Step LP-E6 Battery Charging 1. Connect the Charger Adapter Cable to the LP-E6 Battery Charger. 2. Connect the Power Cable to a power outlet. 3. Insert the LP-E6 Batteries into the LP-E6 Battery Charger.
-
Page 71: Charge The Tablet
Product Manual - Turf Tank One+ 3.2.4.3 Check the LP-E6 Charge Status LP-E6 Charger Lights: • Green: Battery is fully charged. • Red: Battery is charging. • No light: Charging Block is not connected to a Power Outlet or is not working properly - faulty block and/or cable. -
Page 72: Install Batteries
Product Manual - Turf Tank One+ 3.3 Install Batteries REMOVE batteries from Robot and Base Station after use. Batteries MUST NOT be stored attached to the Base Station or the Robot. Check Battery status frequently. Swap out any batteries that are at or below 25-percent capacity. - Page 73 Product Manual - Turf Tank One+ 2. Rotate the Battery Lock clear of the Battery Box opening. 3. Grip the handle on the Battery, which will face the Battery’s power connectors in the proper direction. 4. Firmly push the Battery into the Battery Box until it is fully seated.
- Page 74 Product Manual - Turf Tank One+ 6. Close Battery/Paint Compartment Lid. 3.3.1.1 Remove the Robot Battery Make sure the power (Ignition and Breaker) to the Robot is OFF before removing the Battery. Reverse the steps above. When pulling the Battery from the Battery Box, pull it out straight to disengage the connectors cleanly without twisting.
-
Page 75: Install Base Station Batteries
Product Manual - Turf Tank One+ 3.3.2 Install Base Station Batteries The Base Station can use two different types of batteries. You can use both battery types at the same time for extended battery life. 3.3.2.1 Pole Battery The Pole Battery is an external battery that screws into the bottom of the Base Station and screws into the top of the Prism Pole. - Page 76 Product Manual - Turf Tank One+ 3.3.2.3 Pole Battery Installation Connect the Pole Battery to the Base Station 1. Turn the Base Station upside down to display its ports. 2. Screw the Pole Battery into the threaded socket in the center.
- Page 77 Product Manual - Turf Tank One+ 3. Remove the protective caps from the Base Station’s charging port and the Pole Battery’s power connector. 4. Attach the power cable to both the Battery and the Base Station. 5. Align the red dot on the charger with the red dot on the Base Station.
- Page 78 Product Manual - Turf Tank One+ 3.3.2.4 LP-E6 Battery Installation 1. Turn the Base Station upside down and remove the Battery Lids on both sides. 2. Insert the LP-E6 Batteries into each battery tray, making sure the connectors align with the connectors in the battery tray.
- Page 79 Product Manual - Turf Tank One+ 3. Re-attach both Battery Lids. You can power the Base Station with one LP-E6 batteries at a time. Battery life will obviously be twice as long if you use two at the same time.
- Page 80 Product Manual - Turf Tank One+ 3.3.2.5 Replace LP-E6 Batteries The Base Station uses one LP-E6 battery at a time. Should it be necessary to swap out a spent battery while the other battery is in use, you can do so without turning off the Base Station or removing it from the Prism Pole.
- Page 81 Product Manual - Turf Tank One+ 2. Place a fully charged Battery into the Battery Cover. Match the connectors and the plus-minus icon on the Battery to the Battery Cover. 3. Reattach the Battery Cover containing the Battery to the Base Station.
-
Page 82: Getting Started
3.4 Getting Started Before you begin, log into and set up the Turf Tank App according to instructions from your Turf Tank Representative and directives within the App. 3.4.1 Collect the following essential items for your initial installation:... -
Page 83: Prepare The Robot
Before you head to the field to set up the Base Station, make sure the Robot is functioning properly. The following procedures will guide you. 3.4.3.1 Get to Know Your Robot Familiarize yourself with all the Turf Tank One+ parts, inside and out, as detailed in Product Description - Turf Tank One+. -
Page 84: Start The Robot
Product Manual - Turf Tank One+ 3.4.4 Start the Robot Battery must be inserted before the Robot can be turned on. 1. Push in the Shield Lock for the Left Shield. 2. Open the Left Shield. - Page 85 Product Manual - Turf Tank One+ 3. Flip the Power Breaker so it points down. 4. Close the Left Shield. 5. Turn the Ignition Switch to the ON position. Installation and Operation...
-
Page 86: Prepare The Paint System
Product Manual - Turf Tank One+ 3.4.5 Prepare the Paint System 3.4.5.1 The Paint System These are the elements of the Paint System, from the Suction Rod that goes into the paint jug to the Nozzle that sprays the paint: Suction Rod: a rigid, hollow rod of plastic with a non-removable mesh housing on the bottom containing a rattling agitator. - Page 87 Product Manual - Turf Tank One+ Sprayer Head Assembly: consists of Solenoid to power the opening and closing of the sprayer, a chamber reducer to increase the pressure in the Sprayer Head, a gasket to prevent paint dripping, and a nozzle tip to dispense paint.
- Page 88 Product Manual - Turf Tank One+ Prepare the Paint System On first use, assemble the components of the Paint System and prime the Pump. Insert The Inline Mesh Filter 1. Unscrew the Lid from the filter housing. 2. Insert the Inline Mesh Filter.
- Page 89 Product Manual - Turf Tank One+ Check All Compression Fittings If a tube needs to be removed then (1) press in the collar while at the same time (2) pull out the tube. The tube is reinserted by pushing it back into the collar. Be sure the tube is seated all the way into the opening before letting the collar clamp shut.
- Page 90 Product Manual - Turf Tank One+ Complete the Sprayer Assembly The Sprayer Assembly already contains the Solenoid and valve to control paint flow. Customizable nozzles are added to the tip to alter the pattern and size of the lines the Robot paints.
- Page 91 Product Manual - Turf Tank One+ 3. Mount the Quick Fan Cap onto the Sprayer by seating it into the Sprayer Body and twisting a quarter turn counterclockwise until it locks. Installation and Operation...
-
Page 92: Prime The Paint System
Product Manual - Turf Tank One+ 3.4.6 Prime the Paint System 3.4.6.1 Priming the Paint System in the App 1. On the Home Screen select Quick Actions 2. From the options, choose Priming 3. The Priming Guide walks you step by step through the process. -
Page 93: Adjust Spray Width
Product Manual - Turf Tank One+ 3.4.7 Adjust Spray Width There are two ways to control the width of the paint spray: Adjust the Spray Discs. Adjust the Sprayer height. 3.4.7.1 Adjust Spray Discs The knob on the side of the sprayer housing controls the width of the Spray Discs. Turning counterclockwise increases the distance between the discs. - Page 94 Product Manual - Turf Tank One+ A scale punched into the metal over the Spray Discs marks the distance between them (and thus the width of the line painted) in centimeters (10 cm equals roughly four inches). Take the measurement from the outside of the disc arm. ...
- Page 95 Product Manual - Turf Tank One+ 3.4.7.2 Adjust Sprayer Height Turn the knob on the top of the sprayer housing clockwise to raise the Sprayer Assembly. Raising the Sprayer Assembly widens the paint spray. Turn the knob counterclockwise to lower the Sprayer Assembly. Lowering the Sprayer Assembly narrows the paint spray.
- Page 96 Product Manual - Turf Tank One+ 3.4.7.3 Ideal Sprayer Assembly Position When the Spray Discs are at the desired width and in the Down position, the fan of the paint spray should hit near the bottom of the Spray Discs.
-
Page 97: Adjust Spray Guard
Product Manual - Turf Tank One+ 3.4.8 Adjust Spray Guard The Spray Guard minimizes paint being sprayed forward. The Spray Guard should be adjusted so that it barely touches the grass or surface being painted. 1. Rotate the Spray Guard Knob, located on the back of the Sprayer Assembly, counterclockwise to loosen it. - Page 98 Product Manual - Turf Tank One+ 3. Rotate the Spray Guard Knob clockwise to tighten it. Installation and Operation...
-
Page 99: Connect App To Robot Wifi
5. Enter the Password as listed on the Robot's ID Tag. You may need to swipe down to refresh the list to see the Robot's WiFi network. The Turf Tank App will connect to the Robot automatically once the WiFi connection is established. Installation and Operation... -
Page 100: Operating Modes
Manual 3.4.10.1 Autonomous Mode Set up and controlled through the Turf Tank App, Autonomous Mode paints pre-plotted sports fields, athletic tracks, free-form text, logos, and more. The App allows for extensive customization of fields and layouts. Please see the App for further instructions and tutorials for Autonomous operation. - Page 101 Product Manual - Turf Tank One+ 3.4.10.3 Joystick Move the Joystick center button in the desired direction (from the Robot’s perspective) to drive the Robot. Release the Joystick center button to stop the Robot. The direction labels on the Joystick and the Keypad are ALWAYS relative to the Robot NOT the Operator.
- Page 102 Product Manual - Turf Tank One+ 3.4.10.4 Keypad Tap an Arrow Key on the Keypad to drive the Robot. The Robot will move in the direction of the arrow from the Robot’s perspective. A single tap on an Arrow Key will drive the Robot continuously in the direction selected at a slow speed. Tapping the Arrow Key again will increase the Robot’s speed.
- Page 103 Product Manual - Turf Tank One+ 3.4.10.5 Other Manual Tool Controls On the Toolbox page, you will also see controls to manually operate the Sprayer and the Spray Discs. During Autonomous operation, the Sprayer and Spray Discs are deployed automatically, depending upon the settings for the specific layout you are painting.
-
Page 104: Load Paint
Product Manual - Turf Tank One+ 3.4.11 Load Paint 1. Open the lid of the Battery/Paint Compartment. 2. Pull the Suction Rod and tube assembly out of the Battery/Paint Compartment (do not detach any tubing). Installation and Operation... - Page 105 Product Manual - Turf Tank One+ 3. Place the Paint Jug inside the Battery/Paint Compartment. 4. Remove the cap from the Paint Jug after it is seated in the compartment to prevent spillage. Installation and Operation...
- Page 106 Product Manual - Turf Tank One+ 5. Insert the Suction Rod into the Paint Jug, securing the Rubber Stopper in the mouth of the Jug. 6. Close the Lid of the Battery/Paint Compartment. Installation and Operation...
-
Page 107: Power Off The Robot
Product Manual - Turf Tank One+ 3.4.12 Power Off the Robot 1. Turn the Ignition Switch to OFF. 2. Push in the Shield Lock for the Left Shield. Installation and Operation... - Page 108 Product Manual - Turf Tank One+ 3. Open the Left Shield. 4. Wait for the Indicator Light on the Control Unit to turn off. Installation and Operation...
- Page 109 Product Manual - Turf Tank One+ 5. Flip the Power Breaker Switch to the horizontal position (from l to O). 6. Close the Left Shield. Installation and Operation...
-
Page 110: Place And Operate The Base Station
3.5.1.1 Line of Sight - Satellites to Base Station The Turf Tank System receives input from geopositioning satellites. If the sight line between satellites and the Base Station is obstructed, the line marking could be less precise or the Robot could fail to paint. - Page 111 Product Manual - Turf Tank One+ Structures Good: The Base Station is at least 20 meters (~21 yards) from the structure. Bad: The building obstructs the satellite signals. Installation and Operation...
- Page 112 Product Manual - Turf Tank One+ 3.5.1.2 Line of Sight - Base Station to Robot The Robot’s precise line marking is governed by the Base Station, which sends corrective position signals to the Robot's Rover. The Base Station needs a clear, direct line of sight to the Robot to maintain precision. If the line of sight is obstructed, the Robot may not paint at all.
- Page 113 Product Manual - Turf Tank One+ 3.5.1.3 Line of Sight - Satellites to Robot Like the Base Station, the Robot needs a line-of-sight connection to satellites to operate properly. A clear line of sight between the Base Station and the Robot is not enough.
- Page 114 Product Manual - Turf Tank One+ 3.5.1.4 Level the Base Station Sloped surfaces can obscure otherwise visible satellites from the Base Station, causing line marking to be less precise. Sloped surfaces also magnify the possibility of the entire Base Station structure blowing over in a gust of wind, causing severe damage.
- Page 115 Tripod while painting. Before placing the Base Station, check the Turf Tank App for the job with Transit Lines (the Robot’s lines of travel throughout a job) activated. This will allow you to ensure that the Robot will not hit the Tripod and do not interfere with the Base Station.
-
Page 116: Install The Ground Spike
Product Manual - Turf Tank One+ 3.5.2 Install the Ground Spike The constant Base Station position is marked by the Ground Spike, a rigid piece of plastic inserted into the ground. The Ground Spike provides a reference spot for the Prism Pole placement to keep the Base Station position consistent and your fields accurate every time. -
Page 117: Prism Pole And Tripod Set Up
Product Manual - Turf Tank One+ 3.5.3 Prism Pole and Tripod Set Up 1. Insert the Prism Pole into the ring at the center (the “spider”) of the Tripod. 2. Tighten the knob to secure the Prism Pole. - Page 118 Product Manual - Turf Tank One+ 3. When you are ready to set up for painting, insert the Prism Pole into the Ground Spike. 4. Using the telescoping leg locks, adjust the angle of the Tripod’s legs to approximately 30 degrees.
- Page 119 Product Manual - Turf Tank One+ 5. Drive the foot of each leg into the ground by pressing the button (1) while simultaneously pushing down on the placement collar (2) with your foot. 6. Press down two buttons at a time to adjust the angle of Prism Pole, alternating moving the legs until the bubble level on the spider is centered.
-
Page 120: Attach Base Station Antenna
Product Manual - Turf Tank One+ 3.5.4 Attach Base Station Antenna When using the Pole Battery to power the Base Station, you must attach the Pole Battery before attaching the Antenna. The images below illustrate Antenna installation depending upon battery type used. Follow the directions for the battery type you are using. - Page 121 Product Manual - Turf Tank One+ 2. Screw the Antenna into its port on the bottom of the Base Station. Attaching the Antenna when using LP-E6 batteries. Attaching the Antenna with the Pole Battery already attached. Installation and Operation...
-
Page 122: Mount The Base Station On The Prism Pole
Product Manual - Turf Tank One+ 3.5.5 Mount the Base Station on the Prism Pole To attach the Base Station and Pole Battery to the Prism Pole: 1. Open the Upper Column Lock. 2. Screw the threaded head of the Prism Pole into the bottom of the Pole Battery. - Page 123 Product Manual - Turf Tank One+ 3. Close the Upper Column Lock. Installation and Operation...
-
Page 124: Power On The Base Station
Product Manual - Turf Tank One+ 3.5.6 Power On the Base Station When you connect the Base Station to the Pole Battery, all Display Panel lights will illuminate briefly. A key to the lights and what they mean appears on the Base Station opposite the Display Panel. - Page 125 Product Manual - Turf Tank One+ 3.5.6.1 Searching for a Saved Position To search for a Saved Position at any time other than startup, press the Position button. When the Base Station has found a Saved Position, it will: Show a solid orange Position Light.
-
Page 126: Create A Saved Position
Product Manual - Turf Tank One+ 3.5.7 Create a Saved Position Leave at least 33 yards (~30 meters) between multiple Saved Positions. Base Station power should be on. Press and hold the Position Button until you hear a short beep from the Base Station. -
Page 127: Adjust The Base Station Height
Product Manual - Turf Tank One+ 3.5.8 Adjust the Base Station Height For optimum Base Station operation, raise it to the highest point where you can still reach its controls. To adjust the height: 1. Open the Lower Column Lock. - Page 128 Product Manual - Turf Tank One+ 3. Close the Lower Column Lock. Installation and Operation...
-
Page 129: Turn Off The Base Station
Product Manual - Turf Tank One+ 3.5.9 Turn Off the Base Station Press and hold the Power Button until the Base Station makes a short beep. All of the lights on the Display will illuminate briefly. When the lights go off, the power is off. -
Page 130: Link The System
Product Manual - Turf Tank One+ 3.6 Link the System Once your components are all set up, it is time to link the Turf Tank System together. 3.6.1 Connecting the Robot to the App Power on the Tablet. Open the Tablet’s WiFi Settings. -
Page 131: Check System Status
Product Manual - Turf Tank One+ 3.6.2 Check System Status The App Dashboard reports the health of the System’s connections. Satellite Status: Shows the number of satellites connected to the Robot. Good: When satellite strength is good, the symbol in the App is green. -
Page 132: General Operation
Product Manual - Turf Tank One+ 3.7 General Operation 3.7.1 Operation - Turf Tank One+ 3.7.1.1 General System Operation Instructions The Rover on the top of the Robot is an essential part of the guidance system for autonomous operation. ... - Page 133 Product Manual - Turf Tank One+ 3.7.1.2 Routine Robot Operation Operating the Robot after the First Time Once you have set the Base Station’s position(s) and have at least one Plan ready to paint, follow these steps: Power Ensure all components' batteries are charged.
- Page 134 3.7.1.3 Fine Tuning the Robot Keep your corners sharp and limit ghosting to almost nothing. The Turf Tank App provides settings that allow you to finely adjust when the Robot starts and stops spraying and when the Sprayer Disc arms raise and lower, within fractions of a second.
-
Page 135: Place Field Plans On The Map
Product Manual - Turf Tank One+ 3.8 Place Field Plans on the Map Plans for what to paint are created in the Turf Tank App. The App provides tutorials and guides to walk you through designing your fields. Before you can begin to paint, you must orient the plan you will be painting with the Robot and the map in the App. -
Page 136: Reference Points
Product Manual - Turf Tank One+ 3.8.2 Reference Points Most Plans begin with reference points placed on the map charted by the Robot’s position as determined by the Base Station. You could place reference points in the App using satellite maps and geographic coordinates, to get a general idea of how layouts will fit into a general space, for example, but they will be imprecise. -
Page 137: Maintenance
Product Manual - Turf Tank One+ 4 Maintenance Maintenance... -
Page 138: Maintenance Introduction
4.1.3 The Turf Tank App When the The Turf Tank App boots up with an internet connection, it will sync to the cloud. The App will inform you when it needs to be updated and guide you through the update. -
Page 139: Clean Robot Paint System
Cleaning the Robot often is the best way to keep it in perfect working order. Paint can easily clog the Suction Rod, tubes, Pump, and Sprayer. Clean the paint system thoroughly after each use. The Turf Tank App walks you through the cleaning routine every time to ensure your Robot always provides peak performance. -
Page 140: Paint System Cleaning Order
Product Manual - Turf Tank One+ 4.2.2 Paint System Cleaning Order: Remove Inline Mesh Filter. Disassemble Sprayer Head. Rinse Inline Mesh Filter and Sprayer Head parts. Flush Paint System. Reassemble Paint System 4.2.2.1 Remove the Inline Mesh Filter The Inline Mesh Filter is located within a black screw-top housing on the tubing close to the Suction Rod. - Page 141 Product Manual - Turf Tank One+ 2. Remove the Inline Filter. 3. Screw the Cap back onto the housing. Maintenance...
- Page 142 Product Manual - Turf Tank One+ 4.2.2.2 Disassemble Sprayer Head The Sprayer Head is at the bottom of the Sprayer Assembly. 1. Remove the Quick Fan Cap, Nozzle, Gasket, and Chamber Reducer. Maintenance...
- Page 143 4.2.2.4 Flush the Paint System Place the Suction Wand into a jug with filled warm tap water. You may add dishwashing soap if you like. Follow the Cleaning guide in the Turf Tank App. 4.2.2.5 Reassemble the Paint System To reassemble the Paint System see “PREPARE THE PAINT SYSTEM.”...
-
Page 144: Clean Robot Body
Product Manual - Turf Tank One+ 4.3 Clean Robot Body DO NOT use a pressure washer to clean the Robot. DO NOT use paint thinners or chemical solvents to clean the Robot. Clean the paint, dirt, turf, and mud the Robot picks up on a normal day from the shields, chassis, wheels, wheel scrapers, and spray discs after every use to keep it looking sharp and performing at its peak. -
Page 145: Clean Base Station
Product Manual - Turf Tank One+ 4.4 Clean Base Station DO NOT use a pressure washer to clean the product. Disconnect any power supply before cleaning. Should the Base Station become splattered with paint or any other substance, you may want to clean it. -
Page 146: Software Updates
Once updated, the Robot reboots, and the Turf Tank App returns to the Home Screen. Every time the Turf Tank App is connected to the Robot the App will check if the Robot needs to be updated. If an update exists the App will initiate a robot update process. -
Page 147: Updating The Turf Tank App
The App can also check for updates via a home or office WiFi signal or a cellular hotspot. You must install the App update when it appears. The Turf Tank System will not operate until the App is updated to its latest version. -
Page 148: Troubleshooting
Product Manual - Turf Tank One+ 5 Troubleshooting Troubleshooting... -
Page 149: Troubleshooting Introduction
Product Manual - Turf Tank One+ 5.1 Troubleshooting Introduction The Turf Tank System is a complex, interdependent collection of components. It is easy for one small thing that needs adjustment to prevent other elements from working correctly. Most such situations are easily remedied. -
Page 150: Troubleshooting Robot
Product Manual - Turf Tank One+ 5.2 Troubleshooting Robot 5.2.1 Robot Operation 5.2.1.1 Troubleshooting Basic Robot Issues Issue Cause Action The Bumper sensor is stuck. Gently massage along the length of Bumper Engaged error in App; the rubber Bumper to reset the obstacle has been cleared/there is connection inside it. - Page 151 Connect Tablet to Robot WiFi using Robot’s WiFi. the Tablet’s WiFi settings menu. The Robot will not drive Emergency Stop Button is pressed. Release the Emergency Stop Button. For Robot operation issues not listed here, contact your Turf Tank Representative or “SUPPORT.” Troubleshooting...
-
Page 152: Error Messages
Move the Robot further away from the obstacles preventing Rover to satellite communication. System Bad Message Action Pump Unknown The App cannot communicate with the Robot. Contact your Turf Tank Representative or call “SUPPORT.” Valve Unknown Spray Discs Unknown Troubleshooting... -
Page 153: Main Indicator Light Status Signals
Product Manual - Turf Tank One+ 5.2.3 Main Indicator Light Status Signals The pattern of the Robot’s Main Indicator Light provides Robot status information. Light State Status Action Robot is OFF Turn the Robot ON via the Ignition Switch and Power Breaker Switch. -
Page 154: Troubleshooting Base Station
Product Manual - Turf Tank One+ 5.3 Troubleshooting Base Station 5.3.1 Base Station Operation Issue Cause Action Base Station will not create a A Saved Position already exists at Move the Base Station away by at Saved Position. the location. -
Page 155: Base Station Indicator Lights
Product Manual - Turf Tank One+ 5.3.2 Base Station Indicator Lights Position Light Transmission Light Satellite Light Battery A Light Battery B Light Internet Light Position Light Status No position found. Flashing Searching or creating a saved position. Constant Position found. - Page 156 Product Manual - Turf Tank One+ Battery Light A Only Status Internal battery not in use (no battery inserted or no power in battery). Constant Internal battery in use. Flashing Battery power low. Battery Light B Only Status Internal battery not in use (no battery inserted or no power on battery).
-
Page 157: Transportation, Storage And Disposal
Product Manual - Turf Tank One+ 6 Transportation, Storage and Disposal Transportation, Storage and Disposal... -
Page 158: Transportation, Storage And Disposal - Robot
6.1 Transportation, Storage and Disposal - Robot 6.1.1 Transportation - Robot 6.1.1.1 Shipping the Turf Tank One+ Battery The Robot is shipped with lithium-ion batteries and follows national and United Nations requirements for testing, labeling, and safe transport of lithium-ion batteries. - Page 159 When using Tie Down Straps it is recommended to thread the strap through the lifting handles, and use a strap at both end of the Robot. Check the laws and regulations in your area before shipping your Turf Tank Robot to ensure you comply with all applicable statutes. Transportation, Storage and Disposal...
-
Page 160: Storage - Robot
Chamber Reducer / Tip Strainer. • Test Sprayer height adjustment. • Test Spray Disc width adjustment. • Connect the Turf Tank App to the Robot to check the following: • Paint System works with water. • Spray Discs raise and lower. •... -
Page 161: Disposal - Robot
6.1.3 Disposal - Robot 6.1.3.1 Returning the Turf Tank If you have a Subscription Agreement with Turf Tank, you must return the System to us when the Subscription period has ended. Contact your local Turf Tank Representative for further information. -
Page 162: Transportation, Storage And Disposal - Base Station
Product Manual - Turf Tank One+ 6.2 Transportation, Storage and Disposal - Base Station 6.2.1 Transportation - Base Station 6.2.1.1 Transporting the Pole Battery The Pole Battery and its accessories must always be transported in the Accessory Box. 6.2.1.2 Transporting the Base Station The Base Station and its accessories must always be transported in the Accessory Box. -
Page 163: Technical Data
Product Manual - Turf Tank One+ 7 Technical Data Technical Data... -
Page 164: Technical Data - Robot
60 / 132 Electrical system Turf Tank One+ Robot Turf Tank One+ Battery, Lithium-Ion, V / Ah / Wh 24 / 26.6 / 680 Turf Tank Robot Battery Charger, Art. No PF2410 (24V10A) Turf Tank Robot Battery Charger, V AC 100 - 240 (50-60Hz / max 3.8A) - Page 165 Product Manual - Turf Tank One+ Operating Turf Tank One+ Robot Pump operating voltage, V AC Technical Data...
-
Page 166: Technical Data - Base Station
Product Manual - Turf Tank One+ 7.2 Technical Data - Base Station Dimensions Base Station Length, cm / in. 16 / 6 1/4 Width, cm / in. 17 / 6 3/4 Height, cm / in. 7.7 / 3 Weight without battery, kg/ lbs 0.92 / 2... - Page 167 Product Manual - Turf Tank One+ Internal Battery LP-E6 Battery Charger, charge current, A 2x 600mA Charging time to 100%, h average 2.5 (2x LP-E6 Batteries simultaneously) Average battery life, h External Battery Pole Battery, Lithium-Ion, V / Ah / Wh 10.89 - 12.6 / 7.8 / 85 - 93.6...
- Page 168 Product Manual - Turf Tank One+ Communication Base Station Modem Modem bands 4G Bands: 800/900/1800/2100/2600 MHz 3G Bands: 900/2100 MHz 2G Bands: 900/1800 MHz Technical Data...
-
Page 169: Warranty
Product Manual - Turf Tank One+ 8 Warranty Warranty... -
Page 170: Warranty Terms
8.1.2 How will we correct problems? During the Warranty Period, Turf Tank will repair or replace, at no charge, a Robot (or parts of a Robot) that proves defective because of improper material or workmanship under normal use and maintenance. ... -
Page 171: Regulatory Information
Product Manual - Turf Tank One+ 9 Regulatory Information Regulatory Information... -
Page 172: Declaration Of Conformity
9.1 Declaration of Conformity 9.1.1 Declaration of Conformity Hereby, Turf Tank, declares that this product, Turf Tank, is in conformity with the requirements and other relevant provisions of the following European directives for the CE mark: 2004/108/EC: Electromagnetic Compatibility Directive (EMC) 2006/42/EF: Machine Directive (MD) ... -
Page 173: Applicable To Us Market
The recycling of materials will help to conserve natural resources. Turf Tank offers take-back and recycling services for products in many locations around the world. The customers are advised to contact the local Turf Tank representative for further information.
Need help?
Do you have a question about the One+ and is the answer not in the manual?
Questions and answers