Table of Contents
Advertisement
Quick Links
Advertisement
Table of Contents

Related Manuals for Scott MCX32


Summary of Contents for Scott MCX32
- Page 1 MCX32 CD/MP3 CAR RADIO WITH MANUAL TUNING AND RDS FUNCTION AM/FM STEREO RDS FUNCTION (AF/TA/PTY) PLAYS MP3/ID3 TAG FILES RECORDED ON CD-R/CD-RW USB PORT & SD/MMC CARD SLOT ON FRONT PANEL ANTI-THEFT DETACHABLE FRONT PANEL MUSIC POWER: 28 WATT USER MANUAL AND INSTALLATION INSTRUCTIONS...
-
Page 2: Table Of Contents
Contents ACCESSORIES....................................GB-1 SAFETY.........................................GB-2 1. INSTALLATION....................................GB-3 2. USING THE DETACHABLE FRONT PANEL...........................GB-6 2.1 Removing the front panel................................GB-6 2.2 Installing the front panel................................GB-6 3. Wiring Diagram....................................GB-7 4. OPERATION.....................................GB-8 4.1 Features and Controls..................................GB-8 4.2 General Operation..................................GB-9 4.3. Radio Operation..................................GB-11 4.4. RDS (Radio Data System) Operation............................GB-12 4.5. -
Page 3: Accessories
(Half Sleeve) Tapping Screw Screw Hex Nut Release key ISO Wire connector MCX32 AM/FM STEREO RDS FUNCTION (AF/TA/PTY) PLAYS MP3/ID3 TAG FILES RECORDED ON CD-R/CD-RW FRONT PANEL USB PORT & SD/MMC CARD SLOT ANTI-THEFT DETACHABLE ON FRONT PANEL MUSIC POWER: 28 WATT... -
Page 4: Safety
SAFETY This unit is designed and manufactured with the users safety in mind, however any improper use or operation may result in certain dangers. It is therefore highly recommended to read this manual thoroughly and adhere to the following precautions. Safety precautions To prevent an electrical shock, do not open the housing of the unit. -
Page 5: Installation
1. INSTALLATION Notes: - Before the installation of the unit, make the electrical connections and ensure everything is connected properly and that the unit works correctly. - Consult your dealer if installation requires the drilling of holes or other modifi cations of the vehicle. - Install the unit where it does not get in the driver’s way and cannot injure the passenger if there is a sudden stop, like an emergency stop. - Page 6 4. If necessary, remove the outer trim ring. 5. The two supplied keys release tabs inside the unit’s sleeve so you can remove it. Insert the left (“L”) and right (“R”) release key as far as they will go (with the notches facing up) into the appropriate slots at the center of the left and right sides of the unit. Then slide the sleeve off the back of the unit.
- Page 7 10. Reconnect the cable to the vehicle battery’s negative (-) terminal. Then replace the outer trim ring and install the unit’s front panel (see the steps of ‘Installing the front panel’). Removing the unit 1. Make sure the ignition is turned off, and then disconnect the cable from the negative (-) terminal of the vehicle’s battery. 2.
-
Page 8: Using The Detachable Front Panel
2. USING THE DETACHABLE FRONT PANEL 2.1 Removing the front panel Pull off the front panel. Place the front panel into the Press the REL button protective case provided. on the front panel. Fig.1 Fig.2 Fig.3 2.2 Installing the front panel First, fi... -
Page 9: Wiring Diagram
3. Wiring Diagram ISO CONNECTOR Part A A1: / A2: / A3: / A4: Battery B+ (10A FUSE) (Yellow) A5: Electric antenna (Blue) A6: / A7: + after ignition (Red) A8: Ground B- (Black) Part B B1: Rear Right + (Violet) B2: Rear Right - (Violet/Black) B3: Front Right + (Grey) B4: Front Right - (Grey/Black) -
Page 10: Operation
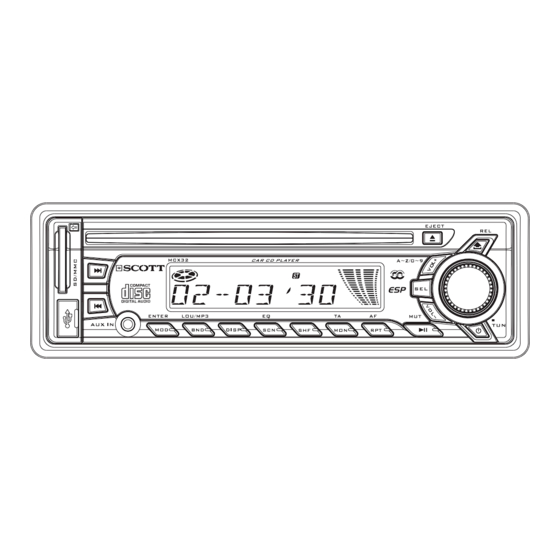
SD/MMC CARD SLOT 4. OPERATION (Next Track) button 4.1 Features and Controls 1) Front panel DISC SLOT LCD display SEL (select) button EJECT ( ) button VOL +/- button (RELEASE) button USB PORT (Previous Track) button AUX Input Jack MOD/ENTER button BND/LOU (loudness)/MP3 button DISP (display) button 2) Main unit of the car radio... -
Page 11: General Operation
4.2 General Operation 4.2.1 Turning the unit on/off Turn on the unit by pressing any button (except the REL ( ) button or EJECT ( ) button) or by inserting a disc in the DISC SLOT, or inserting an SD/MMC card into the card slot or a USB device into the USB port. Press the VOL+/- buttons to adjust the volume level. - Page 12 - When receiving an RDS station In RADIO mode: Name of the station FREQUENCY CLOCK In DISC, USB, SD/MMC or AUX mode: Name of the station FREQUENCY CLOCK FUNC - When receiving a non-RDS station In RADIO mode: Frequency (NO PTY) CLOCK In DISC,USB, SD/MMC or AUX mode: FREQUENCY...
-
Page 13: Radio Operation
unit skips due to rough road conditions, the music will be uninterrupted. The time of the memorised content varies depending on the disc type: CD: 40 seconds; MP3: 120 seconds See section 4.2.2 “SEL button function” to the ESP function on/off. 4.2.10 LED anti-theft indicator The LED indicator will fl... -
Page 14: Rds (Radio Data System) Operation
4.4. RDS (Radio Data System) Operation RDS allows FM broadcast stations to emit an additional signal along with the ordinary FM radio signal. For example, the stations can emit their station name, as well as information about what type of programme they are broadcasting. 4.4.1 AF function This function allows the user to fi... - Page 15 4.5.4 Introduction scan Press the SCN button to play the fi rst several seconds of each track on the current disc. Press it again to stop the introduction scan and listen to the music. 4.5.5 Repeating the same track Press the RPT button to set the unit to repeat the same track. Press it again to stop the repeat function. 4.5.6 Playing all tracks in random Press the SHF button to play all tracks on the disc in random order.
- Page 16 3) Searching from root directory In this search mode, the list of directories and tracks appears on the LCD display. a). Press the VOL+/VOL- buttons to browse through all the directories or fi les in the root directory. b). Press MOD(ENTER) to select. Play the song if the selected title is a fi le. If the selected title is a directory, repeat the above steps. 4) Searching from current directory In this search mode, the list of sub-directories and tracks in the current directory appears on the LCD display.
-
Page 17: Usb Device And Sd/Mmc Card Operations
4.5.8 Supported MP3 decoding modes The MP3 decoder in this unit supports the following formats: Standard Bit Rate (kbps) Supports mode MPEG1 32,48,64,96,128, Stereo AUDIO 192,256,320 Layers 3 (44.1KHz) 4.6 USB device and SD/MMC card Operations - Playing MP3 fi les on the USB device or SD/MMC card: When you insert a USB device into the port or an SD/MMC card into the card slot, the unit will search for the MP3 fi... -
Page 18: Disc Notes
5. DISC NOTES 5.1 Notes on discs a. Do not use non-standard shape discs (e.g. square, star or heart-shaped discs) as they may damage the unit. Be sure to use circular CD discs only for this unit. b. Do not stick paper or tape, etc, onto either side of your discs, as it may cause a malfunction. Dusty, scratched and warped discs may cause problems in playback. -
Page 19: Precautions When Using New Discs
- Do not expose discs to direct sunlight or place them in dirty, dusty or damp areas. Do not store near the heater vent of your car, or leave on the seats or dashboard. 2) Disc cleaning Use a dry soft cloth to wipe the surface. If the disc is quite dirty, use a soft cloth, lightly dampened with isopropyl alcohol. Never use solvents such as benzene, thinner or conventional record cleaners as they may damage the surface of the disc. -
Page 20: Technical Specifications
6. TECHNICAL SPECIFICATIONS Sensitivity: <38dB GENERAL Pow er Supply Requirements DC 12 Volts, Negative Ground USB/SD/MMC (card) Unit Dimensions USB port type: 2.0 178(W) x 160(D) x 50(H) mm USB port maximum handling capacity: Tone Controls Card types : SD/MMC - Bass (at 100 Hz) ±14 dB SD/MMC card slot maximum handling capacity: 8GB... -
Page 21: Troubleshooting
7. TROUBLESHOOTING SYMPTOM CAUSE SOLUTION Turn the ignition key to the “Accessory.” position in order to power The +12V car ignition is not on. the radio. The fuse of the vehicle powering the unit has blown. Replace the vehicle fuse with a new one with the same capacity. The unit will not switch on Remove the unit from the dashboard and check the electrical...
Need help?
Do you have a question about the MCX32 and is the answer not in the manual?
Questions and answers