Table of Contents
Advertisement
Available languages
Available languages
Quick Links
Advertisement
Table of Contents

Related Manuals for Axis 0936-001 20289045


Summary of Contents for Axis 0936-001 20289045
- Page 1 INSTALLATION GUIDE AXIS F44 Main Unit Installation Guide...
- Page 2 States, other countries or both. Every care has been taken in the preparation of this Regulatory Information document. Please inform your local Axis office of Europe any inaccuracies or omissions. Axis Communications AB cannot be held responsible for any technical or...
- Page 3 (shielded twisted pair) 케이블을 사용하여 제 Support 품을 연결 하십시오. Should you require any technical assistance, please contact your Axis reseller. If your questions cannot Safety be answered immediately, your reseller will forward This product complies with IEC/EN/UL 60950-1, your queries through the appropriate channels to Safety of Information Technology Equipment.
- Page 4 • visit Axis Support at www.axis.com/techsup/ Learn More! Visit Axis learning center www.axis.com/academy/ for useful trainings, webinars, tutorials and guides.
-
Page 5: Hazard Levels
AXIS F44 Main Unit Safety Information Read through this Installation Guide carefully before installing the product. Keep the Installation Guide for future reference. Hazard Levels DANGER Indicates a hazardous situation which, if not avoided, will result in death or serious injury. - Page 6 • Use a clean cloth dampened with pure water for cleaning. • Use only accessories that comply with the technical specification of the product. These can be provided by Axis or a third party. • Use only spare parts provided by or recommended by Axis.
- Page 7 AXIS F44 Main Unit Battery The Axis product uses a 3.0 V BR2032 lithium battery as the power supply for its internal real-time clock (RTC). Under normal conditions this battery will last for a minimum of five years. Low battery power affects the operation of the RTC, causing it to reset at every power-up.
-
Page 9: Installation Steps
AXIS F44 Main Unit Installation Guide This Installation Guide provides instructions for installing AXIS F44 Main Unit on your network. For other aspects of using the product, see the User Manual available at www.axis.com Installation Steps Make sure the package contents, tools and other materials necessary for the installation are in order. -
Page 10: Hardware Overview
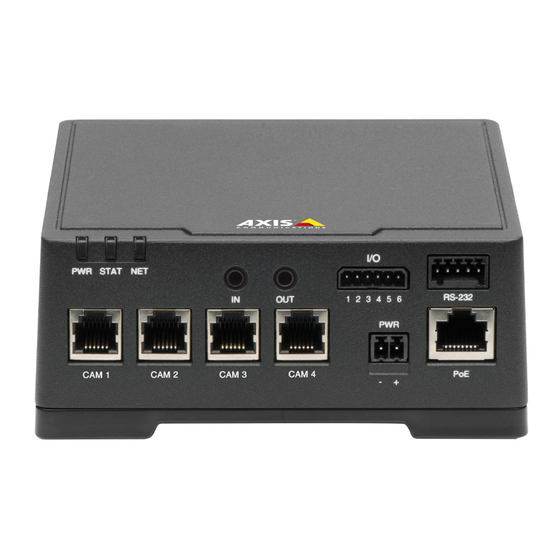
AXIS F44 Main Unit For information about available accessories, see www.axis.com Hardware Overview Control button SD card slots LEDs (Power, Status, Network) RJ12 connector (4 nos.) Audio in Audio out I/O connector Power connector Network connector (PoE) 10. RS232 connector... - Page 11 AXIS F44 Main Unit LED Indicators Note • The Status LED can be configured to be unlit during normal operation. To configure, go to Setup > System Options > Ports & Devices > LED. See the online help for more information.
- Page 12 AXIS F44 Main Unit Amber Steady for connection to a 10 Mbit/s network. Flashes for network activity. Unlit No network connection. Power LED Indication Normal operation. Green Amber Flashes green/amber during firmware upgrade. Connectors and Buttons For specifications and operating conditions, see page 14.
- Page 13 (SELV) compliant limited power source (LPS) with either a rated output power limited to ≤100 W or a rated output current limited to ≤5 A. Audio Connector The Axis product has the following audio connectors: • Audio in – 3.5 mm input for a mono microphone, or a line-in mono signal (left channel is used from a stereo signal).
-
Page 14: Specifications
• Risk of data loss and corrupted recordings. Do not remove the SD card while the product is running. Disconnect power or unmount the SD card from the Axis product’s webpages before removal. This product supports SD/SDHC/SDXC cards (not included). - Page 15 AXIS F44 Main Unit Connectors I/O Connector 6–pin terminal block For an example diagram, see Connection Diagrams on page 18. Func- Notes Specifications tion 0 V DC (-) 1 0 V DC Can be used to power auxiliary 12 V DC output equipment.
- Page 16 AXIS F44 Main Unit Power Connector 2-pin terminal block for DC power input. Use a Safety Extra Low Voltage (SELV) compliant limited power source (LPS) with either a rated output power limited to ≤100 W or a rated output current limited to ≤5 A.
- Page 17 AXIS F44 Main Unit • 2TX/2RX RS-232 interface (TXD, RTS, GND, CTS, RXD) Function Notes RS232 TD alt RS-232 Driver Output RS232 RTS alt RS232 GND Ground RS232 CTS alt RS-232 Receiver Input RS232 RD alt...
- Page 18 AXIS F44 Main Unit Connection Diagrams I/O Connector 0 V DC (-) DC output 12 V, max 50 mA Example: push button I/O configured as input I/O configured as output...
-
Page 19: Install The Hardware
AXIS F44 Main Unit Install the Hardware The Axis F41/F44 Main Unit can be placed on a table desktop or mounted on a DIN rail. To facilitate routing the cables from the top or side remove the 4 screws (Torx T20) and suitably realign the bottom plate under the unit (see Hardware Overview on page 10). - Page 20 AXIS F44 Main Unit If required, attach the RS232 cable to connect to auxiliary equipment. Shorten Sensor Unit Cable Note The sensor unit’s cable cannot be extended or split. The sensor unit is delivered with a cable. To shorten the cable follow these steps: Cut the cable to the desired length.
-
Page 21: Access The Product
Use a crimping tool to fasten the connector to the cable. Access the Product AXIS IP Utility and AXIS Camera Management are recommended methods for finding Axis products on the network and assigning them IP addresses in Windows®. Both applications are free and can be downloaded from www.axis.com/techsup The product can be used with most operating systems and browsers. -
Page 22: Reset To Factory Default Settings
IP address, to the factory default values. Note The installation and management software tools are available from the support pages on www.axis.com/techsup For products with multiple IP addresses channel 1 will have the address 192.168.0.90 , channel 2 will have the address 192.168.0.91... -
Page 23: Further Information
AXIS F44 Main Unit Further information • For the latest version of this document, see www.axis.com • The user manual is available at www.axis.com • To check if there is updated firmware available for your product, see www.axis.com/support • For useful online trainings and webinars, see www.axis.com/academy... -
Page 25: Niveaux De Risques
AXIS F44 Main Unit Informations sur la sécurité Lisez attentivement ce guide d'installation avant d'installer l'appareil. Conservez le guide d'installation pour toute référence ultérieure. Niveaux de risques DANGER Indique une situation dangereuse qui, si elle n'est pas évitée, entraînera le décès ou des blessures graves. - Page 26 être installé dans un boîtier d'extérieur homologué. • Conserver ce produit Axis dans un environnement sec et ventilé. • Ne pas exposer ce produit Axis aux chocs ou aux fortes pressions. • Ne pas installer ce produit sur des supports, surfaces ou murs instables.
- Page 27 AXIS F44 Main Unit Batterie Le produit Axis utilise une batterie au lithium BR2032 3,0 V comme alimentation de son horloge en temps réel interne (RTC). Dans des conditions normales, cette batterie a une durée de vie minimale de cinq ans.
- Page 29 AXIS F44 Main Unit Guide d'installation Ce guide d'installation vous explique comment installer l'unité principale AXIS F44 sur votre réseau. Pour toute autre information relative à l'utilisation du produit, reportez-vous au manuel de l'utilisateur disponible sur le site www.axis.com Procédures d’installation Assurez-vous que les outils et autres matériels nécessaires à...
-
Page 30: Aperçu Du Matériel
AXIS F44 Main Unit • Clip pour rail DIN AXIS F8002 Pour plus d’informations sur les accessoires disponibles, consultez le site www.axis.com Aperçu du matériel Bouton de commande Emplacements pour carte SD DEL (alimentation, réseau, état) Connecteur RJ12 (4) Entrée audio... - Page 31 AXIS F44 Main Unit Voyants Note • Le voyant d'état peut être éteint pendant le fonctionnement normal. Pour ce faire, rendez-vous dans Setup > System Options > Ports & Devices > LED (Configuration > Options système > Ports et dispositifs > DEL). Consultez l'aide en ligne pour plus d'informations.
- Page 32 AXIS F44 Main Unit Indication Voyant DEL réseau Vert Fixe en cas de connexion à un réseau de 100 Mbits/s. Clignote en cas d’activité réseau. Orange Fixe en cas de connexion à un réseau de 10 Mbits/s. Clignote en cas d’activité réseau.
- Page 33 (TBTS) dont la puissance de sortie nominale est limitée à ≤100 W ou dont le courant de sortie nominal est limité à ≤5 A. Connecteur audio Le produit Axis dispose des connecteurs audio suivants : • Entrée audio – entrée de 3,5 mm pour microphone mono ou signal d’entrée mono (le canal de gauche est utilisé...
- Page 34 Débranchez ou déposez la carte SD des pages Web du produit AXIS avant de la retirer. Cet appareil est compatible avec une carte SD/SDHC/SDXC (non incluse). Pour obtenir des conseils sur la carte SD, rendez-vous sur www.axis.com Bouton de commande Pour connaître l'emplacement du bouton de commande, consultez Aperçu du matériel page 30.
-
Page 35: Caractéristiques Techniques
Connexion au service du Système d'hébergement vidéo AXIS ou au service AXIS Internet Dynamic DNS. Pour plus d'informations sur ces services, reportez-vous au Manuel de l'utilisateur. Caractéristiques techniques L'appareil Axis est uniquement destiné à une utilisation en intérieur. Produit Classifica- Température Humidité... - Page 36 AXIS F44 Main Unit Sortie CC Peut servir à alimenter le 12 V CC matériel auxiliaire. Remarque : cette broche ne Charge max. = peut être utilisée que comme 50 mA sortie d’alimentation. 3–6 Entrée numérique – Config- 0 à 30 V CC max.
- Page 37 AXIS F44 Main Unit Connecteur audio Connecteurs audio 3,5 mm (stéréo) 1 Pointe 2 Anneau 3 Man- chon Masse Entrée Entrée micro/ligne audio Sortie Masse Sortie ligne (mono) audio Connecteur RS232 Bloc terminal à 5 broches pour l'interface de série RS232 utilisée pour contrôler le matériel auxiliaire.
- Page 38 AXIS F44 Main Unit Schémas de connexion Connecteur d'E/S 0 V CC (-) Sortie CC 12 V, maxi. 50 mA Exemple : bouton-poussoir Entrée/sortie configurée comme entrée Entrée/sortie configurée comme sortie...
-
Page 39: Installation Du Matériel
AXIS F44 Main Unit Installation du matériel L'unité principale Axis F41/F44 peut être placée sur un bureau ou montée sur un rail DIN. Pour faciliter l'acheminement des câbles du haut vers le côté, retirez les 4 vis (Torx T20) et réalignez convenablement la plaque inférieure sous l'appareil (reportez-vous à... - Page 40 AXIS F44 Main Unit Si nécessaire, reliez les câbles audio pour raccorder un haut-parleur/microphone externe actif. Si nécessaire, reliez le câble RS232 pour connecter les équipements auxiliaires. Raccourcir le câble du capteur Note Le câble du capteur ne peut pas être allongé ou séparé.
-
Page 41: Utilisez Le Produit
Utilisez un outil de sertissage pour fixer le connecteur sur le câble. Utilisez le produit Si vous souhaitez rechercher des produits Axis sur le réseau ou leur affecter des adresses IP sous Windows®, nous recommandons l’utilisation des applications AXIS IP Utility et AXIS Camera Management. Ces deux applications sont gratuites et peuvent être téléchargées depuis... -
Page 42: Réinitialisation Aux Paramètres D'usine Par Défaut
Firefox avec les autres systèmes d’exploitation. Pour plus d’informations concernant l’utilisation du produit, consultez le manuel de l’utilisateur disponible sur le site www.axis.com Réinitialisation aux paramètres d’usine par défaut Important La réinitialisation aux paramètres par défaut doit être utilisée avec prudence. -
Page 43: Informations Complémentaires
Pour en savoir plus sur les formations, les webinaires, les tutoriels et les guides, visitez le site www.axis.com/academy. Informations sur la garantie Pour obtenir de plus amples informations sur la garantie du produit AXIS et des renseignements connexes, allez sur le site www.axis.com/warranty/... -
Page 45: Weitere Nachrichtenstufen
AXIS F44 Main Unit Sicherheitsinformation Lesen Sie das Installationshandbuch sorgfältig durch bevor sie das Produkt installieren. Bewahren Sie das Installationshandbuch für zukünftige Zwecke auf. Gefährdungsstufen GEFAHR Weist auf eine gefährliche Situation hin, welche , falls nicht verhindert, zu Tod oder schweren Verletzungen führt. - Page 46 • Bei der Anwendung von Axis Produkten im Außenbereich oder ähnlichen Umgebungen, müssen diese in zugelassenen Außengehäusen installiert werden. • Lagern Sie das Axis Produkt in einer trockenen und belüfteten Umgebung. • Achten Sie darauf, dass das Axis Produkt weder Stößen noch starkem Druck ausgesetzt ist.
- Page 47 AXIS F44 Main Unit Transport HINWEIS HINWEIS HINWEIS • Bei Bedarf transportieren Sie das Axis Produkt in der Originalverpackung oder einer entsprechenden Verpackung, so dass Schäden vermieden werden. Batterie Das Axis-Produkt ist mit einer 3,0 V-BR2032-Lithium-Batterie ausgestattet, mit der die interne Echtzeituhr (RTC) versorgt wird. Unter normalen Bedingungen hat die Batterie eine Lebensdauer von mindestens fünf Jahren.
-
Page 49: Empfohlene Werkzeuge
AXIS F44 Main Unit Installationsanleitung In dieser Anleitung wird die Installation der AXIS F44-Haupteinheit im Netzwerk beschrieben. Weitere Informationen zur Nutzung dieses Produktes finden Sie im Benutzerhandbuch unter www.axis.com. Installationsschritte Stellen Sie sicher, dass die Packungsinhalte, Werkzeuge und andere notwendige Materialien für die Installation in Ordnung sind. -
Page 50: Optionales Zubehör
AXIS F44 Main Unit Optionales Zubehör • AXIS F8001 Oberflächenmontage mit Zugentlastung • AXIS F8002 DIN-Schienenhalterung Unter www.axis.com finden Sie Informationen über verfügbares Zubehör. Übersicht über die Hardware Steuertaste SD-Karteneinschübe LEDs (Stromversorgung, Status, Netzwerk) RJ12-Anschluss (4 Stück) Audioeingang Audioausgang E/A-Anschluss... - Page 51 AXIS F44 Main Unit LEDs Beachten • Die Status-LED kann so eingestellt werden, dass sie während des Normalbetriebs nicht leuchtet. Diese Konfiguration können Sie unter Setup > System Options > Ports & Devices > LED (Setup > Systemoptionen > Ports & Geräte > LED) einstellen. Weitere Informationen finden Sie in der Online-Hilfe.
- Page 52 AXIS F44 Main Unit Gelb Leuchtet bei Verbindung mit einem 10 MBit/s-Netzwerk. Blinkt bei Netzwerkaktivität. Leuchtet nicht Keine Netzwerkverbindung vorhanden. Netz-LED Bedeutung Grün Normaler Betrieb. Gelb Blinkt grün/gelb bei der Firmware-Aktualisierung. Anschlüsse und Tasten Für die technischen Daten und Betriebsbedingungen siehe Seite 55.
- Page 53 Stromquelle mit begrenzter Leistung (LPS) mit einer Nennausgangsleistung von ≤100 W oder einem dauerhaft auf ≤5 A begrenzten Nennausgangsstrom. Audioanschlüsse Das Axis Produkt ist mit den folgenden Audioanschlüssen ausgestattet: • Audioeingang – 3,5-mm-Anschluss für ein Monomikrofon oder ein Monosignal (der linke Kanal wird von einem Stereosignal benutzt).
- Page 54 AXIS F44 Main Unit RS232-Anschluss 5-poliger Anschlussblock für die serielle Schnittstelle vom Typ RS232 zur Steuerung von Zusatzgeräten. Zur Verwendung des RS232-Ports ist eine Drittanbieter-Anwendung für AXIS Camera Application Platform erforderlich. RJ12-Anschluss Der RJ12-Anschluss ist zum Anschließen der Sensoreinheit an die Haupteinheit vorgesehen.
-
Page 55: Technische Daten
Verbinden mit einem AXIS Video Hosting System-Service oder einem AXIS Internet Dynamic DNS-Service. Weitere Informationen zu diesen Diensten finden Sie in der Bedienungsanleitung. Technische Daten Das Axis Produkt ist für die Verwendung in Innenräumen ausgelegt. Produkt Klassifika- Temperatur Luftfeuchtigkeit tion AXIS F44 -30 °C bis... - Page 56 AXIS F44 Main Unit Gleich- Kann für die 12 V DC strom- Stromversorgung von ausgang Zusatzgeräten verwendet Max. werden. Stromstärke = Hinweis: Dieser Kontakt 50 mA kann nur für den Stromausgang verwendet werden. 3–6 Konfigu- Digitaleingang – 0 bis max. 30 V DC...
- Page 57 AXIS F44 Main Unit Stromanschluss 2-poliger Anschlussblock für die Gleichstromver- sorgung. Verwenden Sie eine mit den Anforderungen für Schutzkleinspannung (SELV) kompatible Stromquelle mit begrenzter Leistung (LPS) mit einer Nennausgangsleistung von ≤100 W oder einem dauerhaft auf ≤5 A begrenzten Nennausgangsstrom.
- Page 58 AXIS F44 Main Unit • 2TX/2RX RS-232-Schnittstelle (TXD, RTS, GND, CTS, RXD) Funktion Kontakt Hinweise RS232 TD alt RS-232-Treiber-Ausgang RS232 RTS alt Masse RS232 GND RS232 CTS alt RS-232-Empfänger-Eingang RS232 RD alt...
- Page 59 AXIS F44 Main Unit Anschlussschaltbilder E/A-Anschluss 0 V (-) DC DC-Ausgang 12 V, max. 50 mA Beispiel: Drucktaste E/A als Eingang konfiguriert E/A als Ausgang konfiguriert...
-
Page 60: Installieren Der Hardware
AXIS F44 Main Unit Installieren der Hardware Die Axis F41/F44-Haupteinheit kann auf eine Arbeitsfläche gestellt oder an einer DIN-Schiene montiert werden. Entfernen Sie für eine erleichterte Kabelführung von oben oder der Seite die 4 Schrauben (Torx T20), und richten Sie Bodenplatte unter dem Gerät entsprechend aus (siehe Übersicht über die Hardware auf Seite 50). - Page 61 AXIS F44 Main Unit Schließen Sie ggf. die Audiokabel für Aktivlautsprecher bzw. ein externes Mikrofon an. Schließen Sie ggf. das RS232-Kabel für Zusatzgeräte an. Kürzen des Kabels der Sensoreinheit Beachten Das Kabel der Sensoreinheit kann nicht verlängert oder geteilt werden.
-
Page 62: Zugriff Auf Das Produkt
Befestigen Sie den Stecker mithilfe eines Crimpwerkzeugs am Kabel. Zugriff auf das Produkt Für die Suche nach Axis Produkten im Netzwerk und zur Zuweisung einer IP-Adresse unter Windows® werden AXIS IP Utility und AXIS Camera Management empfohlen. Beide Anwendungen sind kostenlos und können von unserer Website unter www.axis.com/techsup heruntergeladen werden. -
Page 63: Zurücksetzen Auf Werkseinstellungen
AXIS F44 Main Unit ® ® • Internet Explorer unter Windows ® ® • Safari unter OS X ® • Chrome oder Firefox unter anderen Betriebssystemen Weitere Informationen zur Nutzung dieses Produkts finden Sie im Benutzerhandbuch unter www.axis.com. Zurücksetzen auf Werkseinstellungen Wichtig Das Zurücksetzen auf die Werkseinstellungen sollte mit... -
Page 64: Weitere Informationen
Das Benutzerhandbuch steht unter www.axis.com zur Verfügung. • Unter www.axis.com/support finden Sie Firmware- Aktualisierungen für Ihre Produkte. • Nützliche Onlineschulungen und Webinare finden Sie unter www.axis.com/academy. Gewährleistungsinformationen Informationen zur Gewährleistung der Axis Produkte und andere, hierzu relevante Informationen, finden Sie unter www.axis.com/warranty/... -
Page 65: Livelli Di Pericolo
AXIS F44 Main Unit Informazioni di sicurezza Leggere con attenzione questa guida all'installazione prima di installare il dispositivo. Conservare questo documento per usi futuri. Livelli di pericolo PERICOLO Indica una situazione pericolosa che, se non evitata, provoca morte o lesioni gravi. - Page 66 • Conservare il dispositivo Axis in un ambiente asciutto e ventilato. • Evitare di esporre il dispositivo Axis a urti o pressioni eccessive. • Non installare il dispositivo su supporti, superfici o pareti instabili.
- Page 67 AXIS F44 Main Unit Batteria Il dispositivo Axis utilizza una batteria al litio da 3,0 V BR2032 come alimentazione per il suo real-time clock (RTC) interno. In condizioni normali questa batteria avrà una durata minima di cinque anni. Una bassa carica della batteria influisce sul funzionamento del RTC, facendolo resettare a ogni accensione.
-
Page 69: Procedura Di Installazione
AXIS F44 Main Unit Guida all'installazione Questa Guida all'installazione spiega come installare l'unità principale AXIS F44 nella rete in uso. Per ulteriori informazioni sull’utilizzo del prodotto, consultare la Guida per l'utente disponibile all'indirizzo www.axis.com Procedura di installazione Assicurarsi che il contenuto della confezione, gli strumenti e altri materiali necessari per l'installazione siano in ordine. -
Page 70: Accessori Opzionali
• Montaggio di superficie di AXIS F8001 con dispositivi antistrappo • Clip per guida DIN AXIS F8002 Visitare il sito Web www.axis.com per informazioni sugli accessori disponibili. Panoramica dell'hardware Pulsante di comando Slot per scheda SD Indicatori LED (alimentazione, stato, rete) Connettore RJ12 (4 nos.) - Page 71 AXIS F44 Main Unit Indicatori LED Nota • Lo stato del LED può essere configurato per essere spento durante il normale funzionamento. Per configurarlo, selezionare Setup > System Options > Ports & Devices > LED (Configurazione > Opzioni di sistema > Porte & Dispositivi >...
- Page 72 AXIS F44 Main Unit LED di rete Indicazione Verde Luce fissa per connessione di rete a 100 Mbit/s. Luce lampeggiante: attività di rete. Giallo Luce fissa per connessione di rete a 10 Mbit/s. Luce lampeggiante: attività di rete. Spento Assenza di connessione.
- Page 73 (SELV) con una potenza di uscita nominale limitata a ≤100 W o una corrente nominale di uscita limitata a ≤5 A. Connettore audio Il dispositivo Axis dispone dei seguenti connettori audio: • Ingresso audio: da 3,5 mm per microfono mono o segnale mono line-in (il canale sinistro viene utilizzato da un segnale stereo).
- Page 74 SD dalle pagine Web del dispositivo Axis prima di rimuoverla. Questo dispositivo supporta schede di memoria SD/SDHC/SDXC (scheda di memoria non inclusa). Per i consigli sulla scheda SD, visitare il sito Web www.axis.com. Pulsante di comando Per l'ubicazione del pulsante di comando, vedere Panoramica dell'hardware...
-
Page 75: Dati Tecnici
• Ripristino del dispositivo alle impostazioni predefinite di fabbrica. Consultare pagina 83. • Collegamento a un servizio AXIS Video Hosting System o AXIS Internet Dynamic DNS Service. Per ulteriori informazioni su questi servizi, consultare il Manuale Utente. Dati tecnici Il prodotto Axis è destinato all'uso interno. - Page 76 AXIS F44 Main Unit Funzi- Note Specifiche 0 V CC 0 V CC (-) Uscita CC Consente anche di alimentare 12 V CC una periferica ausiliaria. Nota: questo pin può essere Carico massimo= usato solo come uscita 50 mA alimentazione.
- Page 77 AXIS F44 Main Unit Connettore di alimentazione Morsettiera a 2 pin per ingresso alimentazione CC. Utilizzare una sorgente di alimentazione limitata (LPS) compatibile con una bassissima tensione di sicurezza (SELV) con una potenza di uscita nominale limitata a ≤100 W o una corrente nominale di uscita limitata a ≤5 A.
- Page 78 AXIS F44 Main Unit • Interfaccia RS-232 2TX/2RX (TXD, RTS, GND, CTS, RXD) Funzione Note RS232 TD alt Uscita driver RS-232 RS232 RTS alt Terra GND RS232 RS232 CTS alt Ingresso ricevitore RS-232 RS232 RD alt...
- Page 79 AXIS F44 Main Unit Schema delle connessioni Connettore I/O 0 V CC (-) Uscita CC 12 V, max 50 mA Esempio: pulsante I/O configurato come ingresso I/O configurato come uscita...
-
Page 80: Installare L'hardware
AXIS F44 Main Unit Installare l’hardware È possibile posizionare l'unità principale Axis F41/F44 su una scrivania o montarla su una guida DIN. Per semplificare l'instradamento dei cavi dalla parte superiore o da un lato, rimuovere le 4 viti (Torx T20) e riallineare la piastra inferiore sotto l'unità... - Page 81 AXIS F44 Main Unit Se necessario, usare il cavo RS232 per collegare una periferica ausiliaria. Accorciare il cavo dell'unità con sensore Nota Il cavo dell'unità con sensore non può essere esteso o diviso. L'unità con sensore è dotata di un cavo. Per accorciare il cavo, attenersi alla procedura seguente: Tagliare il cavo della lunghezza desiderata.
-
Page 82: Accedere Al Dispositivo
Accedere al dispositivo AXIS IP Utility e AXIS Camera Management sono i metodi consigliati per trovare i dispositivi Axis in rete e assegnare loro un indirizzo IP in Windows®. Queste applicazioni sono entrambe gratuite e possono essere scaricate da www.axis.com/techsup Il dispositivo può... -
Page 83: Ripristino Dei Valori Predefiniti Di Fabbrica
Chrome o Firefox con altri sistemi operativi. Per ulteriori informazioni sull'utilizzo del dispositivo, consultare la guida per l'utente disponibile sul sito Web www.axis.com Ripristino dei valori predefiniti di fabbrica Importante Il ripristino delle impostazioni di fabbrica deve essere usato con cautela. -
Page 84: Ulteriori Informazioni
Per verificare se sono stati pubblicati aggiornamenti del firmware per il proprio dispositivo, vedere www.axis.com/support • Per servizi di formazione utili e webinar, visita il sito www.axis.com/academy Informazioni sulla garanzia Per informazioni sulla garanzia del dispositivo Axis e informazioni ad esso relative, consultare la pagina www.axis.com/warranty/... -
Page 85: Niveles De Peligro
AXIS F44 Main Unit Información de seguridad Lea esta Guía de instalación con atención antes de instalar el producto. Guarde la Guía de instalación para poder consultarla en otro momento. Niveles de peligro PELIGRO Indica una situación peligrosa que, si no se evita, provocará... - Page 86 A A A VISO VISO VISO • El producto de Axis debe utilizarse de acuerdo con las leyes y normativas locales. • Para usar el producto de Axis en exteriores, o en entornos similares, debe instalarse en una carcasa exterior aprobada.
- Page 87 AXIS F44 Main Unit Batería Este producto de Axis utiliza una batería de litio BR2032 de 3,0 V como fuente de alimentación del reloj interno en tiempo real. En condiciones normales, esta batería durará un mínimo de cinco años. Un nivel bajo de batería afectará al funcionamiento del reloj en tiempo real, lo que provocará...
- Page 89 Guía de instalación Esta Guía de instalación incluye las instrucciones necesarias para instalar la unidad principal AXIS F44 en su red. Para conocer otros aspectos de uso del producto, consulte el Manual del usuario disponible en www.axis.com. Pasos de la instalación Asegúrese de que dispone del contenido del paquete, las...
-
Page 90: Información General Del Hardware
AXIS F44 Main Unit • Clip para carril DIN AXIS F8002 Para obtener información sobre los accesorios disponibles, visite www.axis.com. Información general del hardware Botón de control Ranuras para tarjetas SD LED (encendido, estado y red) Conector RJ12 (4 unidades) - Page 91 AXIS F44 Main Unit Indicadores LED Nota • Se puede configurar el LED de estado para que se apague durante el funcionamiento normal. Para ello, vaya a Setup > System Options > Ports & Devices > LED (Configuración > Opciones del sistema > Puertos y dispositivos > LED). Vea la ayuda en línea para obtener más información.
- Page 92 AXIS F44 Main Unit LED de red Indicación Verde Fijo para indicar una conexión a una red de 100 Mbits/s. Parpadea cuando hay actividad de red. Fijo para indicar una conexión a Ámbar una red de 10 Mbits/s. Parpadea cuando hay actividad de red.
- Page 93 (SELV) con una potencia nominal de salida limitada a ≤100 W o una corriente nominal de salida limitada a ≤5 A. Conector de audio El producto de Axis integra los siguientes conectores de audio: • Entrada de audio: Entrada de 3,5 mm para micrófono mono, o entrada de línea de señal mono (se usa el canal izquierdo...
- Page 94 Bloque de terminales de 5 pines para la interfaz serie RS232 usada para controlar equipos auxiliares. Para utilizar el puerto RS232, se precisa una aplicación de terceros para la plataforma de aplicaciones de cámaras AXIS. Conector RJ12 El conector RJ12 se utiliza para conectar la unidad del sensor a la unidad principal.
-
Page 95: Especificaciones
Conectarse a un servicio AXIS Video Hosting System o al Servicio de DNS dinámico de Internet de AXIS. Para obtener más información sobre estos servicios, consulte el Manual del usuario. Especificaciones El producto de Axis se ha creado para su uso en interiores. Producto Clasifi- Temperatura Humedad cación... - Page 96 AXIS F44 Main Unit Salida Se puede utilizar para 12 V CC de CC conectar el equipo auxiliar. Nota: Este pin solo se puede Carga máx. = utilizar como salida. 50 mA 3–6 Config- Entrada digital: Conectar al 0 a 30 V CC máx.
- Page 97 AXIS F44 Main Unit Conector de audio Conectores de audio de 3,5 mm (estéreo) 1 Punta 2 Anillo 3 Man- guito Entrada Entrada de Tierra de audio línea/micrófono Salida de Tierra Salida de línea (mono) audio Conector RS232 Bloque de terminales de cinco pines para la interfaz serie RS232 usada para controlar equipos auxiliares.
- Page 98 AXIS F44 Main Unit Diagramas de conexión Conector de E/S 0 V CC (-) Salida de CC 12 V, 50 mA máx. Ejemplo: Pulsador E/S configurada como entrada E/S configurada como salida...
-
Page 99: Instalación Del Hardware
AXIS F44 Main Unit Instalación del hardware La unidad principal Axis F41/F44 se puede colocar en un escritorio o montarse en un carril DIN. Para facilitar la guía de los cables desde la parte superior o lateral, extraiga los cuatro tornillos (Torx T20) y vuelva a alinear de manera adecuada la placa inferior de debajo de la unidad (vea Información general del hardware en la página 90). - Page 100 AXIS F44 Main Unit Si procede, enchufe los cables de audio para conectar un micrófono externo/altavoz activo. Si es necesario, enchufe el cable RS232 para conectar equipos auxiliares. Cómo acortar el cable de la unidad del sensor Nota El cable de la unidad del sensor no se puede ampliar o dividir.
-
Page 101: Acceso Al Producto
Utilice un engarzador para fijar el conector al cable. Acceso al producto Se recomiendan AXIS IP Utility y AXIS Camera Management como métodos para buscar los productos de Axis en la red y asignarles direcciones IP en Windows®. Ambas aplicaciones son gratuitas y pueden descargase de www.axis.com/techsup El producto se puede utilizar con la mayoría de los sistemas operativos y... -
Page 102: Restablecimiento A La Configuración Predeterminada De Fábrica
Chrome o Firefox con otros sistemas operativos. Para obtener más información sobre el uso del producto, consulte el manual del usuario, disponible en www.axis.com. Restablecimiento a la configuración predeterminada de fábrica Importante Hay que tener cuidado al restablecer la configuración predeterminada de fábrica. -
Page 103: Más Información
• Para consultar seminarios web y cursos en línea que pueden resultarle útiles, vaya a www.axis.com/academy Información de garantía Para obtener más detalles sobre la garantía del producto Axis y la información relacionada con ella, consulte www.axis.com/warranty/... - Page 105 AXIS F44 Main Unit 安 安 安 全 全 全 情 情 情 報 報 報 本製品を設置する前に、このインストールガイドをよくお読 みください。 インストールガイドは、後で参照できるよう に保管しておいてください。 危 危 危 険 険 険 レ レ レ ベ ベ ベ ル ル ル 危険 回避しない場合、死亡または重傷につながる危険な状 態を⽰します。 警告 回避しない場合、死亡または重傷につながるおそれのあ...
- Page 106 AXIS F44 Main Unit 安 安 安 全 全 全 ⼿ ⼿ ⼿ 順 順 順 注記 • 本製品は、お使いになる地域の法律や規制に準拠して 使⽤してください。 • 本製品を屋外またはそれに準じる環境で使⽤する場 合は、認定済みの屋外⽤筐体に収納して設置する必 要があります。 • 本製品は乾燥した換気のよい環境に保管してくださ い。 • 本製品に衝撃または強い圧⼒を加えないでください。 • 本製品を不安定なブラケット、表⾯、または壁に設置 しないでください。 • 本製品を設置する際には、適切な⼯具のみを使⽤して ください。 電動⼯具を使⽤して過剰な⼒をかけると、 製品が損傷することがあります。 • 化学薬品、腐⾷剤、噴霧式クリーナーは使⽤しないで ください。...
- Page 107 AXIS F44 Main Unit 輸 輸 輸 送 送 送 注記 • 本製品を運搬する際は、製品が損傷しないよう、元の 梱包か同等の梱包を使⽤してください。 バ バ バ ッ ッ ッ テ テ テ リ リ リ ー ー ー 本製品は、内部リアルタイムクロック (RTC) ⽤電源とし て、3.0 V BR2032リチウムバッテリーを使⽤します。 このバッ テリーは、通常条件下で最低5年間使⽤できます。 バッテリーが低電⼒状態になると、内部リアルタイムクロック (RTC)の動作に影響し、電源を⼊れるたびにRTCがリセットされ ます。 バッテリーの交換が必要になると、製品のサーバーレ...
- Page 109 AXIS F44 Main Unit イ イ イ ン ン ン ス ス ス ト ト ト ー ー ー ル ル ル ガ ガ ガ イ イ イ ド ド ド このインストールガイドでは、AXIS F44メインユニットをお 使いのネットワークにインストールする⼿順について説明し ます。 製品の使⽤の詳細については、Axisのホームページ www.axis.com ) でユーザーズマニュアルを参照してください。 設 設 設 置 置 置 ⼿ ⼿ ⼿ 順 順 順...
- Page 110 AXIS F44 Main Unit 推 推 推 奨 奨 奨 ツ ツ ツ ー ー ー ル ル ル トルクスT20ドライバー (プラスチック製ボトムカ • バー取り外し⽤) オ オ オ プ プ プ シ シ シ ョ ョ ョ ン ン ン ア ア ア ク ク ク セ セ セ サ サ サ リ リ リ ー ー ー...
- Page 111 AXIS F44 Main Unit I/Oコネクタ 電源コネクタ ネットワークコネクタ (PoE) 10. RS232コネクタ 11. プラスチック製ボトムプレート LED イ イ イ ン ン ン ジ ジ ジ ケ ケ ケ ー ー ー タ タ タ ー ー ー 注意 • ステータスLEDは、正常動作時に消灯させることがで きます。 設定は、[Setup [Setup - - - System...
- Page 112 AXIS F44 Main Unit [Setup - - - System System Options Options - - - Ports Ports & & & Devices Devices - - - 設定は、[Setup [Setup System Options Ports Devices LED] ( ( ( 設 設 設 定 定 定 - - - シ シ シ ス ス ス テ テ テ ム ム ム オ オ オ プ プ プ シ シ シ ョ ョ ョ ン ン ン - - - ポ ポ ポ ー ー ー ト ト ト と と と デ デ デ バ バ バ イ イ イ ス ス ス - - -...
- Page 113 AXIS F44 Main Unit 注記 本製品は、シールドネットワークケーブル (STP) を使⽤ して接続してください。 本製品は、⽤途に合ったケーブ ルを使⽤してネットワークに接続してください。 ネット ワーク装置がメーカーの指⽰どおりに設置されているこ Electromagnetic とを確認します。 法的要件については、 Compatibility (EMC) 2 を参照してください。 I/O コ コ コ ネ ネ ネ ク ク ク タ タ タ ー ー ー 外部装置を接続し、カメラに対するいたずらの警報、動体検 知、イベントトリガー、低速度撮影、アラーム通知などを使⽤ することができます。 I/Oコネクターは、0 V DC基準点と電⼒...
- Page 114 AXIS F44 Main Unit ⾳ ⾳ ⾳ 声 声 声 コ コ コ ネ ネ ネ ク ク ク タ タ タ 本製品は、以下の⾳声コネクタを搭載しています。 ⾳ ⾳ ⾳ 声 声 声 ⼊ ⼊ ⼊ ⼒ ⼒ ⼒ - モノラルマイクロフォンまたはラインイ • ンモノラル信号⽤ (左チャンネルはステレオ信号で...
- Page 115 AXIS F44 Main Unit www.axis.com 推奨するSDカードについては、 を参照してく ださい コ コ コ ン ン ン ト ト ト ロ ロ ロ ー ー ー ル ル ル ボ ボ ボ タ タ タ ン ン ン 110ページの、ハード コントロールボタンの位置については、 ウェアの概要 を参照してください。 コントロールボタンは、以下の⽤途で使⽤します。...
- Page 116 AXIS F44 Main Unit コ コ コ ネ ネ ネ ク ク ク タ タ タ ー ー ー I/O コ コ コ ネ ネ ネ ク ク ク タ タ タ 6ピンターミナルブロック 119ページの、接続図 接続例の図については、 を参照してく ださい。 機 機 機 能 能 能...
- Page 117 AXIS F44 Main Unit 3‒6 設定可 0〜30 V DC (最⼤) デジタル⼊⼒ ‒ 動作さ 能 せるにはピン1に接続 (⼊⼒ま し、動作させない場合 たは出 はフロート状態 (未接 ⼒) 続) のままにします。 0〜30 V DC (最⼤)、 デジタル出⼒ ‒ 動作さ オープンドレイ せるにはピン1に接続 し、動作させない場合 ン、100 mA はフロート状態 (未接 続) にします。 誘導負...
- Page 118 AXIS F44 Main Unit ⾳ ⾳ ⾳ 声 声 声 コ コ コ ネ ネ ネ ク ク ク タ タ タ 3.5 mm⾳声 コネクタ (ス テレオ) 3 スリー 1 チップ 2 リング ブ ⾳ ⾳ ⾳ 声 声 声 ⼊ ⼊ ⼊...
- Page 119 AXIS F44 Main Unit RS232 CTS RS-232レシーバー⼊⼒ RS232 RD Alt 接 接 接 続 続 続 図 図 図 I/O コ コ コ ネ ネ ネ ク ク ク タ タ タ 0 V DC (-) DC出⼒12 V、最⼤50 mA 例: プッシュボタン...
- Page 120 AXIS F44 Main Unit I/O (⼊⼒として設定) I/O (出⼒として設定) ハ ハ ハ ー ー ー ド ド ド ウ ウ ウ ェ ェ ェ ア ア ア の の の 設 設 設 置 置 置 Axis F41/F44メインユニットは、卓上に設置するか、DINレー ルに取り付けることができます。 上部または側⾯からケーブ ルを容易に配線できるようにするには、4本のネジ (トルクス...
- Page 121 AXIS F44 Main Unit 必要に応じて、電源コネクタにAC/DC電源を接続し ます。 必要に応じて、I/Oケーブルを使⽤して、外部⼊出⼒ デバイスを6ピンI/Oコネクタブロックに接続します。 必要に応じて、⾳声ケーブルを使⽤して、アクティ ブスピーカー/外部マイクロフォンを接続します。 必要に応じて、RS232ケーブルを使⽤して外部装置 を接続します。 セ セ セ ン ン ン サ サ サ ー ー ー ユ ユ ユ ニ ニ ニ ッ ッ ッ ト ト ト の の の ケ ケ ケ ー ー ー ブ ブ ブ ル ル ル を を を 短 短 短 く く く す す す る る る...
- Page 122 AXIS F44 Main Unit ⽩/⻘ ⻘ ワイヤーをシールド付き6P6C RJ12コネクタに差し 込みます。 注記 ワイヤーが正しい順序に並び、ケーブルシールドが コネクタシールドときちんと接触していることを確 認します。 圧着⼯具を使⽤して、コネクタをケーブルに固定 します。...
- Page 123 AXIS F44 Main Unit 製 製 製 品 品 品 へ へ へ の の の ア ア ア ク ク ク セ セ セ ス ス ス ネットワーク上でAxis製品を検索したり、Windows®で それにIPアドレスを割り当てるには、AXIS IP Utilityまた はAXIS Camera Managementの使⽤をお勧めします。 いずれの www.axis.com/techsup アプリケーションも無料で、 からダウ ンロードできます...
- Page 124 AXIS F44 Main Unit 本製品の電源を切ります。 コントロールボタンを押し続けながら電源を再投⼊ 110ページの、ハードウェアの概要 します。 「 」を参 照してください。 ステータスLEDインジケーターが⻩⾊に点滅するま で、コントロールボタンを15〜30秒間押し続けます。 4. コントロールボタンを離します。 プロセスが完了する と、ステータスLEDが緑⾊に変わります。 これで本製 品は⼯場出荷時の設定にリセットされました。 ネッ トワーク上に利⽤可能なDHCPサーバーがない場合、 192.168.0.90 デフォルトのIPアドレスは になります。 インストール・管理ソフトウェアツールを使⽤して、 IPアドレスの割り当て、パスワードの設定、ビデオス トリームへのアクセスを⾏います。 注意 1つのチャンネルを⼯場出荷時の設定にリセットするに は、製品のWebページ上のボタンを使⽤します。 Webインターフェースを使⽤して、各種パラメーターを⼯場出 [Setup - - - System System Options Options - - - 荷時の設定に戻すこともできます。...
- Page 125 AXIS F44 Main Unit 保 保 保 証 証 証 情 情 情 報 報 報 Axis の 製 品 保 証 と 関 連 情 報 に つ い て www.axis.com/warranty/ は、 をご覧ください...
- Page 127 AXIS F44 Main Unit 安 安 安 全 全 全 信 信 信 息 息 息 安装该产品前请仔细通读该安装指南。请保管好安装指南以供 以后查阅。 危 危 危 险 险 险 等 等 等 级 级 级 危险 表示有危险的情形,如果不能避免,将导致死亡或严 重的个人伤害。 警告 表示有危险的情形,如果不能避免,将导致死亡或严 重的个人伤害。 小心 表示有危险的情形,如果不能避免,将导致轻微或中 度的个人伤害。 注意...
- Page 128 AXIS F44 Main Unit 安 安 安 全 全 全 说 说 说 明 明 明 注意 • 使用该安讯士产品必须符合当地法律法规要求。 • 如要在室外或相似环境中使用该安讯士产品,必须将其 安装在符合标准的室外防护罩中。 • 安讯士产品应存放在干燥通风的环境中。 • 应避免对安讯士产品造成冲撞或重压。 • 不得将本产品安装于不稳固的支架、表面或墙面上。 • 安装安讯士产品时,请使用适用工具。使用电动工具 时过度用力可能对产品造成损坏。 • 请勿使用化学制剂、腐蚀性制剂或气雾性清洁剂。 • 使用浸有净水的干净抹布进行清洁。 • 所用附件必须符合该产品的技术规格要求。可由安讯 士或第三方供应商提供。 • 必须使用安讯士提供或推荐的零件。...
- Page 129 AXIS F44 Main Unit 于服务器报告的更多信息,请参考产品的设置页面或联系安讯 士支持人员。 如非需要请勿更换电池!电池必须更换时,请联系安讯士支持人 www.axis.com/techsup 员寻求帮助,网址 。 3.0 V 锂钮扣电池包含 1,2-二甲氧基乙烷;乙二醇二甲醚 (EGDME),CAS 号为 110-71-4。 警告 • 电池更换不当将引发爆炸危险。 • 请务必使用相同或安讯士推荐的电池进行更换。 • 请按照当地法规或电池制造商的说明来处理废旧电池。...
- Page 131 AXIS F44 Main Unit 安 安 安 装 装 装 指 指 指 南 南 南 本安装指南提供网络安装 AXIS F44 主单元的说明。有关使用该产 www.axis.com 品的其他信息,请参见用户手册,网址: 安 安 安 装 装 装 步 步 步 骤 骤 骤 1. 确保安装必需的包装内容、工具和其它材料井然有 第131页 序。参见 。 第132页...
- Page 132 AXIS F44 Main Unit www.axis.com 如欲了解有关可用附件的信息,请访问 硬 硬 硬 件 件 件 概 概 概 览 览 览 控制按钮 SD 卡插槽 LED(电源、状态、网络) RJ12 接口(4 号) 音频输入 音频输出 I/O 接口 电源接口 网络接口(PoE) 10. RS232 接口 11. 塑料底板...
- Page 133 AXIS F44 Main Unit LED 指 指 指 示 示 示 灯 灯 灯 备注 • LED 状态指示灯可被配置为在工作正常时不亮。进行配 置请访问设 设 设 置 置 置 > > > 系 系 系 统 统 统 选 选 选 项 项 项 > > > 端 端 端 口 口 口 和 和 和 设 设 设 备 备 备 > > > LED LED 。如欲...
- Page 134 AXIS F44 Main Unit LED 电 电 电 源 源 源 指 指 指 示 示 示 灯 灯 灯 指 指 指 示 示 示 绿色 工作正常。 淡黄色 固件升级过程中呈绿色/淡黄 色闪烁。 接 接 接 口 口 口 和 和 和 按 按 按 钮 钮 钮...
- Page 135 AXIS F44 Main Unit 电 电 电 源 源 源 接 接 接 口 口 口 2 针接线端子用于电源输入。使用符合安全超低压(SELV)规 定,且额定输出功率 ≤100 W 或额定输出电流 ≤5 A 的有限电 源(LPS)。 音 音 音 频 频 频 接 接 接 口 口 口 安讯士产品具有以下音频接口: 音 音 音 频 频 频 输 输 输 入 入 入 – 3.5 毫米单声道麦克风输入,或一路单声道...
- Page 136 AXIS F44 Main Unit 控 控 控 制 制 制 按 按 按 钮 钮 钮 硬件概览 在第132页 有关控制按钮的位置信息,请参见 。 控制按钮用于: 第143页 将产品重置为出厂默认设置。参见 。 • 连接至安讯士视频托管系统服务或安讯士互联网动 • 态 DNS 服务。有关这些服务的更多信息,请参见用 户手册。 规 规 规 格 格 格 安讯士产品用于在室内使用。 产 产 产 品 品 品...
- Page 137 AXIS F44 Main Unit 功 功 功 能 能 能 针 针 针 脚 脚 脚 注 注 注 释 释 释 规 规 规 格 格 格 0 V DC (-) 1 0 V DC 12 V DC DC 输出...
- Page 138 AXIS F44 Main Unit 音 音 音 频 频 频 接 接 接 口 口 口 3.5 毫米音频 接口(立体 声) 2 环 1 顶端 3 套 音 音 音 频 频 频 输 输 输 入 入 入 麦克风/线路输入 接地...
- Page 139 AXIS F44 Main Unit 连 连 连 接 接 接 图 图 图 I/O 接 接 接 口 口 口 0 V DC (-) DC 输出 12 V ,最大 50 mA 示例:按键 I/O 配置为输入 I/O 配置为输出...
- Page 140 AXIS F44 Main Unit 安 安 安 装 装 装 硬 硬 硬 件 件 件 Axis F41/F44 主单元可放置于桌子的桌面上,或安装在 DIN 导 轨上。为方便从顶部或侧面布线,可移除 4 个螺钉 (Torx T20), 硬件概览 在第132页 并适当调整单元下方的底板(请参见 )。 请访问 www.axis.com,了解可选附件。 1. 若需要,请按动释放虚拟 SD 卡,将 SD 内存卡插入 SD 内存卡插槽。...
- Page 141 AXIS F44 Main Unit 缩 缩 缩 短 短 短 传 传 传 感 感 感 器 器 器 单 单 单 元 元 元 线 线 线 缆 缆 缆 的 的 的 长 长 长 度 度 度...
- Page 142 AXIS F44 Main Unit 访 访 访 问 问 问 产 产 产 品 品 品 AXIS IP Utility 和AXIS Camera Management 推荐用于查找网络上 的安讯士产品,并在 Windows 中为它们分配 IP 地址®。两款应 www.axis.com/techsup 用都免费提供,并可在下列网址中下载: 该产品可配合多数操作系统和浏览器使用。我们推荐使用下列浏 览器: Internet Explorer (搭配 Windows) ® ® • Safari (搭配...
- Page 143 AXIS F44 Main Unit 重 重 重 置 置 置 为 为 为 出 出 出 厂 厂 厂 默 默 默 认 认 认 设 设 设 置 置 置 重要 重置为出厂默认设置应慎用。重置为出厂默认设置将把所 有设置重置为出厂默认值,包括 IP 地址。 备注 安装和管理软件工具可通过以下网站中的支持页面获 www.axis.com/techsup 取:...
- Page 144 AXIS F44 Main Unit www.axis.com 如欲查阅用户手册,请访问 • 检查是否有可供您产品使用的更新固件请访问 • www.axis.com/support 有关有用的在线培训和网络研讨会的信息请访问 • www.axis.com/academy 保 保 保 修 修 修 信 信 信 息 息 息 有关安讯士产品保修的信息及与之相关的信息,请访问 www.axis.com/warranty/...
- Page 146 Installation Guide Ver. M2.2 AXIS F44 Main Unit Date: May 2016 © Axis Communications AB, 2014 - 2016 Part No. 1601150...
Need help?
Do you have a question about the 0936-001 20289045 and is the answer not in the manual?
Questions and answers