Axis FA54 User Manual
Main unit
Hide thumbs
Also See for FA54:
- User manual (49 pages) ,
- Installation manual (20 pages) ,
- User manual (19 pages)
Table of Contents
Advertisement
Quick Links
Advertisement
Table of Contents

Related Manuals for Axis FA54


Summary of Contents for Axis FA54
-
Page 1: User Manual
AXIS FA54 Main Unit User Manual... -
Page 2: Table Of Contents
AXIS FA54 Main Unit Table of Contents System overview .......... -
Page 3: System Overview
AXIS FA54 Main Unit System overview System overview... -
Page 4: Product Overview
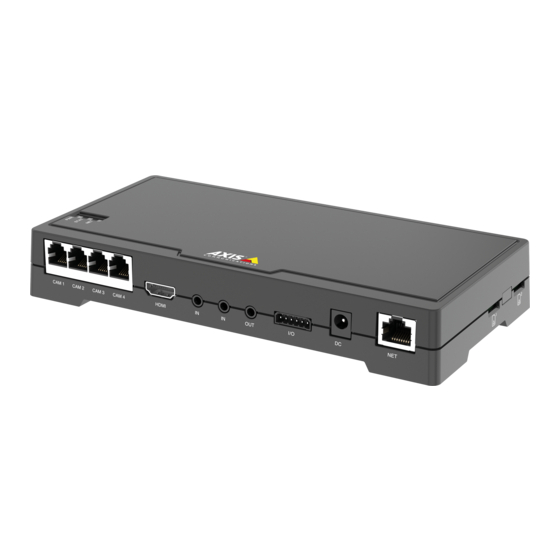
AXIS FA54 Main Unit Product overview Product overview Status LED RJ12 connector (4x) HDMI Audio in (2x) Audio out I/O connector Power connector Network connector (DC input) Control button 10 microSD card slot About the sensor units We recommend that you connect the sensor units to the main unit before powering the main unit. If you disconnect a sensor unit, and connect a different sensor unit, it may be necessary to restart the main unit. - Page 5 AXIS FA54 Main Unit Product overview White/blue Blue 5. Insert the wires all the way into a shielded 6P6C RJ12 connector. NOTICE TICE TICE Make sure that the wires stay in the correct order and that the cable shield makes good contact with the connector shield.
-
Page 6: Setup
If you do not know the IP address, use AXIS IP Utility to locate the product on the network. For information about how to discover and assign an IP address, see the document Assign an IP Address and Access the Video Stream on Axis Support web at www.axis.com/support... -
Page 7: About The Product's Built-In Help
AXIS Internet Dynamic DNS Service assigns a host name for easy access to the product. For more information, see www.axiscam.net To register the Axis product with AXIS Internet Dynamic DNS Service, go to System Options > Network > TCP/IP > Basic. Under Services, click the AXIS Internet Dynamic DNS Service Settings button (requires access to the Internet). -
Page 8: How To View Live Video Stream On A Monitor
AXIS FA54 Main Unit Setup 1. Turn the camera 90°. 2. Go to the Stream tab on the product’s webpage and rotate the view 90°. How to view live video stream on a monitor Your camera can transmit live video stream to an HDMI monitor without a network connection. The monitor can be used for surveillance purposes or for public viewing e.g. -
Page 9: How To Reduce Bandwidth And Storage
Turn on the dynamic FPS. About applications AXIS Camera Application Platform (ACAP) is an open platform that enables third parties to develop analytics and other applications for Axis products. For information about available applications, downloads, trials and licenses, go to www.axis.com/applications To find the user manuals for Axis applications, go to www.axis.com... -
Page 10: Troubleshooting
To find the latest firmware and the release notes, go to www.axis.com > product > Support & Documentation. 1. Download the latest firmware file to your computer, available free of charge at www.axis.com/support/firmware 2. Log in to the product as an administrator. -
Page 11: Technical Issues, Clues And Solutions
Axis product. Check all cabling and reinstall the product. Possible IP address conflict The static IP address in the Axis product is used before the DHCP server sets a dynamic address. with another device on the... -
Page 12: Performance Considerations
Heavy network utilization due to poor infrastructure affects the bandwidth. • Viewing on poorly performing client computers lowers perceived performance and affects frame rate. • Running multiple AXIS Camera Application Platform (ACAP) applications simultaneously may affect the frame rate and the general performance. -
Page 13: Technical Specifications
The control button is used for: • Resetting the product to factory default settings. See . • Connecting to an AXIS Video Hosting System service. To connect, press and hold the button for about 3 seconds until the status LED flashes green. Connectors HDMI connector Use the HDMI connector to connect a display or public view monitor. - Page 14 Network connector RJ45 Ethernet connector. Audio connector The Axis product has the following audio connectors: • Audio in – 3.5 mm input for a mono microphone, or a line-in mono signal (left channel is used from a stereo signal). •...
- Page 15 AXIS FA54 Main Unit Technical specifications 0 V DC (-) DC output 12 V, max 50 mA I/O configured as input I/O configured as output Power connector DC connector. Use the supplied adapter. RJ12 Connector The RJ12 connector is used for connecting the sensor unit to the main unit. For information on how to shorten the sensor unit...
- Page 16 User Manual Ver. M3.2 AXIS FA54 Main Unit Date: July 2017 © Axis Communications AB, 2016 - 2017 Part No. 1659322...
Need help?
Do you have a question about the FA54 and is the answer not in the manual?
Questions and answers