Table of Contents
Advertisement
Quick Links
Advertisement
Table of Contents

Related Manuals for Axis S1132


Summary of Contents for Axis S1132
- Page 1 AXIS Camera Station S1132 Recorder User Manual...
-
Page 2: Table Of Contents
Configure AXIS Camera Station ........ -
Page 3: About Your Device
Camera Station video management software including licenses plus all necessary system software. The system configuration can easily be imported from AXIS Site Designer, and AXIS Camera Station lets you take full advantage of Axis wide range of video surveillance devices. With redundant enterprise-grade hard disks, operating system stored on solid-state drive (SSD), the recorder series provides high-performance and reliability for your system. -
Page 4: Get Started
License a system with Internet connection on page 16 License a system without Internet connection on page 16 6. Connect your system to the AXIS Camera Station mobile viewing app. See Configure AXIS Secure Remote Access To watch this video, go to the web version of this document. - Page 5 AXIS Camera Station S1132 Recorder Install your device Install your device...
- Page 6 AXIS Camera Station S1132 Recorder Install your device...
- Page 7 AXIS Camera Station S1132 Recorder Install your device...
- Page 8 AXIS Camera Station S1132 Recorder Install your device...
- Page 9 AXIS Camera Station S1132 Recorder Install your device...
- Page 10 AXIS Camera Station S1132 Recorder Install your device...
- Page 11 AXIS Camera Station S1132 Recorder Install your device...
-
Page 12: Configure Your Device
AXIS Camera Station Service Control automatically starts after the installation is complete. Double-click the AXIS Camera Station Client icon to start the AXIS Camera Station client. When starting the client for the first time, it automatically attempts to log on to the AXIS Camera Station server installed on the same computer as the client. - Page 13 AXIS Camera Station S1132 Recorder Configure your device 2.2 Turn on Motion detection. 2.3 Click Apply. 3. If you want to enable continuous recording: 3.1 Select a camera. 3.2 Turn on Continuous. 3.3 Click Apply. Live view cameras 1. Click the Live view tab to navigate to the camera live view.
- Page 14 Click Browse to select the location to export the recordings. Select Include Axis File Player, Include notes, and Add digital signature. 7. Click Export. 8. Select Use password and enter your password for the digital signature. Click OK.
- Page 15 AXIS Camera Station S1132 Recorder Configure your device In this example, the exported files include the recordings in the .asf format, the notes in the .txt format, and AXIS File Player. 2. Double-click AXIS File Player. The exported recordings will be automatically played.
-
Page 16: License A System With Internet Connection
License a system with Internet connection Both the AXIS Camera Station client and the server must be connected to the internet. 1. In the AXIS Camera Station client, go to Configuration > Licenses > Management and click Go to AXIS Camera Station License Portal. - Page 17 Note For AXIS Network Video Recorders, your license details are generated automatically and can be found under the License keys section. We recommend that you write them down, or save them in a digital format on a USB flash drive for future reference.
-
Page 18: Manage Windows® User Accounts
AXIS Camera Station S1132 Recorder Manage Windows® user accounts Manage Windows® user accounts Create a user account To help keep your personal data and information more secure, we recommend that you add a password for each local account. Important Once you create a password for a local account, don't forget it. There’s no way to recover a lost password for local accounts. -
Page 19: Change A User Account's Password
AXIS Camera Station S1132 Recorder Manage Windows® user accounts 1. Go to Settings > Accounts > Other people. 2. Go to the account you want to remove and click Remove. Change a user account's password 1. Log in with an administrator account. -
Page 20: Manage Axis Camera Station User Accounts
Manage AXIS Camera Station user accounts Manage AXIS Camera Station user accounts Configure user permissions Go to Configuration > Security > User permissions to view a list of the users and groups that have been added to AXIS Camera Station. Note Administrators of the computer on which the AXIS Camera Station server is installed are automatically given administrator privileges to AXIS Camera Station. -
Page 21: User Or Group Privileges
4. Select Users or Groups to search for only users or groups. 5. The list of users or groups is displayed. Users and groups that have already been added to AXIS Camera Station are not listed. If there are too many users or groups, the search result is not displayed. Use the Type to search field to refine the search and find a specific user or group. - Page 22 AXIS Camera Station S1132 Recorder Manage AXIS Camera Station user accounts • Access: Allow access to the views in AXIS Camera Station. • Edit: Allow to edit the views in AXIS Camera Station. The following access privileges are available for users or groups with the Operator or Viewer role. The I/O ports are listed by device.
-
Page 23: Manage Your Device
AXIS Camera Station S1132 Recorder Manage your device Manage your device Update Windows® Windows® 10 periodically checks for updates. When an update is available, your device automatically downloads the update but you've to install it manually. Note Recording will be interrupted during a scheduled system restart. -
Page 24: Change The Raid
1. Boot Lifecycle Controller: 1.1 Power on your device. 1.2 When you see the AXIS splash screen, press F10. 2. In the Lifecycle Controller, go to Hardware Configuration > Configuration Wizards and select RAID Configuration. 3. Select the RAID Controller on which you want to have the RAID created. Details of any virtual disk(s) available on the selected controller will be shown in the table displayed on the page below the controller list. -
Page 25: Troubleshooting
To check the current BIOS: 1. Power on the device. 2. Wait until you see the Axis splash screen. You’ll see the version number above the splash screen. Upgrade the BIOS We recommend to keep the BIOS up to date. -
Page 26: Perform A System Recovery
6. When you see the AXIS splash screen, press F11. 7. Click One-shot UEFI Boot Menu. 8. Navigate to your USB drive and press ENTER. The system boots into the AXIS Recovery Kit. 9. Click Reinstall Operating System. The recovery takes roughly 10 to 15 min to complete. You find detailed instructions in the download for the recovery kit. -
Page 27: Enable Idrac
AXIS Camera Station S1132 Recorder Troubleshooting Lifecycle Controller retrieves the selected report data and exports the report file to the specified location. This can take a few minutes. Enable IDRAC You can set up the IP address or use the default iDRAC IP address 192.168.0.120 to configure initial network settings, including setting up DHCP or the static IP for iDRAC. -
Page 28: Troubleshoot Memory Errors
Troubleshoot memory errors 1. Upgrade the BIOS to the latest version. 2. If the errors persist, contact Axis Technical Support. Troubleshoot AXIS Camera Station For information about how to troubleshoot AXIS Camera Station, go to the AXIS Camera Station user manual. -
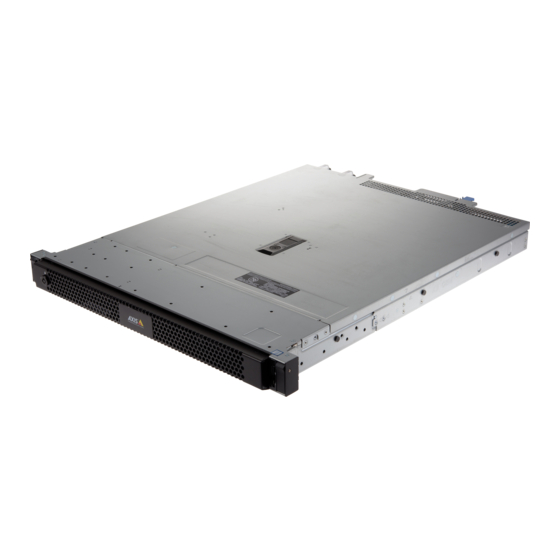
Page 29: Product Overview
AXIS Camera Station S1132 Recorder Product overview Product overview Front and rear sides i LED Drive activity LED Dive status LED Opening button System power LED USB 2.0 iDRAC direct micro USB port Information tag Serial port 10 Ethernet (RJ45) 1 GbE... - Page 30 AXIS Camera Station S1132 Recorder Product overview Amber solid The system is in fail-safe mode. Amber blinking The system is experiencing a fault. Check the system event log for the specific error message. IDRAC quick sync 2 indicator Description Action...
- Page 31 AXIS Camera Station S1132 Recorder Product overview Blinking green When the firmware of the PSU is being updated, the PSU handle blinks green. CAUTION: Do not disconnect the power cord or unplug the PSU when updating firmware. If firmware update is interrupted the PSUs do not function.
- Page 32 AXIS Camera Station S1132 Recorder Product overview CAUTION • When correcting a PSU mismatch, replace only the PSU with the blinking indicator. Swapping the PSU to make a matched pair can result in an error condition and unexpected system shutdown. To change from a High Output configuration to a Low Output configuration or vice versa, you must turn off the system.
-
Page 33: Need More Help
AXIS Camera Station S1132 Recorder Need more help? Need more help? Useful links • AXIS Camera Station user manual • Configure AXIS Secure Remote Access • What to include in an Antivirus white list for AXIS Camera Station Contact support Contact support at axis.com/support. - Page 34 User Manual Ver. M4.7 AXIS Camera Station S1132 Recorder Date: April 2020 © Axis Communications AB, 2018 - 2020 Part No. T10129602...
Need help?
Do you have a question about the S1132 and is the answer not in the manual?
Questions and answers