
Subscribe to Our Youtube Channel
Related Manuals for Axis T8310


Summary of Contents for Axis T8310
- Page 1 AXIS T8310 Video Surveillance Control Board AXIS T8311 Video Surveillance Joystick AXIS T8312 Video Surveillance Keypad AXIS T8313 Video Surveillance Jog Dial Installation Guide...
- Page 3 English France: Français Deutschland: Deutsch Italia: Italiano España: Español 日本: 日本語 中文: 简体中文...
-
Page 4: Intellectual Property Rights
Axis AB has intellectual property rights relating to technology embodied in the product described in this document. In particular, and without limitation, these intellectual property rights may include one or more of the patents listed at axis.com/patent and one or more additional patents or pending patent applications in the US and other countries. -
Page 5: Regulatory Information
This product complies with the applicable CE marking directives and harmonized standards: • Restrictions of Hazardous Substances (RoHS) Directive 2011/65/EU. See Disposal and recycling 6 . A copy of the original declaration of conformity may be obtained from Axis Communications AB. See Contact information 7 . Regulatory information Europe This product complies with the applicable CE marking directives and harmonized standards: •... -
Page 6: Disposal And Recycling
AXIS T8310 Video Surveillance Control Board • Reorient or relocate the receiving antenna. • Increase the separation between the equipment and receiver. • Connect the equipment into an outlet on a circuit different from that to which the receiver is connected. -
Page 7: Contact Information
AXIS T8310 Video Surveillance Control Board applicable in the European Union member states. To prevent potential harm to human health and the environment, the product must be disposed of in an approved and environmentally safe recycling process. For information about your nearest designated collection point, contact your local authority responsible for waste disposal. -
Page 8: Warranty Information
Support Should you require any technical assistance, please contact your Axis reseller. If your questions cannot be answered immediately, your reseller will forward your queries through the appropriate channels to ensure a rapid response. If you are connected to the Internet, you can: •... -
Page 9: Package Contents
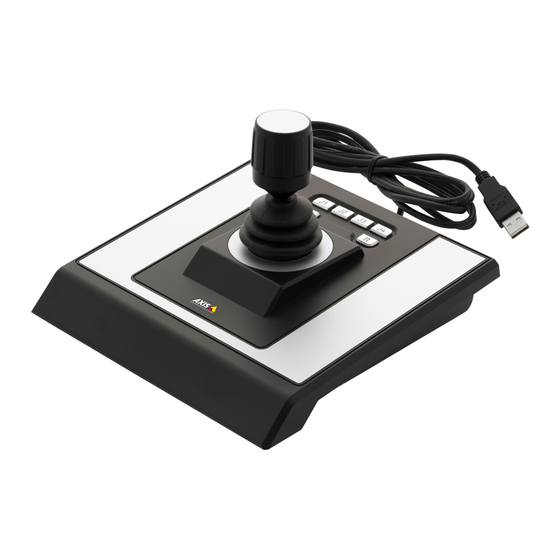
Installation Guide This Installation Guide provides instructions for installing AXIS T8310 Video Surveillance Control Board. For all other aspects of using the product, please see the AXIS Camera Station help pages. Overview The three units in AXIS T8310 Video Surveillance Control Board can be installed separately or together as one unit. - Page 10 AXIS T8310 Video Surveillance Control Board AXIS T8311 Joystick 1: USB port 2: 6 fully customizable keys 3: Joystick Key default values: J1–J4 - No defaults L - Simulate left mouse button click R - Simulate right mouse button click...
-
Page 11: Install The Hardware
AXIS T8311 Video Surveillance Joystick, AXIS T8312 Video Surveillance Keypad and AXIS T8313 Video Surveillance Jog Dial can be connected separately, or together as a unit, using AXIS T8312 Video Surveillance Keypad as a USB hub. The units can be placed in any order, to meet your own... -
Page 12: Troubleshooting
AXIS T8310 Video Surveillance Control Board 1. Connect the USB cable to a USB port on your computer. 2. Follow the onscreen instructions (if applicable) to install the necessary drivers. The AXIS T8311 joystick will appear as a game controller/device in Windows. -
Page 13: Vue D'ensemble
T8310. Pour toutes les autres informations relatives à l'utilisation du produit, reportez-vous aux pages de l'aide AXIS Camera Station. Vue d'ensemble Les trois unités du Tableau de contrôle de vidéosurveillance AXIS T8310 peuvent être installées séparément ou ensemble en une seule unité. L'alimentation est fournie via les connexions USB. Contenu de l’emballage Article Modèles/variantes/remarques... - Page 14 AXIS T8310 Video Surveillance Control Board Joystick AXIS T8311 1: Port USB 2 : 6 touches entièrement personnalisables 3 : Joystick Valeur par défaut des clés : J1–J4 - Pas de valeurs par défaut L - Simule un clic gauche de la souris...
-
Page 15: Installation Du Matériel
Installation du matériel Le joystick de vidéosurveillance AXIS T8311, le clavier de vidéosurveillance AXIS T8312 et la molette de vidéosurveillance AXIS T8313 peuvent être raccordés séparément ou ensemble en une seule unité, en utilisant le clavier de vidéosurveillance AXIS T8312 comme concentrateur USB. Pour... -
Page 16: Dépannage
3. Démarrez le logiciel d'application, à savoir AXIS Camera Station, qui détectera automatiquement les périphériques sur l'AXIS T8310. Note Le système doit disposer d'un logiciel d'application, à savoir AXIS Camera Station, qui peut détecter le nouveau matériel. Consultez axis.com pour plus d’informations sur les systèmes d'exploitation. -
Page 17: Übersicht Über Die Hardware
Sicherheitsüberwachung beschrieben. Alle weiteren Informationen zur Nutzung dieses Produktes finden Sie auf den Hilfeseiten zu AXIS Camera Station. Übersicht Die drei Geräte in der AXIS T8310 Steuerungseinheit zur Sicherheitsüberwachung können getrennt oder gemeinsam installiert werden. Die Stromversorgung erfolgt über die USB-Anschlüsse. Lieferumfang... - Page 18 AXIS T8310 Video Surveillance Control Board 1: AXIS T8311 Joystick Videoüberwachung 2: AXIS T8312 Funktionstastenfeld Videoüberwachung 3: AXIS T8313 Jog Dial Videoüberwachung Beachten Die Funktion sämtlicher Tasten aller Geräte lässt sich mithilfe der entsprechenden Software frei programmieren. Einigen Tasten ist ein Standardwert zugewiesen.
- Page 19 AXIS T8310 Video Surveillance Control Board 1: USB-Port (2x) 2: 22 frei programmierbare Tasten 3: USB-Port Standardwerte der Tasten: F1 - Kein Standardwert F2 - Hotkey-Registerkarte öffnen F3 - Kein Standardwert F4 - Protokollregisterkarte öffnen F5: Konfigurationsregisterkarte öffnen - Ansichten öffnen - Nächste Kamera/Ansicht...
-
Page 20: Installieren Der Hardware
2. Führen Sie ggf. die Anweisungen auf dem Bildschirm aus, um die erforderlichen Treiber zu installieren. Der AXIS T8311 Joystick wird in Windows als Gamecontroller/-gerät angezeigt. 3. Starten Sie die zugehörige Anwendungssoftware (z. B. AXIS Camera Station), die die Geräte in der AXIS T8310 automatisch erkennt. Beachten Für das System ist eine zugehörige Anwendungssoftware (z. - Page 21 AXIS T8310 Video Surveillance Control Board • Schließen Sie das USB-Kabel an einen anderen USB-Port Ihres Computers an. • Überprüfen Sie, ob das Betriebssystem den Joystick erkannt hat. Dies lässt sich im Windows-Gerätemanager überprüfen.
-
Page 23: Contenuto Della Confezione
Installation Guide This Installation Guide provides instructions for installing AXIS T8310 Video Surveillance Control Board. For all other aspects of using the product, please see the AXIS Camera Station help pages. Panoramica Le tre unità in AXIS T8310 Video Surveillance Control Board possono essere installate separatamente oppure come un'unica unità. - Page 24 AXIS T8310 Video Surveillance Control Board AXIS T8311 Joystick (Joystick AXIS T8311) 1: Porta USB 2: 6 tasti completamente personalizzabili 3: Joystick Valori predefiniti dei tasti: J1–J4 - Nessun valore predefinito L - Simula il clic del pulsante sinistro del...
-
Page 25: Installazione Dell'hardware
Installazione dell'hardware AXIS T8311 Video Surveillance Joystick, AXIS T8312 Video Surveillance Keypad e AXIS T8313 Video Surveillance Jog Dial possono essere collegati separatamente o come unica unità, utilizzando AXIS T8312 Video Surveillance Keypad come hub USB. Le unità possono essere posizionate in qualsiasi... -
Page 26: Risoluzione Di Problemi
AXIS T8310. Nota Il sistema deve disporre di un software dell'applicazione di supporto, ad esempio AXIS Camera Station, in grado di rilevare il nuovo hardware. Visitare il sito Web axis.com per informazioni sui sistemi di supporto. Risoluzione di problemi Se si sono verificati problemi durante l'installazione, provare una delle seguenti soluzioni: •... -
Page 27: Contenido Del Paquete
AXIS Camera Station. Información general Las tres unidades de la AXIS T8310 Video Surveillance Control Board se pueden instalar por separado o juntas como una unidad. Se suministra la corriente a través de las conexiones USB. - Page 28 AXIS T8310 Video Surveillance Control Board AXIS T8311 Joystick 1: Puerto USB 2: 6 teclas totalmente personalizables 3: Joystick Valores predeterminados de tecla: J1–J4: Sin valores predeterminados L: Simula el clic en el botón izquierdo del ratón R: Simula el clic en el botón derecho del ratón...
-
Page 29: Instalación Del Hardware
AXIS T8311 Video Surveillance Joystick, AXIS T8312 Video Surveillance Keypad y AXIS T8313 Video Surveillance Jog Dial se pueden conectar por separado o juntos como unidad utilizando el AXIS T8312 Video Surveillance Keypad como un concentrador USB. Las unidades se pueden colocar en el... -
Page 30: Solución De Problemas
3. Inicie el software de aplicación compatible —por ejemplo, AXIS Camera Station—, que detectará automáticamente los dispositivos en el AXIS T8310. Nota El sistema debe contar con un software de aplicación compatible, p, ej. AXIS Camera Station, que pueda detectar el nuevo hardware. Consulte axis.com para obtener información sobre los sistemas compatibles. - Page 31 Overview ( ( ( 概 概 概 要 要 要 ) ) ) Overview Overview AXIS T8310 Video Surveillance Control Board (ビデオ監視コントロールボード) の3つの ユニットは個別に、または1つのユニットとして同時にインストールできます。 USB 接続を経由して電源が供給されます。 パ パ パ ッ ッ ッ ケ ケ ケ ー ー ー ジ ジ ジ の の の 内 内 内 容 容 容...
- Page 32 AXIS T8310 Video Surveillance Control Board 1: AXIS T8311 Video Surveillance Joystick (ジョイスティック) 2: AXIS T8312 Video Surveillance Keypad (キーパッド) 3: AXIS T8313 Video Surveillance (ジョ グダイアル) 注意 全ユニットの全キーは対応ソフ トウェアからすべてカスタマイ ズ可能です。 いくつかのキー にはデフォルト値があり、製品 の概要とともに表⽰されてい ます。 AXIS T8311 T8311 Joystick Joystick ( ( ( ジ ジ ジ ョ ョ ョ イ イ イ ス ス ス テ テ テ ィ ィ ィ ッ ッ ッ ク ク ク ) ) )
- Page 33 AXIS T8310 Video Surveillance Control Board 1: USBポート (x2) 2: 22の全カスタマイズ可能なキー 3: USBポート キーのデフォルト値: F1 - デフォルトなし F2 - [ホットキー] タブを開く F3 - デフォルトなし F4 - [ログ] タブを開く F5 - [設定] タブを開く - ビューを開く - 次のカメラ/ビュー - デフォルトなし - デフォルトなし...
- Page 34 ハ ハ ハ ー ー ー ド ド ド ウ ウ ウ ェ ェ ェ ア ア ア の の の 設 設 設 置 置 置 AXIS T8311 Video Surveillance Joystick (ジョイスティック)、AXIS T8312 Video Surveillance Keypad (キーパッド) およびAXIS T8313 Video Surveillance (ジョグダイア...
- Page 35 AXIS T8310 Video Surveillance Control Board USBケーブルをコンピューターから外し、10秒待ってから再接続します。 • USBケーブルをコンピューターの使⽤可能な別USBポートに移動します。 • オペレーティングシステムがジョイスティックを認識しているか確認しま • す。 Windowsデバイスマネージャーで確認することができます。...
- Page 37 之间的连接 硬 硬 硬 件 件 件 概 概 概 览 览 览 AXIS T8310 T8310 视 视 视 频 频 频 监 监 监 控 控 控 控 控 控 制 制 制 板 板 板 AXIS AXIS T8310 1: AXIS T8311 视频监控操纵杆...
- Page 38 AXIS T8310 Video Surveillance Control Board AXIS AXIS AXIS T8311 T8311 操 操 操 纵 纵 纵 杆 杆 杆 T8311 1: USB 端口 2: 6 个完全自定义键 3: 操纵杆 键默认值: J1–J4 - 无默认 L - 模拟鼠标左键点击 R - 模拟鼠标右键点击 AXIS T8312 T8312 键...
- Page 39 - 播放/暂停 - 转至下一条记录 L - 显示/隐藏出口标记 R - 在现场/记录之间切换 安 安 安 装 装 装 硬 硬 硬 件 件 件 使用 AXIS T8312 视频监控键盘作为 USB 集线器,可以将 AXIS T8311 视频监控操纵 杆、 AXIS T8312 视频监控键盘和 AXIS T8313 视频监控滚轮按钮分别连接或连接为一 个单元。 可以将此类单元排列成任何顺序来满足你自己的要求。...
- Page 40 AXIS T8310 Video Surveillance Control Board 1. 在你的电脑上将 USB 数据线连接至 USB 端口。 2. (如果适用)按照屏幕上的指示安装必要的驱动程序。 AXIS T8311 操纵杆将 作为游戏控制器/设备出现在 Windows 中。 3. 启动支持应用软件(例如 AXIS Camera Station),它将自动检测 AXIS T8310 中的设备。 备注 系统必须安装可以检测到新硬件的支持应用软件(例如 AXIS Camera Station)。 关于支持系统的信息,请浏览 axis.com。 故 故 故 障 障 障 排 排 排 除 除 除...
- Page 42 Installation Guide Ver. M2.2 AXIS T8310 Video Surveillance Control Board Date: July 2018 © Axis Communications AB, 2010 - 2018 Part No. 1868113...
Need help?
Do you have a question about the T8310 and is the answer not in the manual?
Questions and answers