Table of Contents
Advertisement
Available languages
Available languages
Quick Links
Advertisement
Chapters
Table of Contents

Related Manuals for Singer 398054


Summary of Contents for Singer 398054
- Page 1 MACHINE À COUDRE NÄHMASCHINE Instructions d‘utilisation et consignes de sécurité Bedienungs- und Sicherheitshinweise SEWING MACHINE MACCHINA DA CUCIRE Operation and Safety Notes Indicazioni per l’uso e per la sicurezza IAN398054...
- Page 2 Diese Haushaltsnähmaschine wurde im Einklang mit IEC/DIN EN 60335-1 und 60335-2-28 oder UL1594 entwickelt und konstruiert. WICHTIGE SICHERHEITSHINWEISE Bei der Verwendung von elektrischen Geräten sind stets die grundlegenden Sicherheitsvorkehrungen zu beachten. Zusätzlich gilt: Lesen Sie die Gebrauchsanleitung für diese Haushaltsnähmaschine vor der erstmaligen Benutzung aufmerksam durch.
- Page 3 • Schutzbrille tragen. • Schalten Sie für Arbeiten im Nadelbereich, wie Einfädeln der Nadel, Wechseln der Nadel, Einfädeln des Unterfadens oder Wechseln des Nähfußes usw., immer zuerst die Nähmaschine aus („O“). • Keine Gegenstände in die Öffnungen stecken oder fallen lassen. •...
-
Page 4: Technische Daten
beaufsichtigt oder angeleitet. Kinder sind zu beaufsichtigen um sicherzustellen, dass sie nicht mit der Nähmaschine spielen. Die Maschine darf ausschließlich mit dem Fußanlassertyp „ES01FC“ verwendet werden, der von ZHEJIANG HENGQIANG SEWING MACHINE GROUP CO., LTD. hergestellt wurde. VERWENDUNGSZWECK Die optimale Nutzung und Wartung werden in dieser Anleitung beschrieben. Dieses Produkt ist nicht für den industriellen Einsatz vorgesehen. -
Page 5: Table Of Contents
Technische Daten ........4 ERSTE NÄHSCHRITTE ..21 VORSTELLUNG DER Zier- und stretchstiche .......26 NÄHMASCHINE ...... 6 Weitere zierstiche ......31 Nähen von knopflöchern....32 Maschinenteile........6 Zubehör ..........7 Zwillingsnadel ........35 Maschine vorbereiten ......7 Nadelposition für den geradstich ..35 Garnrollenstifte ........8 Nähfußheber........8 PFLEGE DER MASCHINE ..36 Transporteurregler .......8 Transporteur und greiferbereich reinigen ..........36... -
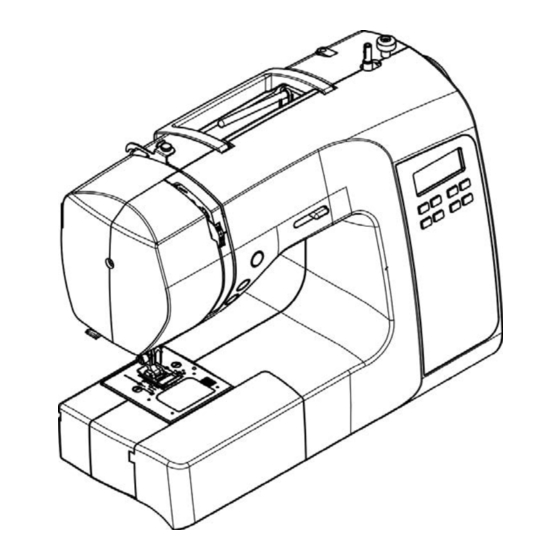
Page 6: Vorstellung Der Nähmaschine
VORSTELLUNG DER NÄHMASCHINE MASCHINENTEILE 1. Fadenführung 2. Spannungsscheibe Spulen 3. Fadengeber 4. Fadenspannungsregler 5. Stirndeckel 6. Fadenschneider 7. Knopflochhebel 8. Abnehmbares Zubehörfach 9. Spuler 10. Spulenstopper 11. Geschwindigkeitsregler 12. LCD-Display 13. Musterwahltaste 14. Stichlängentaste 15. Stichbreitentaste 16. Umschalter für Zwillingsnadel 17. -
Page 7: Zubehör
Standardnähfuß (J) versehen, der sich für die meisten Näharbeiten eignet. Der Zierstichfuß ** Wichtig! Ihre Maschine verwendet SINGER® Spulen der Klasse 15J. (Z) ist ein weiterer sehr nützlicher Nähfuß und Verwenden Sie auf Ihrer Maschine auss- die ideale Wahl für die meisten Ziernähte. -
Page 8: Garnrollenstifte
GARNROLLENSTIFTE WAAGERECHTER GARNROLLEN- STIFT für normale Garnrollen Setzen Sie eine Garnrolle auf den Gar- Garnrolle nrollenstift und sichern Sie ihn mit einer Garnrollenführungsscheibe, damit der Faden gleichmäßig abläuft. Bei Garnrollen mit Fadenvorspannung sollte dieser rechts Zusätzlicher ausgerichtet werden. Garnrollenstift ZUSÄTZLICHER GARNROLLENSTI- Fadenvorspannung FT für größere Garnrollen Bringen Sie den zusätzlichen Garnrollen-... -
Page 9: Freiarmnähen Vorbereiten
FREIARMNÄHEN VORBEREITEN Sie können Ihre Maschine sowohl als Flach- bett- als auch als Freiarmmaschine nutzen. Ist das abnehmbare Zubehörfach eingesetzt, bietet die Maschine eine große Nähfläche wie ein normales Flachbettmodell. Zum Abnehmen des Zubehörfachs halten Sie es mit beiden Händen fest und ziehen Sie es nach links ab, s. -
Page 10: Unterfaden Einfädeln
UNTERFADEN EINFÄDELN 1. Bringen Sie die Nadel in ihre höchste Stellung, indem Sie das Handrad zu sich hin drehen. 2. Entfernen Sie die Spulenabdeckplatte, indem Sie die Entriegelungstaste nach rechts schie- ben. Die Spulenabdeckung wird dann soweit angehoben, dass Sie sie abnehmen können 3. -
Page 11: Oberfaden Einfädeln
OBERFADEN EINFÄDELN A. Heben Sie den Nähfußheber an. Achten Sie immer darauf, dass vor dem Einfädeln des Oberfadens der Nähfußheber angehoben ist (ohne Anheben des Nähfußhebers kann nicht die richtige Fadenspannung erzielt werden). B. Drehen Sie das Handrad zu sich hin, bis sich die Nadel in ihrer höchsten Stellung befindet und der Fadengeber zu sehen ist. -
Page 12: Automatischer Nadeleinfädler
AUTOMATISCHER NADELEINFÄDLER Bringen Sie die Nadel in ihre höchste Stellung, indem Sie das Handrad zu sich hin drehen. 1. Haken Sie den Faden wie abgebildet in die Fadenführung ein. 2. Halten Sie das Fadenende fest und ziehen Sie den Hebel nach unten. 3. -
Page 13: Unterfaden Heraufholen
UNTERFADEN HERAUFHOLEN 1. Heben Sie den Nähfußheber an. 2. Halten Sie den Oberfaden locker mit der linken Hand festund drehen Sie das Handrad mit der rechten Hand zu sich hin, bis die Nadel abge- senkt wird und danach ihre höchste Stellung erreicht. -
Page 14: Tabelle Für Nadeln, Garne Und Stoffe
TABELLE FÜR NADELN, GARNE UND STOFFE Welche Nadel und welches Garn für Ihr Projekt geeignet sind, hängt ganz von Ihrem gewählten Stoff ab. Die folgende Tabelle bietet eine praktische Orientierungshilfe bei der Auswahl von Nadel und Garn. Ziehen Sie die Tabelle zu Beginn eines Nähprojekts zurate. Achten Sie darauf, das Ober- und Unterfaden in Art und Stärke immer identisch sind. -
Page 15: Oberfadenspannung Anpassen
OBERFADENSPANNUNG ANPASSEN hlten Bei den meisten Nähprojekten kann der Spannungsregler auf „4“ stehen. Unterseite arauf, Nützlicher Tipp: Das Stichbild lässt sich durch leichtes Erhöhen bzw. Reduzieren der Gut ausgeglichen Spannungsregelung vielleicht optimieren. NÄHEN MIT DEM GERADSTICH Oberseite Das optimale Stichbild wird wesentlich von der ausgeglichenen Spannung von Ober- und Unterfaden bestimmt. -
Page 16: Funktionen Des Bedienfelds
FUNKTIONEN DES BEDIENFELDS Anzeige Nadelposition Symbol Zwillingsnadel Anzeige Nähfuß Stichlänge LCD-Display Stichbreite Symbol Buchstabenmodus Stichmusternummer Musterwahltaste Stichlängentaste Stichbreitentaste Taste Buchstaben Mustermodus Taste Zwillingsnadelmodus Mustertabelle Buchstaben-Mustertabelle Buchstaben-Mustermodus Wenn die Taste gedrückt wird, erscheint auf dem LCD-Display ein . Drücken Sie auf oder auf . -
Page 17: Einstelltasten Für Stichlänge Uns Stichbreite / Nadelposition
EINSTELLTASTEN FÜR STICHLÄNGE UNS STICHBREITE / NADELPOSITION Ihre Nähmaschine zeigt Ihre Sticheinstellun- gen mit automatischer/Standard-Stichlänge und -Stichbreite an. Über die manuellen Ein- Anzeige Stan- stelltasten können Sie die Länge, Breite oder dard-Stichbreite Nadelposition eines Geradstiches nach Ihren Wünschen anpassen. Stichlänge Weicht die eingegebene Stichlänge oder -bre- ite von der Standardeinstellung ab, wird Manuelle Einstell-... -
Page 18: Bedientasten
BEDIENTASTEN Über die Bedientasten können Sie verschie- dene grundlegende Nähmaschinenfunktionen einfach betätigen. TASTE „START/STOP“ Ist der Fußanlasser nicht angeschlossen, Taste „Start/Stop“ dann startet die Maschine bei Betätigen der Taste „Start/Stop“ langsam. Wird die Taste Rückwärtsnähtaste erneut betätigt, bewegt sich die Nadel und Taste für die Nadel- hält in ihrer höchsten Stellung an. -
Page 19: Hilfreiche Meldungen
GESCHWINDIGKEITSREGLER Die Nähgeschwindigkeit können Sie über den Geschwindigkeitsregler steuern, indem Sie Langsam Schnell diesen seitlich verschieben. Je nach aus- gewähltem Muster kann die Höchstgeschwin- digkeit variieren – unabhängig davon, welche Geschwindigkeit Sie einstellen. HILFREICHE MELDUNGEN Bei falschen Eingaben oder Befehlen erhalten Sie Meldungen mit hilfreichen Hinweisen. Bei Anzeige einer solchen Meldung können Sie das jeweilige Problem anhand der nach- folgenden Anweisungen beheben. -
Page 20: Praktische Nähtipps
PRAKTISCHE NÄHTIPPS Nachfolgend finden Sie verschiedene Tipps, wie Sie bessere Nähergebnisse erzielen. Beachten Sie diese Tipps beim Nähen. 1. Probenähen Probieren Sie Ihren Stich zunächst mit unterschiedlichen Stichbreiten und -längen aus. So ermitteln Sie die ideale Einstellung für das beste Nähergebnis. Am besten verwenden Sie zum Probenähen einen Stoffrest und ein Garn, die Ihrem gewün- schten Nähprojekt entsprechen. -
Page 21: Erste Nähschritte
ERSTE NÄHSCHRITTE chten NÄHEN MIT DEM GRADSTICH Der Geradstich eignet sich für die meisten Nähtechni- ken und wird daher am häufigsten eingesetzt. Nach- folgend erfahren Sie, wie Sie damit am besten nähen. EINSTELLUNGEN: Nähfuß: Standardnähfuß (J), wün- Fadenspannungsregler: 4 HINWEIS: Je nach Stoffstärke kann eine Feinab- stimmung der Fadenspannung erforderlich sein. - Page 22 REIßVERSCHLÜSSE UND PASPELN EINNÄHEN Verwenden Sie den Reißverschlussfuß, um die rechte und die linke Seite des Reißver- schlusses anzunähen bzw. um bei Paspeln nahe an der Kordel zu nähen. REIßVERSCHLÜSSE EINNÄHEN Zum Annähen der rechten Seite bringen Sie die linke Seite des Reißverschlussfußes so Nadel links Nadel rechts am Nähfußhalter an, dass die Nadel durch die...
- Page 23 ZICKZACK-NÄHTE EINSTELLUNGEN: Nähfuß: Standardnähfuß (J), Unterseite Fadenspannungsregler: 4 Der Oberfaden kann je nach Garn, Stoff, Art und Stich sowie Nähgeschwindigkeit auf der Unter- seite zu sehen sein. Der Unterfaden dagegen sollte niemals an der Stoffoberseite zu sehen Oberseite sein. Falls der Unterfaden noch oben gezogen wird oder der Stoff wellt, reduzieren Sie die Spannung einfach mit dem Fadenspannungsregler.
- Page 24 BLINDSTICH Der Blindstich dient vorrangig zum Säumen von Vorhängen, Hosen, Röcken usw. Normale bis dicke Stoffe EINSTELLUNGEN: Nähfuß: Blindstichfuß (H), Fadenspannungsregler: 4 – Normaler Blindstich für unelastische Stoffe Unterseite Unterseite – Elastischer Blindstich für elastische Stoffe 1. Versäubern Sie zunächst die Schnittkante. Dünnere Stoffelegen Sie dafür zur linken Seite um und normale bis dicke Stoffe Dünner Stoff...
- Page 25 MEHRFACHER ZICKZACKSTICH EINSTELLUNGEN: Nähfuß: Standardnähfuß (J), Fadenspannungsregler: 4 Hierbei handelt es sich um einen stabilen Stich mit gleich drei kurzen Einstichen, wo ein normal- er Zickzackstich nur einen macht. Aus diesem Grund eignet er sich besonders zum Versäubern aller Arten von Stoff. Er eignet sich auch ideal zum Nähen von Riegeln, zum Ausbessern von Rissen, zum Flicken, für Patchwork-Arbeiten und zum Annähen flacher Gummibänder.
-
Page 26: Zier- Und Stretchstiche
ZIER- UND STRETCHSTICHE INSTELLUNGEN: Nähfuß: Standardnähfuß (J) oder Satinstichfuß (Z) Fadenspannungsregler: 4 Stretchstiche kommen hauptsächlich bei Strickst- offen und dehnbaren Stoffen zum Einsatz, eignen sich grundsätzlich aber auch zum Nähen unelas- tischer Materialien. VERSTÄRKTER GERADSTICH Der verstärkte Geradstich ist wesentlich stabil- er als ein normaler Geradstich, da er den Stoff dreimal sichert: vorwärts, rückwärts und wied- er vorwärts. - Page 27 VERSTÄRKTER ZICKZACKSTICH Der verstärkte Zickzackstich wird hauptsäch- lich zum dekorativen Absteppen verwendet. Halsausschnitte, Bündchen, Ärmel und Säume lassen sich damit ideal nähen. Wird die Stichb- reite sehr schmal eingestellt, dann lassen sich mit dem Stich auch extrem strapazierfähige Nähte erzielen. DOPPELTER OVERLOCKSTICH Der doppelte Overlockstich wird hauptsächlich für drei Zwecke eingesetzt: Er ist der perfekte...
- Page 28 LEITERSTICH Der Leiterstich wird hauptsächlich für Hohlsau- marbeiten verwendet. Er dient aber auch zum Auf- steppen von schmalen Bändern, auch in Kontrast- farben. Durch gezieltes Platzieren des Stiches in der Mitte erzielen Sie dekorative Effekte. Der Leiterstich eignet sich auch für Reliefstickereien mit Bändern, Einlaufgarnen und Gummibän- dern.
- Page 29 STRETCHOVERLOCKSTICH Ein praktischer Stich zum Zusammennähen und Versäubern in einem Schritt. Erzeugt eine schmale, elastische Naht. Eignet sich insbe- son-dere für Schwimm- und Sportkleidung, T-Shirts, dehnbares Nylon, Jersey und Baum- wolljersey. HEXENSTICH Zum Nähen und Versäubern von elastischen Stoffen sowie zur Verzierung. GRIECHISCHER STICH Traditionelles Stichmuster für dekorative Um- randungen und Kantenabschlüsse.
- Page 30 EINFACHER GRÄTENSTICH Dieser vielseitige Stich lässt sich zum Zusam- mennähen von Stoffen ebenso verwenden wie für dekorative Zwecke. GERADER FEDERSTICH Ein schöner Stich für dekorative Verzierungen. CHEVRON-STICH Ein schöner Stich für dekorative Verzierungen. 30 –DE...
-
Page 31: Weitere Zierstiche
WEITERE ZIERSTICHE INSTELLUNGEN: Nähfuß: Standardnähfuß (J), oder Satinstichfuß (Z) Fadenspannungs- regler: 4 oder 3 Die folgenden Beispiele verdeutlichen, wie diese Stiche eingesetzt und genäht werden. Andere Zierstiche können Sie auf dieselbe Art verwenden. Vor dem Nähen sollten Sie den jeweiligen Stich auf einem Stoffrest ausprobie- ren, um das Ziermuster bei Bedarf nach Ihren Wünschen anzupassen. -
Page 32: Nähen Von Knopflöchern
NÄHEN VON KNOPFLÖCHERN AUTOMATISCHES KNOPFLOCH Stopper B Stopper A KNOPFLOCHFUẞ VERWENDEN Ihre Maschine bietet eine Vielzahl an Knop- flöchern. Das System misst die Größe des Knopfes und ermittelt so die erforderliche Größe des Knopflochs – alles in einem ein- fachen Schritt. VORGEHENSWEISE •... - Page 33 • Der Nähvorgang erfolgt automatisch gemäß den folgenden Schritten. Ausrichtungsposition Knopflochfuß Stoff- markierung 9. Schneiden Sie den Stoff nach dem Nähvorgang vorsichtig in der Mitte des Knopflochs mit einem Nahttren- ner auf. Achten Sie dabei darauf, dass Sie keine Stiche durchtrennen. KNOPFLÖCHER MIT BEILAUFGARN Nocken Legen Sie das Beilaufgarn (wie Häkel-...
- Page 34 STOPFSTICH 1. Wählen Sie das Muster für den Stopfstich aus. 2. Öffnen Sie den Knopfhalter ca. 2 cm. 3. Nehmen Sie den Nähfuß ab und setzen Sie stattdessen den Knopflochfuß ein (siehe „Nähfuß wechseln“). 4. Senken Sie den Knopflochhebel (C) so ab, dass er sich senkrecht zwischen Stopper (A) und Stopper (B) einpasst.
-
Page 35: Zwillingsnadel
ZWILLINGSNADEL WICHTIG: Stellen Sie die Stichbreite beiVerwendung einer Zwillingsnadel auf 3,5 oder darunter ein, da die Na- del sonst brechen kann. Eine Zwillingsnadel erzeugt zwei Rei- hen mit parallelen Stichen für Biesen, Doppelziernähte und andere dekorative Verzierungen. 1. Setzen Sie den zusätzlichen Garnrollenstift ein. -
Page 36: Pflege Der Maschine
PFLEGE DER MASCHINE TRANSPORTEUR UND GREI- FERBEREICH REINIGEN Ziehen Sie immer den Netzs- ACHTUNG tecker aus der Steckdose, wenn die Maschine von der Stromzu- fuhr getrennt werden soll. Den optimalen Betrieb Ihrer Maschine stellen Sie sicher, indem Sie die wichtigsten Teile immer sauber halten. -
Page 37: Checkliste
CHECKLISTE ALLGEMEINE STÖRUNGEN Die Maschine läuft nicht. Der Netzschalter ist ausgeschaltet. – Schalten Sie den Schalter ein. • Der Knopflochhebel ist beim Nähen von Stichmustern nicht angehoben. – Heben Sie den • Knopflochhebel an. Der Knopflochhebel ist beim Nähen eines Knopflochs nicht abgesenkt. – Senken Sie den •... -
Page 38: Probleme Mit Dem Garn
PROBLEME MIT DEM GARN Das Garn bildet Knäuel. • Ober- und Unterfaden wurden vor Nähbeginn nicht nach hinten unter den Nähfuß gezogen. – Ziehen Sie beide Fadenende von ca. 15 cm unter dem Nähfuß nach hinten und halten Sie sie fest, bis ein paar Stiche genäht wurden. Der Oberfaden reißt. -
Page 39: Garantie Und Service
Service- Niederlassung vorgenommen wurden, erlischt die Garantie. Ihre gesetzlichen Rechte werden durch diese Garantie nicht eingeschränkt. Diese Garantie gilt nur gegenüber dem Erstkäufer und ist nicht übertragbar. SERVICE Singer Service Center Breitefeld 15, D-64839 Münster bei Dieburg Telefon: 00800-74643700 E-Mail: singer-service-de@teknihall.de Internet: www.singerdeutschland.de... - Page 40 I...
- Page 41 C620L MACHINE À COUDRE Instructions d‘utilisation et consignes de sécurité IAN398054...
- Page 42 Cette machine à coudre à usage domestique est conçue pour répondre aux normes IEC/EN/CSA C22.2 No. 60335-1 et 60335-2-28 ou UL1594. IMPORTANTE S CONSIGNES DE SÉCURITÉ Lors de l’utilisation d’un appareil électrique, les précautions de sécurité essentielles doivent toujours être respectées, y compris les suivantes : Lisez attentivement toutes les instructions avant d’utiliser cette machine à...
- Page 43 • Éteignez la machine (position « 0 ») lors des réglages au niveau de l’aiguille, par exemple : enfilage de l’aiguille, changement d’aiguille, bobinage de la canette, changement de pied-de-biche, etc. • Ne faites jamais tomber ou ne glissez aucun objet dans les ouvertures. •...
-
Page 44: Caractéristiques Techniques
UTILISATION PRÉVUE L’utilisation optimale et l’entretien sont décrits dans ces consignes. Ce produit n’est pas destiné à une utilisation industrielle. Une aide supplémentaire, par région, peut être trouvée sur le site web www.singer.com. ENTRETIEN DES PRODUITS ÉQUIPÉS D’UNE DOUBLE ISOLATION Une machine à... - Page 45 AJUSTER L’ESPACEMENT Table of Contents ENTRE LES LETTRES Caractéristiques techniques BOUTONS DE COMMANDE DÉCOUVERTE DE VOTRE MACHINE À CONTRÔLE DE LA VITESSE DE COUDRE COUTURE IDENTIFICATION DE LA MACHINE CONSEILS DE COUTURE UTILES ACCESSOIRES COUTURE DE POINT DROIT CONFIGURATION DE VOTRE MACHINE COUDRE BIEN DROIT BROCHES PORTE-BOBINE...
-
Page 46: Découverte De Votre Machine Àcoudre
DÉCOUVERTE DE VOTRE MACHINE À COUDRE IDENTIFICATION DE LA MACHINE 1. Guide-fil 2. Disque de tension de bobinage de canette 3. Releveur de fil 4. Contrôle de tension du fil 5. Couvercle frontal 6. Coupe-fil 7. Levier de boutonnière 8. Compartiment de rangement amovible 9. -
Page 47: Accessoires
Le pied fantaisie (Z) * Important ! Votre machine utilise des est un autre pied très utile et devrait être utilisé canettes SINGER® Classe 15J. Utilisez pour la plupart des coutures décoratives. uniquement ce style de canette dans votre machine. -
Page 48: Broches Porte-Bobine
BROCHES PORTE-BOBINE BROCHE PORTE-BOBINE HORIZONTALE pour bobine de fil normale Placez la bobine de fil sur la broche et fixez-la Bobine à l’aide d’un support de broche porte-bobine pour assurer un débit fluide du fil. Si la bobine de fil possède une fente de retenue de fil, elle doit être placée à... -
Page 49: Conversion À La Coutureà Bras Libre
CONVERSION À LA COUTURE À BRAS LIBRE Votre machine peut être utilisée soit comme modèle à rallonge plate, soit comme modèle à bras libre. Avec le compartiment de rangement amovible en position, il fournit une grande surface de travail comme un modèle standard à rallonge plate. -
Page 50: Enfiler Le Fil De Canette
ENFILER LE FIL DE CANETTE 1. Amenez l’aiguille à sa position la plus haute en faisant pivoter le volant vers vous. 2. Retirez la plaque de couvercle de canette en poussant le bouton de déverrouillage vers la droite. Le couvercle de canette sera suffisamment soulevé pour vous permettre de retirer le couvercle. -
Page 51: Enfilage Du Fil Supérieur
ENFILAGE DU FIL SUPÉRIEUR A. Élevez le releveur de pied-de-biche. Assu- rez-vous de toujours soulever le pied-de-biche avant d’enfiler le fil supérieur. (Si le releveur de pied-de-biche n’est pas soulevé, la tension correcte de fil ne peut pas être obtenue.) B. -
Page 52: Utilisation De L'enfile-Aiguille Automatique
UTILISATION DE L’ENFILE-AIGUILLE AUTOMATIQUE Amenez l’aiguille à sa position la plus haute en faisant pivoter le volant vers vous. 1. Accrochez le fil autour du guide-fil, comme illustré. 2. Tirez le levier vers le bas tout en tenant l’extrémité du fil. 3. -
Page 53: Récupérer Le Fil De La Canette
RÉCUPÉRER LE FIL DE LA CANETTE 1. Élevez le releveur de pied-de-biche. 2. Tenez le fil de l’aiguille sans serrer avec votre main gauche, tournez le volant vers vous avec votre main droite d’abord en abaissant l’aiguille et en continuant jusqu’à ce que l’aiguille arrive dans sa position la plus élevée. -
Page 54: Tableau D'aiguilles, De Fils Et De Tissus
TABLEAU D’AIGUILLES, DE FILS ET DE TISSUS Votre tissu déterminera quelle aiguille et quel fil choisir. Le tableau suivant est un guide pra- tique de sélection des aiguilles et des fils. Faites-y toujours référence avant un nouveau projet de couture. Et assurez-vous d’utiliser la même taille et le même type de fil dans la canette que dans l’alimentation en fil supérieure. -
Page 55: Ajuster La Tension Du Fil Supérieur
AJUSTER LA TENSION DU FIL SUPÉRIEUR La plupart de votre couture sera effectuée avec le contrôle de tension fixé sur le chiffre Dessous « 4 ». Bien équilibré Astuce utile : Un léger ajustement à un nombre plus élevé ou à un nombre moins élevé peut améliorer l’apparence de la couture. -
Page 56: Funktionen Des Bedienfelds
FUNKTIONEN DES BEDIENFELDS Indicateur de position Indicateur du mode de l’aiguille aiguille double Indicateur de pied-de- -biche Longueur de point Écran LCD Largeur de point Numéro de dessin Indicateur du mode de point de point de lettre Bouton de sélection Bouton d’ajustement de de dessin la longueur de point... -
Page 57: Boutons De Réglage De Longueur De Point Et De Largeur De Point/Position De L'aiguille
BOUTONS DE RÉGLAGE DE LONGUEUR DE POINT ET DE LARGEUR DE POINT/POSITION DE L’AIGUILLE Indicateur de Votre machine à coudre affichera vos réglag- longueur de point es de point, une longueur et une largeur de point automatiques/par défaut. Vous pouvez modifier manuellement la longueur, la largeur Longueur de point... -
Page 58: Boutons De Commande
BOUTONS DE COMMANDE Les boutons de commande vous aident à effectuer facilement diverses opérations de base de la machine à coudre. BOUTON MARCHE/ARRÊT Lorsque vous cousez sans avoir branché la pédale de commande, la machine démarre Bouton marche/arrêt lentement lorsque vous appuyez sur le bouton marche/arrêt. -
Page 59: Contrôle De La Vitesse De Couture
CONTRÔLE DE LA VITESSE DE Lent Rapide COUTURE La vitesse de couture est réglée à l’aide du contrôle de la vitesse de couture. Le contrôle de la vitesse de couture est déplacé horizon- talement pour déterminer la vitesse requise. Quel que soit le réglage, la vitesse maximale peut être limitée en fonction du dessin sélec- tionné. -
Page 60: Conseils De Couture Utiles
CONSEILS DE COUTURE UTILES Diverses façons d’obtenir de meilleurs résultats de couture sont décrites ci-dessous. Repor- tez-vous à ces conseils lors de la couture. 1. Couture d’essai Utilisez différentes largeurs et longueurs de point pour la couture d’essai. Lorsque vous avez terminé, sélectionnez la meilleure largeur de point et la longueur pour la couture correcte. -
Page 61: Couture De Point Droit
COUTURE DE POINT DROIT Le point droit est le plus fréquemment utilisé pour tous les types de couture. Apprenons comment coudre en suivant les étapest ci-dessous. 1. RÉGLAGES : Pied-de-biche – Pied multi-usage (J) Trådspændingsregulator: 4 REMARQUE : En fonction de l’épaisseur du tissu, un léger «... -
Page 62: Insertion De Fermetures Àglissière Et De Passepoil
INSERTION DE FERMETURES À GLISSIÈRE ET DE PASSEPOIL Utilisez le pied pour fermeture à glissière pour coudre à droite ou à gauche de la fermeture à glissière ou près du cordon. INSERTION DE FERMETURES À GLISSIÈRE Pour coudre le long du côté droit, attachez le Aiguille à... -
Page 63: Points Zigzag
POINTS ZIGZAG RÉGLAGES : Pied-de-biche – Pied multi-usage (J) Dessous Contrôle de tension du fil – 4 Le fil supérieur peut apparaître en bas en fonction du fil, du tissu, du type de point et de la vitesse de couture, mais le fil de canette ne Dessus doit jamais apparaître sur le dessus du tissu. -
Page 64: Point D'ourlet Invisible
POINT D’OURLET INVISIBLE Le point d’ourlet invisible est principalement utilisé pour les ourlets de rideaux, de pan- Tissu d’épaisseur moyenne à talons, de jupes, etc. Réglages: épaisse Pied-de-biche – Pied pour ourlet invisible (H) Contrôle de tension du fil : 4 –Point invisible régulier pour tissus tissés Dessus Dessous... -
Page 65: Zigzag Multi-Point
ZIGZAG MULTI-POINT RÉGLAGES : Pied-de-biche – Pied multi-usage (J) Contrôle de tension du fil – 4 Il s’agit d’un point résistant, car comme son nom l’indique, il forme trois points courts tandis que le zigzag normal n’en forme qu’un. Pour cette raison, il est fortement recommandé de surfiler tous les types de tissus. - Page 66 POINTS DÉCORATIFS ET EXTENSIBLES RÉGLAGES : Pied-de-biche – Pied multi-usage (J) ou Pied pour point fantaisie (Z) Contrôle de tension du fil – 4 Les points extensibles sont principalement destinés au tricot ou aux tissus extensibles, mais peuvent également être utilisés sur des matériaux tissés. POINT DROIT EXTENSIBLE Le point droit extensible est beaucoup plus solide qu’un point droit ordinaire, car il se...
- Page 67 POINT ZIGZAG RENFORCÉ Le point zigzag renforcé est principalement utilisé pour la surpiqûre décorative. Il est idéal pour border les encolures, les échancrures de manches, les manches et les ourlets. Lorsqu’il est ajusté manuellement à une largeur très étroite, il peut également être utilisé pour cou- dre des coutures à...
- Page 68 POINT ÉCHELLE Le point échelle est principalement utilisé pour les jours de tirage de fil. Il peut égale- ment être utilisé pour coudre sur du ruban fin dans une couleur contrastante ou de la même couleur. Placez le point au centre et un effet de décoration spécial sera obtenu.
- Page 69 POINT DE SURJET INCLINÉ Coutures et surfilages en une seule opération pour obtenir une couture étroite et souple, particulièrement adaptée aux maillots de bain, aux vêtements de sport, aux T-shirts, au nylon extensible, au jersey et au jersey de coton. POINT CROISÉ...
-
Page 70: Point Épine
POINT ÉPINE Il s’agit d’un point polyvalent utilisé pour join- dre des pièces de tissu et comme un embel- lissement décoratif. POINT PLUME DROITE Utilisé pour créer des embellissements déco- ratifs. POINT CHEVRON Utilisé pour créer des embellissements déco- ratifs. 30 –FR... -
Page 71: Points Plus Décoratifs
POINTS PLUS DÉCORATIFS RÉGLAGES : Pied-de-biche – Pied multi-usage (J) ou Pied pour point fantaisie (Z) Contrôle de tension du fil - 4 ou 3 Voici des exemples de la façon d’utiliser et de coudre ces points. Vous pouvez utiliser d’au- tres points décoratifs de la même manière. -
Page 72: Couture D'une Boutonnière
COUTURE D’UNE BOUTONNIÈRE BOUTONNIÈRE AUTOMATIQUE Onglet B Onglet A UTILISATION DU PIED POUR BOUTONNIÈRE Votre machine vous offre une variété de styles de boutonnière, cousus par un système qui mesure la taille du bouton et calcule la taille de la boutonnière requise. Tout cela se fait en une seule étape facile. - Page 73 La couture sera effectuée automatiquement dans l’ordre suivant. • Position d’alignement du pied pour boutonnière Marque sur le tissu 9. Lorsque la couture est terminée, utilisez un ouvreur de boutonnière/ découvit pour ouvrir le tissu au centre de la boutonnière. Veillez à ne pas couper les coutures.
- Page 74 POINT DE REPRISAGE RACCOMMODAGE 1. Sélectionnez le patron de point de reprisage. 2. Tirez sur le support du bouton ouvert d’environ 2 cm. Pied pour boutonnière 3. Remettez en place le pied-de-biche avec le pied pour boutonnière. 4. Abaissez le levier de boutonnière (C) de sorte qu’il s’abaisse verticalement entre les bu- tées (A) et (B).
-
Page 75: Position D'aiguille De Point Droit
AIGUILLE DOUBLE IMPORTANT : Lorsque vous utilisez une aiguille double, réglez la largeur du point à 3,5 ou moins, autrement l’aiguille pou- rrait se casser. Une aiguille double produit deux rangées de points parallèles pour les nervures, les doubles surpiqûres et la couture décorative. -
Page 76: Entretien De Votre Machine
ENTRETIEN DE VOTRE MACHINE NETTOYAGE DES GRIFFES D’EN- TRAÎNEMENT ET DE LA ZONE DE NAVETTE Débranchez toujours la machine de l’alimentation en retirant la fiche de la prise murale. Pour assurer le meilleur fonctionnement possible de votre machine, il est nécessaire de garder les pièces essentielles propres en tout temps. -
Page 77: Liste De Vérification Des Performances
LISTE DE VÉRIFICATION DES PERFORMANCES PROBLÈMES GÉNÉRAUX La machine ne coud pas. • Le commutateur d’alimentation est éteint. - Allumez l’interrupteur. • Le levier de boutonnière n’est pas soulevé lors de la couture de dessins de point. • Soulevez le levier de boutonnière. •... -
Page 78: Problèmes D'enfilage
PROBLÈMES D’ENFILAGE Le fil s’accumule. Les fils supérieur et de canette ne sont pas tirés vers l’arrière sous le pied-de-biche avant • decommencer la couture. - Tirez les deux fils vers l’arrière sous le pied-de-biche à environ 10 cm (6 pouces) et tenez-les jusqu’à... - Page 79 SERVICE APRÈS-VENTE Teknihall benelux p/a Brusselstraat 33, 2321 Meer, BE 00800-74643700 E-mail : singer-service-be@teknihall.com IAN 398054 Veuillez conserver le ticket de caisse et la référence de l’article (par ex. IAN 12345) à titre de preuves d’achat pour toute demande. DÉCLARATION DE CONFORMITÉ...
- Page 80 I...
- Page 81 C620L SEWING MACHINE Operation and Safety Notes IAN398054...
- Page 82 This household sewing machine is designed to comply with IEC/EN/CSA C22.2 No.60335-1 & 60335-2-28 and UL1594 IMPORTANT SAFETY INSTRUCTIONS When using an electrical appliance, basic safety precautions should always be followed, including the following: Read all instructions before using this household sewing machine.
- Page 83 • Do not operate where aerosol (spray) products are being used or where oxygen is being administrated. • To disconnect, turn all controls to the off ("O") position, then remove plug from outlet. • Do not unplug by pulling on cord. To unplug, grasp the plug, not the cord. •...
- Page 84 LATION’ or ‘DOUBLE INSULATED’. INTENDED USE Optimal use and maintenance are described in these instructions. This product is not intended for industrial use. Additional assistance, by region, may be found on the web at www.singer.com. Technical Data Nominal voltage 230 V ~...
- Page 85 OPERATION BUTTONS Table of Contents KNOWING YOUR SEWING MACHINE 6 SEWING SPEED CONTROL MACHINE IDENTIFICATION USEFUL SEWING TIPS ACCESSORIES STRAIGHT STITCHING SETTING UP YOUR MACHINE HAND-LOOK QUILTING STITCH SPOOL PINS ZIGZAG STITCHING PRESSER FOOT LIFTER BLIND HEM STITCH FEED TEETH CONTROL MULTI-STITCH ZIGZAG PICOT HEM STITCH SEWING...
-
Page 86: Knowing Your Sewing Machine
KNOWING YOUR SEWING MACHINE MACHINE IDENTIFICATION 1. Thread guide 2. Bobbin winding tension disk 3. Thread take-up lever 4. Thread tension control 5. Face cover 6. Thread cutter 7. Buttonhole lever 8. Removable storage compartment 9. Bobbin winding spindle 10. Bobbin winder stopper 11. -
Page 87: Accessories
The Satin Foot (Z) is another very useful foot and * Important! Your machine uses should be used for most decorative sewing. SINGER® Class 15J bobbins. Use only this style of bobbin in your machine. SETTING UP YOUR MACHINE Be sure to wipe off any surplus oil from needle Set power/light switch at “OFF”... -
Page 88: Spool Pins
SPOOL PINS HORIZONTAL SPOOL PIN for nor- mal thread spool Spool Place thread spool on the pin and secure with a spool cap to ensure smooth flow of thread. If the thread spool has a thread re- Auxiliary spool taining slit, it should be placed to the right. AUXILIARY SPOOL PIN for large thread spool Thread retaining slot... -
Page 89: Sewing
CONVERTING TO FREE-ARM SEWING Your machine can be used either as a flat-bed or as a free-arm model. With the removable storage compartment in position, it provides a large working surface as a standard flat-bed model. To take off the removable storage compartment, hold it firmly with both hands and pull it off to the left as shown. -
Page 90: Threading The Bobbin Thread
THREADING THE BOBBIN THREAD 1. Raise the needle to its highest position by rotating the hand wheel toward you. 2. Remove the bobbin cover plate by pushing the release button to the right. Bobbin cover will pop up sufficiently to allow you to remove the cover. 3. -
Page 91: Threading The Top Thread
THREADING THE TOP THREAD A. Raise the presser foot lifter. Always be sure to raise the presser foot lifter before thread- ing the top thread. (If the presser foot lifter is not raised, correct thread tension cannot be obtained.) B. Turn the hand wheel toward you until the needle is in its highest position and the thread take-up is visible. -
Page 92: Using Automatic Needle Threader
USING AUTOMATIC NEEDLE THREADER Raise the needle to its highest position by rotating the hand wheel towards you. 1. Hook thread around thread guide, as illustrated. 2. Pull down lever while holding the end of thread. 3. Rotate the lever to the rear of the machine until the hook pin come though the eye of the needle. -
Page 93: Drawing Up Bobbin Thread
DRAWING UP BOBBIN THREAD 1. Raise the presser foot lifter. 2. Holding needle thread loosely with your left hand, turn hand wheel toward you with your right hand first lowering the needle and continuing until the needle comes to its highest position. NOTE: A quick way to pick up the bobbin thread is, with straight stitch selected, touch and relea- se the reverse button. -
Page 94: Needle, Thread And Fabric Chart
NEEDLE, THREAD AND FABRIC CHART Your fabric will determine the choice of needle and thread. The following table is a practical guide to needle and thread selection. Always refer to it before a new sewing project. And be sure to use the same size and type of thread in the bobbin as in the top thread supply. FABRICS THREAD NEEDLES... -
Page 95: Adjusting Top Thread Tension
ADJUSTING TOP THREAD TENSION Under side Most of your sewing will be done with the tension control set at “4”. Well balanced Helpful Hint: A slight adjustment to a higher number or a lower number may improve sewing appearance. Top side STRAIGHT STITCHING The correct appearance of your stitching is largely determined by the balanced tension of... -
Page 96: Functions Of Control Panel
FUNCTIONS OF CONTROL PANEL Needle position indicator Twin needle mode indication Presser foot indicator Stitch length LCD display Stitch width Stitch pattern number Letter stitch mode indicator Pattern selection button Stitch length adjustment button Stitch width adjustment Letter pattern mode button button Twin needle mode button Pattern number reference guide... -
Page 97: Stitch Length And Stitch Width / Needle Position Adjustment Buttons
STITCH LENGTH AND STITCH WIDTH / NEEDLE POSITION ADJUSTMENT BUTTONS Your sewing machine will display your stitch Default stitch length settings an Auto/Default stitch Length and indicator Width. You can manually change the length, width or needle position for straight stitch according to Stitch length your preference pushing manual adjustment Manual adjustment... -
Page 98: Operation Buttons
OPERATION BUTTONS The operation buttons help you to easily perform various basic sewing machine oper- ations. START/STOP BUTTON When sewing without having the foot control connected, the machine starts slowly when Start/Stop Button the start/stop button is pushed. When it is pushed again, needle moves and stops at its Reverse stitch button highest position. -
Page 99: Sewing Speed Control
SEWING SPEED CONTROL Slow Sewing speed is set by using the sewing Fast speed control. The sewing speed control is moved horizontally to determine the amount of speed required. Regardless of the setting, maximum speed may be limited depending on which pattern has been selected. -
Page 100: Useful Sewing Tips
USEFUL SEWING TIPS Various ways to achieve better sewing results are described below. Refer to these tips when sewing. 1. Trial sewing Use different stitch width and length for trial sewing. When you have finished, select the best looking stitch width and length for correct sewing. For the trial sewing, use a piece of fabric and thread that are the same as those used for your project, and check the thread tension and stitch length and width. -
Page 101: Straight Stitching
STRAIGHT STITCHING Straight stitch is most frequently used for every aspect of sewing. Lets learn how to sew following the steps below. 1. 1. SETTINGS: Presser foot - All Purpose Foot (J) Thread tension control - 4 NOTE: Based upon the weight of the fabric, sli- ght “fine tuning”... -
Page 102: Hand-Look Quilting Stitch
INSERTING ZIPPERS AND PIPING Use zipper foot to sew to the right or left of the zipper or close to the cord. INSERTING ZIPPERS To sew down the right side, attach left side of zipper foot to presser foot holder so that the needle passes through the opening on the left side of the foot. -
Page 103: Zigzag Stitching
ZIGZAG STITCHING SETTINGS: Presser foot – All Purpose Foot (J) : Thread tension control – 4 Under side The top thread may appear on the bottom depending on the thread, fabric, type of stitch and sewing speed, but the bobbin thread must never appear on the top of the fabric. -
Page 104: Blind Hem Stitch
BLIND HEM STITCH The blind hem stitch is primarily used for hem- ming curtains, trousers, skirts, etc. Medium to heavyweight fabric Settings: Presser foot - Blind Hem Foot (H) –Thread Tension Control: 4 – Regular blind stitch for woven fabrics –Elastic blind stitch for stretch fabrics Under side Under side... -
Page 105: Multi-Stitch Zigzag
MULTI-STITCH ZIGZAG ISETTINGS: Presser foot - All Purpose Foot (J) Thread tension control – 4 This is a strong stitch because as its name implies, it makes three short stitches where the normal zig-zag makes only one. For this reason it is highly recommended for overcasting all types of fabrics. - Page 106 DECORATIVE AND STRETCH STITCHES SETTINGS: Presser foot - All Purpose Foot (J) or Satin Stitch Foot (Z) Thread tension control – 4 Stretch stitches are mainly for use on knit, or stretchable fabrics, but can also be used on woven materials. STRAIGHT STRETCH STITCH Straight stretch stitch is far stronger than an ordinary straight stitch because it locks three...
- Page 107 REINFORCED ZIGZAG STITCH The reinforced zigzag stitch, is primarily used for a decorative topstitch. It is ideal for edging neck-bands, armholes, sleeves and hems. When manually adjusted to a very narrow width, it also can be used for sewing high stress seams.
- Page 108 LADDER STITCH The Ladder stitch is primarily used for drawn thread hemstitching. It can also be used for sewing over thin tape in a contrasting or same color. Place the stitch in the center and a spe- cial effect will be obtained for decoration. Another use for the ladder stitch is couching over narrow ribbon, yarn or elastic.
- Page 109 SLANT OVEREDGE STITCH Seams and overcasts in one operation to produce a narrow, supple seam, particular- ly suited to swimwear, sportswear, T-shirts, stretch nylon, jersey and cotton jersey. CROSSED STITCH Use to sew and finish elastic fabrics or for decorative work. GREEK KEY STITCH A traditional pattern suited for decorative bor- ders and edge finishing.
- Page 110 THORN STITCH It is a versatile stitch used for joining fabric pieces and as a decorative embellishment. STRAIGHT FEATHER STITCH Use to create decorative embellishments. CHEVRON STITCH Use to create decorative embellishments. 30 –EN...
- Page 111 MORE DECORATIVE STITCHES SETTINGS: Presser foot - All Purpose Foot (J) or Satin Stitch Foot (Z) Thread tension control - 4 or 3 Following are examples of how to use and sew these stitches. You can use some other decorative stitches in the same way. You should carry out a test sewing on an extra piece of the fabric to check the decorative pattern and make any adjustments desired.
-
Page 112: Automatic Buttonhole
AUTOMATIC BUTTONHOLE Tab A Tab B USING BUTTONHOLE FOOT Your machine offers you a variety of button- hole styles, sewn by a system that measures the size of the button and calculates the size of buttonhole required. All of this is done in one easy step. - Page 113 • Sewing will be completed automatically in the following order. Buttonhole foot alignment position Fabric marking 9. When sewing is finished, use a but- tonhole opener/seam ripper to open up the fabric in the center of the buttonhole. Be careful not to cut any of the stitching. CORDED BUTTONHOLES Spur Hook filler cord (such as crochet thread...
- Page 114 DARNING STITCH 1. Select the darning stitch pattern. 2. Pull the button holder open about 2cm. Buttonhole foot 3. Replace the presser foot with the buttonhole foot. (Refer to “Changing presser foot” on page 11.) 4. Lower the buttonhole lever (C) so that it drops down vertically between the stoppers (A) and (B) 34 –EN...
-
Page 115: Twin Needle
TWIN NEEDLE IMPORTANT: When using a twin-needles, set stitch width at 3.5 or less, or otherwise needle may be broken. A twin-needle produces two rows of parallel stitches for pin tucks, double topstitching and decorative sewing. 1. Insert the auxiliary spool pin. Place a spool on each spool pin. -
Page 116: Cleaning The Feed Teeth And Shuttle Area
CLEANING THE FEED TEETH AND SHUTTLE AREA Always disconnect the ma- chine from power supply by removing the plug from the CAUTION wall-outlet. To ensure the best possible operation of your machine, it is necessary to keep the essential parts clean at all times. 1. -
Page 117: Performance Checklist
PERFORMANCE CHECKLIST GENERAL PROBLEMS Machine does not sew. Power switch is turned off. - Turn on the switch. • • Buttonhole lever is not raised when sewing stitch patterns. - Raise the buttonhole lever. • Buttonhole lever is not lowered when sewing buttonhole. - Lower the buttonhole lever. •... -
Page 118: Thread Problems
THREAD PROBLEMS Thread bunches. • Top and bobbin threads are not drawn back under presser foot before starting seam. - Draw both threads back under presser foot about 6 inches (10 cm) and hold until a few stitches are formed. Needle thread breaks. -
Page 119: Guarantee And Service
Bogod & Company Ltd. Fortran Road, St Mellons, CF3 0WJ Cardiff, GB 0044-29-20774910 IAN 398054 Please have your receipt and the article number (e.g. IAN 12345) ready as your proof of purchase when enquiring about your product. Declaration of Conformity This appliance complies with the requirements of the relevant European and national guidelines. - Page 121 C620L MACCHINA DA CUCIRE Indicazioni per l’uso e per la sicurezza IAN398054...
- Page 122 Questa macchina per cucire è stata realizzata in conformità a IEC/EN 60335-1, 60335- 2-28 o UL1594 ISTRUZIONI IMPORTANTI PER LA SICUREZZA Durante l'uso dell'apparecchiatura, seguire sempre le precauzioni di sicurezza, ivi compreso quanto segue: Leggere attentamente le istruzioni prima di utilizzare questa macchina per cucire per uso domestico.
- Page 123 • Non utilizzare la macchina in ambienti in cui si stia facendo uso di sostanze spray o si stia somministrando ossigeno. • Per scollegare l’apparecchiatura, disattivare tutti i comandi (posizione "O") e staccare la spina dalla presa elettrica. • Non scollegare dalla presa di rete tirando il cavo. Per scollegare la spina, afferrare la stessa e non il cavo.
- Page 124 ASSISTENZA DEI PRODOTTI CON DOPPIO ISOLAMENTO I prodotti con doppio isolamento sono dotati di due sistemi di isolamento invece della messa a terra. Un prodotto a doppio isolamento è privo di messa a terra ed è vietato aggiungerne una. L'assistenza a un prodotto con doppio isolamento richiede un'estrema attenzione e la conoscenza del sistema e deve essere eseguito solamente dal personale di assistenza qualificato.
- Page 125 Dati tecnici ..........4 Tasti di funzionamento ......18 Messaggi utili ........19 INFORMAZIONI SULLA MACCHINA PER CUCIRE ..6 Suggerimenti utili per la cucitura ..20 Identificazione della macchina....6 Accessori ..........7 INIZIARE A CUCIRE ....21 Configurazione della macchina .....7 Punti decorativi ed elastici ....26 Porta-spole ..........8 Altri punti decorativi ......31 Alza-piedino ...........8...
-
Page 126: Informazioni Sulla Macchina Per Cucire
INFORMAZIONI SULLA MACCHINA PER CUCIRE IDENTIFICAZIONE DELLA MACCHINA 1. Guidafilo 2. Disco tendifilo carica bobina 3. Leva tendifilo 4. Comando della tensione del filo 5. Coperchio frontale 6. Taglia-filo 7. Leva asola 8. Vano accessori rimovibile 9. Alberino carica bobina 10. -
Page 127: Accessori
Il piedino per * Importante! La macchina utilizza cordoncino è un altro piedino molto utile e bobine SINGER® Classe 15J. Utilizzare deve essere utilizzato per la maggior parte del esclusivamente questo tipo di bobine cucito decorativo. -
Page 128: Porta-Spole
PORTA-SPOLE PORTA-SPOLA ORIZZONTALE per spola di filo normale Posizionare la spola di filo sul porta-spola e fissarla con un ferma-spola per assicu- Spola rare un flusso regolare del filo. Se la spola è provvista di un intaglio ferma-filo, questo deve essere posizionato a destra. Porta-spola ausiliario PORTA-SPOLA AUSILIARIO per... -
Page 129: Trasformazione Della Macchina Nella Versione A Braccio Libero
TRASFORMAZIONE DELLA MACCHINA NELLA VERSIONE A BRACCIO LIBERO La macchina può essere utilizzata sia con piano di lavoro montato che in versione a braccio libero. Con il vano accessori rimovibile montato, offre un’ampia superficie di lavoro nella versione standard con piano di lavoro. Per togliere il vano accessori rimovibile, afferrarlo saldamente con entrambe le mani e tirarlo verso sinistra come mostrato. -
Page 130: Infilatura Del Filo Della Bobina
INFILATURA DEL FILO DELLA BOBINA 1. Sollevare l’ago alla posizione di massima altezza ruotando il volantino verso di sé. 2. Aprire la piastra copri-bobina premendo il tasto di apertura a destra. Il copri-bobina si aprirà in modo da poter essere rimosso. 3. -
Page 131: Infilatura Del Filo Dell'ago
INFILATURA DEL FILO DELL‘AGO A. Sollevare l‘alza-piedino. Assicurarsi sempre di sollevare l’alza-piedino prima di infilare l’ago. (Se l’alza-piedino non viene sollevato, non è possibile ottenere una corretta tensione del filo.) B. Ruotare il volantino verso di sé fino a quando l‘ago non si trova nella sua posizione più... -
Page 132: Uso Dell'infila-Ago Automatico
USO DELL’INFILA-AGO AUTOMATICO Sollevare l‘ago alla posizione di massima altezza ruotando il volantino verso di sé. 1. Agganciare il filo intorno al guidafilo, come illustrato. 2. Abbassare la leva tenendo il capo del filo. 3. Ruotare la leva verso la parte posteriore della macchina fino a quando il perno del gancio non si avvicina alla cruna dell‘ago. -
Page 133: Estrazione Del Filo Della Bobina
ESTRAZIONE DEL FILO DELLA BOBINA 1. Sollevare l‘alza-piedino. 2. Tenendo il filo dell‘ago allentato con la mano sinistra, girare il volantino verso di sé con la mano destra, prima abbassando l‘ago e poi continuan- do a ruotare il volantino fino a quando l’ago non raggiunge la posizione di massima altezza. -
Page 134: Schema Per Aghi, Fili E Tessuti
SCHEMA PER AGHI, FILI E TESSUTI Il tessuto determina la scelta dell’ago e del filo. La seguente tabella è una guida pratica alla selezione di aghi e fili. Consultarla sempre prima di un nuovo progetto di cucitura. Assicurarsi di utilizzare la stessa dimensione e lo stesso tipo di filo per la bobina e per l’ago. TESSUTI FILO AGHI... -
Page 135: Regolazione Della Tensione Del Filo Dell'ago
REGOLAZIONE DELLA TENSIONE DEL FILO DELL’AGO La maggior parte della cucitura sarà eseguita rsi di con il comando della tensione impostato su “4”. Lato inferiore Suggerimento utile: una leggera regolazi- one verso un numero più alto o più basso Ben bilanciato può... -
Page 136: Funzioni Del Pannello Di Controllo
FUNZIONI DEL PANNELLO DI CONTROLLO Indicatore della posizione dell’ago Indicatore della modalità ago doppio Indicatore del piedino Lunghezza del punto Display LCD Larghezza del punto Numero del motivo di cucitura Indicatore della modalità punto lettera Tasto di regolazione della Tasto di selezione del motivo lunghezza del punto Tasto di regolazione della larghezza Tasto della modalità... -
Page 137: Tasti Di Regolazione Della Lunghezza Elarghezza Del Punto/Posizione Dell'ago
TASTI DI REGOLAZIONE DELLA LUNGHEZZA E LARGHEZZA DEL PUNTO/POSIZIONE DELL’AGO Sulla macchina per cucire verranno visualizza- te le impostazioni relative alla larghezza e alla lunghezza del punto come Auto/Predefinito. Indicatore di È possibile modificare manualmente la lung- lunghezza punto ettera predefinita hezza, la larghezza o la posizione dell’ago per il punto dritto in base alle proprie preferenze,... -
Page 138: Tasti Di Funzionamento
TASTI DI FUNZIONAMENTO I tasti di funzionamento consentono di eseguire facilmente varie operazioni di base della mac- china per cucire. TASTO DI AVVIO/ARRESTO Se il pedale non è collegato, la macchina si Tasto di avvio/arresto avvia lentamente premendo il tasto di avvio/ arresto. -
Page 139: Messaggi Utili
COMANDO DELLA VELOCITÀ DI CUCITURA La velocità di cucitura viene impostata utiliz- Lento Veloce zando il comando della velocità di cucitura. Il comando della velocità di cucitura viene sposta- to orizzontalmente per determinare la velocità richiesta. Indipendentemente dall‘impostazione, la velocità massima può... -
Page 140: Suggerimenti Utili Per La Cucitura
SUGGERIMENTI UTILI PER LA CUCITURA Di seguito sono descritti vari modi per ottenere risultati di cucitura migliori. Fare riferimento a questi suggerimenti durante la cucitura. 1. Cucitura di prova Per la cucitura di prova, utilizzare punti di varia larghezza e lunghezza. Al termine, selezion- are la larghezza e la lunghezza del punto migliori per una corretta cucitura. -
Page 141: Iniziare A Cucire
INIZIARE A CUCIRE PUNTO DRITTO Il punto dritto è quello usato più frequentemente per tutti i tipi di cuciture. Di seguito sono riportati i pas- saggi per imparare a eseguirlo. 1. IMPOSTAZIONI: Piedino - Universale (J), Coman- do della tensione del filo - 4 NOTA: in base al peso del tessuto, si può... - Page 142 INSERIMENTO DI CERNIERE E CORDONCINI Utilizzare il piedino per cerniere per cucire a destra o a sinistra della cerniera o vicino al cordoncino. INSERIMENTO DI CERNIERE Per cucire lungo il lato destro della cerniera, inserire il lato sinistro del piedino per cerniere Ago a sinistra Ago a destra nel porta-piedino in modo che l‘ago passi...
- Page 143 PUNTO ZIG-ZAG IMPOSTAZIONI: Piedino - Universale (J), Co- mando della tensione del filo - 4 Lato inferiore Il filo dell’ago potrebbe essere visibile sul rovescio a seconda del filo, del tessuto, del tipo di punto e della velocità di cucitura. Il filo della bobina tuttavia, non deve mai essere visibile sul Lato superiore dritto.
- Page 144 PUNTO ORLO INVISIBILE Il punto orlo invisibile viene utilizzato principal- mente per orlare tende, pantaloni, gonne, ecc. IMPOSTAZIONI: Piedino - Piedino per orlo Tessuto medio-pesante invisibile (H), Comando della tensione del filo: 4 –Punto cieco regolare per tessuti intrecciati Lato inferiore Lato inferiore –Punto cieco elastico per tessuti elastici 1.
- Page 145 PUNTO ZIG-ZAG MULTIPLO IMPOSTAZIONI: Piedino - Universale (J), Co- mando della tensione del filo - 4 Questo è un punto robusto, poiché cuce tre punti corti ove il normale punto a zig-zag ne cuce solo uno. Per questa ragione, viene caldamente consigliato per la sorfilatura di tutti i tipi di tessuto.
-
Page 146: Punti Decorativi Ed Elastici
PUNTI DECORATIVI ED ELASTICI IMPOSTAZIONI: Piedino - Universale (J) o Piedino per punto cordoncino (Z), Comando della tensione del filo - 4 I punti elastici sono principalmente utilizzati su tessuti lavorati a maglia o elastici, ma possono essere utilizzati anche su materiali non elastici. PUNTO DRITTO ELASTICO Il punto dritto elastico è... - Page 147 PUNTO ZIG-ZAG RINFORZATO Il punto zig-zag rinforzato viene utilizzato principalmente per le impunture decorative. È ideale per bordare scollature, giromanica, polsini e orli. Se regolato manualmente su una larghezza molto stretta, può anche essere utilizzato per cuciture molto sollecitate. PUNTO OVERLOCK DOPPIO Il punto overlock doppio ha tre usi principali.
- Page 148 PUNTO DEL TAPPEZZIERE Il punto del tappezziere viene utilizzato princi- palmente per orli a giorno. Può anche essere utilizzato per cucire un nastro sottile con un colore a contrasto o tono su tono. Posizionare il punto al centro per un effetto decorativo speciale. Un altro uso del punto del tappezziere è...
- Page 149 PUNTO SOPRAGGITTO INCLINATO Cuciture e sorfilature in un’unica operazione per produrre cuciture strette e morbide, parti- colarmente adatte a costumi da bagno, capi sportivi, T-shirt, nylon elasticizzato, jersey e jersey di cotone. PUNTO INCROCIATO Utilizzare per cucire e rifinire tessuti elastici o per lavori decorativi.
- Page 150 PUNTO SPINA È un punto versatile utilizzato per unire pezzi di tessuto e come abbellimento decorativo. PUNTO PIUMA DRITTO Per realizzare abbellimenti decorativi. PUNTO CHEVRON Per realizzare abbellimenti decorativi. 30 –IT...
-
Page 151: Altri Punti Decorativi
ALTRI PUNTI DECORATIVI IMPOSTAZIONI: Piedino - Universale (J) o Piedino per punto cordoncino (Z), Comando della tensione del filo - 4 o 3 Di seguito sono riportati alcuni esempi per utilizzare e cucire questi punti. È possibile uti- lizzare altri punti decorativi nello stesso modo. Effettuare una prova di cucitura su un pezzo di tessuto per controllare il motivo decorativo ed eseguire le regolazioni desiderate. -
Page 152: Cucitura Di Asole
CUCITURA DI ASOLE ASOLA AUTOMATICA Linguetta B Linguetta A USO DEL PIEDINO PER ASOLE La macchina offre la possibilità di realizzare una varietà di stili di asole, mediante un sistema che misura la dimensione del bottone e calcola la di- mensione dell’asola richiesta. - Page 153 • La cucitura sarà eseguita automaticamente nel seguente ordine. Posizione di allineamento del piedino per asole Pennarello da tessuto 9. Al termine della cucitura, utilizzare un apri-asola/taglia-asole per tagliare il tessuto al centro dell’asola. Fare attenzione a non tagliare le cuciture. ASOLE CORDONATE Far passare il cordoncino (ad esempio un filo da crochet o da impuntura) sullo...
- Page 154 PUNTO PER RAMMENDO 1. Selezionare un motivo di punto per rammendo. 2. Tirare il porta-bottone e aprirlo di circa 2 cm. 3. Sostituire il piedino con il piedino per asole. (Consultare la sezione “Sostituzione del pied- ino”.) 4. Abbassare la leva asole (C) in modo che cada verticalmente tra i fermagli (A) e (B). Piedino per asole 34 –IT...
-
Page 155: Ago Doppio
AGO DOPPIO IMPORTANTE: quando si utilizza un ago doppio, impostare la larghezza del punto a 3,5 o meno, onde evitare che l’ago si spezzi. Un ago doppio produce due file di punti paralleli per nervature, doppie impun- ture e cuciture decorative. 1. -
Page 156: Cura Della Macchina
CURA DELLA MACCHINA PULIZIA DELLE GRIFFE E DELL‘AREA CROCHET Scollegare sempre la macchi- ATTENZIONE na dall’alimentazione elettrica togliendo la spina dalla presa a muro. Per assicurare il miglior funzionamento pos- sibile della macchina, è fondamentale tenere sempre pulite le parti essenziali. 1. -
Page 157: Elenco Di Controllo Delle Prestazioni
ELENCO DI CONTROLLO DELLE PRESTAZIONI PROBLEMI GENERALI La macchina non cuce. • L’interruttore di alimentazione è spento. - Accendere l’interruttore. • La leva asole non è sollevata quando si cuciono i motivi. - Alzare la leva asole. • La leva asole non è abbassata quando si cuciono le asole. - Abbassare la leva asole. •... -
Page 158: Problemi Di Infilatura
PROBLEMI DI INFILATURA Il filo si aggroviglia. I fili dell’ago e della bobina non sono stati tirati verso la parte posteriore della macchina • sotto il piedino prima di iniziare la cucitura. - Tirare entrambi i fili verso la parte posteriore della macchina, sotto il piedino, per circa 10 cm e tenerli fino a quando non si formano alcuni punti. -
Page 159: Garanzia E Assistenza
Hauptstr. 91, CH-5070 Frick Telefon: 062-8715665 E-Mail: ursula.moesch@europe.svpworldwide.com Internet: www.singerswitzerland.com IAN 398054 Per tutte le richieste si prega di conservare lo scontrino ed il codice dell‘ articolo (p.e. IAN 12345) a prova dell‘avvenuto acquisto. DICHIARAZIONE DI CONFORMITÀ Questo apparecchio è stato realizzato in osservanza dei requisiti previsti dalle direttive europee e nazionali. - Page 160 VSM Group AB Soldattorpsgatan 3 SE-554 74 Jönköping SWEDEN Statut des informations: / Stand der Informationen: 05 / 2021 Ident.-No.: 471101401 IAN398054...
Need help?
Do you have a question about the 398054 and is the answer not in the manual?
Questions and answers