Table of Contents
Advertisement
Advertisement
Table of Contents

Related Manuals for Singer 4843116


Summary of Contents for Singer 4843116
- Page 1 SINGER Instruction Manual Manual de Instrucciones Manuel d'lnstruction...
- Page 2 IMPORTANT SAFETY INSTRUCTIONS When using an electrical appliance, basic safety should always Always use the proper needle plate, The wrong plate can cause the needle to break. be followed, including the following: Do not use bent needles. Read all instructions before using this sewing machine.
- Page 3 r--i IMPORTANTE INSTRUCCIONES DE SEGURIDAD de coser. Cuando se utiliza un dispositivo electrico, debe seguirse siempre precausiones de seguridad b_.sica, incluyendo las siguientes: 6. Utilice siempre la placa de aguja adecuada. placa Leer todaas las instrucciones antes de utilizar est,. m_.quina de incorrecta puede hacer que se rompa la aguja.
- Page 4 r-J INSTRUCTIONS IMPORTANTES DE SI:!:CURITI:!: Lors de I'utilisation d'un appareil electrique, il est essentiel morceaux de tissu ou de charpie. toujours prendre precautions pour la securit6; elles Garder les doigts & I'ecart de toute partie mobile. Porter une comprennent les suivantes: attention particuliere dans la zone voisine de I'aiguille de la...
- Page 5 ® Singer est une marque depos6e ® Singer is a registered trademark @ Singer es una marca registrada de la de The Singer Company Ltd ou de The Singer Company Ltd or its affiliates. CompaNia Singer o sus afiliados.
-
Page 6: Table Of Contents
List of contents Principal parts of the machine ........... Sewing on buttons ..............Accessories .................. How to sew buttonholes (one-step buttonhole) ......Installing the snap-in sewing table ..........Left and right side balance for buttonhole ........Connecting machine to power source ........Zippers and piping .............. - Page 7 r--i Indice Punto de sobreorillado el_.stico ..........Detalles de la m_.quina .............. Accessories .................. Cosido de botones ..............Instalaci6n de la mesa de coser convertible ........Como coser ojales (ojales de un solo paso) ......Conexi6n de la m_.quina a la fuente Balance a izquierda y derecha para coser ojales ......
- Page 8 r-J Table des matieres Pose des boutons ..............Composants principaux de la machine & coudre ...... 3/5 Accessoires .................. Comment faire des boutonnieres Installation de la tablette de couture amovible ......(boutonnieres en une etape) ..........Branchement de la machine & une source d'alimentation ..11 €:quilibrage gauche et droit pour boutonniere ......
-
Page 9: Principal Parts Of The Machine
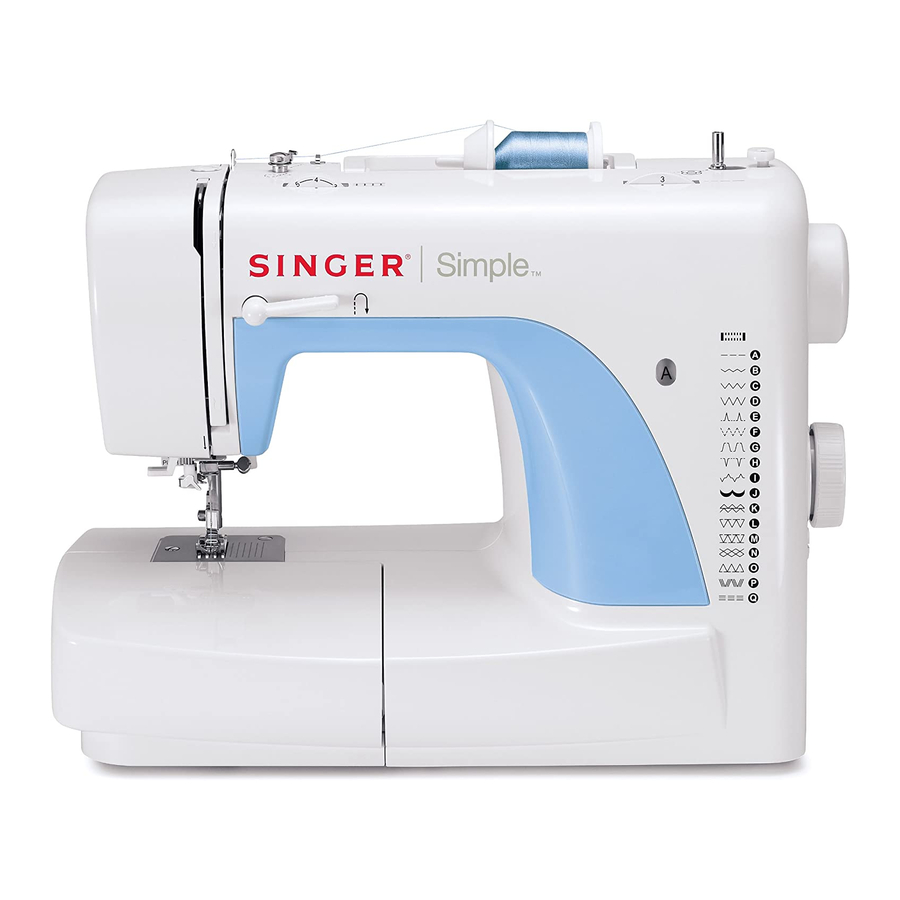
Principal parts of the machine 1. Thread tension dial 2. Presser foot pressure adjustment 3. Thread take-up lever 4. Thread cutter 5. Presser foot 6. Needle plate 7. Removable sewing table/accessory storage 8. Reverse sewing lever 9. Bobbin stopper 10. Stitch length dial 11. -
Page 10: Detalles De La M_.Quina
F_ Detalles de la maquina Composants principaux de la machine b coudre 1. Disco de tensi6n 2. Ajuste del prensatelas de presi6n 1. Molette de commande de tension 3. Palanca tensora del hilo 2. Commande de reglage de pression du pied-presseur 4. -
Page 11: Principal Parts Of The Machine
Principal parts of the machine 15. Horizontal spool pin 16. Bobbin winder 17. Handwheel 18. Pattern selector dial 19. Power and light switch © 20. Main plug socket 21. Bobbin thread guide 22. Upper thread guide 23. Face plate 24. Handle 25. - Page 12 F_ Detalles de la maquina Composants principaux de la machine b coudre 15.Portabobinas 16.Bobinadora 15. Axe horizontal et porte-bobine 17. Volante 16. Bobineur 18. Disco selector de dibugo 17. Volant 19. Interruptor principal y de la luz 18. Selecteur regle-point 20.
-
Page 13: Accessories
Accessories Standard accessories a. All purpose foot b. Zipper foot 006806008 006905008 006914008 c. Buttonhole foot d. Button sewing foot e. Seam ripper/brush f. Seam guide g. Pack of needles h. Spool holder i. Bobbin (3x) j. L-screwdriver Optional accessories (These 10 accessories are not supplied... -
Page 14: Accessories
Singer) traves de su distribuidor local.) k. Second axe de bobine k. Segundo perno de la canilla I. Pied pour zig-zag I. Prensatelas de puntada de raso m. Pied pour surfil m.Prensatelas... -
Page 15: Installing The Snap-In Sewing Table
Installing the snap-in sewing table Keep the snap-in sewing table horizontal, and push it in the direction of the arrow. (1 The inside of the snap-m sewing table can be utilized as an accessory box. To open, lift up at the point of the arrow. (2) -
Page 16: Instalaci6N De La Mesa De Coser Convertible
r-_ Installation de la tablette de couture amovible F_ Instalacion de la mesa de coser convertible Mantenga horizontal la mesa de coser convertible y empt3jela Maintenir la tablette en position horizontale et la pousser dans en la direcci6n de la flecha. (1) la direction de la fleche. -
Page 17: Connecting Machine To Power Source
Connecting machine to power source Connect the machine to a power source as illustrated. This appliance is equipped with a polarized plug which must be used with the appropriate polarized outlet. Attention: Unplug power cord when machine is not in use. Foot control The foot control pedal regulates the sewing... -
Page 18: De Alimentaci6N Electrica
une source r=l Conexion de la maquina a la fuente de r-J Branchement de la machine alimentacion electrica d'alimentation Conecte la maquina a una fuente de alimentacion segQn se ilustra. (1) Brancher la machine tel qu'illustre en (1). La fiche de la machine dotee de broches normalisees et doit _tre utilisee avec une prise de... -
Page 19: Changing The Bulb
Changing the bulb Disconnect the machine from the power supply by removing the plug from the main socket! Replace bulb with same type rated 10 watts (110-120V area) or 15 watts (220-240V area). - Loosen screw (A) as illustrated. (1) - Remove the face plate (B). -
Page 20: Cambio De La Bombilla
Changement de I'ampoule Cambio de la bombilla Desconecte la m_.quina de la alimentaci6n principal retirando el Debrancher la machine de I'alimentation electrique en enlevant conector desde la toma de corriente. la prise! Sustituir la bombilla con otra del mismo tipo de 10 vatios Remplacez cette derni_re par une ampoule de 10 watts (110-... -
Page 21: Two-Step Presser Foot Lifter
Two-step presser foot lifter When sewing several layers or thick fabrics, the presser foot can be raised to a high rise position for easy positioning of the work. (A) Adjusting presser foot pressure The presser foot pressure of the machine has been pre-set and requires no particular... -
Page 22: Ajuste De La Presi6N Del Prensatelas
ir_ Elevador del prensatelas de dos tiempos r-J Levier de levage du pied presseur a deux niveaux Cuando se cose varias capas de tela gruesa, el prensatelas puede elevarse a una posici6n alta para facilitar la colocaci6n Lorsque vous cousez plusieurs epaisseurs de tissus epais, le de la labor (A). -
Page 23: Attaching The Presser Foot Shank
Attaching the presser foot shank Raise the presser bar (a). Attach the presser foot shank (b) as illustrated. (1) Attaching the presser foot Lower the presser foot shank (b) until the cut-out (c) is directly above the pin (d). (2) !"... -
Page 24: Montaje Del Portaprensatelas
Montaje del portaprensatelas Fixation du support de pied presseur Eleve la barra del prensatelas (a). Monte el portaprensatelas Soulever la tige du pied-presseur (a) avec le dispositif de levage segt3n se ilustra. du pied-presseur puis fixer son support (b) comme illustre en. (1) Fixation du pied-presseur Montaje del prensatelas Baje... -
Page 25: Winding The Bobbin
Winding the bobbin - Place thread and spool holder onto spool pin (1). For smaller spools of thread place spool holder with small side next to spool. (2) - Snap thread into thread guide. (3) -Wind thread clockwise around bobbin winder tension discs. -
Page 26: Devanado De La Canilla
Devanado de la canilla Remplissage de la canette - Coloque el hilo y el portacarrete en el pasador del carrete (1). Placer le filet le porte-bobine sur I'axe de la bobine (1). Para carretes de hilo m_.s pequefios, coloque el portacarrete Si la bobine est plus petite, placer le porte-bobine avec le con el lado pequefio cerca del carrete (2). -
Page 27: Inserting The Bobbin
Inserting the bobbin When inserting or removing the bobbin, the needle must be fully raised. - Open the hinged cover (1) - Pull the bobbin case tab (a) and remove the bobbin case. (2) - Hold the bobbin case with one hand. Insert the bobbin so that the thread runs in a clockwise direction (arrow) (3). -
Page 28: Colocaci6N De La Canilla
Insertion de la canette Colocacion de la canilla La aguja tiene que estar siempre arriba del todo al poner y Attention: sacar la canilla. Assurez-vous de placer I'interrupteur principal en position CO") avant d'inserer ou de retirer la canette. Abrir la tapa con charnela. (1) Abrir tapa de la caja de bobina (a) y quitar la caja de bobina. -
Page 29: Inserting And Changing Needles
Inserting and changing needles Change the needle regularly, especially if it is showing signs of wear and causing problems. For best sewing results always use SINGER Brand Needles. Insert the needle as illustrated as follows: A. Loosen the needle clamp screw... -
Page 30: Colocaci6N Y Cambio De Agujas
Para mejores resultados de la indique des signes d'usure et cause des problemes. Pour costura, utilice siempre agujas originales de Singer. obtenir les meilleurs resultats, toujours utiliser des aiguilles fabriquees par Singer. Inserta la aguja como se ilustra:... -
Page 31: Threading The Upper Thread
Threading the upper thread This is a simple operation but it is important to carry out correctly as by not doing so several sewing problems could result. - Start by raising the needle to its highest point (1), and also raise the presser foot to release the tension discs. (2) Note: For safety, it is strongly suggested you turn off the power before threading. -
Page 32: Enherbrado Del Hilo Superior
Enhebrado del hilo superior Enfilage superieur Cette operation simple. Neanmoins, il est important Se trate de una operaci6n sencilla pero importe realizarla I'executer correctement sous peine de faire eventuellement face & correctamente pues de no hacerlo podria surgir varios problemas en la costura. -
Page 33: Automatic Needle Threader
Automatic needle threader -Raise the needle to its highest position. - Press lever (A) down as far as it will go. - The threader automatically swings to the threading position (B). - Pass thread around thread guide (C). - Pass the thread in front of the needle around the hook (D) from bottom to top. -
Page 34: Enherbrador Autom_.Tico De La Aguja
r-J Enhebrador automatico de la aguja r-J Enfileur automatique d'option - Eleve la aguja a su posici6n m_.s alta. Relever I'aiguille & la position la plus elev6e. - Presione la palanca (A) hacia abajo Io m_.s posible en su - Appuyer sur (A) le plus que possible. recorrido. -
Page 35: Thread Tension
Thread tension Upper thread tension Basic thread tension setting: "4" To increase the tension, turn the dial to the next number up. To reduce the tension, turn the dial to the next number down. A. Normal thread tension for straight stitch sewing. -
Page 36: Tensi6N Del Hilo
Tension du fil Tension del hilo Tension del hilo superior Tension du fil superieur Adjuste de la tensi6n del hilo b_.sica: "4" Reglage de base pour la tension du ill: "4" Para aumentar la tensi6n, girar el disco al siguiente ntJmero Pour augmenter la tension,... -
Page 37: Raising The Bobbin Thread
Raising the bobbin thread Hold the upper thread with the left hand. Turn the handwheel (1) towards (counterclockwise) lowering, then raising needle. Gently pull on the upper thread to bring the bobbin thread up through the needle plate hole (2). Lay both threads to the back under the presser foot. -
Page 38: Elevaci6N Del Hilo De La Canilla
r-J Pour remonter le fil de canette F--I Elevacion del hilo de la canilla Sujete el hilo superior con la mano izquierda. Gire el volante (1) Tenir le fil superieur avec la main gauche. Tourner le volant hacia usted (a izquierdas) bajando y luego elevando la aguja. vers vous (sens anti-horaire) pour abaisser et lever I'aiguille. -
Page 39: Reverse Sewing/Removing The Work/Cutting The Thread
Reverse sewing To secure the beginning and the end of a seam, press down the reverse sewing lever (A). Sew a few reverse stitches. Release the lever and the machine will sew forwards again. Removing the work Turn the handwheel counterclockwise to bring the thread take up lever to its highest... -
Page 40: Coser Para Atr_.S/Como Sacar La Labor/Como Cortar El Hilo
Coser para atras r-_ Couture en sens inverse Para fijar el comienzo y el final de la costura, presione Afin de renforcer le debut et la fin d'une couture, mettre palanca de mando de coser para atr_.s. position basse la commande d'inversion de couture. -
Page 41: Matching Needle/Fabric/Thread
1. Twin needles, can be purchased for utility and decorative work. 2. When sewing with twin needles, the stitch width dial should be set at less than "3". 3. For best sewing results always use genuine SINGER needles. 4. Replace needle often (approximately every other garment ) and/or at first thread breakage or skipped stitches. - Page 42 2. Cuando cosa con agujas dobles, el disco selector de ancho de puntada debe ajustarlo a menos de "3". 3. Para mejores resultados de la costura, utilice solamente agujas Singer originales. 4. Cambie la aguja con frecuencia (aproximadamente cada dos prendas) y/o a los primeros hilos rotos o faltas de puntadas.
- Page 43 2045 tissus interlock, jerseys simples et doubles. Egalement, tissus en lycra, tissus pour costumes de bain, tissus elastiques. SINGER 2025 Aiguille jumelee. Tissus tisses et tricots. SINGER Aiguilles pour cuir 12 (80) a 18 (110). Cuir, vinyle, tissus pour rembourrage.
-
Page 45: How To Choose Your Pattern
How to choose your pattern " , " with pattern For straight stitch select pattern selector dial. Adjust the stitch length with the stitch length dial. For zigzag stitch, select pattern " } " with pattern selector dial. Adjust the stitch length according to the fabric being used. -
Page 46: Como Seleccionar Su Dibujo
&Cbmo seleccionar su dibujo? Comment choisir vos points _" avec le selecteur Para punto recto, seleccione el dibujo "_j" con el disco selector Pour les points droits, choisir le type " de dibujo. Ajuste el largo de la puntada el disco regle-point. -
Page 47: Straight Stitch / Zigzag Stitching
r¢_ Straight stitching Turn the stitch selection dial so that the pointer is set to the straight stitch position. Generally speaking, the thicker the fabric, thread and needle, the longer the stitch should be. For a fine stitch set length at "1" or "2". -
Page 48: Punto Recto / Punto En Zig-Zag
Couture au point droit Punto recto Gire el disco selector de la puntada, de modo que la pantalla de Tournez le selecteur regle-point jusqu'& ce que I'ecran montre la puntada indique la posici6n del punto recto. la position du point droit. En terminos generales, cuanto m_.s grosor tenga la tela, el hilo... -
Page 49: Blind Hem/Lingerie Stitch
Blind hem/Lingerie stitch * The blindhem foot is an optional accessory not supplied with this machine. For hems, curtains, trousers, skirts, etc. A_._J_ Blind hem/lingerie for firm fabrics. Set the machine as illustrated in a, b and c. Note: It takes practice to sew blind hems. Always make a sewing test first. -
Page 50: Dobladillo / Punto De Lencer
Ourlet invisible et point de lingerie Dobladillo / Punto de lenceria * El pie para puntada ciega es un accesorio opcional * Le pied pour ourlet invisible est un accessoire optionnel qui suministrado con su m_.quina. n'est pas fourni avec votre machine. Para dobladillos, cortinas, pantalones, faldas, etc. -
Page 51: Overedge Stitches
Overedge stitches * The overcasting foot is an optional accessory not supplied with your machine. Seams, neatening, visible hems. Standard overlock: For fine knits, jerseys, neck edges, ribbing. (a) Double overlock stitch: For fine knits, handknits, seams. (b) All overedge stitches suitable for sewing... -
Page 52: Punto De Sobreorillado El_.Stico
Punto de sobreorillado elastico Point surfil * El prensatelas para sobrehilar es un accesorio opcional * Le pied pour surfil est un accessoire optionnel qui n'est pas fourni avec votre machine. suministrado con su m_.quina. Costura, sobrehilar dobladillos visibles. Coutures, finitions, ourlets visibles. I>... -
Page 53: Sewing On Buttons
Sewing on buttons Move the drop feed control to right side to lower the feed dogs. (1) Change presser foot to button sewing foot. (2) Position the work under the foot. Place the button in the desired position and lower the foot. Set the pattern selector knob on "... -
Page 54: Cosido De Botones
ir=.l Cosido de botones r-J Pose des boutons Deslice el control del transportador de dientes al lado derecho Deplacer le cont61e de pied b. droit pour baisser le systeme para bajar los dientes. (1) d'enfilage.(1 ). Combie el prensatelas al especial para coser botones. (2) Pied pour la pose de boutons (2). -
Page 55: How To Sew Buttonholes (One-Step Buttonhole)
How to sew buttonholes .--. (one-step buttonhole) always make a practice buttonhole on a sample of your "" reliable results. However, it is strongly suggested fabric and interfacing. Buttonhole sewing is a simple process that provides • Making a Buttonhole 1. -
Page 56: Como Coser Ojales (Ojales De Un Solo Paso)
Como coser ojales (ojales de un solo paso) Comment faire des boutonnieres (boutonnieres en une etape) Confeccionar ojales es un proceso sencillo proporciona resultados fiables. Sin embargo, se recomienda encarecidamente La pose de boutonniere est un processus simple qui assure des resultats realizar siempre un ojal de practica en una muestra de su tejido e fiables. -
Page 57: Left And Right Side Balance For Buttonhole
Left and right side balance for buttonhole Stitch density on right and left sides of buttonhole can be adjusted by buttonhole balance control dial. This dial should usually be in a neutral position. (between "+" and "-") If the stitches on the left side of the buttonhole are too close together,... -
Page 58: Balance A Izquierda Y Derecha Para Coser Ojales
F=I Balance a izquierda y derecha para r-J I_quilibrage gauche et droit pour boutonniere coser ojales La densidad de la puntada en los lados derecho e izquierdo La densite des points de part et d'autre de la boutonniere peut del ojal puede ajustarse por el mando de control del balance _tre regl6e au moyen du selecteur d'equilibrage de boutonniere. -
Page 59: Zippers And Piping
Zippers and piping Set the machine as illustrated. Dial selector on " _ " Set machine as illustrated on the left. Set stitch length control between "1" "4" (according thickness of fabric). Change to zipper foot. (1) The zipper foot can be attached right or left, depending which side of the foot you are going to sew. -
Page 60: Cremalleras Y Ribetes
r-J Cremalleras y ribetes r-J Fermeture et ganse Coloque el disco selector de dibujo a " " " Regler le selecteur de points b. " " " Cambie al prensatelas para cremalleras. Changer le pied de fermeture. Ajuste el control del largo de la puntada entre "1"... -
Page 61: Sewing With The Optional Hemmer Foot
Sewing with the optional hemmer foot * The hemmer foot is an optional accessory not supplied with your machine. For hems in fine or sheer fabrics. Set the stitch pattern dial to ..Change to optional hummer foot. Neaten the edge of the fabric. At the beginning of the hem, turn under the edge twice by about 3 mm (1/8") and sew 4-5 stitches to secure. -
Page 62: Coser Con El Pie Para Ruedos Opcional
Coser con el pie para ruedos opcional r-_ Couture a I'aide du pied pour ourlet roulette optionnel * El pie para ruedos es un accesorio opcional no suministrado con su m_.quina. * Le pied pour ourlet roulette est un accessoire optionnel n'est pas fourni avec votre machine. -
Page 63: Straight Stretch Stitch And Ric Rac Stitch
Straight stretch stitch and Ric Rac stitch Straight stretch stitch (1) Set the stitch pattern dial to " m " Used to add triple reinforcement to stretch and hardwearing seams. Set the stitch length dial to "4". Ric Rac stitch Set the stitch pattern dial to Used primarily as a decorative stitch. -
Page 64: Selecci6N De Puntos
Seleccion de puntos r-_ Points droit elastiques et points Ric Rac Triple punto recto (1) Points droits elastiques Ponga el disco selector de dibujo en " ,_"_ " Regler le selecteur de modeles &" "_ " Para resistente de costura. Pour ajouter un renforcement triple aux joints solides. -
Page 65: Honeycomb Stitch
Honeycomb stitch Seams, hems, T-shirts, underwear, etc. Set stitch pattern selector on " Set machine as illustrated on left. This stitch can be used for all types of jersey and woven fabrics. When using honeycomb stitch pattern for hemming sew at lcm (1/4") from the fabric edge and trim the surplus fabric. -
Page 66: Punto En Nido De Abeja
F--I Punto en nido de abeja r-J Point nid d'abeille Joints, ourlets, T-shirts, sous-v_tement, etc. Para costuras, dobladillos, camisetas de manga corta, ropa interior, etc. Regler la mchine comme indiqu& Ajuste la m_.quina segt3n se ilustra. Regler le selecteur de modeles &" }_" Ponga el disco selector de dibujo en "_ "... -
Page 67: Multi-Stitch Zig-Zag/Bar Tack
Multi-stitch zig-zag Sewing on lace and elastic, darning, mending, reinforcing edges. Set the stitch pattern dial to " ii: ". Set machine as illustrated on left. Place patch in position. The stitch length can be shortened to produce very close stitches. (1) When mending tears,... -
Page 68: Multipunto En Zig-Zag/Presillar
r-.i Multipunto en zig-zag r-J Point zigzag multipoints Para cosido de encaje y elastico, zurcido, remiendos, refuerzos Pour la couture de dentelle et des elastiques, le reprisage, raccommodage, la pose de pieces, le renforcement de bordures. y presillas. Regler le selecteur de point &" :_: " Ponga el disco selector de dibujo en "... -
Page 69: Sewing With The Optional Cording Foot
Sewing with the optional cording foot *The cording foot is an optional accessory not supplied with your machine. Decorative effects, cushions, tablecloths, etc. In addition to zig zag, various other stitches are suitable sewing on cord, e.g. blindhem, multi-stitch zig zag,and selected decorative stitches. -
Page 70: Coser Con El Prensatelas De Cordoncillo Opcional
_-_ Coser con el prensatelas de cordoncillo r-_ Couture a I'aide du pied pour cordon opcional optionnel *El prensatelas de cordoncillo es un accesorio opcional * Le pied pour cordon est un accessoire optionnel qui n'est pas fourni avec votre machine. suministrado con su m_.quina. -
Page 71: Free Motion Darning
Free motion darning * The darning foot is an optional accessory not included with your machine. _ ....Move the drop feed control to right to lower the feed dogs. b --v_r _ Set the pattern selector dial to " _ " Remove the presser foot clamp. -
Page 72: Zurcido De Brazo Libre
Raccommodage avec mouvement libre Zurcido de brazo libre * El prensatelas zurcidor accesorio opcional * Le pied de raccommodage est un accessoire d'option dont suminstrado con su m_.quina. votre machine n'est pas equip6e. Regler le selecteur de points &" _ " Ponga el selector del dibujo eno "... -
Page 73: Practical Stitches
Practical stitches Set the machine as illustrated. Turn the switch width dial and stitch length dial to suit the fabric and application. Shell stitch For decorative edges. Suitable for edges on sheer, fine and stretch fabrics. The wider part of the stitch should go just over the folded edge of the fabric to create the shell effect. -
Page 74: Puntadas De Utilidad
r-J Points utilitaires F¢I Puntadas de utilidad Seleccione el dibujo deseado con el disco selector de dibujo. Utiliser le pied tout usage pour tous ces points. Gire el disco del largo de la puntada que se ajuste a la tela y a Voir le schema pour un exemple de point. -
Page 75: Darning
Darning - Turn stitch length dial to the desired length. - Turn stitch selector to straight stitch, center needle position. -Position the fabric to be darned under presser foot together with the under laying fabric to be used. - Lower the presser foot and alternately sew forward or reverse using the lever. -
Page 76: Zurcido
Raccommedage Zurcido - Gire el disco regulador del largo de puntada al largo deseado. - Regler le selecter Iongueur de point & la Iongueur desir6e. - Gire el selector al punto recto, posici6n central de la aguja. - Regler le selecteur de points b. point droit, position d'aiguille centrale. -
Page 77: Attaching Lace
Attaching lace - Turn stitch length dial to the desired length. -Turn stitch selector to straight stitch, center needle position. - Fold in the edge of the fabric (approximately 6 mm 1/4"). - Place the lace under the folded edge of the fabric allowing it to under lap the fabric slightly as required by the pattern of the lace. -
Page 78: Como Pegar Encajes
r-J Pose de dentelle Como pegar encajes - Gire el disco selector del largo de puntada al largo deseado. - Regler le selecter Iongueur de point b. la Iongueur desir6e. - Gire el selector al punto recto, posici6n central de la aguja. -Regler le selecteur de points b. -
Page 79: Applique And Blindstitch Applique
Applique and blindstitch applique Position applique piece on background fabric. Align needle so that it pierces background fabric along outside edge if the applique. Lower presser foot. If using a blindhem foot, align the lip of the blindhem foot guide so that it sits directly under the edge of the applique. -
Page 80: Puntada Y Aplicaci6N Invisible
r-J Puntada y aplicacion invisible r-J Applique et applique invisible Ponga la aplicaci6n sobre la tela. Alinee la aguja para que Placer I'applique le tissu de fond. Aligner I'aiguille penetre bien a Io largo del orillo de la aplicaci6n. Baje el abaisser-la dans le tissu au bord de I'appliqu&... -
Page 81: Monogramming And Embroidering
Monogramming and embroidering with embroidery hoop* Drop the feed dogs. (Note: Stitch length cannot be controlled with dial) - Set the machine as illustrated above. - Remove the presser foot and the presser foot holder. - Lower presser foot lever before starting to sew. - Adjust the stitch width according to the size of lettering design. -
Page 82: Creaci6N De Monogramas Y Recamado Con Aro De Bordar
r-_ Pose de monogramme et broderie en Creacion de monogramas y recamado con aro de bordar* utilisant un cercle a broder* Baje los dientes del transportador (NOTA: El largo no puede Escamotez les griffes d'entrainement. (Note: la Iongueur controlarse con el disco) point ne peut pas _tre commandee avec le selecteur) - Ajuste la m_.quina segt3n se ilustra. -
Page 83: Quilting Functions
Quilting functions * The quilting foot is an optional accessory not supplied with this machine. Stippling is free motion quilting where you hoop the fabric and guide it by hand, allowing you to stitch in any direction. For template quilting transfer a design from a template (plastic stencil) to your fabric and then stitch following the outline. -
Page 84: Para Acolchar
Fonctions de courtepointe Para acolchar * El prensatelas zurcidor accesorio opcional * Le pied double entrainement est un accessoire optionnel qui suminstrado con su m_.quina. n'est pas vendu avec cette machine. El punteado es un movimiento para acolchonar en donde usted Pour Piqt3re Libre, placer le tissu dans un cerceau et piquer &... -
Page 85: Gathering
Gathering * The gathering foot is an optional accessory not supplied with this machine. Set the pattern selector as illustrated. 1. Attach the gathering foot. 2. Sew a single row or multiple rows of straight stitches. 3. If more gathering is required, loosen the upper thread tension to below 2 so that the lower thread lies on the under side of the material. -
Page 86: Para Fruncir
Front;age Para fruncir * El pie fruncidor es un accesorio opcional no suminstrado * Le pied double entrainement est un accessoire optionnel qui su m_.quina. n'est pas vendu avec cette machine. Ponga el selector del dibujo tal como se ilustra. Regler le selecteur de points tel qu'illustr&... -
Page 87: The Evenfeed Foot Optional Accessory
The evenfeed foot optional accessory * The evenfeed foot accessory is optional. It is not included with this machine. Always try to sew first without the evenfeed foot accessory which should be used only when necessary. It is easier to guide the fabric and you have a better view of the seam when using the standard, regular foot on your machine. -
Page 88: Accesorio De Presi6N Compacta Opcional
Accesorio de presion compacta opcional r-J Pied double entrainement * Este prensatelas zurcidor es un accesorio opcional no suminstrado con * Le pied double entraTnement est un accessoire optionnel qui n'est su maquina. pas vendu avec cette machine. Toujours tenter de coudre d'abord sans... -
Page 89: Maintenance
Maintenance Attention: Disconnect machine from the electrical supply removing the plug from the main socket. When cleaning the machine, it must always be disconnected from the electrical supply. Remove the needle plate: Turn the handwheel until the needle is fully raised. Open the hinged front cover and unscrew the needle plate screws with the screw driver (1). -
Page 90: Mantenimiento De La M_.Quina
Mantenimiento de la maquina r-J Entretien de la machine Pour retirer la plaque & aiguille, mettre I'aiguille en position Atencion: haute en tournant le volant. Ouvrir le couvercle d'acces. Avec le Antes de la limpieza desconectar la m_.quina quitando tournevis, desserrer les 2 vis (1) et enlever la plaque & aiguille. enchufe de la red electrica. -
Page 91: Trouble Shooting Guide
Trouble shooting guide Problem Cause Correction 1.The 1.Rethread the machine. Upper thread breaks machine is not threaded correctly. 2.The thread tension is too tight. 2.Reduce the thread tension. (lower number) 3.The thread is too thick for the needle. 3.Select a larger needle. 4.The needle is not inserted correctly. -
Page 92: Eliminaci6N De Aver
F--I Eliminacion de averias Problema Causa Correcio El hilo superior se 1 .La mAquina esta mal enhebrada. 1.Enhebrar la mAquina correctamente. 2La tensi6n del hilo es demasiado fuerte. rompe 2.Disnminuir la tensi6n del hilo superior. (nQmero menor) 3.El hilo es demasiado grueso para la aguja. 3.Usar una aguja mAs gruesa. -
Page 93: Guide De Depannage
r-J Guide de depannage Probleme Cause Solution Bris du fil 1. R6enfiler la machine. 1. La machine n'est pas correctement enfiler. sup6rieur 2. La tension du fil est trop 61ev6e. 2. R6duire la tension. (valeur inf6rieure) 3. Le fil est trop gros pour I'aiguille. 3. - Page 94 021G2D0101 (_ _':)j__)Dec/05 SINGER 3116(970CB4)
Need help?
Do you have a question about the 4843116 and is the answer not in the manual?
Questions and answers