Advertisement
WVSXM70 / WVSXM70CV
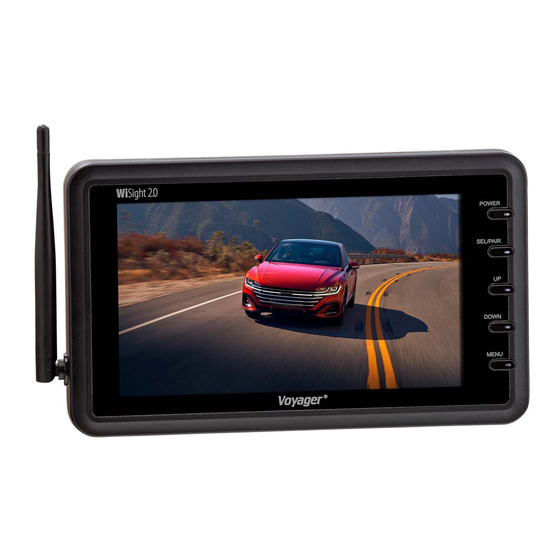
Digital Wireless Observation Monitor
KEY FEATURES:
● Easy installation - fits most applications
● 7.0" monitor comes with suction cup mount and 12 Volt DC
plug for easy portability
●
technology- no cables or wiring necessary
● No interference
● Signal transmits through and around objects up to 60+ feet away
● Sharp, clear, uninterrupted picture
● Can support up to four wireless cameras (WVSXC150 or WVSXC160) simultaneously
(must be WiSight 2.0)
● Mirror or Normal View selectable
Package includes a 7.0" LCD color monitor, one 12 Volt DC accessory plug and a suction cup
monitor mount.
English
Patent # (9,054,743)
Advertisement
Table of Contents

Related Manuals for Voyager WVSXM70CV


Summary of Contents for Voyager WVSXM70CV
- Page 1 WVSXM70 / WVSXM70CV Digital Wireless Observation Monitor KEY FEATURES: ● Easy installation - fits most applications ● 7.0" monitor comes with suction cup mount and 12 Volt DC plug for easy portability ● technology- no cables or wiring necessary ● No interference ●...
-
Page 2: Installing The Monitor
NSTALLING THE ONITOR 1. Plug power cable into the back of the monitor. 2. Attach the suction cup mount to the rear of the monitor with the supplied bracket. 3. Locate a flatter section of glass on your windshield (that does not block your vision) and apply suction cup (as shown in diagram). -
Page 3: Key Function
UNCTION Power Button Select/Pair Button Up Button Down Button Menu Button 1. POWER BUTTON - Press once to turn on the monitor. - Press again to turn off the monitor. 2. SELECT/PAIR BUTTON - Press the SELECT/PAIR button for less than 1 second to change the AV Source. - Press the SELECT/PAIR button for over 5 seconds to start the pairing mode. - Page 4 Tint Color Color Tint Mirror Flip Flip Mirror Dimmimg AutoPower AutoPower Dimming Scale Marker Screen Saver Scale Marker Screen Saver EN-4...
- Page 5 Split Menu 2 Split Channel Select Split Menu 2 Split Channel Select L1,R2 Volume Trigger Delay Trigger Delay Volume EN-5...
- Page 6 4. UP AND 5. DOWN BUTTON Function for Brightness, Contrast, Color, and Tint Control - Press the “UP” button to increases brightness, contrast, color, or tint level when accessing menus adjust mode instead of when accessed menu adjust mode. - Press the “DOWN” button to decreases brightness, contrast, color, or tint level when accessing menus adjust mode instead of when accessed menu adjust mode.
- Page 7 Function for Scale Marker - Press the “UP” or “DOWN” to change the Scale Marker mode. 1.OFF mode 2. Mode1 3. Mode 2 Scale Marker Scale Marker 4. Mode 3 5. Mode 4 Scale Marker Scale Marker Function for Split Menu - Press the “UP”...
- Page 8 Function for 2 Split Channel Select - Press the“UP” button to change the 2 Split Chanel Select Mode to L1/R2,L1/R3,L1/R4, L2/R1,L2/R3,L2/R4,L3/R1,L3/R2,L3/R4,L4/R1,L4/R2,L4/R3 when accessed menu adjust mode. L1,R2 2 Split Channel Select Function for Trigger Delay - Press the“UP” button to change theTrigger Delay time when accessing menus adjust mode instead of when accessed menu adjust mode.
-
Page 9: Wiring Definitions
IRING EFINITIONS EN-9... - Page 10 Wi-Fi systems, personal Wi-Fi hotspots, Bluetooth devices or additional wireless monitors & cameras. If you have a Voyager WiSight 2.0 Digital Wireless Observation System along with any other device that transmits or receives and you are experiencing any difficulty with the systems operation, the device(s) may be too close to either the WiSight 2.0 Monitor or...
- Page 11 ROUBLE HOOTING - Check power cord connection at monitor Monitor will not turn on. and 12VDC socket. - Check fuse in cigarette socket adapter. - Check 12VDC power at camera. Monitor displays "No Signal". - Make sure antenna is tight and pointed correctly.
Need help?
Do you have a question about the WVSXM70CV and is the answer not in the manual?
Questions and answers