Hans Grohe Vernis Blend Vario 04970 0 Series Installation/User Instructions/Warranty
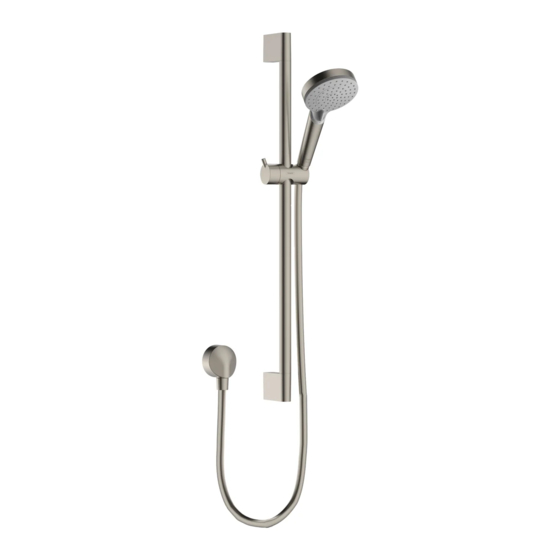
Wallbar set
Hide thumbs
Also See for Vernis Blend Vario 04970 0 Series:
- Installation/user instructions/warranty (20 pages)

Related Manuals for Hans Grohe Vernis Blend Vario 04970 0 Series


Summary of Contents for Hans Grohe Vernis Blend Vario 04970 0 Series
- Page 1 EN Installation / User Instructions / Warranty FR Instructions de montage / Mode d'emploi / Garantie ES Instrucciones de montaje / Manejo / Garantía Vernis Blend Vario Wallbar Set 04969xx0 04970xx0 04971xx0...
-
Page 2: Technical Information
English Technical Information Flow rate 04969xx0 2.5 GPM (9.5 L/min) 04970xx0 1.75 GPM (6.6 L/min) 04971xx0 1.5 GPM (5.7 L/min) Installation Considerations • 04969xx0, 04970xx0, 04971xx0: The • For best results, Hansgrohe recommends that this unit be installed by a licensed, professional plumber. screws and anchors included with this set are suitable for use in a tile or other solid surface wall. - Page 3 Français Données techniques Capacité nominale 04969xx0 2.5 GPM (9.5 L/min) 04970xx0 1.75 GPM (6.6 L/min) 04971xx0 1.5 GPM (5.7 L/min) À prendre en considération pour l’installation • 04969xx0, 04970xx0, 04971xx0: Les vis et • Pour de meilleurs résultats, Hansgrohe recommande que ce produit soit installé...
- Page 4 Español Datos tecnicos Caudal máximo 04969xx0 2.5 GPM (9.5 L/min) 04970xx0 1.75 GPM (6.6 L/min) 04971xx0 1.5 GPM (5.7 L/min) Consideraciones para la instalación • 04969xx0, 04970xx0, 04971xx0: Los • Para obtener mejores resultados, la instalación debe estar a cargo de un plomero profesional tornillos y pernos de anclaje incluidos en este juego matriculado.
- Page 5 Vernis Blend Vario Wallbar Set 04969xx0 04970xx0 04971xx0 max. 11⅛" (284 mm) ⅞" (22 mm) Ø⅞" (22 mm) Vernis Blend Vario Handshower FixFit Wall Outlet with Check Valves 26270xx1 26340xx1 27458xx3 26090xx1 G ½ 1½" (39 mm)
-
Page 6: Installation / Installation / Instalación
Installation / Installation / Instalación 27458xx3 ⅝" - ⅞" (16 - 22 mm) ½ NPT English Français Español Install a ½" male threaded nipple, Installez un raccord fileté NPT de Instale un niple NPT de ½" (no extending ⅝" outside the surface ½... - Page 7 English Français Español Install the cover. Installez la couverture. Instale la cobertura.
- Page 8 Installation / Installation / Instalación ¼" (6 mm) English Français Español Mark the positions of the screw Marquez les positions des trous de Marque las posiciones de los holes. vissage. orificios para tornillos. Drill the holes using a ¼" (6mm) Percez les trous à...
- Page 9 English Français Español Install the anchors. Installez les chevilles. Instale los pernos de anclaje. Selle la pared alred- Seal the wall around the Scellez le mur autour des edor de los pernos de anchors with waterproof chevilles à l’aide d’un anclaje con un sellador sealant.
- Page 10 English Français Español Place a black rubber washer in the Placez une rondelle en caoutchouc Coloque una arandela de goma short end of the handshower hose. noir dans l’une des extrémités du negra en un extremo de la tuyau de douchette. manguera de la ducha de mano.
- Page 12 Vernis Blend Vario Wallbar Set 04969xx0 04970xx0 04971xx0 Vernis Blend Vario 97709670 26270671 26340671 96275000 26090671 97651670 94246000 98058000 28276673 FixFit Wall Outlet with Check Valves 27458673 96179000 98557000 98531001 97454670 94074000...
- Page 13 User Instructions / Instructions de service / Manejo Rain Intense Rain 15° 55°...
- Page 14 Cleaning / Nettoyage / Limpieza Just clean: simply rub over the spray nozzles to QUICK CLEAN remove lime scale. La propreté en toute simplicité: les dépôts formés sur les buses élastiques en silicone s’éliminent par un simple passage de la main. Fácil aseo: La cal se puede retirar sencillamente frotando con los dedos de las toberas elásticas de silicona.
- Page 15 Cleaning / Nettoyage / Limpieza > 1 min. Check valve maintenance / Entretien de les clapets anti-retour/ Mantenimiento de las válvulas antirretornos...
- Page 16 Cleaning Recommendation for Hansgrohe Products Modern bathroom faucets, kitchen faucets and shower products are made from different materials to comply with the needs of the market with regard to design and functionality. To avoid damage to the product, it is necessary to take proper care of it. For best results: •...
- Page 17 Important • Les residus de produits pour le corps comme les savons liquides, shampooings, gels de douche, teintures pour cheveux, parfums, apres-rasage et vernis a ongles peuvent causer des deteriorations. Rincez le produit avec de l’eau propre après chaque utilisation. •...
-
Page 19: What We W Ill D O
Hansgrohe, Inc. Limited Warranty Offering our customers the highest quality at all times is a fundamental • abuse, neglect or improper or incorrectly performed instal- part of the Hansgrohe, Inc. company philosophy. We offer consumers lation, maintenance or repair, including the use of abrasive a limited warranty on our hansgrohe and AXOR branded products. - Page 20 PROD UCT I NSTRUC TI ON S A ND Q U ESTI O NS FROM REASONABLE WEAR AND TEAR, OUTDOOR USE, MISUSE (INCLUDING USE OF THE PRODUCT FOR AN UNINTENDED APPLICATION), FREEZING WATER, EXCESSIVE WATER PRESSURE, Upon purchase or prior to installation, please carefully inspect your PIPE CORROSION IN THE HOME IN WHICH THE PRODUCT IS product for any damage or visible defect.
Need help?
Do you have a question about the Vernis Blend Vario 04970 0 Series and is the answer not in the manual?
Questions and answers