Sage the Super Q BBL920 / SBL920 - Blender 2L, 2400W Manual
- Quick manual (116 pages)
Advertisement
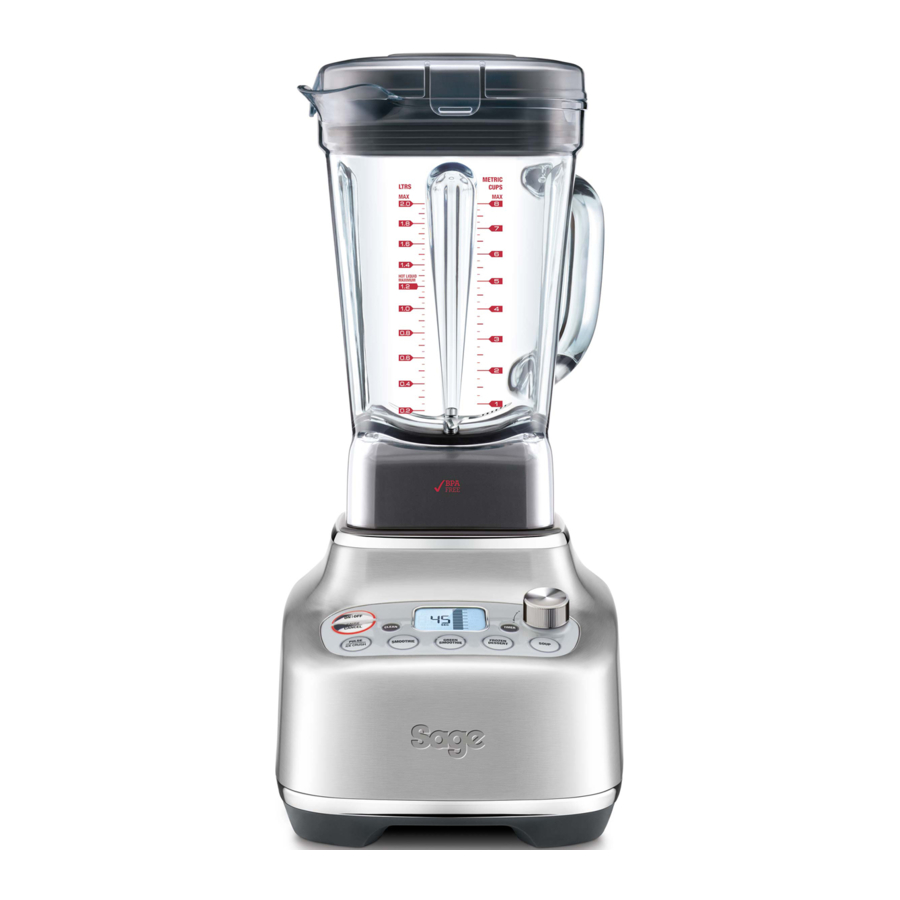
Components

- Inner measuring cup
- High performance lid
- 2.0 Litre BPA-free jug
- Extra-wide, heavy duty blade and bowl system
- Heavy duty metal coupling
- Heavy duty 2400W motor
- LCD indicator with timer
- Durable base
- 5 preset programs
- Overload protection
- Manual speed dial
ACCESSORIES
- Scraper
- Tamper
- Travel lid
- BPA-free Personal blender cup
- Personal Blender Blade System
Functions
BEFORE FIRST USE
Before using your Sage® Blender for the first time, remove any packaging material and promotional labels.
Wash the lid, inner lid, blender jug (refer to "Care & Cleaning") in warm, soapy water with a soft cloth. Rinse and dry thoroughly. Do not place parts in the dishwasher (with the exception of the blender jug).
Please refer to the "Care & Cleaning" Section for further details. The motor base can be wiped with a damp cloth. Dry thoroughly.
GETTING STARTED
Ready Mode
Press ON | OFF button to power the unit to READY mode.
Sleep
After 2 minutes of inactivity, LCD powers off, and the ON | OFF button flashes red.
After 5 minutes of inactivity, the blender turns power OFF. Press the ON | OFF button to reactivate the blender.
VESSELS
This unit features two blending vessels. The Blender base automatically detects the vessel and adjusts blending times in pre-set programs to optimise food results.
2.0 Litre Jug
The jug is recommended for big volumes up to 2 Litres and can be used with all pre-set programs.
Personal Blender Cup & Blade System
The personal blender cup blends smaller volumes up to 700mL. The travel lid transforms it to a Take Away Cup so it's ideal for blended drinks.
Preset programs of PULSE | ICE CRUSH, SMOOTHIE and GREEN SMOOTHIE are enabled. The FROZEN DESSERT and SOUP program are not suitable to use with the Personal Blender accessories and pre-set programs are disabled.
PAUSE / CANCEL
For Manual Blending
First press pauses the selected speed.
Second press Cancels selected speed. Turn the Dial to start blending again.
For Program Blending
First press pauses selected program.
Second press cancels selected program. Press the PROGRAM button to start the Program again.
MANUAL OPERATION

SPEED CONTROL DIAL
Turn the Speed Control Dial clockwise to select one of 12 speed settings from a slow STIR through to a very fast MILL.
To stop blending, turn the Speed Control Dial anticlockwise back to READY.
The blender is programmed to allow manual speeds to run for a total of 6 minutes (2.0L Jug) or 30 Seconds (Personal Blending Cup) before automatically stopping.

Never blend boiling hot liquids. Allow temperature of ingredients to cool down to room temperature before placing into blender jug.
PRESET PROGRAMS
PULSE | ICE CRUSH
A program of continuous pulsing designed to chop food into an even consistency or crush ice cubes.
SMOOTHIE
For dairy-based smoothies. A combination of speeds and pulses designed to combine and aerate ingredients into a smooth and creamy texture.
GREEN SMOOTHIE
For blending whole fruits/vegetables into a smooth beverage. A combination of high speed profiles breaks down tough fibres into very fine particles.
Use the tamper if ingredients become wedged.
FROZEN DESSERT
A high speed program to breakdown frozen fruit/ vegetables into a dessert ready to scoop. Use the tamper for best results.
SOUP
This program is exclusively for creating a Cold to Hot Soup–turning whole ingredients at ambient temperature into a smooth, hot soup. Primarily a high speed program, the program will finish with a slow stir to remove steam bubbles.
![]()
NOTE
Raw foods such as meats and seafood need to be cooked prior to using the SOUP program.
Do not add hot ingredients when using the SOUP program.
CLEAN
Use to remove most of the ingredients off the blender walls and blades. Add 4 cups of warm soapy water to the blender jug and press the CLEAN button. For harder to clean, sticky or thick ingredients, add ½ teaspoon of liquid dish detergent for extra cleaning power. For best results, clean the blender jug this way immediately after use.
Tips
- The inner measuring cap can be removed and oils/liquids or other ingredients added during blending. Extreme care must be taken as depending on the mixture and speeds of operation, splashes can eject from the lid. It is not suggested to remove the inner measuring cap when blending hot liquids.
- Do not exceed the maximum mark when adding foods and liquids into the blender.
- Use the PULSE | ICE CRUSH button when food is too thick or coarse to circulate within the blender jug.
- The scraper and tamper accessories can be used during blending by removing the inner measuring cap. Always make sure the main lid stays firmly in place.
- Ingredients may stick to the sides of the blender jug. To push food back onto the blades with the main lid on (inner cap removed), use the tamper or scraper provided to scrape down the sides of the jug, and continue blending.
- If any moisture or liquid spills on top of the motor base during blending, turn the blender off and unplug from the outlet. Remove the blender jug, and wipe motor base immediately with a dry cloth or paper towel.
- The optimum amount of ice cubes that the blender can process in the jug is 250g (approximately 1 standard ice tray).
- When the blender has been running for 6 minutes in manual mode with the jug or 30 seconds with the personal blender cup, it will automatically turn off. This is a safety feature to protect the motor.
- Thicker mixtures puree more efficiently if the jug is ¼ to ½ full.
- Do not use metal utensils, as they may damage the blades or blender jug.
- To remove any food that cannot easily be scraped out from under the blades, replace lid and turn blender back on high speed for 4–5 seconds to spin foods out from under blades.
Blending Chart (for Jug)
| FOOD | PREPARATION & USAGE | QUANTITY | FUNCTIONS | TIME |
| Grains & seeds | Mill into flour. Use in bread, pizza doughs, cakes, muffins and flour batters. | 250g–420 1–2 cups | MILL speed | 20–30 seconds |
| Dried legumes & corn e.g. soy beans, chickpeas popping corn | Mill into flour. Use in combination with plain or self-raising flour for breads, cakes, muffins, pancakes. | 250g–630g 1–2 cups | MILL speed | 20–30 seconds |
| Spices | To make ground spices. Use whole spices except for cinnamon quills that need to be broken half. Store in airtight containers. | Minimum ¼ cup 8–16 cinnamon sticks | MILL speed | 20–30 seconds |
| Raw nuts | To make nut meal. Use in cakes, biscuits and muffins. | 100g–400g ½–2cups | MILL speed | 8–15 seconds |
| Roasted nuts | To make nut butters and spreads. | 100g-400g ½–2 cups | BLEND speed, use tamper | 20–30 seconds |
| White sugar | Mill to make pure icing sugar or powdered sugar. | 100g–200g 1–2 cups | MILL speed | 15–30 seconds |
| Biscuits/cookies | Break biscuits/cookies in half. Blend to form crumbs. Use for cheesecake crusts. | 250g | PULSE | ICE CRUSH | 20–30 seconds |
| Bread crumbs | Remove crusts. Cut bread into 2½ cm cubes. Use in crumb coatings, stuffings or in meatballs and meat patties. | 120g–400g (up to 5 slices) | MIX speed | 20–30 seconds |
| Mayonnaise | Mix the egg yolk, mustard and vinegar or lemon juice. Add oil slowly through the lid. Use for dressing. | Up to 4 egg yolks and 2 cups of oil. | MIX speed | 1 min 30 sec |
| Hard cheeses (like Parmesan and Pecorino) | Cut into 3cm cubes. Use in creamy sauces, pasta dishes. | Maximum 250g | CHOP speed | 15–25 seconds |
| Cream | Whip cream to firm peaks. Add sugar or vanilla before blending, if desired. | 300–600mL | CHOP speed | 25–60 seconds |
| Raw vegetables | Peel and cut into 2cm cubes. Finely chopped. Use for stuffing, filling, bolognese, stews and casseroles. | 200g | CHOP speed | 4–6 seconds |

| FOOD | PREPARATION & USAGE | QUANTITY | FUNCTIONS | TIME |
| Coconut Mixture | Sliced coconuts. Size: not more than 25mm Use: drinks | 600 + water 1300 | Mill speed | 10 seconds |
| Blended Soups | Cool to room temperature | 700 ml | Soup speed | 30 seconds |
![]()
| FOOD | PREPARATION & USAGE | QUANTITY | FUNCTIONS | TIME |
| Smoothie | Milk, chopped fresh fruits, yoghurt, ice cream | Maximum 400 ml | SMOOTHIE | 30 seconds |
Dry milling
Please note that milling hard ingredients like spices, nuts, sugar, coffee, grains, etc will cause scratching and clouding to the inside surfaces of the jug. This is a cosmetic result from milling these kinds of ingredients, and does not affect the performance of the jug.
Avoid over-processing spices though. Essential oils found in spices when combined with heat can damage the jug surface.
This blending chart should be used as a guide only.
Troubleshooting
| PROBLEM | EASY SOLUTION |
| Motor doesn't start or blade doesn't rotate |
|
| Food is unevenly chopped |
|
| Food is chopped too fine or is watery |
|
| Food sticks to blade and jug |
|
| Food stuck under blades |
|
| Blender overloaded |
|
Care & Cleaning
Vessels and lids
To avoid food drying on blades, vessels and lids, follow the below steps as soon as possible after use:
- Rinse most of the ingredients off the vessels and lids.
2-litre jug
- Add 1L of warm water and 1–2 drops of detergent and press the CLEAN button.
- Rinse the jug and lid again and/or wash separately in warm soapy water with a soft cloth or bottle brush.
Personal blender attachments
- All personal blender attachments are dishwasher safe on top shelf.
- To help removing food residues from the blades and cup walls you can add 250mL of cold water to the personal blender cup and press CLEAN.
- Rinse the cup with warm water afterwards.
- If not clean yet, hand wash in warm, soapy water using a mild liquid detergent and non-abrasive sponge.
There is a risk of pressurisation from hot water and / or detergent. When rinsing the personal blender cup by using the CLEAN cycle never add hot or even warm water, as the steam produced can create dangerous pressurisation. Do not add detergent, as the foam produced will expand and may cause pressurisation.
Oils in citrus rind can damage the material of your jug and personal blender cup if being exposed to it for a longer period. Always clean your blender jug and personal blender cup immediately after processing citrus rind.
Motor base
To clean the motor base, wipe with a soft, damp cloth then dry thoroughly. Wipe any excess food particles from the power cord.
Cleaning agents
Do not use abrasive scouring pads or cleaners on either the motor base or the jug, as they may scratch the surface. Use only warm soapy water with a soft cloth.
Dishwasher
The blender jug, personal blender cup, personal blender blade system, tamper, scraper and all lids can be washed in the dishwasher on a standard wash cycle. Jug can be placed on the bottom shelf, however the personal blender cup and lids should be on the top shelf only.
Stubborn food stains and odours
Strong smelling foods such as garlic and fish, and some vegetables such as carrots, may leave an odour or stain.
2 Litre jug
To remove, clean the jug and lid using the CLEAN instructions. Add 2 tablespoons bicarbonate of soda and ½ cup (125mL) vinegar into jug and let the mixture froth for 1 minute. Scrub the jug and lid with the mixture using a soft dishwashing brush. Add 2 cups warm water and allow to stand for 5 minutes. Attach jug to blender base. Secure lid and then press the CLEAN button. Thoroughly rinse the jug, and allow to air dry. Store jug and lid with the lid off to allow air to circulate.
Personal blender cup
To remove, pour warm soapy water and fill to the MAX mark. Set aside to soak for 5 minutes. Then wash with a mild detergent and warm water, rinse well and dry thoroughly. Do not use the CLEAN function to remove stubborn stains and odours from your personal blender cup.
Dry milling
Milling hard ingredients like spices, nuts, sugar, coffee, grains, etc will cause scratching and clouding to the inside surfaces of the jug.
Some spices and herbs release aromatic oils that may discolour the jug or leave an aroma. These are cosmetic results from milling these kinds of ingredients, and does not affect the performance of the jug.
Storage
Store your blender upright with the blender jug assembled on the motor base, or beside it. Store the personal blender cup with the blade system assembled. Do not place anything on top. To allow air to circulate, keep the lid off.

Documents / ResourcesDownload manual
Here you can download full pdf version of manual, it may contain additional safety instructions, warranty information, FCC rules, etc.
Download Sage the Super Q BBL920 / SBL920 - Blender 2L, 2400W Manual
Advertisement


Need help?
Do you have a question about the the Super Q BBL920 and is the answer not in the manual?
Questions and answers