
Subscribe to Our Youtube Channel
Related Manuals for OJ Electronics AWG4


Summary of Contents for OJ Electronics AWG4
- Page 1 67433F 08/22 (KJE) UWG4/AWG4 WiFi Touch Thermostat Interactive User Manual > WWW.OJELECTRONICS.COM Contents © 2022 OJ Electronics A/S...
- Page 2 ... . . 9.2.1.1 Adjust... for a few hours 10.4.5 Floor Sensor Calibration ..< > PAGE 2 Contents © 2022 OJ Electronics A/S...
-
Page 3: Menu Overview
Floor Sensor Calibration Installer Settings Heating Schedule Daylight Saving Time Room Sensor Calibration WiFi/Weather Unit View/Edit Schedule Floor Protection Language Reset to Factory Schedule Factory Reset Information Support User Reset < > PAGE 3 Contents © 2022 OJ Electronics A/S... - Page 4 The thermostat comes with a preset heating schedule the rest. that is suitable for most homes. Unless you change the settings, the thermostat will operate according to this preset heating schedule. < > PAGE 4 Contents © 2022 OJ Electronics A/S...
-
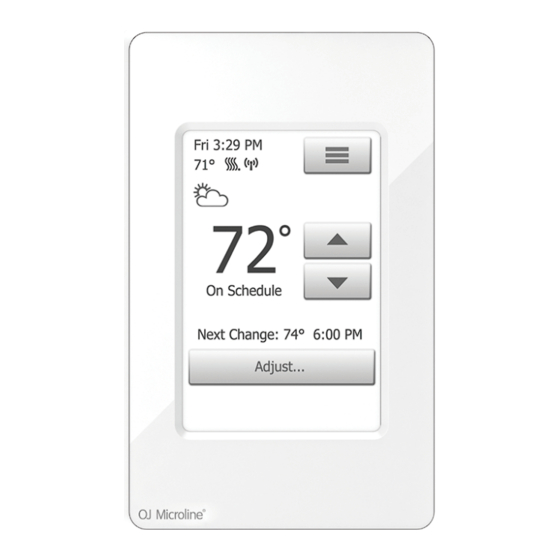
Page 5: General Operation
The thermostat is an intuitively operated touch thermostat in which the touchscreen is used to navigate through the menus and to change the settings. < > PAGE 5 Contents © 2022 OJ Electronics A/S... -
Page 6: Navigation Buttons
“Arrow Up”, “Arrow Down”, “Arrow Left”, and “Arrow Right” are used to toggle settings and values and to navigate through the menus. The “Arrow Up” and “Arrow Down” buttons are repeat buttons. Holding either of them will make the value change continuously. < > PAGE 6 Contents © 2022 OJ Electronics A/S... - Page 7 If this does not occur, there is a ground fault! In case of a ground fault, it is important to have the installation checked by a qualified electrician according to local and national regulations. < > PAGE 7 Contents © 2022 OJ Electronics A/S...
- Page 8 Try switching the thermostat off and then back on again. If the LED still lights constantly, the GFCI/EGFPD is defective and the thermostat must be replaced. Note: The LED lights up briefly without flashing during every power-up. < > PAGE 8 Contents © 2022 OJ Electronics A/S...
- Page 9 User Settings Daylight Saving Time Sensor Type ° Installer Settings Unit Floor Protection en saver Floor Sensor WiFi Settings Language Calibration Room Sensor Child Lock Information Calibration Display Brightness Support < > PAGE 9 Contents © 2022 OJ Electronics A/S...
- Page 10 Heating is activated with adaptive mode icons Arrow Up Note icons Arrow Down Try Again screen saver Arrow Left WiFi connection screen saver Arrow Right Weather screen saver screen saver < > PAGE 10 Contents screen saver © 2022 OJ Electronics A/S...
-
Page 11: Startup Wizard
The Wizard will take you through tests, which ensure that the thermostat is fully functional. After the tests, the Wizard leads you through a basic setup routine to ensure that you have the right settings. < > PAGE 11 Contents © 2022 OJ Electronics A/S... -
Page 12: Set The Language
First you must set the language. The chosen language will become the default language for the thermostat. The language can be changed under Menu/User Settings/Language. 1. Tap the language you prefer. 2. Tap the “Arrow Right” button to continue. < > PAGE 12 Contents © 2022 OJ Electronics A/S... -
Page 13: System Test
Note: if the thermostat is to operate with an air/room sensor only, the floor sensor test will result in “Fail” being shown. 1. Tap the “Arrow Right” button to continue. < > PAGE 13 Contents © 2022 OJ Electronics A/S... -
Page 14: Safety Test
Fault error text is shown on the display. 2. Press the power/reset button on the lower right side of the thermostat to reset the GFCI/EGFPD. 3. Tap the “Arrow Right” button to continue. < > PAGE 14 Contents © 2022 OJ Electronics A/S... -
Page 15: Set The Preferred Temperature Unit
7.4 Set the preferred temperature unit 1. Tap the temperature unit that you prefer. 2. Tap the “Arrow Right” button to continue. The temperature unit can be changed under Menu/User Settings/Unit < > PAGE 15 Contents © 2022 OJ Electronics A/S... -
Page 16: Enter The Distributor Id
2. Tap the “Arrow Right” button to continue (the button becomes available when a valid Distributor ID has been entered). Important! It is imperative that you make a note of the “Distributor ID” found in the thermostat under “Menu/User Settings/Information”. < > PAGE 16 Contents © 2022 OJ Electronics A/S... -
Page 17: Setting The Load Measurement
(if set to “OFF”, you will later have to set the floor load manually). 2. Tap the “Arrow Right” button to continue. This setting can be changed later if a factory reset is performed. < > PAGE 17 Contents © 2022 OJ Electronics A/S... -
Page 18: Set The Floor Load
2. Tap the “Arrow Right” button to continue. If you do not know the value for your floor, leave it at the default. This setting can be changed later if a factory reset is performed. < > PAGE 18 Contents © 2022 OJ Electronics A/S... -
Page 19: Set The Sensor Type
Choose which floor sensor type is used with the thermostat. 1. Tap the sensor type installed in the floor. 2. Tap the “Arrow Right” button to continue. The thermostat is calibrated for use with standard sensors from OJ Electronics: ETF-110/99C - 10kΩ (US) ETF-144/99T - 12kΩ (CA) The value can be changed later from the Installer Settings menu. -
Page 20: Set The Date
1. Tap the “Arrow” buttons to change the values. 2. Tap the preferred date format. 3. Tap the “Arrow Right” button to continue. The date can be changed under Menu/User Settings/Date < > PAGE 20 Contents © 2022 OJ Electronics A/S... -
Page 21: Set The Time
3. Uncheck if you do not want to synchronize the thermostat time with that of the server, which is set up under WiFi settings. 4. Tap the “Arrow Right” button to continue. The time can be changed under Menu/User Settings/Time < > PAGE 21 Contents © 2022 OJ Electronics A/S... -
Page 22: Set Floor Protection
Set the floor protection according to the floor type. 1. Tap the preferred limits that are used to protect the floor. 2. Tap “√” to continue Floor protection settings can be changed under Menu/Installer Settings/Floor Protection. < > PAGE 22 Contents © 2022 OJ Electronics A/S... -
Page 23: Thermostat Activation
7.12 Thermostat activation 1. Tap the “√” button to activate the thermostat. < > PAGE 23 Contents © 2022 OJ Electronics A/S... -
Page 24: Programed Heating Schedule
The thermostat comes with a preprogramed schedule for easy and economic heating control of most homes, see 11. Factory Settings: Preset Schedule. The schedule can be changed under Menu/Heating Schedule < > PAGE 24 Contents © 2022 OJ Electronics A/S... -
Page 25: Operating Choices
9. Operating Choices 9.1 Scheduled operation 9.2 Manual Operation 9.2.1 Manual Operation Adjust 9.2.1.1 Adjust... for a few hours 9.2.1.2 Adjust... for a few days 9.2.1.3 Adjust... permanently < > PAGE 25 Contents © 2022 OJ Electronics A/S... -
Page 26: Scheduled Operation
8. Current thermostat operating mode. 9. Information on the next thermostat behavior change. 10. Tap here to adjust the length of time the displayed target temperature/setpoint is to remain valid. < > PAGE 26 Contents © 2022 OJ Electronics A/S... -
Page 27: Manual Operation
11. Tap here to return to Scheduled Operation. Available only when the thermostat is the Scheduled Operation. operated manually. < > PAGE 27 Contents © 2022 OJ Electronics A/S... -
Page 28: Manual Operation Adjust
When the set time period has elapsed, the thermostat will automatically revert to Scheduled Operation. • Adjust… for a few hours • Adjust… for a few days • Adjust… permanently < > PAGE 28 Contents © 2022 OJ Electronics A/S... -
Page 29: Adjust... For A Few Hours
4. Tap the “Arrow” buttons for the parameter that you want to change. 5. Confirm your choice with “√” or discard it with “X”. The thermostat will automatically return to the home screen. < > PAGE 29 Contents © 2022 OJ Electronics A/S... -
Page 30: Adjust... For A Few Days
The “for a few days...” option can be disabled by or rescheduled by repeating steps 1 to 7. 9. Tap the ON/OFF button to activate/deactivate the function. 10. Confirm your choice with “√” or discard it with “X”. < > PAGE 30 Contents © 2022 OJ Electronics A/S... - Page 31 1. On the home screen, adjust the temperature to the preferred level using the “Arrow Up” and “Arrow Down” buttons. 2. Tap the “Adjust…” button. 3. Then tap the “permanently” button. The thermostat will automatically return to the home screen. < > PAGE 31 Contents © 2022 OJ Electronics A/S...
-
Page 32: Thermostat Setup Menu
10. Thermostat Setup Menu Heating Schedule Energy Use User Settings Installer Settings screen saver WiFi Settings < > PAGE 32 Contents © 2022 OJ Electronics A/S... -
Page 33: Heating Schedule
Grayed out events marked with a red “X” are not currently in use. 5. To change the start time, temperature, and activity status for a specific event, tap on the event to the right of the number. < > PAGE 33 Contents © 2022 OJ Electronics A/S... - Page 34 You can then set the schedule for the other days by repeating steps 3 through 8. 12. Once you have finished setting the schedules, tap the “Back” button to return to the Thermostat Setup Menu. < > PAGE 34 Contents © 2022 OJ Electronics A/S...
-
Page 35: Energy Use
3. You can toggle between the readouts using the “Arrow Right” or “Arrow Left” button. 4. Tap the “Back Arrow” button to return to the menu. 5. Tap on “Edit Energy Tariff…” to change the energy tariff, see “11.3.4 Energy Tariff”. < > PAGE 35 Contents © 2022 OJ Electronics A/S... -
Page 36: User Settings
Note: if an item is grayed out, it is not available due to other settings. Child Lock Display Brightness Screen Saver Date Time Daylight Saving Time ° Unit Language Information Support User Reset < > PAGE 36 Contents © 2022 OJ Electronics A/S... -
Page 37: Child Lock
“L”. If done correctly, the home screen will appear. < > PAGE 37 Contents © 2022 OJ Electronics A/S... - Page 38 10.3.1 Child Lock 2/2 Please note that the child lock will be reactivated when the thermostat returns to screen saver mode – unless it is deactivated under Menu/User Settings/Child Lock. < > PAGE 38 Contents © 2022 OJ Electronics A/S...
-
Page 39: Display Brightness
4. Select one of the five levels of brightness using the “Arrow Up” or “Arrow Down” button. 5. Confirm your choice with “√” or discard it with “X”. The thermostat will automatically return to “User Settings”. < > PAGE 39 Contents © 2022 OJ Electronics A/S... -
Page 40: Screen Saver
• Time shown in large format. Temperature and date shown in small format. (See example) • Screen Off. 5. Confirm your choice with “√” or discard it with “X”. The thermostat will automatically return to “User Settings”. < > PAGE 40 Contents © 2022 OJ Electronics A/S... - Page 41 5. Tap the date format that you prefer. • Use DD-MM-YYYY • Use MM-DD-YYYY 6. Confirm your settings with “√” or discard them with “X”. The thermostat will automatically return to “User Settings”. < > PAGE 41 Contents © 2022 OJ Electronics A/S...
- Page 42 5. Tap the time format that you prefer. • Use 24 hours • Use 12 hours (AM/PM) 6. Confirm your settings with “√” or discard them with “X”. The thermostat will automatically return to “User Settings”. < > PAGE 42 Contents © 2022 OJ Electronics A/S...
-
Page 43: Daylight Saving Time
4. Tap the “OFF/ON” button to the setting that you prefer. 5. Confirm the setting with “√” or discard it with “X”. The thermostat will automatically return to “User Settings”. < > PAGE 43 Contents © 2022 OJ Electronics A/S... - Page 44 4. Tap the unit that you prefer: • Celsius • Fahrenheit 5. Confirm your choice with “√” or discard it with “X”. The thermostat will automatically return to “User Settings”. < > PAGE 44 Contents © 2022 OJ Electronics A/S...
- Page 45 5. Tap the language that you prefer: • English • French • Spanish 6. Confirm your choice with “√” or discard it with “X”. The thermostat will automatically return to “User Settings”. < > PAGE 45 Contents © 2022 OJ Electronics A/S...
- Page 46 7. Tap the “Back” button, several times if necessary, to return to “User Settings”. 8. Tap the “Arrow Right” and “Arrow Left” buttons to toggle between the information screens. QR Code is a registered trademark of DENSO WAVE INCORPORATED. < > PAGE 46 Contents © 2022 OJ Electronics A/S...
- Page 47 2. Then tap the “User Settings” button to access the various user settings. 3. Tap the “Arrow Right” button to access the second page of User Settings. 4. Tap the “Support” button. 5. Tap the “Back” button to return to “User Settings”. < > PAGE 47 Contents © 2022 OJ Electronics A/S...
-
Page 48: User Reset
6. Tap “Reset Thermostat” to reset all user settings to factory default. A confirmation screen is displayed briefly before the thermostat reverts to “User Settings”. All user and WiFi settings are now reset. < > PAGE 48 Contents © 2022 OJ Electronics A/S... -
Page 49: Installer Settings
Note: if an item is grayed out, it is not available due to other settings. Adaptive Function Open Window Sensor Application Sensor Type Floor Sensor Calibration Room Sensor Calibration Floor Protection Factory Reset < > PAGE 49 Contents © 2022 OJ Electronics A/S... -
Page 50: Adaptive Function
4. Tap the “OFF/ON” button to the setting that you prefer. 5. Confirm your choice with “√” or discard it with “X”. The thermostat will automatically return to “Installer Settings”. < > PAGE 50 Contents © 2022 OJ Electronics A/S... -
Page 51: Open Window
The thermostat will automatically return to “Installer Settings”. 6. If an open window is detected by the thermostat, the “Open Window” screen will appear, the function can be canceled by tapping “Cancel”. < > PAGE 51 Contents © 2022 OJ Electronics A/S... -
Page 52: Sensor Application
Note! Floor Protection is not active while using the Sensor Application “Room”. Note that certain menu options will be grayed out and inaccessible as they are only applicable with the floor sensor. < > PAGE 52 Contents © 2022 OJ Electronics A/S... - Page 53 The thermostat will automatically return to “Installer Settings”. Note that, when changing Sensor Application, certain menu options may be grayed out and inaccessible as they are not applicable with the current settings. < > PAGE 53 Contents © 2022 OJ Electronics A/S...
-
Page 54: Sensor Type
6. If “Custom” is chosen, you must provide resistance values for the sensor concerned at four given temperatures. Ask the supplier of your sensor for these values. Tap the “Arrow Up” or “Arrow Down” to set the resistance for the various temperatures. < > PAGE 54 Contents © 2022 OJ Electronics A/S... - Page 55 8. When all four values are set, tap the “Arrow Right” button. 9. A warning screen will be displayed. Tap “√” to confirm the use of an alternative sensor. The thermostat will automatically return to “Installer Settings”. < > PAGE 55 Contents © 2022 OJ Electronics A/S...
-
Page 56: Floor Sensor Calibration
5. Confirm that you want to calibrate the sensor with “√” or cancel with “X”. If the temperature is confirmed with “√”, a confirmation screen will be displayed briefly. The thermostat will automatically return to “Installer Settings”. < > PAGE 56 Contents © 2022 OJ Electronics A/S... -
Page 57: Room Sensor Calibration
5. Confirm that you want to calibrate the sensor with “√” or cancel with “X”. If the temperature is confirmed with “√”, a confirmation screen will be displayed briefly. The thermostat will automatically return to “Installer Settings”. < > PAGE 57 Contents © 2022 OJ Electronics A/S... -
Page 58: Floor Protection
Quick Guide. < > PAGE 58 Contents © 2022 OJ Electronics A/S... - Page 59 The thermostat will automatically return to “Installer Settings”. NOTE: If the maximum floor temperature is set too high, temperature sensitive floor types may be permanently damaged. For precise information, please ask your flooring supplier. < > PAGE 59 Contents © 2022 OJ Electronics A/S...
-
Page 60: Factory Reset
6. Tap “Reset Thermostat” if you want to restore the factory settings. A confirmation screen will be displayed. The thermostat will then be reset and the “Startup Wizard” will appear on the screen. Note! All personal settings will be lost. < > PAGE 60 Contents © 2022 OJ Electronics A/S... - Page 61 You can access numbers and special characters by tapping the “1$ ñç” button. 9. Confirm your network key by tapping the “√” button. 10. If you choose “X”, the wizard will return to step 3. < > PAGE 61 Contents © 2022 OJ Electronics A/S...
- Page 62 18. An activation email and website link will be sent to the email address you enter. Tap the “√” button. 19. If you choose “X”, the wizard will return to step 3. < > PAGE 62 Contents © 2022 OJ Electronics A/S...
- Page 63 You do not have to set up the account immediately; you can wait until you have completed the WiFi/Weather wizard. 21 22 23. To continue the wizard tap the “√” button to confirm verification and proceed to the weather settings. < > PAGE 63 Contents © 2022 OJ Electronics A/S...
-
Page 64: Weather Settings
After a few seconds, your ZIP/Postal Code and city name should appear on the screen. 29. Tap the “√” button. The thermostat will return to the menu. 30. Tap the “Back” button to return to the home screen. < > PAGE 64 Contents © 2022 OJ Electronics A/S... -
Page 65: Viewing The Weather Forecast
After a few minutes, a weather icon will appear in the top right corner of the home screen. 1. Tap the weather icon to access the weather forecast. 2. Tap the “Back” button to return to the home screen. < > PAGE 65 Contents © 2022 OJ Electronics A/S... - Page 66 1. Open the Google Home app on your smartphone/tablet. 2. Press the room of which you would like to disconnect the thermostat. 3. Press the settings symbol, upper right corner. 4. Press “Unlink OJ Microline UWG4” < > PAGE 66 Contents © 2022 OJ Electronics A/S...
- Page 67 “Hey Google, what is the temperature on *all thermostats*?” Increasing/decrease the temperature: “Hey Google, increase/decrease the temperature in the *Bedroom* with 4 degrees” “Hey Google, make the *Bedroom* warmer” “Hey Google, increase/decrease the temperature on *all thermostats*” < > PAGE 67 Contents © 2022 OJ Electronics A/S...
- Page 68 9. In the upper right corner, press search and type “UWG4” – choose the skill called “UWG4 Thermostat”. 10. Press “enable to use” – You will now be forwarded to the login page to your thermostat. < > PAGE 68 Contents © 2022 OJ Electronics A/S...
- Page 69 5. Press the settings symbol, upper right corner. 6. Press the delete symbol, upper right corner and confirm that you would like to disconnect. Your thermostat is now disconnected from your Amazon Alexa device. < > PAGE 69 Contents © 2022 OJ Electronics A/S...
- Page 70 Read out a temperature: “Alexa, what is the temperature in the *Office*?” Increasing/decrease the temperature: “Alexa, increase/decrease the temperature in the *Bedroom* with 4 degrees” “Alexa, increase/decrease the temperature on *all thermostats*” < > PAGE 70 Contents © 2022 OJ Electronics A/S...
-
Page 71: Factory Settings
82°F / 28°C 88°F / 31°C 01:00 PM 74°F / 23.5°C 74°F / 23.5°C 05:00 PM 82°F / 28°C 88°F / 31°C 11:00 PM 74°F / 23.5°C 74°F / 23.5°C √ < > PAGE 71 Contents © 2022 OJ Electronics A/S... -
Page 72: Troubleshooting
• Three circles containing dots are shown on the screen; the thermostat cannot be operated. The thermostat is in “Child Lock” mode. See the section titled “Child Lock” in this manual for instructions on how to unlock it. < > PAGE 72 Contents © 2022 OJ Electronics A/S... - Page 73 • The floor is warming up, but more slowly than expected. - Floor protection might be set to “Laminate”, which prevents rapid heating of the floor. - The heating element might have insufficient capacity to heat the floor. < > PAGE 73 Contents © 2022 OJ Electronics A/S...
- Page 74 (http://www.tech-faq.com/how-to-change-wep-to-wpa.html). Your WiFi Touch Thermostat can still control your floor heating system without wireless network connection. As the best course of action, OJ Electronics recommends that you upgrade your security settings to properly protect your network from hackers. If that is not possible, contact your network administrator.
- Page 75 Other devices are Try turning off other wireless devices (Bluetooth, WiFi, wireless phones/cameras) that may cause interference, then test the interfering with the wireless WiFi Touch Thermostat’s network connection. signal < > PAGE 75 Contents © 2022 OJ Electronics A/S...
- Page 76 Important! It is imperative that you make a note of the “Distributor ID” found in the thermostat under “Menu/User Settings/Information” before performing a “Factory Reset”. The thermostat will not operate without it. < > PAGE 76 Contents © 2022 OJ Electronics A/S...
- Page 77 < Contents The OJ trademark is a registered trademark belonging to OJ Electronics A/S · © 2022 OJ Electronics A/S...
Need help?
Do you have a question about the AWG4 and is the answer not in the manual?
Questions and answers