
Related Manuals for Kumio ICM1221


Summary of Contents for Kumio ICM1221
- Page 1 ICE MAKER INSTRUCTION MANUAL Model: ICM1221 THANK YOU FOR CHOOSING OUR ICE MAKER PLEASE READ THE MANUAL CAREFULLY BEFORE OPERATING...
-
Page 2: Table Of Contents
Installation 7 Français 25 Bedienfeld 7 Español 35 Inbetriebnahme und Funktionen 8 Italiano 45 Bedienung 8 Reinigung und Wartung 9 Fehlerbehebung 1 1 Hinweise zur Entsorgung 12 Hersteller & Importeur (UK) 12 Spezielle Entsorgungshinweise für Verbraucher in Deutschland 13 TECHNISCHE DATEN ICM1221 Artikelnummer Stromversorgung 220-240 V ~ 50 Hz... -
Page 3: Sicherheitshinweise
SICHERHEITSHINWEISE • Schließen Sie das Gerät nur an geerdete Steckdosen an, die der Nennspannung des Geräts entsprechen. • Wenn Sie das Gerät bewegen, benutzen Sie die Griffe. • Stellen Sie das Gerät auf einen ebenen Untergrund. • Benutzen Sie das Gerät nur in Innenräumen. •... - Page 4 WARNUNG Gefahr durch Feuer/brennbare Materialien! Bitte beachten Sie die örtlichen Vorschriften zur Entsorgung von Geräten mit brennbaren Kältemitteln und Gasen. • Halten Sie die Lüftungsöffnungen im Gerätegehäuse frei von Hindernissen. • Beschädigen Sie nicht den Kältemittelkreislauf. • Verwenden Sie keine mechanischen Vorrichtungen oder anderen Mittel, um den Auftauprozess oder den Eisgewinnungsprozess zu beschleunigen.
-
Page 5: Geräteübersicht
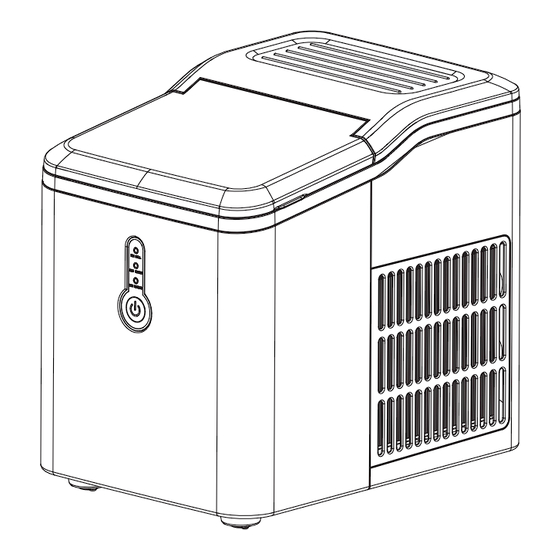
GERÄTEÜBERSICHT Mikroschalterträger Vorderes Gehäuse Verdampfer Eisschaufel Wasserwanne Oberer Deckel Eisschaufelplatte Klarsichtdeckel Eiswürfelbehälter Motorhalterung Wassertank Hinteres Gehäuse Bedienfeld Lüftung Tasten... -
Page 6: Installation
INSTALLATION 1. Während des Transports darf das Gerät nicht um mehr als 45 Grad gekippt werden. Drehen Sie das Gerät nicht auf den Kopf. Dadurch könnten der Kompressor und das Dichtungssystem beschädigt werden. 2. Entfernen Sie alle Verpackungsmaterialien, überprüfen Sie das Gerät sorgfältig und vergewissern Sie sich, dass das Gerät, das Netzkabel und der Stecker unbeschädigt und funktionstüchtig sind. -
Page 7: Inbetriebnahme Und Funktionen
INBETRIEBNAHME UND FUNKTIONEN Inbetriebnahme 1. Stecken Sie den Netzstecker in die Steckdose. Die Anzeige „ICE MAKING“ blinkt und das Gerät startet die Enteisungsfunktion. 2. Drücken Sie die POWER-Taste. Die Anzeige „ICE MAKING“ leuchtet dauerhaft. Dann startet automatisch die Eiswürfelherstellung. Nachdem die Eiswürfelherstellung beendet ist, wird eine Enteisung durchgeführt. - Page 8 Schritt 2 • Stecken Sie den Stecker in die Steckdose und drücken Sie den Netzschalter, um das Gerät zu starten. • Wenn der Eisbehälter voll ist, nehmen Sie das Eis umgehend heraus. Überfüllen Sie den Eisbehälter nicht. Hinweise zur Bedienung 1.
- Page 9 Das Filtersieb im Wassertank muss regelmäßig entfernt und gereinigt werden, um zu verhindern, dass Ablagerungen den Wassereinlass verstopfen. Gehen Sie dabei vor, wie in der Abbildung unten dargestellt. Nehmen Sie die Eisauffangschale und das Filtersieb im Wassertank zur Reinigung heraus, reinigen Sie das Filtersieb mit sauberem Wasser und setzen Sie die Teile dann wieder ein.
-
Page 10: Fehlerbehebung 1
FEHLERBEHEBUNG 1. Beachten Sie, dass sich bei einer Unterbrechung der Stromversorgung, wenn der Stecker aus der Steckdose gezogen oder wenn die POWER-Taste während eines Eisherstellungszyklus gedrückt wurde, kleine Eissplitter bilden können, die sich in der Automatik-Eisschaufel festsetzen und diese blockieren. Entfernen Sie in diesem Fall die Eissplitter, indem Sie den Stecker aus der Steckdose ziehen, die Eisschaufel vorsichtig zur Rückseite des Innengehäuses schieben und die Eissplitter entfernen. -
Page 11: Hinweise Zur Entsorgung
Problem Mögliche Ursache Lösungsansatz Das Gerät läuft, Das Magnetventil ist Lassen Sie das Magnetventil aber das Wasser beschädigt. ersetzen. Wenden Sie sich an hat sich erwärmt. einen Fachbetrieb. Der Eisbehälter Der ICE-FULL-Sensor ist Lassen Sie den ICE-FULL-Sensor ist voll, aber die beschädigt. -
Page 12: Spezielle Entsorgungshinweise Für Verbraucher In Deutschland
SPEZIELLE ENTSORGUNGSHINWEISE FÜR VERBRAUCHER IN DEUTSCHLAND Entsorgen Sie Ihre Altgeräte fachgerecht. Dadurch wird gewährleistet, dass die Altgeräte umweltgerecht verwertet und negative Auswirkungen auf die Umwelt und menschliche Gesundheit vermieden werden. Bei der Entsorgung sind folgende Regeln zu beachten: • Jeder Verbraucher ist gesetzlich verpflichtet, Elektro- und Elektro- nikaltgeräte (Altgeräte) sowie Batterien und Akkus getrennt vom Hausmüll zu entsorgen. - Page 13 • Bei einem Vertrieb unter Verwendung von Fernkommunikationsmitteln ist die unentgeltliche Abholung am Ort der Abgabe auf Elektro- und Elektronikgeräte der Kategorien 1, 2 und 4 gemäß § 2 Abs. 1 ElektroG, nämlich „Wärmeüberträger“, „Bildschirmgeräte“ (Oberfläche von mehr als 100 cm²) oder „Großgeräte“ (letztere mit mindestens einer äußeren Abmessung über 50 Zentimeter) beschränkt.
- Page 14 CONTENT Safety Instructions 16 Device Overview 18 Installation 19 Control Panel 19 Commissioning and Functions 20 Operation 20 Cleaning and Maintenance 21 Troubleshooting 23 Disposal Considerations 24 Manufacturer & Importer (UK) 24 TECHNICAL DATA ICM1221 Item number Power supply 220-240 V~ 50 Hz...
-
Page 15: Safety Instructions
SAFETY INSTRUCTIONS • Check that the mains voltage corresponds to the rating of the appliance before operating. • Use handles or knobs when moving. Place on a flat stable surface for use. Do not use outdoors. • Do not use near or in the immediate vicinity of a bath or swimming pool or any source of liquid. - Page 16 WARNING Danger from fi re/fl ammable materials. Please observe the local regulations for the disposal of units with fl ammable refrigerants and gases. • Keep ventilation openings in the unit housing free of obstacles. • Do not damage the refrigerant circuit. •...
-
Page 17: Device Overview
DEVICE OVERVIEW Micro switch support Front housing Evaporator Ice shovel Water tray Top cover Ice shovel board Transparent lid Ice basket Motor mount Water reservoir Back housing Control panel Air vent Buttons... -
Page 18: Installation
INSTALLATION 1. During transportation, do not tilt the machine more than 45 degrees. Do not reverse the machine. This may damage the compressor and the sealing system. 2. Remove all packing materials, check the machine carefully and make sure that the machine, power cord and plug are normal. -
Page 19: Commissioning And Functions
COMMISSIONING AND FUNCTIONS Commissioning 1. Insert the mains plug into the socket. The “ICE MAKING “ indicator flashes, and the machine will start the deicing function. 2. Press the POWER button, the “ICE MAKING” indicator light is always on and then the ice block will be made automatically. -
Page 20: Cleaning And Maintenance
Notes on operation 1. The three cycles used for the first time, the ice produced is small and irregular. 2. When the ice basket is full, please take out the ice immediately, do not let the ice overflow the ice basket. CLEANING AND MAINTENANCE 1. - Page 21 The filter screen in the water tank must be removed and cleaned regularly to prevent deposits from clogging the water inlet. Proceed as shown in the figure below. Remove the ice collection tray and the filter screen in the water tank for cleaning, clean the filter screen with clean water and then reinsert the parts.
-
Page 22: Troubleshooting
TROUBLESHOOTING 1. Please note, if a power failure occurs due to disconnection of the power cord, or the power button has been pushed off during an ice making cycle, small ice chips may formed and lodge in the automatic shovel causing it to jam. If this occurs, the ice chips may be removed by disconnecting the power cord and gently pushing the shovel to the rear of the cabinet and removing the ice chips, then restarting. -
Page 23: Disposal Considerations
Problem Possible Cause Suggested Solutions The ice basket is The Ice full sensor is Have the ice full sensor replaced. full, but the “ICE damaged. Use the appliance indoors. FULL” indicator light does not come on. Contact a specialist company. DISPOSAL CONSIDERATIONS If there is a legal regulation for the disposal of electrical and electronic devices in your country, this symbol on the... - Page 24 Consignes de sécurité 26 Aperçu de l‘appareil 28 Installation 29 Panneau de commande 29 Mise en marche et fonctions 30 Utilisation 30 Nettoyage et maintenance 31 Résolution des problèmes 33 Informations sur le recyclage 34 Fabricant et importateur (UK) 34 FICHE TECHNIQUE ICM1221 Numéro d'article Alimentation 220-240 V ~ 50 Hz...
-
Page 25: Consignes De Sécurité
CONSIGNES DE SÉCURITÉ • Connectez uniquement l‘appareil à des prises de terre correspondant à la tension nominale de l‘appareil. • Pour déplacer l‘appareil, utilisez les poignées. • Placez l‘appareil sur une surface plane. • N‘utilisez l‘appareil qu‘à l‘intérieur. • N‘utilisez pas l‘appareil près d‘une baignoire ou d‘une piscine. •... - Page 26 MISE EN GARDE Danger d‘incendie / matières infl ammables ! Veuillez respecter les réglementations locales pour l‘élimination des appareils contenant des réfrigérants et des gaz infl ammables. • Gardez les ouvertures de ventilation dans le boîtier de l‘appareil dégagées. • N‘endommagez pas le circuit frigorifi que. •...
-
Page 27: Aperçu De L'appareil
APERÇU DE L‘APPAREIL Porte-micro rupteur Avant du boîtier Évaporateur Pelle à glace Cuvette à eau Couvercle supérieur Planche de pelle à glace Couvercle transparent Seau à glaçons Support moteur Réservoir d'eau Arrière du boîtier Panneau de commande Ventilation Touches... -
Page 28: Installation
INSTALLATION 1. L‘appareil ne doit pas être incliné à plus de 45 degrés pendant le transport. Ne mettez pas l‘appareil à l‘envers. Cela pourrait endommager le compresseur et le système d‘étanchéité. 2. Retirez tous les matériaux d‘emballage, vérifiez soigneusement l‘appareil et assurez-vous que l‘appareil, le cordon d‘alimentation et la fiche sont en bon état et fonctionnels. -
Page 29: Mise En Marche Et Fonctions
MISE EN MARCHE ET FONCTIONS Mise en marche 1. Branchez la fiche dans la prise. L‘affichage „ICE MAKING“ clignote et l‘appareil démarre la fonction de dégivrage. 2. Appuyez sur le bouton d‘allumage. L‘indicateur „ICE MAKING“ s‘allume en continu. Ensuite, la production de glaçons démarre automatiquement. Une fois la production de glaçons terminée, le dégivrage est effectué. -
Page 30: Nettoyage Et Maintenance
Étape 2 • Insérez la fiche dans la prise et appuyez sur l‘interrupteur d‘alimentation pour démarrer l‘appareil. • Si le seau à glace est plein, retirez immédiatement la glace. Ne remplissez pas trop le seau à glace. Remarques sur l‘utilisation 1. - Page 31 Le filtre du réservoir d‘eau doit être retiré et nettoyé régulièrement afin d‘éviter que les dépôts n‘obstruent l‘arrivée d‘eau. Procédez comme indiqué sur l‘illustration ci- dessous. Retirez le bac de récupération de glace et le filtre du réservoir d‘eau pour les nettoyer, nettoyez le filtre à...
-
Page 32: Résolution Des Problèmes
RÉSOLUTION DES PROBLÈMES 1. Veuillez noter que si l‘alimentation est coupée, si la fiche est retirée de la prise ou si vous avez appuyé sur le bouton POWER pendant un cycle de fabrication de glace, de petits morceaux de glace peuvent se former et se loger dans la cuve à glace automatique et la bloquer. -
Page 33: Informations Sur Le Recyclage
Problème Cause possible Solution L'appareil L'électrovanne est Faites remplacer l'électrovanne. fonctionne endommagée. Contactez une entreprise mais l'eau s'est spécialisée. réchauffée. Le seau à glace Le capteur ICE FULL est Faire remplacer le capteur ICE est plein, mais le endommagé. FULL. voyant "ICE FULL"... - Page 34 Instalación 39 Panel de control 39 Puesta en marcha y funcionamiento 40 Uso 40 Limpieza y mantenimiento 41 Solución de problemas 43 Indicaciones sobre la retirada del aparato 44 Fabricante e importador (Reino Unido) 44 DATOS TÉCNICOS ICM1221 Número de artículo Suministro eléctrico 220-240 V ~ 50 Hz...
-
Page 35: Instrucciones De Seguridad
INSTRUCCIONES DE SEGURIDAD • Conecte el dispositivo sólo a enchufes con toma de tierra que correspondan al voltaje nominal del dispositivo. • Cuando mueva la unidad, use las asas. • Coloque la unidad en una superficie plana. • Use la unidad sólo en el interior. •... - Page 36 ADVERTENCIA ¡Peligro de incendio/materiales infl amables! Por favor, observe las regulaciones locales para la eliminación de aparatos que contengan refrigerantes y gases infl amables • Mantenga las aberturas de ventilación de la carcasa del dispositivo libres de obstáculos. • No dañe el circuito de refrigerante. •...
-
Page 37: Descripción Del Producto
DESCRIPCIÓN DEL PRODUCTO Portador del microinterruptor Carcasa delantera Evaporador Pala de hielo Sumidero de agua Cubierta superior Placa de la pala de hielo Tapa transparente Bandeja de cubitos de hielo Soporte del motor Depósito de agua Cubierta trasera Panel de control Ventilación Teclas... -
Page 38: Instalación
INSTALACIÓN 1. Durante el transporte, la unidad no debe inclinarse más de 45 grados No ponga la unidad del revés. Esto podría dañar el compresor y el sistema de sellado. 2. Retire todos los materiales de embalaje, revise el aparato con cuidado y asegúrese de que el aparato, el cable de alimentación y el enchufe no estén dañados y funcionen bien. -
Page 39: Puesta En Marcha Y Funcionamiento
PUESTA EN MARCHA Y FUNCIONAMIENTO Puesta en marcha 1. Inserte el enchufe en la toma de corriente. El indicador „ICE MAKING“ parpadea y la unidad comienza la función de descongelación. 2. Presione el botón POWER. El indicador „HELADO“ se enciende continuamente. Entonces la función de fabricación de cubitos de hielo se inicia automáticamente. -
Page 40: Limpieza Y Mantenimiento
Paso 2 • Inserte el enchufe en la toma de corriente y pulse el interruptor de encendido para poner en marcha el aparato. • Cuando el contenedor de hielo esté lleno, retire el hielo inmediatamente. No llene en exceso el contenedor de hielos. Notas sobre la operación 1. - Page 41 La rejilla del filtro del depósito de agua debe retirarse y limpiarse periódicamente para evitar que los residuos obstruyan la entrada de agua. Proceda como se indica en la siguiente ilustración. Retire la bandeja de recogida de hielo y el tamiz filtrante del depósito de agua para su limpieza, limpie el tamiz filtrante con agua limpia y vuelva a colocar las piezas.
-
Page 42: Solución De Problemas
SOLUCIÓN DE PROBLEMAS 1. Tenga en cuenta que si se desconecta la fuente de alimentación, cuando se saca el enchufe de la toma de corriente o cuando se pulsa el botón POWER durante un ciclo de fabricación de hielo, pueden formarse pequeñas astillas de hielo, que se atascarán en la pala automática y la bloquearán. -
Page 43: Indicaciones Sobre La Retirada Del Aparato
Problema Posible causa Solución La máquina El electrodo se ha roto. Haga que le cambien el ha estado electrodo. Contacte con una funcionando, pero empresa especializada. el agua se ha calentado. La cesta de hielo El sensor de hielo Haga que le cambien el sensor está... - Page 44 Avvertnze di sicurezza 46 Descrizione del prodotto 48 Installazione 49 Pannello di controllo 49 Messa in servizio e funzionamento 50 Utilizzo 50 Manutenzione e pulizia 51 Correzione degli errori 53 Avviso di smaltimento 54 Produttore e importatore (UK) 54 DATI TECNICI ICM1221 Codice articolo Alimentazione 220-240 V ~ 50 Hz...
-
Page 45: Avvertnze Di Sicurezza
AVVERTNZE DI SICUREZZA • Collegare il dispositivo solo a prese con messa a terra corrispondenti alla tensione del dispositivo. • Utilizzare le maniglie per spostare il dispositivo. • Posizionare il dispositivo su una superficie piana. • Non utilizzare il dispositivo all’aperto. •... - Page 46 AVVERTENZA Pericolo dovuto a fuoco/materiali infi ammabili! Osservare le norme locali per lo smaltimento di dispositivi contenenti refrigeranti e gas infi ammabili. • Mantenere le aperture di ventilazione del dispositivo libere da ostacoli. • Non danneggiare il circuito del refrigerante. •...
-
Page 47: Descrizione Del Prodotto
DESCRIZIONE DEL PRODOTTO Supporto microinterruttore Scocca anteriore Evaporatore Paletta per ghiaccio Vaschetta dell’acqua Coperchio superiore Lastra sessola per ghiaccio Coperchio trasparente Contenitore cubetti di ghiaccio Supporto motore Serbatoio dell’acqua Scocca posteriore Pannello di controllo Aerazione Tasti... -
Page 48: Installazione
INSTALLAZIONE 1. Durante il trasporto l’angolo d’inclinazione del dispositivo non deve superare i 45°. Non capovolgerlo per non danneggiare il compressore e la guarnizione. 2. Rimuovere tutti i materiali d’imballaggio, controllare attentamente che il dispositivo sia in buone condizioni e assicurarsi che non vi siano danni alla spina, al cavo d’alimentazione e al dispositivo stesso. -
Page 49: Messa In Servizio E Funzionamento
MESSA IN SERVIZIO E FUNZIONAMENTO Messa in servizio 1. Inserire la spina nella presa. La spia “ICE MAKING” lampeggia e il dispositivo inizia lo sbrinamento. 2. Premere il tasto POWER. La spia “ICE MAKING” lampeggia continuamente. Dopodiché inizia automaticamente la produzione dei cubetti del ghiaccio. Dopo che la produzione si è... -
Page 50: Manutenzione E Pulizia
Fase 2 • Inserire la spina nella presa di corrente e premere l‘interruttore di alimentazione per avviare l‘unità. • Quando il contenitore del ghiaccio è pieno, rimuovere immediatamente il ghiaccio. Non riempire eccessivamente il contenitore del ghiaccio. Note sul funzionamento 1. - Page 51 Il filtro del serbatoio dell‘acqua deve essere rimosso e pulito regolarmente per evitare che i detriti intasino l‘ingresso dell‘acqua. Procedere come indicato nell‘illustrazione seguente. Rimuovere la vaschetta di raccolta del ghiaccio e il setaccio del filtro nel serbatoio dell‘acqua per la pulizia, pulire il setaccio del filtro con acqua pulita e quindi reinserire le parti.
-
Page 52: Correzione Degli Errori
CORREZIONE DEGLI ERRORI 1. Dopo un blackout, dopo aver tolto la spina dalla presa o dopo aver premuto il tasto POWER durante il ciclo di produzione del ghiaccio, si possono formare piccole schegge di ghiaccio che si attaccano alla sessola automatica per ghiaccio e la bloccano. -
Page 53: Avviso Di Smaltimento
Problema Possibile causa Soluzioni Il dispositivo La valvola magnetica è Sostituire la valvola magnetica. funziona, ma danneggiata. Rivolgersi a un’azienda l’acqua si è specializzata. scaldata. Il serbatoio del Il sensore di ICE FULL è Sostituire il sensore di ICE FULL. ghiaccio è...
Need help?
Do you have a question about the ICM1221 and is the answer not in the manual?
Questions and answers
What is your phone number
What os your phne number