
Related Manuals for Zodiac EI2 Expert 18SWC EU VS


Summary of Contents for Zodiac EI2 Expert 18SWC EU VS
- Page 1 Instructions for installation and use (to be kept in a safe place) English : page ..................
-
Page 2: Table Of Contents
Thank you for choosing the Ei chlorine generator for your pool maintenance. From now on your pool will be only a source of relaxation and wellbeing, as your Ei will free you of the tedious manual treatment whilst providing healthy, clear and more natural water throughout the season. -
Page 3: Package Contents Page
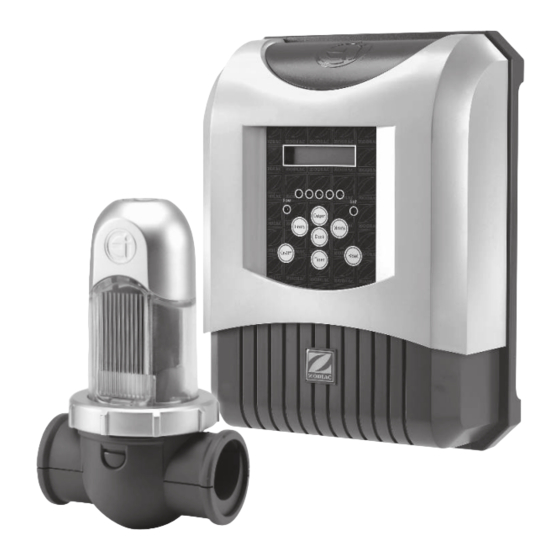
Package contents 1 x Ei power pack 1 x wall mount with fi xing kit 1 x fl ow detector kit (detector, tefl on, adapter & adapter ring) 1 x reducer for DN 50 mm piping (Installed in the ring of the Ei cell) 1 x reducer for 1 1/2 ‘’... -
Page 4: Recommendations
3, 5 meters away from the pool. Electrical hazard The Zodiac Ei Power pack must not come into contact with water and should be installed at least 3.5 metres from the inside wall of your swimming pool. Should a lack of water be detected, the unit’s electronic fl ow switch is designed to turn off the system. -
Page 5: Installation And User Guide
Installation and user guide The following steps will help you get up and running with your new Ei salt water chlorinator. WARNING! The installation and use of Ei salt water chlorinators must comply with the instructions and recommendations presented in this manual. For additional information, please contact your professional pool retailer. -
Page 6: Ei Cell Installation
3.2 Ei cell installation IMPORTANT: > The cell should always be the last appliance placed on the pool return pipe (Pay attention to the assembly directions, see above diagram). > If the fi ltering system fl ow is below 18 m3/h, it will not be essential to install the Ei cell on a bypass. -
Page 7: Flow Meter Installation
7. If you are installing the Ei chlorine generator on a DN50 mm type pipe, insert the reducer bearing the ‘EU’ mention into the paddle clamp lower part (Use the other reducer for a 1 1/2 ‘’ pipe). Important: make sure that the adapter fi ts correctly into the notches located on the lower part of the paddle clamp (4). -
Page 8: Ei Power Pack Connection
3.4 Ei power pack connection The Ei Zodiac appliance is designed to operate only with a 220-240 Vac 50 Hz. power supply. IMPORTANT: The installation and use of Ei salt water chlorinators must comply with the instructions and recommendations presented in this manual. For additional information, please contact your professional pool retailer. -
Page 9: Language Selection
LCD. 4.3 Setting the clock (clock) IMPORTANT REMARK: Your Ei Zodiac chlorinator is equipped with an internal memory. During the fi rst Ei electrical connection (Or upon re-initializing) it is important to leave the power on for at least 24 hours uninterrupted (permanent power supply or forced operation). -
Page 10: Setting The Timer
4.4 Setting the timer The Ei chlorinator is equipped with 2 timers that can be programmed so as to release chlorine during time periods that are different from the fi ltration time, and this, up to twice per day. Note that the timer periods must be included within the fi ltration periods (no chlorine will be released when the fi... -
Page 11: Manual Start-Up
4.5 Manual start-up In addition to operating via the timer, the Ei can also be started and stopped manually by pressing the key. The appliance will then operate until the next ‘OFF’ stop time if no production time period has been specifi... -
Page 12: Connecting To An External Timer (Home Automation)
Before connecting or disconnecting any wires make sure the power supply to both the external timer and the Zodiac Ei unit has been cut off. When the Ei chlorinator is connected to a controller it is in slave mode and responds to requests. -
Page 13: Checking Wiring And Connections
3. If the connection failed, switch off the two appliances and proceed with another test (Steps1 and 2). NOTE: For safety reasons, the Zodiac Ei switches automatically to stop (‘OFF’) when communication between the chlorinator and the external timer/controller is lost. -
Page 14: Water Balance
Water balance Free chlorine Cyanuric Salt level (total alkalinity) (total acid hardness) (stabiliser) mg/L – ppm °f (ppm) mg/L – ppm g/L – kg/m3 °f (ppm) Recommended 8 - 15 10 - 30 7,2 - 7,4 1 - 2 < 50 values (80 - 150) (100 - 300) -
Page 15: Output Fault
7.3 ‘OUTPUT FAULT’ Interpretation: There is a problem with the internal power supply to the Ei command box. Causes possibles : > Cell power supply cable disconnected or incorrectly connected. > Internal power problem in the command box following an external electrical incident. ... -
Page 16: Maintenance
Maintenance In order to keep your Zodiac Ei in the best working condition we recommend that you perform regular maintenance operations. 9.1 Inspecting and cleaning the electrode In zones where the water is hard (high TH) the Ei electrode may have to be cleaned. -
Page 17: Warranty
Register your product on our website: - You will be the fi rst to be informed of new Zodiac products and special offers. - You can help us to constantly improve our product quality. www.zodiac-poolcare.com For any warranty issue, please contact your local dealer. - Page 18 Hinweise und Auskünfte erhalten Sie bei Ihrem Händler Per qualsiasi informazione supplementare, mettetevi in contatto con il vostro rivenditore al dettaglio Contacte o seu revendador para obter informaçoes mais detalhadas Voor nadere inlichtingen kunt u zich wenden tot uw zwembadbouwer Zodiac : Innovative pool products and services...
Need help?
Do you have a question about the EI2 Expert 18SWC EU VS and is the answer not in the manual?
Questions and answers