Table of Contents
Advertisement
Advertisement
Table of Contents

Related Manuals for Insta360 GO 3


Summary of Contents for Insta360 GO 3
- Page 1 GO 3 User Manual User Manual...
-
Page 2: Table Of Contents
Activation ........................... 5 Basic Use ..........................6 Action Pod Button Instructions ..................6 GO 3 Button Instructions ....................7 Using GO 3 and Action Pod ....................8 Using the Touchscreen ....................10 Shortcut Menu .........................11 Storage ..........................16 Indicator Lights ....................... 17 Insta360 App ........................18... -
Page 3: Product Introduction
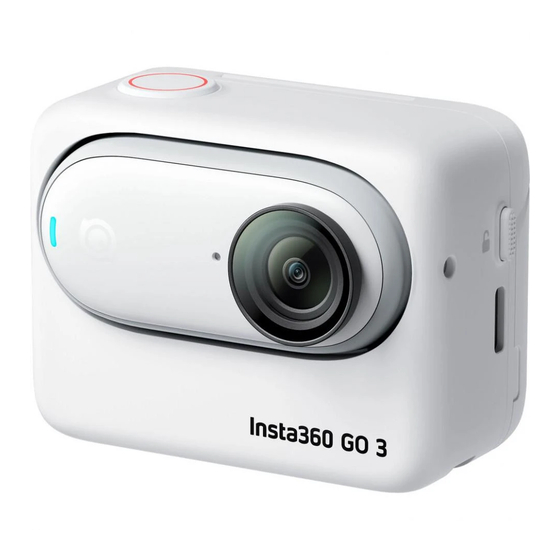
GO 3 User Manual Product Introduction GO 3 Introduction Flip Touchscreen Action Pod Indicator Light Shutter Button Power Button Charging Point Quick Button Mounting Latch Release Switch Type-C Charging Port Microphone Lens GO 3 Button Camera Indicator Light Charging Point... -
Page 4: Standard Accessories
GO 3 User Manual Standard Accessories GO 3 and the Action Pod can be mounted on different accessories for flexible shooting wherever you go. Figure Accessories Description Magnet Wear the Magnet Pendant by Pendant placing it inside your clothing. Then, attach the camera to the front of the Magnet Pendant. - Page 5 GO 3 User Manual Pivot Stand Can be used with GO 3 or the Action Pod. How to Use: Press the buckles on the two sides of the Pivot Stand and attach GO 3 or the Action Pod onto it. Make sure the...
-
Page 6: First Use
Charging Use the Type-C to Type-A fast charging cable included in the box to connect the USB-C port of the GO 3 Action Pod to a USB-C charger. When charging while the device is powered off, the Action Pod Indicator Light will be red. -
Page 7: Activation
The name of your camera is "GO 3 ******" by default, where ****** is the last six digits of the serial number on the box your GO 3 came in. The first time you connect to GO 3, you will need to confirm the connection on the Action Pod screen. -
Page 8: Basic Use
○ Take a photo or start/stop video recording. ○ Quickly power on the camera and start recording (if GO 3 is powered off and in the Action Pod). ○ Confirm connection on the app (when connecting for the first time). -
Page 9: Go 3 Button Instructions
○ Confirm connection on the app (when connecting for the first time). ○ Quickly power on the camera and start recording (if GO 3 is powered off and out of the Action Pod). Long press for 2 seconds: Power off. -
Page 10: Using Go 3 And Action Pod
Using them separately: • When GO 3 is taken out of the Action Pod, you can use the Action Pod for remote control and live preview up to 16ft (5m) away. The buttons on the camera body are enabled. Note: When using the Action Pod for remote preview, the data is transmitted via Bluetooth. The quality of... - Page 11 GO 3 User Manual GO 3 Camera Button customization: The button functions of the GO 3 camera can be customized according to your preferences. You can adjust them through the app settings page or within the Action Pod.
-
Page 12: Using The Touchscreen
GO 3 User Manual Using the Touchscreen The touchscreen's main display shows the current camera shooting mode. The menu bar shows battery level, storage capacity, and current shooting parameters. By swiping or tapping the screen, you can achieve the following:... -
Page 13: Shortcut Menu
GO 3 User Manual Shortcut Menu Storage: Shows the remaining number of photos or the length of video footage that can be stored on the microSD card. Lock screen Timed Capture Preset Wi-Fi Signal Bluetooth: This will be displayed when the camera is not in the Action Pod. - Page 14 GO 3 User Manual Shooting Description mode Video Shoot a normal video. FreeFrame Shoot a video with the option to choose your aspect ratio after recording. video Timelapse Suitable for shooting static timelapse videos. TimeShift Take a hyperlapse (sped-up) video while moving.
- Page 15 GO 3 User Manual Camera Settings Swipe down on the touchscreen to view camera settings. Screen Orientation: Turn on/off. It is turned on by default. Lock Screen: Tap to lock screen. Swipe up on the touchscreen to unlock. Volume Control: Set the camera speaker volume. There are four options: High, Medium, Low, and Mute.
- Page 16 GO 3 User Manual Shooting Specification Settings Swipe up from the bottom of the touchscreen to view shooting specification settings. Shooting Mode Parameters Photo Ratio, Format, Timer Video Ratio, Resolution, Frame Rate, Stabilization FreeFrame Ratio, Resolution, Frame Rate Video Timelapse...
- Page 17 GO 3 User Manual Shooting Parameter Settings Swipe left from the right edge of the touchscreen to see the shooting parameter settings. Shutter Speed: Choose between Auto Mode (Auto) and Manual Mode (M) • Sensitivity (ISO) • Exposure Compensation (EV): Available in Auto Mode (Auto) and Manual Mode (M) •...
-
Page 18: Storage
Swipe right from the left of the Touchscreen to enter the Album page. Storage There are three options available for GO 3's internal storage capacity: 32GB, 64GB, and 128GB. The actual usable space for file storage will be slightly less than the total capacity due to the system occupying some... -
Page 19: Indicator Lights
GO 3 User Manual Indicator Lights GO 3 and the Action Pod have separate LED status indicator lights. Camera/Action Pod's Indicator Light Status Camera/Action Pod Status Slowly flashing cyan, then solid Camera/Action Pod is powering on Flashing cyan five times... -
Page 20: Insta360 App
If you connect to the Insta360 app for the first time, you need to authorize the connection on the touchscreen. If you are unable to connect to the app, go to your smartphone's Wi-Fi settings, find your GO 3, enter the password (the password is "88888888" by default)and return to the app. -
Page 21: Android Mode
Enter the shooting interface of the app and the following icon functions can be seen. Some of the icon functions are only available in some shooting modes. File Transfer You can download GO 3's files to your phone or PC, then use the Insta360 app or Insta360 Studio to edit and export. Step Download files from GO 3 to the Insta360 app Connect GO 3 to your phone via the Insta360 app;... - Page 22 After successful authorization, click the iPhone icon in the top left corner, and the iPhone's files will appear. Click "File Sharing" and choose "Insta360" from the list. Then do one of the following: ○ Transfer from iPhone to Windows PC: Find the DCIM folder, then click Save. Choose your desired path and click Save.
- Page 23 At the top of the Finder window, click Files, then do one of the following: ○ Transfer from Mac to iPhone: Drag a file or a selection of files from your Mac onto the Insta360 app in the list. ○...
-
Page 24: Maintenance
Follow the on-screen instructions to update the firmware. If the camera firmware update fails, check the following and try the update again: Ensure GO 3 is in the Action Pod and close to your phone(remove the red sticker on the back of the GO3 camera). -
Page 25: Waterproofing
GO 3 User Manual Waterproofing GO 3 (when taken out of the Action Pod) is waterproof up to 16ft (5m). The included Lens Guard must be installed on the camera for underwater use. The Action Pod is IPX4 water resistant only when GO 3 is installed. It protects against light rain and snow, but should not be submerged in water or used for activities involving high-velocity water, such as action sports during rainy weather, surfing, and waterskiing. - Page 26 GO 3 User Manual Arashi Vision Inc. ADD: 11th Floor, Building 2, Jinlitong Financial Center, Bao'an District, Shenzhen, Guangdong, China WEB: www.insta360.com TEL: 400-833-4360 +1 800 6920 360 EMAIL: service@insta360.com V1.0...
Need help?
Do you have a question about the GO 3 and is the answer not in the manual?
Questions and answers