Table of Contents
Advertisement
Quick Links
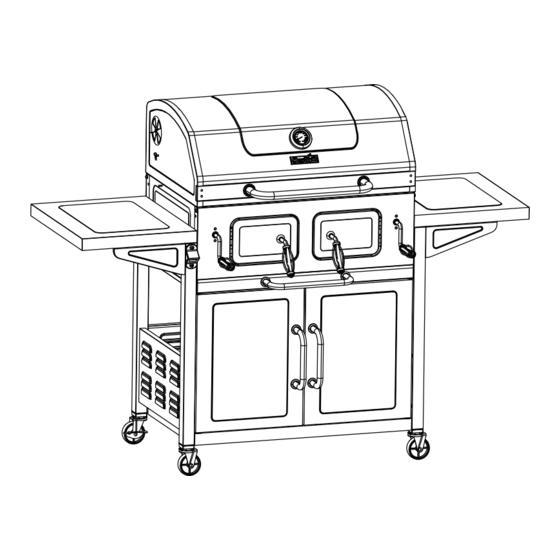
Charcoal Grill
850 Deluxe
Product Guide
Model 21302117
Tools needed for assembly:
Phillips Screwdriver
Adjustable Wrench
IMPORTANT: Fill out the product record information below.
Date Purchased
WARNING
CARBON MONOXIDE HAZARD
Burning charcoal inside can kill you. It gives off carbon
monoxide, which has no odor. NEVER burn charcoal
inside homes, vehicles, or tents.
WARNING
Failure to follow all manufacturer's instructions could
result in serious personal injury and/or property
damage.
INSTALLER/ASSEMBLER:
Leave this manual with consumer.
CONSUMER:
Keep this manual for future reference.
If you have questions or need assistance during assembly, please call Char-Broil at 1-800-241-7548.
To insure your satisfaction and for follow-up service, register your appliance online at www.charbroil.com
FOR OUTDOOR USE ONLY
© 2020 Char-Broil, LLC
CAUTION
Read and follow all safety statements, assembly
instructions, and use and care directions before
attempting to assemble and cook.
CAUTION
Some parts may contain sharp edges! Wear
protective gloves if necessary.
CAUTION
THIS UNIT IS HEAVY! DO NOT attempt to assemble
without a helper.
• Columbus, GA 31902 •
Printed in China
42805512 - 09/08/20
Advertisement
Table of Contents

Related Manuals for Char-Broil American Gourmet 850 Deluxe


Summary of Contents for Char-Broil American Gourmet 850 Deluxe
-
Page 1: Product Record Information
CONSUMER: Keep this manual for future reference. If you have questions or need assistance during assembly, please call Char-Broil at 1-800-241-7548. To insure your satisfaction and for follow-up service, register your appliance online at www.charbroil.com © 2020 Char-Broil, LLC •... -
Page 2: Table Of Contents
TABLE OF CONTENTS WARNING Product Record Information ......1 FAILURE TO READ AND FOLLOW INSTRUCTIONS FOR Safety Symbols. -
Page 3: Preparing To Use Your Grill
Re-season your grates frequently, particularly when new. If rust occurs, it is an indication that the grates have not been seasoned enough or the seasoning has been burned off. Clean with a heavy brush like Char-Broil’s Brush Hawg. Reapply vegetable shortening and heat as indicated above to re-season the grates. -
Page 4: Cooking Tips
COOKING TIPS Building Your Fire Stack charcoal briquettes or wood into a pyramid-shaped pile on top of the charcoal pan. We recommend using 2 pounds (approximately 30 briquettes) ( 1 pound on each charcoal pan) to start your fire, adding more as needed. - Page 5 Direct and Indirect Grilling Direct Grilling - For most grilling, the ignited coals are spread in a single layer under the food. This is called direct grilling and is appropriate for relatively quick-cooking items such as hamburgers, steaks and most seafood. The single layer of coals emits even, steady heat, whether the grill lid is open or closed, and represents the way most people grill.
-
Page 6: Limited Warranty
LIMITED WARRANTY This warranty only applies to units purchased from an authorized retailer. Manufacturer warrants to the original consumer-purchaser only that this product shall be free from defects in workmanship and materials after correct assembly and under normal and reasonable home use for the periods indicated below beginning on the date of purchase*. -
Page 7: Parts List
PARTS LIST Qty Description Qty Description LID ASSEMBLY LEFT FRONT LEG LID BUMPER BOTTLE OPENER DECOR STRIP, F/ LID LEFT REAR LEG KIT, BUTTERFLY DAMPER SIDE CART PANEL TEMPERATURE GAUGE RIGHT FRONT LEG LOGO PLATE KIT RIGHT REAR LEG UPPER HINGE, F/ LID BOTTOM SHELF HANDLE, F/ TOP LID REAR CART PANEL... -
Page 8: Parts Diagram
PARTS DIAGRAM Page 8... -
Page 9: Assembly
ASSEMBLY Secure front and rear right legs to cart side panel with (4) 1/4-20x1/2” screws. Make sure louvers in the side panel are open to bottom. Sockets for casters are on the bottom of the legs. 1/4-20x1/2” Machine Screw Qty 4 Caster Sockets Secure front and rear left legs to cart side panel with (4) 1/4-20x1/2”... - Page 10 Attach bottom shelf to legs assemblies with (4) 1/4-20x1/2” screws. Make sure leg with bottle opener is to front side of bottom shelf where magnets are located. Magnets Front 1/4-20x1/2’ Machine Screw QTY 4 Rear Screw casters into sockets on end of legs. Use caster pin during installation. Locking casters to the rear and non- locking to the front.
- Page 11 Install rear cart panel between rear legs securing to legs and bottom shelf with (7) 1/4-20x1/2” screws. Do NOT tighten the screws. NOTE: Louvers face toward bottomshelf 1/4-20x1/2’ Machine Screw QTY 7 Hinge Pins Install upper door brace between front legs using (4) #8x3/8” screws. Hinge pins are to face to the outside of the cart. Do NOT tighten the screws.
- Page 12 Attach door handle to door using (2) 1/4-20x1/2” screws and (2) bezels as shown. Repeat for other door. Install door by placing hole in upper corner into pin on door brace and then depress pin in bottom shelf . Small 1/4-20x1/2’...
- Page 13 Attach the air damper to outside of each firebox end panel using (1) 1/4-20X1/2” screw, flat washer and 1/4-20 lock nut. NOTE: Do not overtighten nut to allow for proper operation (rotation). Attach firebox end panels to cart legs with (4) 1/4-20x1/2” screws each side. 1/4-20x1/2’...
- Page 14 Install firebox rear panel using (4) 1/4-20x1/2” screws, as shown. Tighten the screws in step 5. 1/4-20x1/2’ Machine Screw QTY 4 Attach ash drawer handle and bezels to ash drawer using (2) 1/4-20x3/4” screws, 1/4” flat washers and 1/4” lock washers.
- Page 15 Insert pivot rod assembly into slots in the right and left charcoal pan adjustment assemblies. IMPORTANT: Note orientation as shown. Make sure lifting paddle aligns with location for crankshaft bushing, as shown. Position pivot assembly and charcoal pan adjustment assemblies on charcoal pan. Insert pivot pin, (2) each side.
-
Page 16: Hardware List
Attach right charcoal pan assy to inside of firebox on left side using (2) 1/4-20x1/2” machine screws. On right side, also install crankshaft bushing using (2) 1/4-20x1/2” machine screws as shown below. Crankshaft bushing and lifting paddle must be next to grill end. Right Side (Facing from front) Crankshaft Bushing... - Page 17 Screw crankshaft handle assy into crankshaft bushing as shown and secure with hitch pin clip. Repeat for other side. Note: Each crankshaft should engage the paddle of a charcoal pan assembly. If not, charcoal pan assemblies are not assembled correctly. Hitch Pin Qty 2 Install left charcoal door handle by placing bezel over handle.
- Page 18 Attach lower hinges to back of firebox using (4) 1/4-20x1 1/2” screws. Do NOT tighten the screws. Attach upper hinges to lid with (4) 1/4-20x1 1/2” screws, flat washers and 1/4-20 flange nuts. 1/4-20x1 1/2” Machine Screw Qty. 8 1/4” Flat Washer Qty.
- Page 19 Attach top lid handle and bezels to lid with (2) 1/4-20x1” screws. Attach temperature gauge with wing nut provided with gauge. 1/4-20x1’ Machine Screw QTY 2 1/4” Flat Washer Qty. 2 Attach air dampers to outside of each top lid end panel using (1) 1/4-20x1/2” screw, 1/4” flat washer and 1/4-20 lock nut.
- Page 20 Insert straight wire of swingaway grid into one side of lid and then into the other side. Insert angled wire into holes in firebox. Secure with 2 hitch pin clips into holes in straight wire located outside of lid end caps. NOTE: Pivot and leg wires, running side-to-side, should be under wires running front-to-back.
- Page 21 HARDWARE LIST Hardware is shown actual size. You may have spare hardware after assembly is complete. Name Picture 4 pcs 1/4-20 FLANGE NUT 1/4-20x1/2" MACHINE 61 pcs SCREW 6 pcs 1/4-20 LOCKING NUT 1/4-20x1 1/2" MACHINE 8 pcs SCREW #8x3/8” SHEET 12 pc METAL SCREW 1/4-20x1"...
- Page 22 NOTES; Page 22...
- Page 24 ©2020 Char-Broil, LLC. Columbus, GA, 31902. Printed in China. Imprimé en Chine. Impreso en China. ©2020 Assembly instructions. ©2020 Assemblée des instructions. ©2020 Instrucciones de ensamblado.
Need help?
Do you have a question about the American Gourmet 850 Deluxe and is the answer not in the manual?
Questions and answers