Table of Contents
Advertisement
Quick Links
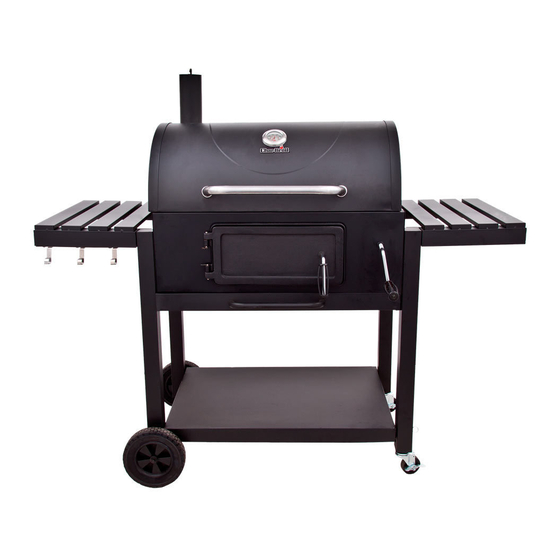
Charcoal Grill 800
Product Guide
Model 13301865
Tools needed for assembly:
Phillips Screwdriver
Adjustable Wrench
Hammer
IMPORTANT: Fill out the product record information below.
Date Purchased
WARNING
CARBON MONOXIDE HAZARD
Burning charcoal inside can kill you. It gives off carbon
monoxide, which has no odor. NEVER burn charcoal
inside homes, vehicles, or tents.
WARNING
Failure to follow all manufacturer's instructions could
result in serious personal injury and/or property
damage.
INSTALLER/ASSEMBLER:
Leave this manual with consumer.
CONSUMER:
Keep this manual for future reference.
If you have questions or need assistance during assembly, please call Char-Broil at 1-800-241-7548.
To insure your satisfaction and for follow-up service, register your appliance online at www.charbroil.com/register
FOR OUTDOOR USE ONLY
© 2012 Char-Broil, LLC
CAUTION
Read and follow all safety statements, assembly
instructions, and use and care directions before
attempting to assemble and cook.
CAUTION
Some parts may contain sharp edges! Wear
protective gloves if necessary.
CAUTION
THIS UNIT IS HEAVY! DO NOT attempt to assemble
without a helper.
• Columbus, GA 31902 •
Printed in China
42804838 - 07/19/12
Advertisement
Table of Contents

Related Manuals for Char-Broil Charcoal Grill 800


Summary of Contents for Char-Broil Charcoal Grill 800
-
Page 1: Product Record Information
CONSUMER: Keep this manual for future reference. If you have questions or need assistance during assembly, please call Char-Broil at 1-800-241-7548. To insure your satisfaction and for follow-up service, register your appliance online at www.charbroil.com/register © 2012 Char-Broil, LLC •... -
Page 2: Table Of Contents
TABLE OF CONTENTS WARNING Product Record Information ......1 FAILURE TO READ AND FOLLOW INSTRUCTIONS FOR Safety Symbols. -
Page 3: Preparing To Use Your Grill
Re-season your grates frequently, particularly when new. If rust occurs, it is an indication that the grates have not been seasoned enough or the seasoning has been burned off. Clean with a heavy brush like Char-Broil’s Brush Hawg. Reapply vegetable shortening and heat as indicated above to re-season the grates. -
Page 4: Cooking Tips
COOKING TIPS Building Your Fire Stack charcoal briquettes or wood into a pyramid-shaped pile on top of the charcoal grate. We recommend using 2 pound (approximately 30 briquettes) to start your fire, adding more as needed. If using lighter fluid, saturate the charcoal briquettes with lighter fluid and let it soak in for approximately 5 minutes. - Page 5 Direct and Indirect Grilling Direct Grilling - For most grilling, the ignited coals are spread in a single layer under the food. This is called direct grilling and is appropriate for relatively quick-cooking items such as hamburgers, steaks and most seafood. The single layer of coals emits even, steady heat, whether the grill lid is open or closed, and represents the way most people grill.
-
Page 6: Limited Warranty
LIMITED WARRANTY This warranty only applies to units purchased from an authorized retailer. Manufacturer warrants to the original consumer-purchaser only that this product shall be free from defects in workmanship and materials after correct assembly and under normal and reasonable home use for the periods indicated below beginning on the date of purchase*. -
Page 7: Parts List/ Parts Diagram
Key Qty Description PARTS LIST Smokestack Key Qty Description Adjuster Crank Handle Lid Assembly Lid Handle Swing-Away Grate Handle Seat Cooking Grate Leg Extender Handle, F/Clean Out Door w/Latch Ash Pan Air Damper Right Rear Leg Charcoal Pan w/Adjust Assembly Left Side Shelf Hinge Assembly Right Side Shelf... -
Page 8: Assembly
ASSEMBLY FIRST, GET A HELPER! This unit is heavy and requires a second person for lifting and moving. NEXT, pick a suitable location to work. Open the carton and slit the corners so that the carton lays flat. This will give you a protective surface during assembly. - Page 9 Attach the Charcoal Pan Assembly to the inside front panel of the Firebox using (4) 1/4-20x1/2” Hex Bolts. Tighten securely with flat wrench provided. Charcoal Pan Assembly Firebox Front of Firebox 1/4-20x1/2” Hex Bolts NOTE: Mounting bracket with hole fits over threaded bushing Page 9...
- Page 10 Attach Bottom Shelf to Legs using (4) 1/4-20x2 3/8” Screws. 1/4-20x2 3/8” Screws 1/4-20x2 3/8” Screws Turn grill upside down. Insert (2) Leg Extenders into Front/Rear Legs (Short Legs) using hammer to tap into place. Leg Extender Leg Extender Page 10...
- Page 11 Insert a small Hair Pin Clip into the hole at one end of the Axle. Slide a Large Flat Washer and a Wheel onto the Axle. Slide the Axle through the holes at the ends of the Legs. Slide the remaining Wheel onto the Axle. Slide a Large Flat Washer onto the Axle and secure with remaining Hair Pin Clip.
- Page 12 Attach the Handle to the front of Ash Pan with (2) 1/4-20x1/2” Screws. Slide the Ash Pan into the bottom of the Firebox. Handle 1/4-20x1/2” Screw Firebox 1/4-20x1/2” Screw 1/4-20x1/2 Screws Attach Lid Handle and Handle Seats to the Lid using (2) 1/4-20x1/2” Screws. 1/4-20x1/2”...
- Page 13 Attach (2) Hinge Assemblies to the rear of Lid using (4) 1/4-20x1 3/8” Screws and (4) 1/4-20 Flange Nuts. Note orientation shown in enlargement. 1/4-20x1 3/8” Screws 1/4-20x1 3/8” Screws Insert Smokestack Assembly through hole in Lid. Attach Smokestack Assembly to Lid using (2) 1/4-20x1/2” Screws and (2) 1/4-20 Flange Nuts.
- Page 14 Place Lid Assembly onto Firebox Assembly while aligning holes in Hinge Assemblies with holes in Firebox Rear Panel. Attach (2) Hinges Assemblies to the rear of the Firebox Assembly using (4) 1/4-20x1 5/8” Screws. Lid Assembly 1/4-20x1 5/8” Screws 1/4-20x1 5/8” Screws Firebox Rear Panel Remove Flat Washer, Door Latch, Lock Washer and 3/8-16 Nut from Handle.
- Page 15 Attach the Tool Hooks to the underside of the Side Shelf with Threaded Inserts using (3) 1/4-20x1/2” Screws. Attach this Side Shelf Assembly to grill Left Legs using (4) 1/4-20x5/8” Shoulder Screws. 1/4-20x5/8” Shoulder Screw 1/4-20x1/2” Screws Tool Hooks 1/4-20x1/2 Screws Side Shelf W/Threaded Inserts Attach other Side Shelf to Right Legs using (4) 1/4-20x5/8”...
- Page 16 Screw Adjuster Crank through front of Firebox. Rotate Adjuster Crank clockwise until Adjuster Crank engages Crank Lever. Insert Hair Pin Clip into Adjuster Crank Shaft. Hair Pin Clip Crank Lever Adjuster Crank Front of Grill Body Adjuster Crank Shaft Insert straight wire of Swingaway Grid into one side of Lid and then into the other side. Insert angled wire into holes in Firebox.
- Page 17 Place the (3) Cooking Grates into the firebox. The Cooking Grates will rest on the front and rear ledges of the firebox. Cooking Grates Lid omitted for clarity Remove Wingnut from Temperature Gauge. Insert Temperature Gauge through the hole in Lid and attach using Wingnut previously removed.
-
Page 18: Hardware List
HARDWARE LIST Hardware is shown actual size. You may have spare hardware after assembly is complete. 1/4-20 x 2 3/8” Machine Screw Qty. 4 1/4-20 x 1 5/8” Machine Screw Qty. 4 1/4-20 x 1 3/8” Machine Screw Qty. 4 1/4-20 x 1/2”... -
Page 19: Registration Card
Please register your product online at: Registre su producto en línea en: Veuillez enregistrer votre produit à l'adresse: www.charbroil.com/register (If you register online, you do not need to send in this registration card.) (Si registra en línea, no es necesario enviar esta tarjeta de registro.) (Si vous enregistrez votre produit en ligne, il n'est pas nécessaire d'envoyer la carte d'enregistrement.) PLEASE FILL OUT THIS CARD AND ATTACH A COPY OF YOUR SALES RECEIPT. -
Page 20: Thank You
THANK YOU FOR YOUR RECENT PURCHASE FROM CHECK OUT THESE GREAT FEATURES ON OUR WEBSITE Valuable product information • Inspiring grilling accessories • Reliable customer support • Delicious recipes and tips from chefs • Exciting events and promotions • And much more! •...
Need help?
Do you have a question about the Charcoal Grill 800 and is the answer not in the manual?
Questions and answers