Raymarine S1000 User Manual
Raymarine s1000 autopilot system: user guide
Hide thumbs
Also See for S1000:
- Manual (80 pages) ,
- Installation manual (39 pages) ,
- User manual (40 pages)
Table of Contents
Advertisement
Raymarine
S1000 Autopilot
User Guide
Welcome to the S1000 Autopilot
Handbooks can be such daunting things, can't they?
Please don't worry, we have made this guide as simple as
possible.
Your guide contains an explanation on how to use your
S1000, so finding your way around will become second
nature.
If all you want to do is power up and get going, that's fine.
But if you want to know more about what your S1000 will
do for you, you'll find it here.
Document Number: 81245-2
Date: January 2005
Advertisement
Table of Contents

Related Manuals for Raymarine S1000


Summary of Contents for Raymarine S1000
- Page 1 S1000, so finding your way around will become second nature. If all you want to do is power up and get going, that’s fine. But if you want to know more about what your S1000 will do for you, you’ll find it here. Document Number: 81245-2...
- Page 2 Contents S1000 System Raymarine S1000 Autopilot...
-
Page 3: Table Of Contents
How do I follow a cloverleaf pattern? ... 14 How do I dodge an obstacle? ... 15 3 - Setting up your S1000 How do I change the pattern direction? ... 17 How do I change my boat type? ... 18 How do I adjust the autopilot settings ... -
Page 4: Getting Started
Getting started . . . Raymarine S1000 Autopilot... -
Page 5: System Components
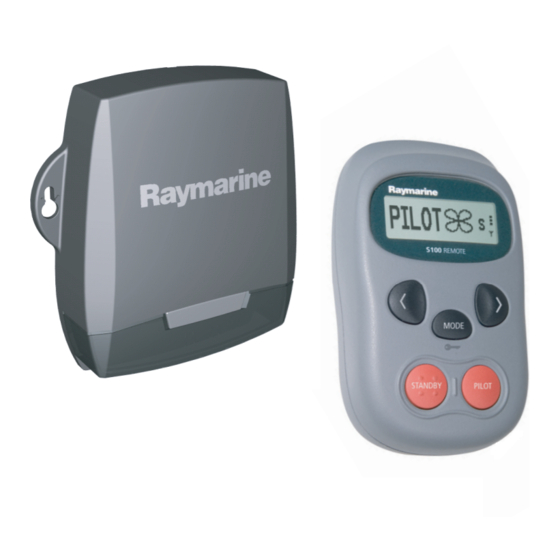
System Components The S1000 system is comprised of a Course Computer, Controller and Hydraulic Pump. Please ensure that these have been installed and commissioned correctly using the S1000 Installation Guide. Finally, check that your system is receiving a good GPS signal through the NMEA or SeaTalk connection. -
Page 6: The S100 Autopilot Controller
MODE Press to select required pilot mode. STANDBY (POWER ON) When off, press to power on the S100 Use to return to manual control of your boat when in PILOT mode. Press and hold to access Pilot Setup Raymarine S1000 Autopilot... -
Page 7: How Do I Power The System On
How do I power the system on? POWER ON Ensure that the S1000 and GPS is powered on at the ships breaker. On the controller, press and hold the STANDBY button. The handset will beep, the display will read STANDBY and you’re ready to go. -
Page 8: Using Your S1000
Using your S1000 System Raymarine S1000 Autopilot... -
Page 9: How Do I Use The Autopilot
How do I use the autopilot? Your S1000 can steer your boat according to one of its preset modes. The modes that are available depend on your boat type. Each of these are explained on the following pages. As your S1000 uses a Course-over-Ground (COG) reading from your... -
Page 10: How Do I Automatically Steer Straight
1. Steer your boat onto the desired AUTO mode heading. 2. Check that there are no obstructions. 3. Press the PILOT key to activate the autopilot. AUTO mode is also available for selection via the MODE button Raymarine S1000 Autopilot... -
Page 11: How Do I Follow A Route From My Gps
How do I follow a route from my GPS? Your autopilot can follow a route that you have previously set on your GPS or Chartplotter. Ensure that your GPS/Chartplotter is sending valid SeaTalk or NMEA 0183 data. press repeatedly until MODE you reach TRACK activates autopilot... -
Page 12: How Do I Follow A Circle Pattern
STARBOARD keys to change the size (S, M or L) if required 3. Press the PILOT key to activate the autopilot If your circles are gradually becoming larger, increase the response setting and restart the circle pattern. Raymarine S1000 Autopilot... -
Page 13: How Do I Follow A Zig-Zag Pattern
How do I follow a zig-zag pattern? When you enter ZIGZAG mode, the autopilot will use your current position and heading as the center line of the zig-zag. The autopilot will now gently steer your boat into the pattern starting with a turn to starboard. -
Page 14: How Do I Follow A Cloverleaf Pattern
2. Use the PORT and STARBOARD keys to change the size (S, M or L) if required 3. Press the PILOT key to activate the autopilot You can change the pattern direction in PILOT SETUP (See section 3) Raymarine S1000 Autopilot... -
Page 15: How Do I Dodge An Obstacle
How do I dodge an obstacle? Even when the autopilot is activated, you are are still able to override it. If, for example, you encounter an obstacle, or you just wish to change direction by a few degrees. With the autopilot activated: 1º... -
Page 16: Setting Up Your S1000
Setting up your S1000 System Raymarine S1000 Autopilot... -
Page 17: How Do I Change The Pattern Direction
How do I change the pattern direction? You can change the default autopilot pattern direction. STANDBY press and hold PATTERN DIRECTION MODE CLOCKWISE or Normal mode STANDBY CLOCKWISE PATTERN Quick Tip User Guide 1. Press and hold STANDBY for Pilot Setup 2 seconds to enter PILOT SETUP mode. -
Page 18: How Do I Change My Boat Type
3. Press the PORT or POWER STARBOARD key to toggle SAIL between POWER, SAIL and or FISHING FISHING 4. Press STANDBY to leave Pilot setup and return to normal mode. S1000 Fishing patterns are only available in FISHING mode Raymarine S1000 Autopilot... -
Page 19: Setting Up The Autopilot
Setting up the autopilot Before you use your S1000 autopilot for the first time, you will need to run through the automatic configuration utility - AutoLearn. AutoLearn requires a significant amount of CLEAR SEA SPACE in front of your boat. It will take your boat through a series of zig-zag manouvers until it has acquired enough data. - Page 20 LRN PASS indicates the end of AutoLearn. LRN FAIL AutoLearn successful After 7 to 27 steps • save AutoLearn calibration settings For best results, perform the AUTOLEARN whilst steering INTO wind and waves. Raymarine S1000 Autopilot LEARN PASS EXIT >...
-
Page 21: How Do I Adjust The Autopilot Settings
4. Press mode to scroll thorugh the available settings. The current value for each will be displayed alongside 5. Press the PILOT key to adjust the value. S1000 Settings: Rudder Gain Counter Rudder Response Auto Trim Details of each setting are given on the following pages Autolearn will have set these to the optimum values. -
Page 22: What Is Rudder Gain
Boats can vary widely in their response to helm, and by adjusting the rudder gain you can change the S1000's steering characteristics. Rudder gain is a measure of how much helm the S1000 applies to correct course errors – higher settings mean more rudder is applied. -
Page 23: What Is Counter Rudder
What is Counter Rudder? Counter rudder is the amount of rudder your S1000 applies to try to prevent the boat from veering off course. Higher counter rudder settings result in more rudder being applied. This can be set in the range 1 to 9. -
Page 24: What Is Response
What is Response? This sets the S1000 response level setting. The response level controls the relationship between course keeping accuracy and the amount of helm/ drive activity. Range is from 1 to 9. level 1 minimizes the amount of pilot activity. This conserves power, but... -
Page 25: Setting Up The Autopilot (Autolearn)
User Guide... -
Page 26: Alarms And Troubleshooting
Alarms and Troubleshooting Raymarine S1000 Autopilot... -
Page 27: S1000 Alarm Messages
S1000 Alarm messages When the S1000 detects a fault or failure on the system, it will activate one of the alarm messages listed in the following table. Unless otherwise stated, you should respond to the alarm by pressing standby to clear the alarm and return to manual control, before you attempt to resolve the problem. - Page 28 Note: The autopilot stops adjusting the heading as soon as it loses data. The S1000 autopilot is not receiving valid COG data from your GPS system. Check the connections and that your GPS unit is powered on and setup to transmit COG data.
-
Page 29: Fault Finding
We also put them through comprehensive testing and quality assurance procedures before shipping. If a fault occurs with your S1000, use the fault finding tables in this section to help identify the problem and provide a solution. If you cannot resolve the problem yourself, refer to the product support information. -
Page 30: Safety Alarm
S1000 loses contact with all of its controllers (including wired controllers), • the S1000 loses GPS signal. In both instances, the S1000 will revert to STANDBY and you will need to take the helm. General maintenance Routine checks The S1000 computer and S100 controller do NOT contain user-serviceable parts. -
Page 31: Dealer Maintenance Procedures
Handset Registration Raymarine wireless systems demand that each wireless controller is “registered” to a basestation, in this case a S1000. This registration process is to prevent unauthorized control of your boat by another user nearby. Your S1000 system is supplied with the handset pre-registered to the S1000. - Page 32 >. To leave without de-registering, press STANDBY. Factory Reset This option will clear all settings from the S100 and the S1000. Press and hold the PILOT key for 2 seconds to activate the reset. Note: A reset does not alter the registration status of the S100...
-
Page 33: Product Support
If the connections are secure, refer to the Fault Finding section in this chapter. If you cannot trace or rectify the fault, contact your nearest Raymarine dealer or Service Center, specifying: The S1000 controller and S1000 computer serial numbers: •... -
Page 34: Important Information
Important Safety Information Raymarine S1000 Autopilot... -
Page 35: Safety Notices
Failure to do so could result in poor product performance, personal injury and/or damage to your boat. Before installing the S1000 computer and drive unit, check that they are the correct voltage for your boat’s supply. -
Page 36: Installation Guide
S1000 autopilot installation guide. Your S1000 will add a new dimension to your boating enjoyment. However, it is the skipper’s responsibility to ensure the safety of the boat at all times by following these basic rules: •... -
Page 37: Radio Frequency Energy
(RF) energy (radio waves). Exposure to radio frequency energy The S1000 and S100 are designed not to exceed the limits for exposure to RF energy set by national authorities and international health agencies These limits establish permitted levels of radio wave exposure for the general population. -
Page 38: Intended Use
Declaration of Conformity Hereby Raymarine UK Ltd., declare that the S1000 and S100 are in compliance with the essential requirements and other relevant provisions of the Directive 1999/5/EC The original Declaration of Conformity certificate may be viewed on the relevant product page at www.raymarine.com... -
Page 39: Connections To Other Equipment
Connections to other equipment If your Raymarine equipment is to be connected to other equipment using a cable not supplied by Raymarine, a suppression ferrite MUST always be attached to the cable near to the Raymarine unit. Handbook Information To the best of our knowledge, the information in this handbook was correct when it went to press. - Page 40 ® SeaTalk is a Registered Trademark of Raymarine All other trademarks used in this document are acknowledged. © Copyright Raymarine UK Limited 2004 Raymarine S1000 Autopilot...
Need help?
Do you have a question about the S1000 and is the answer not in the manual?
Questions and answers