Table of Contents
Advertisement
Available languages
Available languages
Quick Links
Mod.
1092
DS1092-542
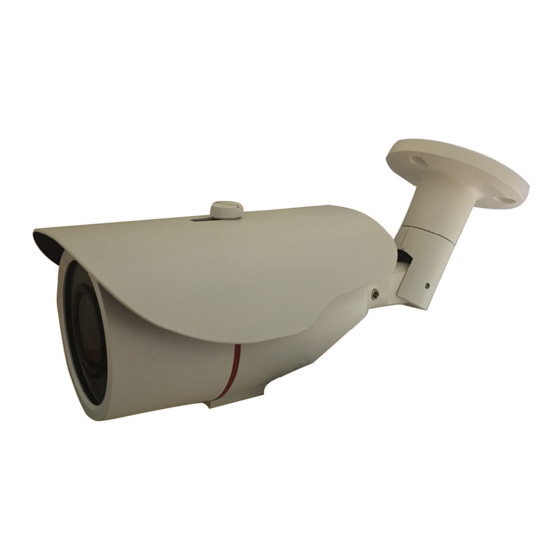
TELECAMERA COMPATTA AHD 4M DAY & NIGHT
OTTICA VARIFOCAL 2.8-12MM
4M AHD DAY & NIGHT CAMERA
2.8-12MM VARIFOCAL LENS BUILT-IN
AHD 4M TAG & NACHT KOMPAKTKAMERA
FESTOBJEKTV 2.8-12 MM
CAMÉRA COMPACTE AHD 4M DAY & NIGHT
OPTIQUE VARIFOCAL 2.8-12MM
CÁMARA COMPACTA DÍA/NOCHE AHD 4M
CON LENTE VARIFOCAL 2.8-12MM INTEGRADA
Sch./Ref./Typ/Réf. 1092/221M
MANUALE D'USO
USER MANUAL
BEDIENUNGSANLEITUNG
MANUEL D'UTILISATION
MANUAL DE USUARIO
Advertisement
Table of Contents

Subscribe to Our Youtube Channel
Related Manuals for urmet domus 1092/221M


Summary of Contents for urmet domus 1092/221M
- Page 1 AHD 4M TAG & NACHT KOMPAKTKAMERA FESTOBJEKTV 2.8-12 MM CAMÉRA COMPACTE AHD 4M DAY & NIGHT OPTIQUE VARIFOCAL 2.8-12MM CÁMARA COMPACTA DÍA/NOCHE AHD 4M CON LENTE VARIFOCAL 2.8-12MM INTEGRADA Sch./Ref./Typ/Réf. 1092/221M MANUALE D’USO USER MANUAL BEDIENUNGSANLEITUNG MANUEL D’UTILISATION MANUAL DE USUARIO...
-
Page 2: Caratteristiche Tecniche
ITALIANO PRECAUZIONI D’USO Assicurarsi dell’integrità dell’apparecchio dopo averlo tolto dall’imballo. • Prima di effettuare qualsiasi operazione di pulizia o di manutenzione disinserire l’apparecchio dalla • rete di alimentazione elettrica. Non usare prodotti spray per la pulizia dell’apparecchio. Controllare che la temperatura d’esercizio sia nei limiti indicati e che l’ambiente non sia •... -
Page 3: Contenuto Della Confezione
CONTENUTO DELLA CONFEZIONE N°1 Telecamera con staffa per installazione a parete. • N°2 Chiavi a brugola. • N°1 Manuale d’uso. • Nota Bene La composizione degli accessori a corredo può essere variata senza alcun preavviso. NORME D’INSTALLAZIONE Evitare di puntare direttamente l’obiettivo contro il sole o contro luci intense, anche se la telecamera è •... -
Page 4: Installazione
INSTALLAZIONE Prima d’iniziare l’installazione, assicurarsi che tutte le unità da collegare non siano alimentate. Installare la telecamera sulla staffa, avvitandola sulla stessa. Posizionare la staffa in modo tale da riprendere le immagini prescelte, quindi procedere con il bloccaggio della staffa sul muro o su un’altra superficie piana. Collegare l’uscita video all’utilizzatore previsto. -
Page 5: Utilizzo Del Menu
UTILIZZO DEL MENU La telecamera 1092/221M utilizza un menù a più livelli che consente di abilitare/disabilitare o variare le impostazioni. DESCRIZIONE DEL SISTEMA DEI MENU Una volta impartito il comando di accesso al menu apparirà a monitor la finestra iniziale di accesso. - Page 6 MENU PRINCIPALE SETUP (VALORI DI DEFAULT) EXPOSURE BACKLIGHT WHITE BAL. DAY&NIGHT SPECIAL ADJUST EXIT SAVE&END Nota Bene Con i valori di default, la telecamera utilizza una regolazione di luminosità che non si adatta a tutte le tipologie di installazione. Se necessario, variare la funzione luminosità disponibile all’interno del menu ESPOSIZIONE (descritto oltre).
- Page 7 EXPOSURE (ESPOSIZIONE) Questo menu consente di variare le funzioni relative all’ottica della telecamera. Selezionando questa voce si accede al seguente sottomenu: EXPOSURE SHUTTER AUTO ■■■■■■■■█15 BRIGHTNESS ■■█■■■■■■35 D-WDR RETURN SHUTTER (OTTURATORE) - ESPOSIZIONE ELETTRONICA Se si è impostata la lente in MANUAL (all’interno del precedente menu LENS), è possibile configurare manualmente la velocità...
- Page 8 BACKLIGHT (RETROILLUMINAZIONE) – COMPENSAZIONE CONTROLUCE Un oggetto inquadrato con forte luce proveniente da dietro solitamente appare scuro e poco visibile rispetto al resto dell’immagine. La funzione BACKLIGHT permette di ovviare a questo inconveniente ed ottenere una buona compensazione nell’area selezionata (definita impostando posizione e dimensione), aumentando la luminosità...
- Page 9 WHITE BAL (BILANCIAMENTO DEL BIANCO) Nota Bene: questo menu non è attivo se la telecamera è in modalità B/W (MENU DAY & NIGHT). Questa funzione consente di selezionare le modalità di bilanciamento del bianco. Selezionando questa voce è possibile scegliere fra le opzioni in tabella. Opzione Valore Spiegazione...
- Page 10 DAY/NIGHT - VARIAZIONE DEL FUNZIONAMENTO DELLA TELECAMERA IN FUNZIONE DELLA VARIAZIONE DI LUCE PRESENTE SULLA SCENA La telecamera, che normalmente riprende le immagini a colori, in condizioni di scarsa illuminazione, commuta automaticamente il suo funzionamento da “colore” a “bianco/nero”. In questo modo viene ottimizzata la qualità...
- Page 11 SPECIAL– REGOLAZIONI SPECIALI Questo menu consente di variare le funzioni relative ai parametri della telecamera. Selezionando questa voce si accede al seguente sottomenu: SPECIAL MIRROR LANGUAGE RETURN Opzione Valore Spiegazione L’opzione MIRROR consente di ruotare l’inquadratura. OFF ÷ MIRROR ÷ MIRROR V-FLIP ÷...
- Page 12 Opzione Valore Spiegazione Questa opzione permette di visualizzare le correzioni dei ON ÷ OFF LIVE DPC pixels in tempo reale Questa opzione consente di avviare il processo di aggiustamento dei pixel danneggiati, dopo aver definito l’area dello schermo dove avviare il processo (posizione e ON ÷...
-
Page 13: Pulizia Del Dispositivo
PULIZIA DEL DISPOSITIVO Usare un panno asciutto e strofinare leggermente per eliminare polvere o sporcizia. • Nel caso la sporcizia non fosse eliminabile con un panno asciutto, compiere l’operazione con un • panno inumidito di detergente neutro. Non usare liquidi volatili come benzina, alcool, solventi, ecc. o panni trattati chimicamente per pulire il •... -
Page 14: Technical Specification
ENGLISH PRECAUTIONS Make sure that the device is intact after removing it from the package. • Disconnect the device from the mains before cleaning or maintenance. Do not use spray products to • clean the device. Check that the working temperature is within the indicated range and that the environment is not •... -
Page 15: Accessories Provided
ACCESSORIES PROVIDED N°1 Camera with bracket for wall mounting. • N°1 Allen wrench • Instruction manual. • Important note: Accessories may be changed without prior notice. INSTALLATION SPECIFICATIONS Avoid pointing the lens directly towards the sun or intense sources of light also when the camera is •... -
Page 16: Installation
These controls can be used to access the OSD menu. Refer to the respective product manuals for using the controls. MENU USE The camera ref. 1092/221M uses a multi-level menu that allows to enable/disable or change camera settings. MENUS SYSTEM DESCRIPTION Once the menu access command has been performed, the access first screen will be displayed. - Page 17 MAIN MENU SETUP (DEFAULT VALUES) EXPOSURE BACKLIGHT WHITE BAL. DAY&NIGHT SPECIAL ADJUST EXIT SAVE&END Note With default values, the camera uses a brightness adjustment that is not suitable for all installations. Change BRIGHTNESS in the menu EXPOSURE (see below), if necessary. Option Value Description...
- Page 18 MENU ITEMS DESCRIPTION EXPOSURE This function lets you vary the options of the camera optics. Select this menu item to access the following submenus: EXPOSURE SHUTTER AUTO ■■■■■■■■█15 BRIGHTNESS ■■█■■■■■■35 D-WDR RETURN SHUTTER If the LENS has been selected in MANUAL (see the main menu), this function allows to set manually the shutter speed;...
- Page 19 BACKLIGHT - BACK LIGHT COMPENSATION An object with a strong light in the background usually appears dark and not so visible if compared with the rest of image. The BACKLIGHT function allows to solve this problem and obtain a good compensation in the selected area (defined by position and dimension) increasing the brightness if the area appears dark or reducing it if too clear.
- Page 20 WHITE BAL – WHITE BALANCING Note: this menu is not active if the camera is in B/W mode (see DAY & NIGHT MENU). This function is used to select white balancing mode. Select this menu item to choose among the options in the table.
- Page 21 DAY/NIGHT – CAMERA OPERATION CHANGE ACCORDING TO VARIATION OF LIGHT PRESENT IN THE SCENE The camera usually captures color images, but under poor light conditions it automatically switches its operation mode from “color” to “black/white”. In this way the captured image quality is optimized. Selecting DAY/NIGHT, you can choose from the options EXT, AUTO (automatic), COLOR and B/W (black and white).
- Page 22 SPECIAL– SPECIAL ADJUSTMENTS This menu allows to change the functions concerning camera parameters. Select this menu item to access to the following submenu: SPECIAL MIRROR LANGUAGE RETURN Option Value Description It mirrors the image in different configurations OFF ÷ MIRROR ÷ MIRROR V-FLIP ÷...
-
Page 23: Cleaning The Device
ADJUST This function allows to access the submenu concerning image display mode. Select this menu item to access the following submenu: ADJUST SHARPNESS MONITOR OUTPUT MODE RETURN SHARPNESS Whit this function it’s possible to adjust the SHARPNESS through the level setting (from 0 to 10) and the AGC function (Automatic gain control which operates when the camera shoot images under poor illumination conditions). - Page 24 DS1092-542 URMET S.p.A. Area tecnica 10154 TORINO (ITALY) servizio clienti +39. 011.23.39.810 VIA BOLOGNA 188/C http://www.urmet.com Telef. +39. 011.24.00.000 (RIC.AUT.) e-mail: info@urmet.com DS1092-542 +39. 011.24.00.300 - 323 MADE IN CHINA Prodotto in Cina su specifica URMET Made in China to URMET specification...
Need help?
Do you have a question about the 1092/221M and is the answer not in the manual?
Questions and answers