Table of Contents
Advertisement
Quick Links
Advertisement
Table of Contents

Subscribe to Our Youtube Channel
Related Manuals for SwiftColor SCL-8000P


Summary of Contents for SwiftColor SCL-8000P
- Page 1 SCL-8000P User’s Guide 4Y1-8582-030...
-
Page 2: How To Use This Guide
How to Use This Guide ■ Start Guide You should read this start guide fi rst if this is the fi rst time you are using this printer. The Start Guide describes precautions for using the printer safely and shows you how to prepare the printer (software installation, etc.) before you use it. -
Page 3: Table Of Contents
Table of Contents How to Use This Guide..................I Start Guide ..................................I User's Guide ..................................I Before You Begin ....................1 Conventions ....................................1 Illustrations and Sample Screens ............................1 Trademarks ....................................1 Abbreviations ....................................2 Legal Notice ....................................2 Legal Limitations on the Usage of Your Product and the Use of Images ......2 Product Name ................................ - Page 4 Table of Contents 2-3 Pausing Printing ................................24 Pause from the Operation Panel ......................... 24 Cleaning During Temporary Stop ....................... 25 3 How to Use the Printer Driver.............. 27 3-1 Opening the Printer Driver Dialog Box ......................27 Opening the Printer Driver from the Application Software ............27 Opening the Printer Driver from the Start Menu ................
- Page 5 Table of Contents Sleep Timer Settings ............................75 Special Settings ..............................77 Add Custom Paper Type ........................... 80 4 How to Use the Status Monitor ............84 4-1 Displaying the Status Monitor ..........................84 Starting the Status Monitor ..........................84 How to Start and Display the Status Monitor ..................
- Page 6 Table of Contents 6-3 Printer Not Operating Correctly ........................147 Power off ..................................147 Printer Does Not Start or Printer Stops During Print Jobs ............147 Paper is Not Feeding Correctly ........................149 Status Monitor Does Not Start........................149 6-4 Print Results Are Unsatisfactory ........................150 Random, Bizarre Characters Are Printed....................150 Slow To Print ................................150 Print Quality Is Poor ............................150...
-
Page 7: Before You Begin
The illustrations and the sample screens of the printer driver settings in this guide are created with SCL-8000P in Windows 7. The contents of these printer driver screens and instructions are essentially the same as those for Windows 8; however, explanations are provided when there are minor differences in screen content or procedures. -
Page 8: Abbreviations
■ Product Name SCL-8000P ■ CE This equipment conforms with the essential EMC requrements of EC Directive. We declare that this product conforms with the EMC requirements of EC Directive at nominal mains input 230V, 50 Hz although the rated input of the product is 100 to 240 V, 50/60 Hz. -
Page 9: Fcc (Federal Communications Commission)
Before You Begin ■ FCC (Federal Communications Commission) This equipment has been tested and found to comply with the limits for a Class A digital device, pursuant to Part 15 of the FCC rules. These limits are designed to provide reasonable protection against harmful interference when the equipment is operated in a commercial environment. -
Page 10: Before Using The Printer
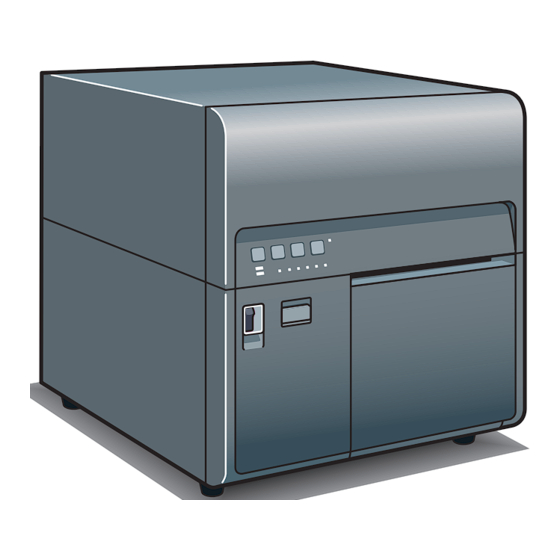
1 Before Using the Printer This section describes how to prepare the printer and procedures you should know before you use the printer. 1-1 Printer Part Names and Functions Component names and functions are as follows: ■ Front View Upper unit Open this unit when set paper or removing the paper jammed in the paper feed path or cleaning inside of the printer. -
Page 11: Rear View
1 Before Using the Printer Maintenance cartridge door Open this door when replacing the maintenance cartridge. Maintenance cartridge door is locked while the printer operates. ■ Rear View LAN port Connect a LAN cable here to connect to the computer. USB port Connect a USB cable here to connect to the computer. -
Page 12: Inside The Printer
1 Before Using the Printer ■ Inside the Printer Upper unit release lever Push this lever up to release the upper unit. Paper tray Load paper in this tray. Feeder lift button Pressing this button moves the paper tray up and down. Ink tanks Black (Bk), Cyan (C), Magenta (M), and Yellow (Y) ink tanks are loaded. -
Page 13: Operation Panel
1 Before Using the Printer ■ Operation Panel BACK PAUSE FEED FEED STATUS ERROR P ower key/lamp Pressing this key to enter the sleep mode. Pressing this key again to exit from the sleep mode. Lamp status are as follows: Power-on. - Page 14 1 Before Using the Printer Maintenance cartridge warning lamp Full. Blinking Nearly full. Suffi cient room to collect ink. Remaining paper lamp No paper or paper jam. Blinking The remaining amount of paper is low. Remaining Paper Lamp starts fl ashing when remaining papers become about 27 mm or less in height.
-
Page 15: Connecting The Printer And Computer
1 Before Using the Printer 1-2 Connecting the Printer and Computer The printer is compatible with Hi-Speed USB and LAN (Gigabit Ethernet). Important • You can disconnect the USB cable even while the printer and computer are on, but do not disconnect the USB cable in the cases described below. -
Page 16: Connect A Lan Cable
1 Before Using the Printer ■ Connect a LAN cable Connect the LAN cable to the printer and the computer. Important • Please consult your network administrator when conecting to an office LAN. • If a printer driver has not been installed in the computer to which you want to connect your printer, install it before connecting the USB cable or LAN cable. -
Page 17: Switching The Printer On And Off
1 Before Using the Printer 1-3 Switching the Printer On and Off ■ Switching the Printer On Switch the printer on. Turn on the main power switch. When the [STATUS] lamp which has been blinking stays lit, the printer is ready for printing. The STATUS lamp stays lit. -
Page 18: Switching The Printer Off
1 Before Using the Printer ■ Switching the Printer Off Switch the printer off . Press the power key for a few seconds more than 1 second. Power lamp blinks and the printer enters the sleep mode. F E E D P A U S E Turn off the main power switch. -
Page 19: Paper Loading Procedure
1 Before Using the Printer 1-4 Paper Loading Procedure This section describes how to load paper. Make sure that the power lamp is lit. If the printer has been turned off, turn on the main power switch. When the printer is in the sleep mode, press the power key. - Page 20 1 Before Using the Printer Push up the upper unit release lever.
- Page 21 1 Before Using the Printer Open the Upper unit. Press the feeder lift button. The feeder lift tray moves up.
- Page 22 1 Before Using the Printer Caution • Do not touch the feeder lift tray and paper while the feeder lift tray is moving up/down. Your fingers could be caught in the machine and this could cause injury. Draw out the feeder lift tray slowly.
- Page 23 1 Before Using the Printer Load paper in the feeder lift tray. Note • Load paper with the black mark located on the right side of the back of the printing surface.
- Page 24 1 Before Using the Printer After loading paper, push the feeder lift tray all the way. Press the feeder lift button. The feeder lift tray moves down. Note • Follow the same procedure when replacing paper. • When the feeder lift tray has been set in position, the remaining paper lamp lights.
- Page 25 1 Before Using the Printer Place the paper on the paper transport area. Important • When setting the paper on the transport area, align it with the paper guides on the right side and pay attention that the paper is not slackened as shown in the figure. •...
- Page 26 1 Before Using the Printer Close the upper unit and the ink tank door. Paper is automatically fed to the printing position. Caution • Watch your hand when closing the upper unit to avoid injury. Important • Load paper in Printer immediately after unpacking it. •...
-
Page 27: How To Print
The Print dialog box appears. Check that [Swiftcolor SCL-8000P] has been selected in [Printer Setup]. If any other printer name is displayed, select [Swiftcolor SCL-8000P] in [Printer Setup]. Note • If your application software supports buttons designed to configure a printer (such as [Advanced Settings] and [Properties]), set the paper type, colors and so on here. - Page 28 2 How to Print Check that paper is ready, and then click [Print]. Printing starts. Note • See “How to Use the Printer Driver” to modify print setting to suit specific purposes. → 3 How to Use the Printer Driver (P.27) •...
-
Page 29: Canceling Print Jobs
The print job can be canceled by clicking [Cancel Print Job] in the status monitor. Click [ Cancel Print Job] in the “Swiftcolor SCL-8000P Status Monitor” window. The print job is canceled, and the currently printing job and the jobs that are under processing or receiving data in the printer are also abandoned, along with all print data in process in the computer. -
Page 30: Pausing Printing
2 How to Print 2-3 Pausing Printing The pause function is described below. ■ Pause from the Operation Panel Use this function to view the status of printing in progress or perform cleaning. Press the PAUSE key on the operation panel while printing is in progress. PAUSE STATUS ERROR... -
Page 31: Cleaning During Temporary Stop
2 How to Print ■ Cleaning During Temporary Stop Important • Cleaning from the “Status Monitor” window is enabled only while the printer pauses. Cleaning can be performed while the printer pauses. Click the [ Cleaning] menu in the “Status Monitor”... - Page 32 2 How to Print Important • While cleaning is in progress, do not perform any other operation. • Cleaning cannot be done during a print job or when an error is occurring. • If Strong cleaning fails to solve the problem, the printhead may require replacement, or there could be some other problem.
-
Page 33: How To Use The Printer Driver
To open [Printing Preferences] from the application software in use, select [Print] and then [Properties]. Open the [File] menu in the application software, and click [Print]. Select [Swiftcolor SCL-8000P] in Printing Preferences and click [Properties]. [Swiftcolor SCL-8000P) Properties] (Print Setup) window appears. -
Page 34: Opening The Printer Driver From The Start Menu
Right-click on the [Swiftcolor SCL-8000P] Printer icon and select [Printing Preferences]. [Swiftcolor SCL-8000P Printing Preferences] dialog box appears. Note • The [Printing Preferences] dialog box can also be opened by clicking [Preferences] in the [Swiftcolor SCL- 8000P Properties] dialog box. -
Page 35: Using The Page Setup Sheet
3 How to Use the Printer Driver 3-2 Using the Page Setup Sheet The [Page Setup] sheet is described below. The [Page Setup] sheet in the [Printing Preferences] dialog box allows you to set paper settings, such as the number of copies to print and the orientation of printing. [12] [11] [10]... -
Page 36: Registration Of Favorites
3 How to Use the Printer Driver Custom Paper Size Set an optional paper size. → Custom Paper Size Settings (P.40) Paper Type Set a paper type. → Paper Type (P.45) Copies Set the number of copies to print. Orientation Set the orientation of printing on the paper. - Page 37 3 How to Use the Printer Driver deleted. To register or delete settings, open the [Printing Preferences] dialog box from the [Start] menu in Windows. → Opening the Printer Driver from the Start Menu (P.28) Set the data to be registered in the [Page Setup] sheet, [Color] sheet, [Overlay Settings] and [Advanced Settings] sheet.
- Page 38 3 How to Use the Printer Driver Type an optional name in the [Setting File Name] box and, on confi rming [Setting Contents], click [Register]. Register here under the name “Setting_A. ” A confirmation message appears. Note • The entry of a name is required. Space and tab characters are not allowed in the name. The name can be up to 16 single- and double-byte characters long.
- Page 39 3 How to Use the Printer Driver Click [Yes]. Confi rm [Setting Contents] and click [OK].
- Page 40 3 How to Use the Printer Driver Check that the registered name has been added in [Favorites]. Click [OK]. The print setting is registered in [Favorites]. Note • To rename registered print settings, select the name of an item to edit from [Favorites] and click [Register/ Delete].
-
Page 41: Deletion Of Favorites
3 How to Use the Printer Driver ■ Deletion of Favorites Delete the settings registered in [Favorites]. Click [Register/Delete] in [Favorites]. Select the setting to delete from the [Setting Register List] in the [Register and Delete Settings] dialog box and click [Delete]. - Page 42 3 How to Use the Printer Driver A confirmation message appears. Click [Yes]. The registered setting is deleted from [Setting Register List]. Check that the print setting has been deleted and click [OK].
-
Page 43: Using Print Setting Registered In Favorite
3 How to Use the Printer Driver ■ Using Print Setting Registered in Favorite Printing can be performed using the print settings registered in [Favorites]. The print settings registered in [Favorites] are imported by simply selecting them from a list, so that print jobs can always be executed with a desired set of print settings. - Page 44 3 How to Use the Printer Driver Color Color Adjustment No color adjustment Set Print Quality Input resolution 600dpi Single color Settings Color Balance* Bk/C/M/Y All 0 Brightness* Normal Density * Contrast* Half-tone Process* Dither Level Correction* Sharpness* 0(None) Overlay Settings Overlay Advanced Settings Print Order...
-
Page 45: Paper Size
3 How to Use the Printer Driver ■ Paper Size Select the size of paper to print from [Paper Size]. Note • The current paper size can be identified in a preview. ● Standard paper (registered paper) A total of 1 diff erent paper sizes are preregistered. Margins (mm) Gap/Mark Paper Size... -
Page 46: Custom Paper Size Settings
3 How to Use the Printer Driver Note • [Customize] allows you to change the values of paper, such as paper size, margins and mark lengths values, without renaming it. • The setting of [Customize] that has been entered by opening the [Printing Preferences] dialog box from application software is erased at the same time as the software is closed. - Page 47 3 How to Use the Printer Driver Enter or select the “Name, ” “Width, ” “Length, ” “Margin, ” “Mark length, ” “Display Unit” and “Paper Shape” items in the [Custom Paper] fi eld. Name Enter a new paper name. The name can be up to 15 single-byte and double- byte characters long.
- Page 48 3 How to Use the Printer Driver Acceptable user paper size range: ● Label / Marker ● Tag/ Marker Mark Top margin Top margin Mark Label Cutting position Cutting position Print area Print area Left margin Right margin Left margin Right margin Transport Transport...
- Page 49 3 How to Use the Printer Driver ● Label / Marker (Edge to Edge) Top margin Mark Label Cutting position Print area Left margin Right margin Transport direction Mark length Cutting position Paper length Cutting position Bottom margin Paper width Paper length: Length from the center of a mark to the center of the next mark Top margin (bottom margin):Total of the half of the mark length and the top (bottom) margin of the label Paper width...
- Page 50 3 How to Use the Printer Driver When entire entry is completed, click [Register]. A confirmation message appears. Click [Yes]. Check that the paper name as entered is displayed in the list in [Paper Size List] and click [OK].
-
Page 51: Paper Type
3 How to Use the Printer Driver ■ Paper Type In [Paper Type], select the type of paper to print on. Select [Paper Type] from among the following kinds of paper: Matte Matte Coated Paper Non-glossy paper that fi ts into a broad range of applications, such as regular printing. -
Page 52: Orientation
3 How to Use the Printer Driver ■ Orientation In [Orientation], select the direction in which to print documents. Portrait Select this option to print the document Transport rotated 90 degrees to the right in relation to direction the direction of paper feeding. Landscape Select this option to print the document Transport... - Page 53 3 How to Use the Printer Driver 180-degree Rotation Check this check box to print a document Portrait,180-degree Rotation: set for [Portrait] or [Landscape] rotated 180 degrees. Transport direction Landscape,180-degree Rotation: Transport direction Note • The current printing direction can be identified in a preview.
-
Page 54: Check Settings
3 How to Use the Printer Driver ■ Check Settings Click [Check Settings] to confi rm the current paper settings. Note • The [Copy] button in [Check Settings] is used to copy the current settings to the clipboard in the OS. -
Page 55: Version Information
3 How to Use the Printer Driver ■ Version Information Information such as version and copyright on the printer driver can be confi rmed. Click [Version Information] to open the [Version Info] dialog box. Click [Obtain Printer Information] to get information on the printer connected. Note •... -
Page 56: Using The Color Sheet
3 How to Use the Printer Driver 3-3 Using the Color Sheet The [Color] sheet is described below. The [Color] sheet is used to set print picture quality and colors. Paper Size Preview The currently set paper size is displayed in a preview. Print image of print data refl ecting changes to the settings A print image of the print data that has been subjected to color adjustment is displayed in a preview. -
Page 57: Color Adjustment
3 How to Use the Printer Driver ■ Color Adjustment [Color Adjustment] adjusts the tint to suit documents. [Color Adjustment] is selectable from the following four items: Photo Performs color adjustment optimized for the printer. Select this option to print images with pictures. -
Page 58: Set Print Quality
3 How to Use the Printer Driver ■ Set Print Quality Set the print quality. Input resolution 1200dpi Prints data after processing it for a resolution of 1200 × 1200 dpi. Input resolution 600dpi Prints data after processing it for a resolution of 600 × 600 dpi. Input resolution 300dpi Prints data after processing it for a resolution of 300 ×... -
Page 59: Single Color Settings
3 How to Use the Printer Driver ■ Single Color Settings [Single-Color Setting] prints multi-colored documents in a single color. To print in a single color, click the [Single-Color Setting] check box and check-select the color to use. To cancel the single-color option, uncheck [Single-Color Setting]. -
Page 60: Using The Detailed Settings Dialog Box
3 How to Use the Printer Driver 3-4 Using the Detailed Settings Dialog Box The [Detailed Settings] dialog box is described below. Use the [Detailed Settings] dialog box to enter more detailed settings in the [Color] sheet. Note • Click [Defaults] to initialize the printer to the factory defaults. ■... -
Page 61: Brightness
3 How to Use the Printer Driver ■ Brightness [Brightness] adjusts brightness if the print results appear too dark or bright as a whole. This adjustment adjusts the brightness of intermediate colors without varying the shading of the darkest and brightest portions. -
Page 62: Density
3 How to Use the Printer Driver ■ Density Drag the [Density] slider to determine over all density. Set the density between -50 and +50. The slider represents the standard density setting (0) at the middle. Drag the slider to the left for a lighter image and to the right for a darker image. -
Page 63: Contrast
3 How to Use the Printer Driver ■ Contrast Drag the [Contrast] slider to determine overall contrast. Set the contrast between -50 and +50. The slider represents the standard contrast setting (0) at the middle. Drag it to the left to get a smoother tone representation with a broader width between the dark and bright edges. -
Page 64: Halftone Process
3 How to Use the Printer Driver ■ Halftone Process Click either the dither or error diff usion check box. After the setup, click [OK]. Dither Arranges dots regularly to represent halftones. This is suitable for printing graphics or similar materials in which color boundaries need to appear crisp. Error diff usion Arranges dots randomly to represent halftones. -
Page 65: Sharpness
3 How to Use the Printer Driver the [Level Correction] check box. After the setup, click [OK]. ■ Sharpness [Sharpness] sharpens images when they appear blurred as a whole in the print results. Sharpness is selectable in a pulldown menu from among 0 (No), 1 (Small), 2(Medium) and 3 (Large). After the setup, click [OK]. -
Page 66: Using The Overlay Settings Sheet
3 How to Use the Printer Driver 3-5 Using the Overlay Settings Sheet The [Overlay Settings] sheet is described below. In overlay printing, a background image that has been created as a form fi le beforehand can be overlaid with a foreground image or text on printing. -
Page 67: Create Form
Select [Print] and the like from the application with which image data has been created, select "Swiftcolor SCL-8000P" as a printer name and select [Properties], [Settings] and so on. Click the [Overlay] tab in the [Swiftcolor SCL-8000P Printing Preferences] dialog box in the printer driver, and then check [Overlay]. - Page 68 3 How to Use the Printer Driver Check [Print the form to the fi le] in [Print Mode]. Click [Reference].
- Page 69 3 How to Use the Printer Driver Specify [File Name] and location to save the fi le.and set a fi le name. File Name: Set any name. Location to save file: Decide a location to save and create a folder with a name. Enter [Comment].
- Page 70 3 How to Use the Printer Driver Click [OK]. When the print window appears again, click [Print]. Prints data to be used as a form file. The data is saved in the folder created in Step 4 as a form file. Note •...
-
Page 71: Overlay Printing
• Prints data overlaid with a form file with the foundation preserved. Overlay printing with the foundation preserved, the image is discolored as its colors overlap the foundation. Click the [Overlay] tab in the [Swiftcolor SCL-8000P Printing Preferences] dialog box in the printer driver, and then check [Overlay]. - Page 72 3 How to Use the Printer Driver Click [Reference]. Select the form fi le that has been created. Check the selected form file in [Form File Information] and [Preview].
- Page 73 3 How to Use the Printer Driver Click [OK]. Executes a print job. Print data is printed overlaid with the form file. Note • Overlay printing would be disabled if the print setup information differs between the print data and the form file.
-
Page 74: Using The Advanced Settings Sheet
Print Speed Set the printing speed. Defaults Resets [Advanced Settings] to the defaults. Important • The setting of [Print Order] is disabled unless [Enable Advanced Printing Features] is checked in the [Advanced] sheet in the [Swiftcolor SCL-8000P Properties] dialog box. -
Page 75: Print Order
3 How to Use the Printer Driver ■ Print Order Decide on whether to start printing from the fi rst or last page. To print from the fi rst page afterwards, select [Ascending Order]; to print from the last page upward, select [Descending Order]. - Page 76 3 How to Use the Printer Driver Important • If glossy paper is selected - If [Glossy Paper] is selected in [Paper Type], a warning is displayed to limit the printing speed. - [Print Speed] in [Advanced Settings] in the printer driver is maximum at 100 mm/sec. [Auto Speed] is switched off if it has been turned on.
-
Page 77: Using The Utility Sheet
3 How to Use the Printer Driver 3-7 Using the Utility Sheet The [Utility] sheet is described below. The [Utility] sheet is used to confi gure settings for the printer maintenance, power saving and so on. Open the [Utility] sheet also when starting the Status Monitor. [10] [11] [12]... - Page 78 3 How to Use the Printer Driver Sleep Switches the printer to the sleep mode. → Sleep (P.73) [7] Sleep Timer Setting Sets the interval of time to elapse to switch to the sleep mode. → Sleep Timer Settings (P.75) [8] Ink Refresh Clicking this button allows ink to fl ow in the print head and ink path to maintain the ink quality.
-
Page 79: Sleep
3 How to Use the Printer Driver • If you log in using an authority other than Administrator, you cannot perform the operation. However, you can perform the operation by getting the Administrator privilege temporarily. • To perform the above-mentioned operation using an authority other than the Administrator privilege. Open [Printer Properties], and then click [Change Properties] on the [General] sheet. - Page 80 3 How to Use the Printer Driver Click [Sleep]. The confirmation dialog box appears. Click [Yes]. The printer enters the sleep mode with the power lamp blinking.
-
Page 81: Sleep Timer Settings
3 How to Use the Printer Driver ■ Sleep Timer Settings [Sleep Timer Setting] allows you to set the time for the printer to enter the sleep mode automatically when the printer has been left idle for a certain period of time or when no print data has been received from the printer. Note •... - Page 82 3 How to Use the Printer Driver Enter time. Enter times for the sleep timer and the off timer from the keyboard or using the up and down buttons to the right of the entry box. Setting range Addressable Name Function resolution (m) Sleep timer setting...
-
Page 83: Special Settings
3 How to Use the Printer Driver ■ Special Settings [Special Settings] normally needs not be set. Set it when using the printer in an extraordinary environment or fanfold paper and so on. Important • If a warning is issued when you click [Sleep Timer Setting], refer to the following: →... - Page 84 3 How to Use the Printer Driver Click [Special Settings] to use and select or deselect them. The default state is shown below. Click [Send]. The confirmation dialog box appears.
- Page 85 3 How to Use the Printer Driver Click [Yes]. The settings are transmitted to the printer to take effect. Click [Close].
-
Page 86: Add Custom Paper Type
3 How to Use the Printer Driver ■ Add Custom Paper Type Up to 10 custom paper types can be added, and ink jetting amounts can be set for respective paper types. Important • If a warning is issued when you click [Sleep Timer Setting], refer to the following: →... - Page 87 3 How to Use the Printer Driver Type a desired name in the [Custom Paper Type Name]. For example, type “Type_A” as a desired name. Set ink jetting amounts for respective colors. Important • Moving the slide bar to the left decreases the ink jetting amount, and moving the slide bar to the right increases the ink jetting amount.
- Page 88 3 How to Use the Printer Driver Click [Register]. A confirmation message appears. Click [Yes]. Click [Close].
- Page 89 3 How to Use the Printer Driver Check the print result by the test print. Note • Deleting a paper type To delete a registered paper type, select if from the [Paper Type Names], and then click [Delete].
-
Page 90: How To Use The Status Monitor
• You can store the Status Monitor normally in the taskbar or the task tray and display it only when an error occurs. → 4-2 Using the Status Monitor (P.88) Open the [Utility] sheet in the [Swiftcolor SCL-8000P Properties] dialog box then click [ Start Status Monitor]. -
Page 91: How To Start And Display The Status Monitor
4 How to Use the Status Monitor The Status Monitor starts. ■ How to Start and Display the Status Monitor A pull down menu will be displayed by clicking on [Start], [View], or [Help] on the Status Monitor Dialog. The method to start and display the Status Monitor can be set. Follow the procedure below to select the display method. - Page 92 4 How to Use the Status Monitor Use either method described below to set the start method. [Start While Printing] The Status Monitor automatically starts and displays when a print job starts. The Status Monitor closes automatically when the print job ends. (This is the default setting.) [Start With Windows] The Status Monitor starts when Windows starts.
- Page 93 4 How to Use the Status Monitor Note • If you want the window to display always on the top, click Always Show On Top to attach the checkmark at the beginning of the name of this selection. This setting has no connection with the other settings on the View menu.
-
Page 94: Using The Status Monitor
4 How to Use the Status Monitor 4-2 Using the Status Monitor Use the Status Monitor to not only monitor the status of print jobs in progress but also monitor the status of the printer and the level of the ink supply and quantity of ink collection of the maintenance cartridge. Graphic image of the printer status Graphic image showing the current status of the printer. -
Page 95: Viewing The Print Status
4 How to Use the Status Monitor Maintenance Cartridge Information Display the amount of ink collected in the maintenance cartridge → Viewing Maintenance Cartridge Information (P.94) ■ Viewing the Print Status Progress of printing can be checked. [Number of Pages] Displays the number of pages of the document specifi ed for printing. -
Page 96: Viewing The Printer Status
4 How to Use the Status Monitor ■ Viewing the Printer Status Use these features to monitor the status of the printer. There are Four types of images to keep you informed about the status of the printer. Displayed to indicate the normal mode. (Background is blue) The printer is in the online mode and ready to print. - Page 97 4 How to Use the Status Monitor The Status Information indicates the status of the printer by displaying the following four icons and messages. Information Display printer related information. Please confi rm the content of the messages displayed here. Warning message Indicate that a warning is being issued for a problem occurred.
- Page 98 4 How to Use the Status Monitor After you read the message displayed in the Status Information, follow the procedure below if you want to open another window to learn more details. Select the message to read, and click [Display the Details of the Selected Status]. The description window opens and displays a description of the message and provides some troubleshooting advice.
-
Page 99: Viewing Ink Information
4 How to Use the Status Monitor ■ Viewing Ink Information Use these features to monitor the level of the ink in the ink tanks. There are four colors of ink tanks; Black (Bk), Cyan (C), Magenta (M), and Yellow (Y). Icons are used to indicate the level of ink in each ink tank. -
Page 100: Viewing Maintenance Cartridge Information
4 How to Use the Status Monitor ■ Viewing Maintenance Cartridge Information Use this feature to monitor the amount of the ink collected in the maintenance cartridge. The [Maintenance Cartridge Information] indicator at the bottom of the [Status Monitor] dialog box indicates the space currently left in the maintenance cartridge. -
Page 101: Printer Maintenance
Contact the dealer. • Please remember that cleaning consumes ink. Clean the printhead only when necessary. Open the [Utility] sheet in the [Swiftcolor SCL-8000P Properties] dialog box, select [Light Cleaning], [Medium Cleaning] or [Strong Cleaning] and click it. - Page 102 5 Printer Maintenance Light Cleaning Recovery operation performed fi rst when printhead nozzle clogging occurs. (Repeat this operation as required.) Medium Cleaning Recovery operation performed when printhead nozzle clogging occurs even after light cleaning is performed. (Repeat this operation as required.) Strong Cleaning Recovery operation performed when printhead nozzle clogging occurs even after Medium cleaning is performed.
-
Page 103: Adjusting The Printhead Position
→ To perform the above-mentioned operation using an authority other than the Administrator privilege. (P.73) ■ Adjust TK-GAP Opening the [Utility] sheet in the [Swiftcolor SCL-8000P Properties] dialog box and click [ Print Head Position Adjustment]. → Opening the Printer Driver from the Start Menu (P.28) - Page 104 5 Printer Maintenance Click [Adjust TK-GAP]. The [Print TK-GAP] dialog box appears. Click [Print]. T-K GAP Pattern: T-K Gap Adjustment T-K Gap Adjustment Print Module 2 Print Module 1 The confirmation dialog box appears.
- Page 105 5 Printer Maintenance Click [Yes]. The TK-GAP adjustment pattern is printed. On confi rming successful printout, click [Yes]. Observe the adjustment pattern to read the [TK-Gap] scale marks, and then enter the read values in [TK1] and [TK2]. (Normally, it is not necessary to adjust the reference position.) Adjusting the TK-1: Check whether the black frame is centered on the paper.
- Page 106 5 Printer Maintenance Adjusting the TK-2: Check whether ”0” of TK-1 is adjusted from -2 to +2. T-K Gap Adjustment Print Module 1 T-K Gap Adjustment Print Module 2 If adjustment is necessary, enter the adjustment value. After entering values in [TK1] and [TK2], click [Send]. A confirmation dialog box appears.
- Page 107 5 Printer Maintenance Click [Yes]. If you do not print a pattern, click [No]. The first dialog box appears again. Click [Next]. Proceed to the printhead position adjustment using “Adjust Position”.
-
Page 108: Adjust Position
5 Printer Maintenance ■ Adjust Position Click [Adjust Position]. Click [Print]. The confirmation dialog box appears. Click [Yes]. The Print Head Position Pattern is printed. Print Head Position Pattern:... - Page 109 5 Printer Maintenance The confirmation dialog box appears.
- Page 110 5 Printer Maintenance On confi rming successful printout, click [Yes]. Clicking [No] prints the adjustment pattern again. Read the KV and KH values on the pattern and then enter the read values in [KV] and [KH]. Read the values at which lines are most closely aligned with each other, and then enter the read values in [KV] and [KH].
- Page 111 5 Printer Maintenance Note • Read the KV and KH values: - The vertical adjustment value ([KV]) is found on the left of the magenta and black lines which appear to be connected most smoothly (without steps). For example, in the pattern shown on the left, the adjustment value is +2.
- Page 112 5 Printer Maintenance After entering values in [KV] and [KH], click [Go To Step 3]. Read the Bk values on the pattern and then enter the read values in [K1V], [K1H], [K2V], and [K2H]. Read the values at which the M (Magenta) line is most closely aligned with the Bk (Black) lines respectively.
- Page 113 5 Printer Maintenance Note • Read the Bk values: - The vertical adjustment value ([K1V],[K2V]) is found on the left of the magenta and black lines which appear to be connected most smoothly (without steps). For example, in the pattern shown on the left, the adjustment value is +3.
- Page 114 5 Printer Maintenance After entering the values, click [Go To Step 4]. Read the C values on the pattern and then enter the read values in [C1V],[C1H],[C2V], and [C2H]. Read the values at which the M (Magenta) line is most closely aligned with the C (Cyan) lines respectively.
- Page 115 5 Printer Maintenance Read the Y values on the pattern and then enter the read values in [Y1V],[Y1H],[Y2V], and [Y2H]. Read the values at which the M (Magenta) line is most closely aligned with the Y (Yellow) lines respectively. Note •...
- Page 116 5 Printer Maintenance Click [Yes]. A confirmation dialog box asking whether you want to print the pattern again appears. Click [Yes]. If you do not print a pattern, click [No]. Click [Quit].
- Page 117 5 Printer Maintenance Click [Close].
-
Page 118: Check The Output Setting Value
• Check that paper is loaded. • Printer settings cannot be printed while printing is in progress or an error persists. Opening the [Utility] sheet in the [Swiftcolor SCL-8000P Properties] dialog box and click [ Output Setting Value]. The [Output Setting Value] dialog box appears. - Page 119 5 Printer Maintenance Click [Proceed]. Note • Output Setting Values: S C L - 8 0 0 0 P P r i n t e r S e r i a l N u m b e r XX XXXX F i r m w a r e R O M V e r s i o n Ver.XX.XX D a t e a n d T i m e...
-
Page 120: Perform The Ink Refresh
5 Printer Maintenance 5-4 Perform the Ink Refresh Ink needs to be stirred periodically to keep its density uniform. Important • When the warning message “Ink refresh timing” appears, carry out ink refreshing. It is not necessary to carry out ink refreshing until this message appears. •... -
Page 121: Ink Refresh Part 1
5 Printer Maintenance Status monitor message Exceeding ink refresh timing 3 (Operator call 3) Time after installation 60 days or longer of ink tank Appears if printing or ink refresh has not been performed at all for 60 days or more since last printing operation (only tuning on the power does not count as printing operation). - Page 122 5 Printer Maintenance Opening the [Utility] sheet in the [Swiftcolor SCL-8000P Properties] dialog box and click [ Ink Refresh]. → Opening the Printer Driver from the Start Menu (P.28) A confirmation message appears. Click [Yes]. Important • Close the status monitor if it is active.
- Page 123 5 Printer Maintenance The printer undergoes "Preparation for ink refresh". All ink within ink flow channels is returned to the ink tank. Once preparation is complete, the dialog will automatically close and the next dialog appears. Carry out the procedure for stirring the ink in each ink tank following the displayed procedure.
- Page 124 5 Printer Maintenance Important • Be sure to shake the ink tank of all 4 colors. • Because ink may leak from the ink supply port and get on clothing or blemish the surrounding area, do not shake the ink tank with the port facing down.
- Page 125 5 Printer Maintenance When you have fi nished the procedure, click [OK]. A confirmation message appears. Important • Be sure not to click [Cancel] while operation is in progress. Clicking [Cancel] causes the initial print to take time. Click [OK]. The printer performs "Ink Refresh".
-
Page 126: Ink Refresh Part 2
5 Printer Maintenance ■ Ink Refresh Part 2 The warning message for operator call for “Exceeding ink refresh timing 2” appears, take an appropriate action. Important • Because the “Ink Refresh” may not properly operate, be sure to close the status monitor after checking details. -
Page 127: Ink Refresh Part 3
5 Printer Maintenance ■ Ink Refresh Part 3 The warning message for operator call for “Exceeding ink refresh timing 3” appears, take an appropriate action. Important • Because the “Ink Refresh” may not properly operate, be sure to close the status monitor after checking details. -
Page 128: Replacing Ink Tanks
• When the message “XXXX ink low” is displayed, get a new ink tank as soon as possible. For how to get a new ink tank, contact the dealer. (XXXX: Black, Cyan, Magenta, or Yellow) • To maintain the best printing quality, please use only Swiftcolor SCL-8000P ink tanks. - Page 129 5 Printer Maintenance • The positions of the ink tanks are as shown below. The printer is designed so that ink tanks cannot be inserted in wrong ink tank slots. Do not attempt to insert ink tanks in wrong ink tank slots forcibly. Black Cyan Magenta...
- Page 130 5 Printer Maintenance Pull the lever down. Remove the empty ink tank.
- Page 131 5 Printer Maintenance Take out a new ink tank from the box. Important • Do not touch the ink outlet and terminal to prevent soiling of the the surrounding work area, damage to the ink tank, and poor printing. Shake the ink tank 2-3 times slowly with the ink supply port facing upward. Because the components of the pigment ink are likely to settle, shake the ink tank before installing it to the printer.
- Page 132 5 Printer Maintenance Important • Do not shake the ink tank with the port facing down. Because ink may leak from the ink supply port and get on clothing or blemish the surrounding area. • Even for a used ink tank for water-based pigment ink, be sure to similarly shake it before installing to printer.
- Page 133 5 Printer Maintenance Close the ink tank rever securely. Close the Ink tank door. Important • Be careful not to stain your clothes and the surrounding work area by the used ink tanks. • Dispose the used ink tank in accordance with local laws and regulations.
-
Page 134: Replacing The Maintenance Cartridge
5 Printer Maintenance 5-6 Replacing the Maintenance Cartridge When the maintenance cartridge is fi lled with the collected ink, the message “Maintenance cartridge full” is displayed in the status information area on the status monitor, and the printer stops. Get a new maintenance cartridge, and replace it with the old one. Caution •... - Page 135 5 Printer Maintenance Take out a new maintenance cartridge and plastic bag from the box. Open the maintenance cartridge door. Draw out the maintenance cartridge slowly.
- Page 136 5 Printer Maintenance Important • When removing the maintenance cartridge full of ink, take care not to incline or drop it. The spilled or scattered ink may stain the floor or clothing. Insert a new maintenance cartridge. Close the maintenance cartridge door.
- Page 137 5 Printer Maintenance Put the used maintenance cartridge in a plastic bag, and then zip the plastic bag closed completely. Important • Dispose the used maintenance cartridge in accordance with local laws and regulations.
-
Page 138: Cleaning The Printer
5 Printer Maintenance 5-7 Cleaning the Printer As the printer is used, ink and paper dust will be collected inside the printer. If the interior of the printer becomes dirty, this will cause prints to become dirty or aff ect print quality interfere with smooth paper feeding. Clean the printer periodically to keep the printer in optimum working condition. - Page 139 5 Printer Maintenance Turn off the main power switch. Disconnect the interface cable and power cord. Open the ink tank door.
- Page 140 5 Printer Maintenance Push the upper unit release lever. up to open the upper unit.
- Page 141 5 Printer Maintenance Open the Upper unit. Wipe off ink, dust and paper dust adhered around Transport and Upper Unit’s bottom areas (Spur, Roller, Paper Ejection Slot) with a cloth dipped in water and tightly wrung out. Transport unit:...
- Page 142 5 Printer Maintenance Upper unit’s bottom areas: Important • Do not wipe with tissues or paper towels. Torn pieces of paper or paper dust may get inside Printer and cause malfunctions. • If "Paper length different" or "Paper jam" has occurred and an error message is continuously displayed, Paper Detection Area may be soiled with paper dust or the like.
- Page 143 5 Printer Maintenance Close the upper unit and the ink tank door.
-
Page 144: Troubleshooting
6 Troubleshooting This section describes how to troubleshoot problems when the printer is not operating correctly. If you cannot solve the problem by following these troubleshooting procedures, please contact the dealer. → 6-1 Error or Warning Messages (P.138) → 6-2 Paper Jams (P.143) →... - Page 145 6 Troubleshooting Error Message Problem Solution Paper length The print data and the Replace the paper. → 1-4 Paper Loading Procedure (P.13) diff erent 1-2 length of the paper loaded do not match. Paper detection area is Wipe Paper Detection Area. →...
- Page 146 Displayed when ink Perform “Ink Refresh”. → 5-4 Perform the Ink Refresh (P.114) timing 1-3 refresh has not been performed. Connected to a It is connected to a Connect with this printer. model other than printer other than this Swiftcolor SCL-8000P printer.
-
Page 147: Warning Messages
6 Troubleshooting Error Message Problem Solution Bidirectional Bidirectional • Confirm that the printer's power is on (online or communication error communication cannot sleep state). be established between • Restart the computer and printer. computer and printer. ■ Warning Messages Error Message Problem Solution XXXX ink low... -
Page 148: Service Call Error
6 Troubleshooting Error Message Problem Solution The print speed is The print speed is not Set [Print Speed] in [Advanced Settings] sheet in the not optimal optimal. [Printing Preferences] dialog box in the printer driver to [Auto Speed]. The battery for the The clock's (RTC) battery Note the message and contact the dealer. -
Page 149: Paper Jams
6 Troubleshooting 6-2 Paper Jams If paper jams while the printer is printing, the printer will stop and the Status Monitor will display a paper jam message. Follow the procedure below to remove the jammed paper. Open the ink tank door. - Page 150 6 Troubleshooting Push the upper unit release lever.
- Page 151 6 Troubleshooting Open the Upper unit. Remove the paper jammed on the transport unit.
- Page 152 6 Troubleshooting Cut the paper along the perforation. → 1-4 Paper Loading Procedure (P.13)
-
Page 153: Printer Not Operating Correctly
6 Troubleshooting 6-3 Printer Not Operating Correctly Check the following points if the printer is not operating correctly. ■ Power off Check Point Solution Main power switch is at the off ( O ) Press main power switch to the on position ( I ). position. - Page 154 6 Troubleshooting Check Point Solution The print destination port setting is Open the printer driver Properties and make sure that the port wrong. setting is correct. If the port setting is not correct, shut down Windows, switch off the computer, then reconnect to the selected port.
-
Page 155: Paper Is Not Feeding Correctly
6 Troubleshooting ■ Paper is Not Feeding Correctly Check Point Solution Paper loaded with the right side up. Load paper so that the black mark is located at the right leading edge on the back side of the printing paper. The edge of the paper is folded or If the leading edge of the paper is folded or curled it will not feed curled. -
Page 156: Print Results Are Unsatisfactory
6 Troubleshooting 6-4 Print Results Are Unsatisfactory If the print results are not what you expect, confi rm the following points. ■ Random, Bizarre Characters Are Printed Check Point Solution A Interface cable is disconnected. Check a Interface cable and make sure that it is connected to the printer and the computer. -
Page 157: Printed Colors Appear Strange
6 Troubleshooting Check Point Solution Half-toning is rough. Select [Error diff usion] for [Half-tone Process] in [Detailed Settings] on the [Color] sheet of Printing Preferences of the printer driver. But the printing speed becomes slow. → Halftone Process (P.58) Color unevennesses appear around Select [Error diff usion] for [Half-tone Process] in [Detailed Settings] on characters or in solid imaging areas. -
Page 158: Others
• When printing is performed with the remaining ink level detection function disabled, damage to the printer or a trouble can result. • Swiftcolor/Kanematsu is not responsible for any failure resulting from the use of an ink tank refilled with ink. -
Page 159: Appendix
Moving the printer without taking necessary measures could cause ink leak inside the printer, resulting in a fire, electric shock, or machine failure. Opening the [Utility] sheet in the [Swiftcolor SCL-8000P Properties] dialog box and click [Printhead Position Adjustment]. → Opening the Printer Driver from the Start Menu (P.28) Click [Moving The Printer]. - Page 160 7 Appendix Important • If a warning is issued when you click [Moving The Printer], refer to the following: → To perform the above-mentioned operation using an authority other than the Administrator privilege. (P.73) Clik [Yes]. Execute [Moving The Printer]. Do not operate the printer before the message indicating that [Moving The Printer] is completed appears.
- Page 161 7 Appendix Turn off the main power switch. Disconnect the interface cable and power cord. Make sure that the upper unit is closed securely.
- Page 162 7 Appendix Move the printer. Caution • The printer weighs about 55.7kg. Three persons are always required to move the printer. When lifting and moving the printer, they should hold the handles at the bottom so that they do not injure their back and other body parts. If they hold other parts of the printer, the printer can be damaged or it can drop and hurt them.
- Page 163 7 Appendix After moving the printer to the destination, connect the power cord and then connect the interface cable. Turn on the main power switch. After completion of the initial operation, the printer is ready for printing.
-
Page 164: Shipping The Printer
When the warning message is displayed, replace the maintenance cartridge with a new one, and then start the work. Opening the [Utility] sheet in the [Swiftcolor SCL-8000P Properties] dialog box and click [Printhead Position Adjustment]. → Opening the Printer Driver from the Start Menu (P.28) - Page 165 7 Appendix Click [Shipping The Printer]. A confirmation message appears. Important • If a warning is issued when you click [Shipping The Printer], refer to the following: → To perform the above-mentioned operation using an authority other than the Administrator privilege. (P.73) Clik [Yes].
- Page 166 7 Appendix Press the power key for at least 1 second. Power lamp blinks and the printer enters the sleep mode. F E E D P A U S E Turn off the main power switch. Disconnect the interface cable and power cord. Make sure that the upper unit is closed securely.
- Page 167 7 Appendix Pack the printer properly following the instructions of the dealer before shipping it. Caution • The printer weighs about 55.7kg. Three persons are always required to move the printer. When lifting and moving the printer, they should hold the handles at the bottom so that they do not injure their back and other body parts.
- Page 168 7 Appendix After shipping the printer to the destination, connect the power cord and then connect the interface cable. Turn on the main power switch. After completion of the initial operation, the printer is ready for printing.
-
Page 169: Software Uninstallation
• To turn off the printer completely, press the power key to place the printer in the sleep mode and then turn off the main power switch. Select the [Swiftcolor SCL-8000P] - [Swiftcolor SCL-8000P Printer Driver Uninstall] from [All Programs] on the [Start] menu. - Page 170 7 Appendix Click [Finish]. The [Changing System Settings] dialog box appears. Click [Yes] to restart Windows. If [No] is clicked, be sure to restart the computer before installing the printer driver again.
-
Page 171: Import / Export Settings
- Paper size registered in [Paper Size] in the [Page Setup] sheet - Paper type registered in [Paper Type] in the [Page Setup] sheet. Double-click the “Program Files” folder of the C: drive. Double-click the “Swiftcolor” folder. Double-click the “Swiftcolor SCL-8000P” folder. - Page 172 7 Appendix Double-click the “Utility” folder. Double-click “transdat.exe. ” [Settings Import/Export Utility] starts. Select [Export Settings information File] and click [Next].
- Page 173 7 Appendix Select the printer (driver) to export from a list. Click either [Save All] or [Custom] check box. To export all settings, click [Save All] to go to Step 14. To export settings selectively, click [Custom] to go to Step 9.
- Page 174 7 Appendix The Create Import/Export data dialog box appears. To export settings for the first time or create a new file, go to Step 11. To append settings to an existing export file, click [Select File]. Note • Print setup information is imported to the [Print Settings] sheet in the [Create Import/ Export data] dialog box.
- Page 175 7 Appendix Select an export fi le (*.tdd) and click [Open]. Imported information appears in the right-side pane of the dialog box. Select the printer settings to export and register them. To export paper settings , go to Step 12. To export paper type settings, go to Step 13. Note •...
- Page 176 7 Appendix [Move All] button Registers all of [1] in [4]. [Clear] button [4] restores the default. Register Print Setup Information to Export The print settings to export appear in [Paper Names]. Detailed information about the selected paper name appear in [Setting Contents] on the line below. Registration number interchange buttons Interchange the places in which to register the items in [4], using the up and down button.
- Page 177 7 Appendix Note • Drop an item name at an “Unregistered” position and the item name will be registered at the end of the registered item names. If an item name is dropped over a registered item name, it will overwrite the item name at that position.
- Page 178 7 Appendix ● To register all paper names Click [Move All]. Note • Paper names moved in a batch would overwrite all existing paper names. To add paper names to an existing fi le, select and register their paper names. ●...
- Page 179 7 Appendix Select the paper type settings to export and register them. Note • About the [Paper Type Settings] sheet. Displays paper size information on the printer driver. A list of [Paper Type] in the [Page Setup] sheet appears in [Paper Type Name]. Detailed information about the selected paper name appear in [Setting Contents] on the line below.
- Page 180 7 Appendix ● To register all paper type names Click [Move All]. Note • Paper type names moved in a batch would overwrite all existing paper type names. To add paper type names to an existing fi le, select and register their paper type names. ●...
- Page 181 7 Appendix Click [Settings Import/Export]. To save the settings displayed, click [OK].
- Page 182 7 Appendix Enter the location to save the fi le and a fi le name (*.tdd) and then click [Save]. Click [OK]. Click [Close] in the [Create Import/Export data] window and the [Device-Data Transport Utility] window. Click [OK].
-
Page 183: Import
• Paper size registered in [Paper Size]in the [Page Setup] sheet • Paper type registered in [Paper Type] in the [Page Setup] sheet. Double-click the “Program Files” folder of the C: drive. Double-click the “Swiftcolor” folder. Double-click the “Swiftcolor SCL-8000P” folder. Double-click the “Utility” folder. - Page 184 7 Appendix Double-click “transdat.exe. ” [Settings Import/Export Utility] starts. Select [Import Settings Information File] and click [Next].
- Page 185 7 Appendix Select the printer (driver) to import from a list. Click [Custom].
- Page 186 7 Appendix Click either [Select File ] or [Select Printer]. To import an export file, click [Select File]. To import settings from a printer driver, click [Select Printer]. Note • The settings that are currently saved on the import printer are displayed in the right-side pane of the dialog box.
- Page 187 7 Appendix ● Importing from the printer driver Select the settings migration source printer and click [OK]. Select the print settings to import from the print setup information imported and register them. To import paper settings, go to Step 12. To import paper type settings, go to Step 13. Note •...
- Page 188 7 Appendix [4] Register Print Setup Information to Import The print settings to import appear in [Item Names]. Detailed information about the selected item name appear in [Setting Contents] on the line below. [5] Registration number interchange buttons Interchange the places in which to register the items in [4], using the up and down button. •...
- Page 189 7 Appendix Note • Drop an item name at an “Unregistered” position and the item name will be registered at the end of the registered item names. If an item name is dropped over a registered item name, it will overwrite the item name at that position.
- Page 190 7 Appendix • The paper name can be changed while it is selected in [1] by clicking it. • If the same paper name exists in [1] and [4], the paper name in [1] is marked in red. When a paper name is registered selectively, the one marked in red cannot be registered in [4].
- Page 191 7 Appendix Select the paper type to import from the paper type information imported. • About the [Paper Type Settings] sheet [1] Displays Paper Type Information Displays an export fi le or paper type information imported from the printer driver. A list of paper type names or a list of [Paper Type] in the [Page Setup] sheet appears in [Paper Type Name].
- Page 192 7 Appendix ● To register all paper type names Click [Move All]. Note • Paper type moved in a batch would overwrite all existing paper type names. To retain paper type left on the target import printer selectively, register the paper type names. ●...
- Page 193 7 Appendix Click [Settings Import/Export]. To import the setting displayed, click [OK].
- Page 194 7 Appendix Click [OK]. Click [OK]. Click [Close] in the [Create Import/Export data Utility] window and the [Device-Data Transport Utility] window. Click [OK].
-
Page 195: Network Utility
Windows 8: Click or tap the down arrow on the bottom left of the start screen (displayed when you move the mouse cursor on the screen) and select [Swiftcolor SCL-8000P Network IF] from the all applications screen (Apps view). The network utility will be launched. -
Page 196: Menu Bar
7 Appendix [2] LAN status Displays communication status of wired LAN. → Printer LAN status (P.193) [3] Serch for printers again Searches for a printer again. [4] Environmental setting Confi gures environmental settings of the Network Utility. → Environmental settings (P.196) [5] Show utility help Displays the Utility Help screen. - Page 197 7 Appendix Enter the password and Click [OK]. Important • Default password is [admin]. Printer Setting window is displayed. The [Basic settings], [TCP/IP], and [LOG settings] are described. Basic settings: [1] Specify the location Enter the location of printer installed. *The number of characters that can be entered: 0 to 15 characters [2] Set password Change the current password.
- Page 198 7 Appendix TCP/IP: [1] Get IP address Automatically obtains IP address. automatically [2] Specify IP address Specify IP address. Select this option when IP address is not obtained from the DHCP server. Log settings: [1] Printer log Enter the location for the printer log fi le to be saved. [2] PC log Check this check box when performing output for logs of the Network Interface Library to a fi le.
- Page 199 7 Appendix Click [OK]. ● Printer LAN status Check the network status obtained from the printer. Click [Printer LAN status] on the pull-down menu. Displays Network Status from printer. Click [OK] after confi rming. ● MAC address fi lter Used when more than 2 printers are being used. Click [MAC address fi lter] on the pull-down menu.
- Page 200 7 Appendix Important • Default password is “admin”. However, if password is changed in [Basic Settings] of [Settings], that password will be in effect. When [Mac address fi lter] window is displayed, check this check box and enter settings. [1] Use MAC address fi lter Check this check box when using MAC address fi lter.
-
Page 201: Display
7 Appendix Enter the password and Click [OK]. Important • Default password is “admin”. However, if password is changed in [Basic Settings] of [Settings], that password will be in effect. When the confi rmation window opens, click [Yes]. ■ Display Click [Display] on the pull-down menu. -
Page 202: Environmental Settings
7 Appendix ■ Environmental settings Click [Environmental Settings] on the pull-down menu. ● Utility Environmental settings Click [Utility environmental settings] on the pull-down menu. Rarge of seaching: [1] Specify IP address for Check ON: When specifying IP address to search. searching Check OFF: Searching for a printer on the network. - Page 203 7 Appendix Display items: Select setting items to be displayed during start-up. Printer name is always displayed so it is not included in the selectable items. Click [OK]. ● Time-out settings Confi gure setting to extend the duration of network time-out to avoid resending print data. Click [Time-out Settings] on the pull-down menu.
-
Page 204: Help
7 Appendix ■ Help Click [Help] on the pulldown menu. ● Utility Help Click to display the Help of this utility. ● Version information Click to display the version of this utility. -
Page 205: Specifi Cations
Specifi cations ■ Printer Product name SCL-8000P Printing method Inkjet Print colors Full color Output resolution 1200dpi × 1200dpi Printing speed Auto mode: 150, 120, 100 mm/sec (Speed changes automatically) Manual mode: 150, 120, 100 mm/sec Printable area 215.6 mm (W) x 759.0 mm (L) Print margin Top/Bottom: 1.5mm, Left: 7.8mm, Right: 11.6mm... -
Page 206: Index
Index Add Custom Paper Type ..........72, 80 Ink Information ..............88, 93 Advanced Settings Sheet ............. 68 Ink pre-fi re on the paper ............77 Ink Refresh ................72, 116 Ink tank ....................6 BACK FEED key ................7 Ink tank door ..................4 Brightness .................. - Page 207 Index PAUSE key .................. 7, 24 Upper unit release lever ............6 Power connector ................5 USB cable ...................9 Power key/lamp ..............7, 12 USB cable clamp ................5 Printer Status ................90 USB port .....................5 Print Head Position Adjustment ....... 71, 97 Utility Sheet ...................
Need help?
Do you have a question about the SCL-8000P and is the answer not in the manual?
Questions and answers