Table of Contents
Advertisement
Quick Links
Advertisement
Table of Contents
Troubleshooting

Related Manuals for SwiftColor SCC-2000D


Summary of Contents for SwiftColor SCC-2000D
- Page 1 SCC-2000D User's Guide 4Y1-8581-010...
-
Page 2: Table Of Contents
Table of Contents Adjusting the Print Position ..........48 Before You Begin Adjusting the Trimming Position ........50 Conventions ...................iv Changing Print Quality and Adjusting Color ....56 Sample Screens ................iv Printing with Print Quality Setting Changed ...56 Trademarks ..................v Printing with the Color Correction Method Changed ...58 Abbreviations .................v Printing in Black and White ..........59 Request to the Customer ............v... - Page 3 Carrying out Strong Cleaning ........107 Specifi cations ......Adjusting Print Head Position ..........109 Index ..........Checking Setting Values ............122 Cleaning Printer ................124 Cleaning the exterior of the printer......124 Cleaning the Transport Unit ..........126 Cleaning the Pick-up Roller ..........137 4.
-
Page 4: Before You Begin
Indicates an operation that must not be performed. Read these items carefully, and make sure not to perform the described operations. Sample Screens The sample screens of the printer driver settings in this guide were created with Swiftcolor SCC-2000D in Windows 7. -
Page 5: Trademarks
Before You Begin Trademarks • Microsoft and Windows are trademarks of Microsoft Corporation in the United States and/or other countries. • Other brand and product names may be trademarks or registered trademarks of their respective companies. Abbreviations Throughout this document the following abbreviations are used in text. •... -
Page 6: Product Name
Before You Begin ■ Product Name SCC-2000D ■ This equipment conforms with the essential EMC requrements of EC Directive. We declare that this product conforms with the EMC requirements of EC Directive at nominal mains input 230V, 50 Hz although the rated input of the product is 100 to 240 V, 50/60 Hz. - Page 7 Chapter 1 Basic Operation This chapter describes basic things to remember before using this product. Names and Functions of Components ........................2 Turning on/off Printer ................................7 Setting Paper ..................................... 13 How to Print ....................................23 Confi guring Print Settings ..............................31...
-
Page 8: Basic Operation
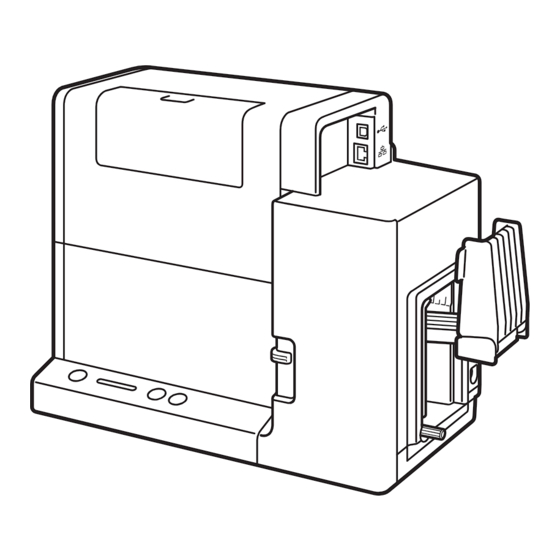
Chapter 1 Basic Operation Names and Functions of Components Names and functions of the components of this printer are described below. External View Operation Panel (P.5) USB Connector Keys for selecting printer operations and lamps Connect a USB cable to this connector. indicating printer statuses are provided on this panel. -
Page 9: Internal View
Names and Functions of Components Rating Plate Power Socket A serial number for identifying the printer is indicated Connect the supplied AC adapter to this socket. on this label. (The serial number is required when repairing the printer or registering the warranty.) IMPORTANT •... -
Page 10: Transport Unit
Chapter 1 Basic Operation Transport Unit 54/55 Transport Unit Lever Paper Guide Open this lever to pull out the transport unit. This guide holds the paper down to keep it from fl oating. Normally, set the lever to the MM position for use. -
Page 11: Operation Panel
Names and Functions of Components Operation Panel Pause Tray Power Key/Lamp Ink Lamps (Bk/C/M/Y) Press this key to turn on/off the printer. This lamp lights Each lamp lights up or blinks when the corresponding up or blinks depending on the power supply status. ink tank is out of ink or short of ink. - Page 12 Chapter 1 Basic Operation Pause Key Tray Key Press this key to switch between online and offl ine Use this key to move the feeder lift tray upward/ modes. downward. When printing is in progress, pressing this key stops printing temporarily. Pressing this key again resumes printing.
-
Page 13: Turning On/Off Printer
Turning on/off Printer Turning on/off Printer Turn on/off the printer following the procedures described below. Turning on the Printer Press the Power key. The Status lamp blinks (green), and then lights NOTE • About the Sleep Timer (P.9) This printer is designed to enter the sleep state automatically if a predetermined time elapses without printing. By default, the time is set to 4 minutes. -
Page 14: Turning Off The Printer
Chapter 1 Basic Operation Turning off the Printer Make sure the printer is not operating. When the Status lamp is blinking (green), the printer is operating. Make sure the Status lamp lights up (green) before turning off the printer. Press and hold the Power key until the Status lamp goes out. When the Status lamp is off , press and hold the Power key at least 1 second. -
Page 15: Changing The Power Settings
Turning on/off Printer Changing the Power Settings The function of managing the power settings from the printer driver is described below. ■ Switching the Printer to the Sleep State Switch the printer to the sleep state (power saving state). IMPORTANT •... - Page 16 Chapter 1 Basic Operation Switch the printer to the sleep state. 1. Click the [Utility] tab. 2. Click [ Sleep]. A confi rmation message appears. 3. Confi rm the message, and then click [Yes]. The Power lamp blinks slowly, and the printer is switched to the sleep state.
- Page 17 Turning on/off Printer ■ Changing the Sleep Timer/Off Timer Setting You can switch this printer to the sleep state automatically (sleep timer), or turn it off automatically ( off timer) when it is not operated for a preset time. IMPORTANT •...
- Page 18 Chapter 1 Basic Operation Set the sleep timer. 1. Click the [Utility] tab. 2. Click [ Sleep Timer Setting]. The [Sleep Timer Setting] dialog box appears. 3. Enter the setting time of the sleep timer. The time can be set in minutes within the range from 1 to 60 (min).
-
Page 19: Setting Paper
Chapter 1 Basic Operation Setting Paper The procedure of setting paper is described below. IMPORTANT • Use the dedicated paper. Using other paper could cause blurred or faint printing or have a negative impact on the printer, resulting in a printer failure. NOTE •... - Page 20 Setting Paper IMPORTANT • Paper will not be fed properly if the paper switch lever is not in the appropriate position for the paper. Lower the feeder lift tray. If the feeder lift tray is already lowered, proceed to step 1.
- Page 21 Chapter 1 Basic Operation Prepare paper. When using plastic cards, proceed to step 1. Flip through the paper to separate the sheets. Setting the paper after fl ipping through it will prevent multiple sheets from being fed at once. Paper dust may be adhered to paper. As shown in the fi gure, fl ip through the four sides (a, b, c, and d) of the paper thoroughly to remove the dust.
- Page 22 Setting Paper It is possible to check the amount of curl in paper that is curled downward with the curl index (A). 2 mm When you place the paper with the printing surface facing down as shown in the fi gure, check that the index is not exceeded (the curl is 2 mm or less).
- Page 23 Chapter 1 Basic Operation 3. Set the paper so that the further edge touches the back of the feeder lift tray. Align the paper neatly before loading. If the paper has front and back sides, face the side that you want to print on up. If the side guides are too narrow, pull them outward and then set the paper.
- Page 24 Setting Paper IMPORTANT • Align the edges before loading. Not doing so can cause paper jams. • Check that the height of the paper stack is not exceeding the load limit mark (arrow). However, long paper (paper length of 157 mm or longer) cannot be set up to the load limit mark. As a guideline, the load limit is the upper limit of the auxiliary tray (B).
- Page 25 Chapter 1 Basic Operation Raise the feeder lift tray. 1. Press the TRAY key. Wait for the feeder lift tray to stop. If the power lamp is blinking, press the Power key to turn on the printer. (P.7) CAUTION • When the feeder lift tray is moving, do not touch it. Doing so can cause injury or malfunction. IMPORTANT •...
- Page 26 Setting Paper 2. Pull out the transport unit with both hands as shown in the fi gure. CAUTION • When pulling the transport unit out of the printer, hold it fi rmly with both hands so that it does not fall. •...
- Page 27 Chapter 1 Basic Operation 3. As shown in the fi gure, check that the paper guide is set to the MM position. While holding the paper guides (C and D) with your fi ngers, adjust them to the paper width indexes (E and F).
- Page 28 Setting Paper 5. Push the transport unit lever until it clicks. CAUTION • When returning the transport unit back inside the printer, be careful not to get your fi ngers caught between the transport unit and the inside body of the printer. IMPORTANT •...
-
Page 29: How To Print
How to Print How to Print The basic printing procedure is described below. Making Prints This section explains how to micro margin printing using Business Card 55.0 x 91.0 mm Matte coated paper. NOTE • The micro margin printing is a function to print with a minimum margin (Top/Bottom/Left/Right: 0.3 mm). •... - Page 30 Chapter 1 Basic Operation NOTE • If the paper size cannot be obtained from the printer driver, follow the procedure below to set the document paper size. In micro margin printing, create the document larger than the actual paper size. Document paper width Set the paper width 0.7 mm (0.03 inch) wider than the actual width.
- Page 31 How to Print When the 157.0 mm - 172.0 mm: Set the paper length 1.7 mm (0.07 inch) longer than the actual length. 0.85mm (0.04inch) Transport direction Paper length 157.0mm - 172.0mm (6.18inch - 6.77inch) 0.85mm (0.04inch) To the paper size, create a document. IMPORTANT •...
- Page 32 Chapter 1 Basic Operation Open the printer driver setup window. Select [Swiftcolor SCC-2000D], and then click [Preferences] or [Properties]. Set the paper size and type. 1. Select the paper size. Select [[X]Business Card(MM) 55.0 x 91.0 mm]. 2. Select the paper type.
- Page 33 How to Print • Selecting a wrong paper size could stain the transport area and paper guides. If stain occurs, clean the transport unit. (P.126) NOTE • Selecting a wrong paper type could fail in making prints with the required level of quality. Click [Print] in the [Print] dialog box.
- Page 34 Chapter 1 Basic Operation NOTE • Checking the Current Printing Status. The status monitor allows you to check the printing status. [Number of Pages] The number of the page currently being printed is displayed. [Copies] The progress of printing of each page is displayed. For example, when the printer is set so as to print ten copies of a document consisting of three pages, ”...
-
Page 35: Cancelling Printing
How to Print Cancelling Printing To cancel printing, click [ Cancel Print Job] on the status monitor. NOTE • Stopping Printing Temporarily To stop printing temporarily, press the Pause key on the operation panel. • Besides the status monitor, you can cancel printing from the Print Queue window (a window in which print data order is registered). - Page 36 Chapter 1 Basic Operation...
-
Page 37: Confi Guring Print Settings
Instruction Manual that comes with your application software. Select [Print] from the [Files] menu or toolbar of the application software. The [Print] dialog box appears. Select [Swiftcolor SCC-2000D] and then click [Preferences] (or [Properties]). The printer driver setup window appears. - Page 38 Chapter 1 Basic Operation ■ Opening the Printer Driver Setup Window from the [Devices and Printers] Folder Select [Devices and Printers] from the [Start] menu. Windows 8: Locate the pointer at the upper right or lower left edge of the Start of Windows to display the Charm Bar and then click or tap [Settings] ->...
- Page 39 Confi guring Print Settings IMPORTANT • Sheets related to the Windows functions and sheets related to print settings are displayed on the printer properties window. The sheets related to print settings are the [General] sheet and the [Utility] sheet. For the sheets related to Windows functions, refer to the Instruction Manual that comes with Windows.
-
Page 40: Printer Driver Setup Window Confi Guration
Chapter 1 Basic Operation Printer Driver Setup Window Confi guration The printer driver setup window consists of the [Page Setup] sheet, [Color] sheet, [Overlay Settings] sheet, [Advanced Settings] sheet, and [Utility] sheet. ■ [Page Setup] Sheet On the [Page Setup] sheet, can be confi gured paper-related settings and specify the number of copies, print orientation, etc. - Page 41 Confi guring Print Settings Orientation [Check Settings] Specify the orientation of paper to print on. Clicking this button allows to check the print settings registered in [Favorites]. [Defaults] On the displayed screen, clicking [Copy] allows Clicking this button restores the default settings you to copy the settings.
- Page 42 Chapter 1 Basic Operation ■ [Color] sheet On the [Color] sheet can be confi gured settings of print quality and color. Preview window showing the current settings Monochrome Print (P.59) The paper size currently set on the [Page Setup] Select this check box to make black-and-white sheet and the print image fi nished with color prints.
- Page 43 Confi guring Print Settings ■ [Overlay Settings] sheet On the [Overlay Settings] sheet, can be confi gured settings related to overlay printing. Overlay (P.68) [Defaults] Check this check box when carrying out overlay Clicking this button restores the default settings printing.
- Page 44 Chapter 1 Basic Operation ■ [Advanced Settings] sheet On the [Advanced Settings] sheet, can be confi gured settings the print layout and print speed. Preview window showing the current settings Micro Margin Position The currently selected paper size is displayed. Adjusting the print position of the micro margin printing.
- Page 45 Confi guring Print Settings ■ [Utility] sheet On the [Utility] sheet, it is possible to perform printer maintenance or change printer settings. [ Light Cleaning] (P.105) [ Sleep Timer Setting]* (P.11) Clicking this button cleans the print head. Clicking this button allows to set the time that elapses before the printer is put into the sleep [ Strong Cleaning] (P.107)
- Page 46 Chapter 1 Basic Operation [Micro Margin adjustment]* [ Shipping The Printer]* (P.172) Clicking this button sets the printer’s trimming Clicking this button makes preparations for position and rounded corner size for micro transporting this printer. margin printing. [ Moving The Printer]* (P.168) [ Add Custom Paper Type]* (P.84)
-
Page 47: Printing
Chapter 2 Printing This chapter describes printing functions. Printing with the Custom Paper Size.......................... 42 Setting Micro Margin Printing ............................48 Changing Print Quality and Adjusting Color ......................56 Carrying out Overlay Printing ............................69 Setting Paper Feed Speed ..............................73 Registering Print Settings You Use Frequently ..................... -
Page 48: Printing With The Custom Paper Size
Chapter 2 Printing Printing with the Custom Paper Size It is possible to register in the printer driver a desired paper size (width, length, etc.) which cannot be selected from the [Paper Size] pull-down menu of the printer driver as a “Custom paper size” or an “Customize. ” Eff ective ranges of paper size settings are as follows: ●... - Page 49 Printing with the Paper Size Registered 2. Select a basic paper size from [Paper sizes list]. Enter information about new paper. 1. Enter the name of new paper in the [Name] text box. Can be entered up to 15 characters. Can not be used spaces and tabs.
- Page 50 Chapter 2 Printing 4. Enter the paper size. Items to be set diff er depending on the paper form. For the ranges of settable values, see “Ranges of Settable Custom Paper Sizes (P.46)” 5. To perform micro margin printing, check the [Micro Margin] check box.
- Page 51 Printing with the Paper Size Registered If you register a micro margin printing paper size and close the Printing Preferences window, a message window appears. Check the information, and click [OK]. NOTE • For details setting of micro margin printing, refer to “Setting Micro Margin Printing (P.48)”.
- Page 52 Chapter 2 Printing ■ Ranges of Settable Custom Paper Sizes Settable paper sizes diff er depending on the paper form. Enter values within the ranges indicated in the table below. ● Paper/Card20-30mil Top margin Left margin Transport direction Paper length Print area Right margin Bottom margin...
- Page 53 Printing with the Paper Size Registered ● Sheet Label Top margin Left margin Transport direction Paper length Print area Right margin Bottom margin Paper width Paper width 51.0 mm - 58.0 mm (2.01 inch - 2.28 inch) Paper length 81.0 mm - 91.0 mm (3.19 inch - 3.58 inch) 157.0 mm - 172.0 mm (6.18 inch - 6.77 inch) Top margin 2.5 mm - (Paper length - 1.0 - Bottom margin) mm...
-
Page 54: Setting Micro Margin Printing
Chapter 2 Printing Setting Micro Margin Printing The procedure for setting micro margin printing is described below. Adjusting the Print Position If the result of micro margin printing is off centered, adjust the print position. Look at the printed result, and check how it is off centered. Open the printer driver setup window. - Page 55 Carrying out Overlay Printing NOTE • The print position adjustment according to the print orientation is as follows: Portrait,180-degree Rotation “OFF” Portrait,180-degree Rotation “ON” Top( - ) Top( - ) Transport Transport direction direction Vertical Vertical Left( - ) Right( + ) Left( - ) Right( + ) Horizontal...
-
Page 56: Adjusting The Trimming Position
Chapter 2 Printing Adjusting the Trimming Position Adjust the position at which the document is to be trimmed. In micro margin printing, the periphery around the area where the paper and document overlap is trimmed before printing is performed. The standard trimming position is 0.3 mm (0.01 inch) smaller on all sides than the paper size. To perform micro margin printing on round corner paper, adjust the trimming position using [Round Corner Size Adjustment]. - Page 57 Carrying out Overlay Printing Display the [Micro Margin Adjustment] dialog box. 1. Click the [Utility] tab. 2. Click [ Micro Margin Adjustment]. Print check patterns. 1. Cilck [Print Check Pattern]. A confi rmation message appears. 2. Cilck [Yes].
- Page 58 Chapter 2 Printing Printing of adjustment check patterns. -3 -2 -1 0 +1 +2 +3 Transport direction +3 +2 +1 0 -1 -2 Look at the micro margin check pattern, and check the adjustment value. The current trimming position is “0” (0.0 mm). For example, if you want to adjust the trimming -3 -2 -1 0 +1 +2 +3 position to the “+1”...
- Page 59 Carrying out Overlay Printing Adjust the trimming position. 1. Enter the trimming position. The current trimming position is 0.0 mm. Each of the four sides can be adjusted in the range of -0.3 mm to +0.3 mm in 0.1 mm steps. However, the adjustment range may be limited depending on the current setting.
- Page 60 Chapter 2 Printing Print adjustment patterns again. 1. Cilck [Print Check Pattern]. A confi rmation message appears. 2. Cilck [Yes]. Check the check pattern after adjustment of the trimming position. Look at the check pattern. If the trimming position is at the adjusted position, adjustment is complete.
- Page 61 Carrying out Overlay Printing Complete the trimming position adjustment procedure. 1. Cilck [Close]. A confi rmation message appears. 2. Cilck [Yes]. IMPORTANT • Printing does not take place in the region outside the trimming position. Therefore, characters and images at the edges of the paper may not fi t in the paper.
-
Page 62: Changing Print Quality And Adjusting Color
Chapter 2 Printing Changing Print Quality and Adjusting Color Using the printer driver, you can confi gure various settings related to the print quality and color in order to achieve the purpose of printing. Printing with Print Quality Setting Changed Print with the print quality best suited for the purpose of printing. - Page 63 Changing Print Quality and Adjusting Color Select a half-toning method. 1. Select [Dither] or [Error Diff usion]. [Dither] This method is suitable for printing of graphics requiring clear borders between colors. [Error Diff usion] This method is suitable for printing of photos and graphics requiring subtle gradation.
-
Page 64: Printing With The Color Correction Method Changed
Chapter 2 Printing Printing with the Color Correction Method Changed It is possible to select a color correction method suitable for the document to be printed. Open the printer driver setup window. (P.31) Select a color correction method. 1. Click the [Color] tab. 2. -
Page 65: Printing In Black And White
Changing Print Quality and Adjusting Color Printing in Black and White Can be maked black-and-white prints of a color document. When black-and-white prints are made, only black ink is used. Open the printer driver setup window. (P.31) Confi gure the settings for black-and-white printing. 1. -
Page 66: Setting The Sharpness
Chapter 2 Printing Setting the Sharpness If the printed image looks blurred wholly, adjust the sharpness level. Adjusting the sharpness level can make contours clearly. Open the printer driver setup window. (P.31) Display the [Detailed Settings] dialog box. 1. Click the [Color] tab. 2. - Page 67 Changing Print Quality and Adjusting Color Adjust the sharpness. 1. Adjust the sharpness level. To increase sharpness, select one of [1(Small)], [2(Medium)], and [3(Large)]. The more the number, the more the contour enhancement eff ect. When [0(None)] is selected, no adjustment is made to sharpness.
-
Page 68: Adjusting The Color Tone
Chapter 2 Printing Adjusting the Color Tone If you are not satisfi ed with the color tone of the printed result, you can adjust it by adjusting the color balances for each colors (cyan(C), magenta(M), yellow(Y), and black(B)). Open the printer driver setup window. (P.31) Display the [Detailed Settings] dialog box. - Page 69 Changing Print Quality and Adjusting Color Adjust the color balance. 1. Adjust the color balance by moving the sliders for each colors. The center of the slidebar is the default position (0). when it is located at the The slider can be moved between -50 to +50.
-
Page 70: Adjusting The Density
Chapter 2 Printing Adjusting the Density If you are not satisfi ed with the overall density of the printed result, adjustment can be made. Open the printer driver setup window. (P.31) Open the [Detailed Settings] dialog box. 1. Click the [Color] tab. 2. - Page 71 Changing Print Quality and Adjusting Color Adjust the density. 1. Adjust the density by moving the slider. The center of the slidebar is the default position (0). The slider can be moved between -50 to +50. The more you move the slider to the left, the lower becomes the density.
-
Page 72: Adjusting The Brightness Or Contrast
Chapter 2 Printing Adjusting the Brightness or Contrast If you are not satisfi ed with the overall brightness (too dark or bright) and contrast (the dark portions are not clearly distinguished from the light portions) of the printed result, adjustment can be made. Open the printer driver setup window. - Page 73 Changing Print Quality and Adjusting Color Adjust the brightness. 1. Select one from [Brighter], [Normal], and [Darker]. Adjust the brightness of the intermediate colors without changing the brightness of the darkest and brightest portions. Adjust the contrast. 1. Adjust the contrast by moving the slider. The center of the slidebar is the default position (0).
- Page 74 Chapter 2 Printing Complete the setting procedure. Click [OK] in the printer driver setup window. When you start printing, the document will be printed at the adjusted brightness and contrast. IMPORTANT • When [Disable] is selected from the [Color Correction] pull-down menu, can not be adjusted the brightness. •...
-
Page 75: Carrying Out Overlay Printing
Carrying out Overlay Printing Carrying out Overlay Printing Overlay printing is a printer function which internally combines two pieces of data, i.e., the fi xed data created in advance as a “form fi le” so as to be commonly printed on all pages and the data on each page of a document (variable data such as characters), and prints them together page by page. - Page 76 Chapter 2 Printing 5. Specify the storage location of the form fi le. 6. Enter a fi le name. 7. Click [Save]. 8. Enter a comment. (Optional) Can be entered up to 31 characters. 9. Click [OK]. Print. Click [Print] in the [Print] dialog box. The form fi le (*.of2) is stored at the specifi ed storage location.
-
Page 77: Carrying Out Overlay Printing
Carrying out Overlay Printing Carrying out Overlay Printing Carry out overlay printing with a form fi le. Open the data to be used as print data using the application software used to create the data. Display the printer driver setup window from the application software. (P.31) Confi gure the settings for overlay printing. - Page 78 Chapter 2 Printing 7. Confi rm the information about the form fi le shown in the [Form File Information] and [Preview] panes. To see the preview, check the [Preview] check box. Some form fi les may not show its information in the [Form File Information] and [Preview] panes.
-
Page 79: Setting Paper Feed Speed
Setting Paper Feed Speed Setting Paper Feed Speed The procedure for setting the paper feed speed of the printer is described below Accelerating Printing on the 1st Sheet of Paper Selecting the 1st Print Priority mode accelerates printing on the fi rst sheet of paper. IMPORTANT •... -
Page 80: Adjusting The Paper Feed Speed
Chapter 2 Printing 3. Click [Yes]. Complete the setting procedure. Click [OK] in the printer driver setup window. Adjusting the Paper Feed Speed AFollow the procedure below to adjust the paper feed speed according to the type of print data, such as when sheets would be stained due to the next sheet being ejected before the printed surface of the current sheet dries completely. - Page 81 Setting Paper Feed Speed Complete the setting procedure. Click [OK] in the printer driver setup window. NOTE • When the [Automatic Speed] check box is checked, the printing speed automatically changes to an appropriate one according to the print data transmission status. (The printing speed automatically changes to 160 mm/sec, 120 mm/sec, or 80 mm/sec.) •...
-
Page 82: Registering Print Settings You Use Frequently
Chapter 2 Printing Registering Print Settings You Use Frequently It is possible to register the frequently used print settings in [ Favorites]. Selecting a registered favorite from the [Favorites List] allows you to make prints with the same print settings as usual. IMPORTANT •... - Page 83 Registering Print Settings You Use Frequently Register the settings. 1. Click the [Page Setup] tab. Make sure [Current Settings] is selected from the [Favorites]. 2. Click [Register/Delete...]. The [Register/Delete Favorites] dialog box appears. 3. Enter a desired name in the [Setting File Name] entry box and then confi rm the [Setting Contents].
- Page 84 Chapter 2 Printing 5. Click [Yes]. 6. Click [OK]. The print settings are registered in [Favorites]. NOTE • Changing the Name of a Favorite To change the name of a registered favorite, select it from the [Registered Settings List] and then click [Change Name].
- Page 85 Registering Print Settings You Use Frequently • Default Settings Default settings are as follows: Sheet Name Item Name Setting Page Setup Paper Size [X]Business Card(MM) 55.0 X 91.0mm Paper Type Matte Copies Orientation Landscape 180-degree Rotation Color Resolution Input resolution 1200dpi Half-tone Error Diff usion Color Correction...
-
Page 86: Changing Special Settings Of Printer
Chapter 2 Printing Changing Special Settings of Printer The function of [Special Settings] on the [Utility] sheet is described below. Use [Special Settings] to change the special settings of the printer as required. Normally, it is not necessary to change the settings. There are three special settings. - Page 87 Changing Special Settings of Printer Open the properties window of the printer. (P.32) Display the [Special Settings] dialog box. 1. Click the [Utility] tab. 2. Click [ Special Settings]. Change settings as needed. The special settings of the connected printer (online status) are displayed.
- Page 88 Chapter 2 Printing IMPORTANT • Ink pre-fi re on the paper is not performed during micro margin printing, regardless of the Ink Pre-fi re On The Paper setting. NOTE • When the computer cannot communicate with the printer (offl ine status), the special settings that the computer received in the last communication (when the printer was in the online status) are displayed.
- Page 89 Changing Special Settings of Printer Finish the special setting change procedure. 1. Click [Close].
-
Page 90: Registering Paper Type
Chapter 2 Printing Registering Paper Type Allows the user to adjust ink jetting amounts and register them along with the paper type of new paper. IMPORTANT • Up to ten custom paper types can be registered. • Administrative privileges over this printer are required to confi gure settings of this printer. If a user without administrative privileges proceeds with confi guration of settings, a message ”You do not have rights to printer management. - Page 91 Registering Paper Type Registering the new paper type. 1. Select a paper type from [Paper Type Names]. Select from [Matte], [Gloss], and [plastic card]. 2. Type a desired name in the [Custom Paper Type Name]. 3. Set ink jetting amounts for respective colors.
- Page 92 Chapter 2 Printing 5. Click [Yes]. The paper types are registered in [Item Names]. 6. Click [Close]. Check the print result by the test print. NOTE • Deleting a paper type To delete a registered paper type, select if from the [Paper Type Names], and then click [Delete].
- Page 93 Chapter 3 Maintenance This chapter describes maintenance required to use the printer in good condition. Checking Printer Status ..............................88 Replacing Ink Tank ................................. 91 Replacing Maintenance Cartridge ..........................98 Cleaning Print Head ................................105 Adjusting Print Head Position ............................109 Checking Setting Values..............................122 Cleaning Printer ..................................124...
-
Page 94: Maintenance
Chapter 3 Maintenance Checking Printer Status The status monitor allows you to check the current status of the printer, There are four types of images to inform the status of the printer. Displayed when the printer is in normal status. The printer is online and ready to print. -
Page 95: How To Start And Display The Status Monitor
Checking Printer Status NOTE • The status monitor allows you to check the current status of the printer, print status, ink information, and maintenance cartridge information. • Cancelling Printing To cancel printing, click [Cancel Print Job] on the status monitor. Printing is canceled, and the currently printing job and the jobs that are under processing or receiving in the printer are also abandoned, along with all print data in process in the computer. - Page 96 Chapter 3 Maintenance Open the View menu and select the desired option. 1. Select one of the followings. [Start With Popup] Open and display the Status Monitor window. (This is the default setting.) [Minimize at Start] Minimize and store the open Status Monitor window on the taskbar.
-
Page 97: Replacing Ink Tank
Replacing Ink Tank Replacing Ink Tank If an ink tank of a certain color is out of ink, the corresponding Ink lamp lights up and an error message “xxxx ink empty” appears on the status monitor. The procedures for replacing the ink tank and checking the ink condition are described below. Replacing the Ink Tank When an ink tank is out of ink, replace it following the procedure described below. - Page 98 Chapter 3 Maintenance Confi rm the ink tank which is out of ink. (Indication by Ink lamp) The Ink lamp lights up when the corresponding ink tank is out of ink. (Indication on the status monitor) An error message “XXXX ink empty” appears on the status monitor.
- Page 99 Replacing Ink Tank Open the ink tank cover. Remove the empty ink tank. Push the ink tank lock knob (A) and raise the ink tank to remove it. IMPORTANT • Handle the ink tank carefully so that your clothes and the area around the printer are not stained with ink. •...
- Page 100 Chapter 3 Maintenance Have the ink tank ready. 1. Take out a new ink tank from the plastic bag. 2. Remove the orange protective cap as shown in the fi gure. Remove the protective cap while holding it as shown so that your fi ngers are not stained with ink.
- Page 101 Replacing Ink Tank • Do not touch the ink tank contacts. The printer could fail in operation/ printing. • Do not touch the ink supply opening. Ink could not be supplied properly. • Do not shake the ink tank with the ink supply opening down. Ink leaking from the ink supply opening could stain your clothes or the area around the printer.
- Page 102 Chapter 3 Maintenance Install the ink tank in the printer. 1. Insert the ink tank in the slot in the printer with the ink supply opening down. Before installing each ink tank, confi rm the ink color according to the label. 2.
-
Page 103: Checking The Ink Condition
Replacing Ink Tank Checking the Ink Condition The ink condition can be checked by the Ink Lamps and the ink information displayed on the status monitor. Indication by Ink lamp Indication on status monitor Status • The ink tank must be replaced (empty). •... -
Page 104: Replacing Maintenance Cartridge
Chapter 3 Maintenance Replacing Maintenance Cartridge When the maintenance cartridge becomes full of collected ink, the Maintenance Cartridge lamp lights up and a message “Maintenance cartridge full” appears on the status monitor. The procedures for replacing the maintenance cartridge and checking the status of the maintenance cartridge are described below. - Page 105 Replacing Maintenance Cartridge Unbox the new maintenance cartridge. 1. Open the shipping box. 2. Take the maintenance cartridge out of the shipping box. Pull out the transport unit from the printer. 1. Raise the transport unit lever, and pull the transport unit out.
- Page 106 Chapter 3 Maintenance 2. Pull out the transport unit with both hands as shown in the fi gure. CAUTION • When pulling the transport unit out of the printer, hold it fi rmly with both hands so that it does not fall. •...
- Page 107 Replacing Maintenance Cartridge Pull out the maintenance cartridge fi lled with ink. 1. Slowly pull out the maintenance cartridge. 2. Put the removed maintenance cartridge in the plastic bag. A new maintenance cartridge comes with a plastic bag for putting a used maintenance cartridge in it.
- Page 108 Chapter 3 Maintenance Install the new maintenance cartridge. Insert the maintenance cartridge as far as it will go. Set the transport unit in the printer. 1. Slowly insert the transport unit as far as it will go. As you do this, be careful not to touch the paper guides causing their positions to be changed.
- Page 109 Replacing Maintenance Cartridge 2. Push the transport unit lever until it clicks. CAUTION • When inserting the transport unit, be careful not to get your fi ngers caught between the transport unit and the main body of the printer. IMPORTANT •...
-
Page 110: Checking The Status Of The Maintenance Cartridge
Chapter 3 Maintenance Checking the Status of the Maintenance Cartridge The status of the maintenance cartridge can be checked by the Maintenance Cartridge Lamp and the maintenance cartridge information displayed on the status monitor. Indication by Maintenance Cartridge Display on status monitor Status lamp •... -
Page 111: Cleaning Print Head
Cleaning Print Head Cleaning Print Head If the printed result is faint, print head nozzles may be clogged with paper dust, etc. When nozzles are clogged, carry out cleaning. IMPORTANT • When printing is in progress or an error has occurred, cleaning can not be carried out . •... - Page 112 Chapter 3 Maintenance 3. Confi rm the displayed message and then click [Yes]. Light cleaning starts. NOTE • If the symptom persists even after completion of light cleaning, carry out strong cleaning (P.107) • Carrying out Cleaning during Printing You can stop printing temporarily to carry out cleaning. 1.
-
Page 113: Carrying Out Strong Cleaning
Cleaning Print Head Carrying out Strong Cleaning If the symptom persists even after completion of normal cleaning (light cleaning), carry out strong cleaning. IMPORTANT • Since strong cleaning consumes more ink than normal cleaning (light cleaning), carry it out only when necessary. Open the printer driver setup window. - Page 114 Chapter 3 Maintenance 3. Select ink colors corresponding to the nozzles you want to clean. [All Colors] Select this radio button to clean nozzles for all colors together. [Specifi ed Colors] The nozzles corresponding to the check boxes which are checked will be cleaned. 4.
-
Page 115: Adjusting Print Head Position
Adjusting Print Head Position Adjusting Print Head Position If a color shift is found in the printed result, adjust the print head position. To adjust the print head position, print adjustment patterns and enter adjustment values while looking at the printed adjustment patterns. - Page 116 Chapter 3 Maintenance Display the [Print Head Position Adjustment] dialog box. 1. Click the [Utility] tab. 2. Click [ Print Head Position Adjustment]. NOTE • Clicking [The details of the adjustment method are here] in the [Print Head Position Adjustment] dialog box will display the help screen showing the print head adjustment method.
- Page 117 Adjusting Print Head Position [Step 1] Print adjustment patterns. 1. Make sure the printer is not operating and then click [Print]. A confi rmation message appears. 2. Confi rm the displayed message, and then click [Yes]. Printing of adjustment patterns starts. 3.
- Page 118 Chapter 3 Maintenance Check the print head adjustment patterns. Check whether inks are injected from the print head normally, and the print head position is not deviated. The print head adjustment patterns include a “print head position adjustment pattern (portrait)” for measuring the print head deviation in the transport direction, a “print head position adjustment pattern (landscape)”...
- Page 119 Adjusting Print Head Position [Step 2] Check the reference position. Check whether the black frame is centered on the paper. If the black frame is not centered, adjust the reference position. (Normally, it is not necessary to adjust the reference position.) 1.
- Page 120 Chapter 3 Maintenance - To specify the adjustment value, move the slider or enter a value directly in the entry box (spinner) interlocked with the slider. - Changing the value by 1 will move the black frame 0.0212 mm upward/downward/leftward/rightward. - The vertical adjustment range is from -32 to +32, and the horizontal adjustment range is from -25 to +25.
- Page 121 Adjusting Print Head Position 3. Read the horizontal adjustment value in the adjustment pattern [K]. The adjustment value is found at the top of the magenta and black lines which appear to be connected most smoothly (without steps). For example, in the pattern shown on the left, the adjustment value is +4.
- Page 122 Chapter 3 Maintenance 5. Click [Proceed to Step 4]. NOTE • To specify the adjustment value, move the slider or enter a value directly in the entry box (spinner) interlocked with the slidebar. • The vertical adjustment range is from -32 to +32, and the horizontal adjustment range is from -25 to +25. However, the adjustment range may be limited depending on the current setting.
- Page 123 Adjusting Print Head Position 2. Click the radio button (C) and then specify the vertical adjustment value. 3. Read the horizontal adjustment value on the adjustment pattern [C]. The adjustment value is found at the top of the magenta and cyan lines which appear to be connected most smoothly (without steps).
- Page 124 Chapter 3 Maintenance 4. Click the radio button (Y) and then specify the horizontal adjustment value. 5. Adjust the print head position for yellow. (Adjustment pattern [Y]) Read the vertical and horizontal adjustment values in the same manner as cyan and then click radio buttons (D) and (Z) one after another to specify the vertical and horizontal adjustment values.
- Page 125 Adjusting Print Head Position [Step 5] Send the adjustment values to the printer. 1. Click [Send]. A confi rmation message appears. 2. Click [Yes]. The print head position is adjusted. 3. Click [OK].
- Page 126 Chapter 3 Maintenance Print adjustment patterns again. 1. Click [Print]. A confi rmation message appears. 2. Confi rm the displayed message and then click [Yes]. Printing of adjustment patterns starts. 3. When adjustment patterns have been printed normally, click [Yes]. If you select [No], printing patterns will be printed again.
- Page 127 Adjusting Print Head Position Complete the print head position adjustment procedure. 1. Click [Close]. A confi rmation message appears. 2. Click [Yes].
-
Page 128: Checking Setting Values
Chapter 3 Maintenance Checking Setting Values Can be output the information about the current settings of this printer. Select the printer or a fi le (*.txt) as the output destination. IMPORTANT • When printing is in progress or an error has occurred, the setting information cannot be printed. When outputting the setting information, check that paper is set in the printer. - Page 129 Checking Setting Values 3. Select an output destination. When you selected the “Output to fi le”: Click [Reference], and select the storage location of the fi le. 4. Click [Proceed]. The setting values are output. NOTE • How to Read the Output Setting Values S C C - 2 0 0 0 D P r i n t e r S e r i a l N u m b e r XX XXXX...
-
Page 130: Cleaning Printer
Chapter 3 Maintenance Cleaning Printer Clean the printer periodically to preserve the print quality and prevent troubles. WARNING • When cleaning the printer, do not use a fl ammable solvent such as alcohol or thinner. If it is brought into contact with the electric parts inside the printer, a fi re or electric shock could result. Cleaning the exterior of the printer To preserve the print quality, clean the exterior of the printer periodically. - Page 131 Cleaning Printer Wipe the exterior clean with a damp cloth wrung out thoroughly. Connect the power cord and interface cable.
-
Page 132: Cleaning The Transport Unit
Chapter 3 Maintenance Cleaning the Transport Unit If printed paper is stained or paper cannot be fed properly, the transport unit may be stained. Clean the transport unit periodically. ■ Cleaning the periphery of the transport path Pull the transport unit out of the printer. 1. - Page 133 Cleaning Printer CAUTION • When pulling the transport unit out of the printer, hold it securely with both hands so that it does not fall down. • Do not put your hands into inside of the printer. Failures or physical injury could result. Further, your hands or clothing may get dirty with ink adhered inside of the printer.
- Page 134 Chapter 3 Maintenance paper retainer (A). 2. Open the 3. Wipe the ink stain and paper dust off of the back side of the paper retainer (B) and roller (C) Clean the roller while rotating it. 4. Wipe ink and paper dust off the sensors (D and E)
- Page 135 Cleaning Printer To clean the sensors , pass a cloth under them. 5. Close the paper retainer. IMPORTANT • Do not use a paper towel or tissue. If a torn piece or dust of the paper towel or tissue enters inside of the printer, a printer failure could result.
- Page 136 Chapter 3 Maintenance Set the transport unit in the printer. 1. Slowly insert the transport unit as far as it will go. As you do this, be careful not to touch the paper guides causing their positions to be changed. 2.
- Page 137 Cleaning Printer ■ Cleaning the Transport Belt IMPORTANT • Administrative privileges over this printer are required to confi gure settings of this printer. If a user without administrative privileges proceeds with confi guration of settings, a message ”You do not have rights to printer management.
- Page 138 Chapter 3 Maintenance A screen showing the cleaning procedure appears. Pull the transport unit out of the printer. 1. Raise the transport unit lever, and pull the transport unit out. If you are using the delivery tray (option), remove 2. Pull out the transport unit with both hands as shown in the fi gure.
- Page 139 Cleaning Printer CAUTION • When pulling the transport unit out of the printer, hold it securely with both hands so that it does not fall down. • Do not put your hands into inside of the printer. Failures or physical injury could result. Further, your hands or clothing may get dirty with ink adhered inside of the printer.
- Page 140 Chapter 3 Maintenance 2. Wipe the stain and paper dust off of the transport belt. 3. Wipe the ink stain and paper dust off of the back side of the paper retainer (B) and roller (C). Clean the roller while rotating it. 4.
- Page 141 Cleaning Printer IMPORTANT • Do not use a paper towel or tissue. If a torn piece or dust of the paper towel or tissue enters inside of the printer, a printer failure could result. • When cleaning, be careful not to damage the transport path fi lm (F). Set the transport unit in the printer.
- Page 142 Chapter 3 Maintenance CAUTION • When inserting the transport unit, be careful not to get your fi ngers caught between the transport unit and the main body of the printer. When the transport belt rotates, the progress bar moves. Check that the progress bar has moved, and then begin the next cleaning step.
-
Page 143: Cleaning The Pick-Up Roller
Cleaning Printer Cleaning the Pick-up Roller If printed paper is stained or paper cannot be fed properly, the pick-up roller may be stained. Clean the tpick-up roller periodically. IMPORTANT • While the Power lamp is lit or blinking, do not remove the power plug from the outlet. A printer failure could result. - Page 144 Chapter 3 Maintenance Remove the paper from the printer. 1. Open the auxiliary tray. 2. Remove the paper.
- Page 145 Cleaning Printer Turn off the printer. (P.8) IMPORTANT • While the Power lamp is lit or blinking, do not remove the power plug from the outlet. A printer failure could result. Disconnect the power cord and interface cable. Wipe the pick-up rollers clean with a damp cotton swab. Carefully wipe the stain off the pick-up rollers (A).
- Page 146 Chapter 3 Maintenance IMPORTANT • When cleaning, be sure not to get the cotton swab or your hand caught in the sensor lever (B). Connect the power cord and interface cable.
-
Page 147: Troubleshooting
Chapter 4 Troubleshooting Here are explanations of actions required for dealing with problems that occur while using this printer. For Troubleshooting Operations ..........................142 List of Error Messages/Warning Messages ......................158... -
Page 148: For Troubleshooting Operations
Chapter 4 Troubleshooting For Troubleshooting Operations Here are explanations of actions required for dealing with problems that occur while using this printer. If problems persist after trying these procedures, contact the dealer. Status Lamp Lights up Orange When an error occurs in the printer requiring actions the Status Lamp of the Operation Panel will light up orange (operator call error). - Page 149 For Troubleshooting Operations IMPORTANT • For information on the details of the messages displayed on the Status Monitor and how to deal with errors, refer “List of Error Messages/Warning Messages (P.158)”. • When error messages are displayed, the printer will automatically go offl ine. Depending on the type of error, even after handling the error, there are cases where it will not go online automatically.
-
Page 150: Status Lamp Is Flashing Orange
Chapter 4 Troubleshooting Status Lamp Is Flashing Orange When an error occurs in the printer and normal operation is not possible, the Status Lamp of the Operation Panel will fl ash orange (service call error). Handle accordingly: Turn off the printer. (P.8) After the Power Lamp goes off , turn the power on again. -
Page 151: Power Does Not Turn On
For Troubleshooting Operations Power Does not Turn on Points to Confi rm Solution Is the AC adapter and power cord After confi rming that the AC adapter and power cord are properly properly connected? connected, insert the power plug fi rmly into the power outlet. Is the power outlet supplying Try plugging in other electric appliances. - Page 152 Chapter 4 Troubleshooting Points to Confi rm Solution Are the port settings correct? Confi rm the port settings with the following steps: 1. Click on [Devices and printers] from the Windows [Start] menu. For Windows 8: Move the pointer to the top right or lower right corner of the screen to show the “charm bar”...
- Page 153 For Troubleshooting Operations As a result of confi rming the IP addresses, if the printer and computer are not on the same network, it is necessary to change the printer's IP address according to the following steps and add a new port. (Changing the printer's IP address) Start the network utility and change this printer's IP address.
-
Page 154: Paper Does Not Feed Properly
Chapter 4 Troubleshooting Points to Confi rm Solution Is the computer's confi guration Confi gure the time value that the computer goes into suspend or for suspend or sleep state set to sleep to “none”. something other than “none”? When the computer resumes operation from suspend or sleep, data sent from the computer will be discarded. -
Page 155: Improving The Print Quality
For Troubleshooting Operations Points to Confi rm Solution Is the transport unit or pick-up roller If the transport unit or pick-up roller is stained with paper dust or ink, stained? paper jams are more likely to occur. Clean them regularly. (P.124). Is the maximum number of sheets Check the maximum number of sheets. - Page 156 Chapter 4 Troubleshooting Condition Solution The color deviation appears in the Confi rm that the paper set (size, shape, and type) that displays color print result. deviation matches the paper (size, shape, and type) confi gured by the application software or printer driver. Adjust the position of the printhead.
- Page 157 For Troubleshooting Operations Condition Solution Printed paper is wavy and rubbing Confi rm that the paper set (size, shape, and type) matches the paper marks are left on the paper. (size, shape, and type) confi gured by the application software or printer driver.
- Page 158 Chapter 4 Troubleshooting Condition Solution The margin of the printed result is too Confi gure the paper size set by the application software or printer small or large driver as follows: When the margin is small or When images on the edge of the paper are missing: Decrease the [Paper Length] and adjust the image according to the paper size changed.
-
Page 159: Paper Is Jammed
For Troubleshooting Operations Paper Is Jammed When a paper jam occurs during printing, the printing is interrupted and the Status Monitor will display an error message such as “Paper jam #****” (**** represents numbers). Remove the paper jam according to the following steps: IMPORTANT •... - Page 160 Chapter 4 Troubleshooting Check the transport unit. 1. Raise the transport unit lever, and pull the transport unit out. If you are using the delivery tray (option), remove 2. Pull out the transport unit with both hands as shown in the fi gure. CAUTION •...
- Page 161 For Troubleshooting Operations IMPORTANT • When pulling the transport unit out of the printer or inserting it in the printer, be careful not to hit it strongly against the table or shelf. The surface of the table or shelf could be damaged. 3.
- Page 162 Chapter 4 Troubleshooting 4. Slowly insert the transport unit as far as it will go. As you do this, be careful not to touch the paper guides causing their positions to be changed. 5. Push the transport unit lever until it clicks. To cancel the printing, click on [Cancel Print Job] on the Status Monitor.
- Page 163 For Troubleshooting Operations IMPORTANT • If paper jams or printing surface rubbing does not improve Adjust the paper guides to the paper width. However, when the paper guides are adjusted to the paper width, micro margin printing is not possible. 1.
-
Page 164: List Of Error Messages/Warning Messages
Chapter 4 Troubleshooting List of Error Messages/Warning Messages When trouble occurs while operating the printer or printing, the Status Monitor will activate and display error messages and warning messages. If problems persist after trying these procedures, please contact the dealer. IMPORTANT •... -
Page 165: Error Message
List of Error Messages/Warning Messages Error Message ■ Operator Call Error If problems persist after trying these procedures, please contact the dealer. (#**** represents numbers) Error Message Error Content Handling Transport unit lever open The transport unit lever is open. Close the transport unit lever. - Page 166 Chapter 4 Troubleshooting Error Message Error Content Handling Paper empty #**** Out of paper. Set new paper. (P.13) To cancel printing, click on [Cancel Print Job] in the Status Monitor. Confi rm the the paper so that the further edge touches the back of the feeder lift tray.
- Page 167 List of Error Messages/Warning Messages Error Message Error Content Handling Feeder tray overloaded #**** The amount of paper loaded in Load paper so that the number the feeder lift tray is over the limit. of sheets is less than the specifi ed amount and the top surface of the paper stack is lower than the paper loading limit mark.
- Page 168 Connected to a model other than It is connected to a printer other Connect with this printer. Swiftcolor SCC-2000D than this printer. Bidirectional communication Bidirectional communication Confi rm that the printer's power is...
-
Page 169: Service Call Error
List of Error Messages/Warning Messages ■ Service Call Error Error Message Error Content Error Content Service call error #**** An error that cannot be fi xed by Turn the power off then on. the customer occurred. If the same error occurs again, take note of the message displayed (#****) and contact the dealer. -
Page 170: Warning Message
Chapter 4 Troubleshooting Warning Message Warning Message Warning Content Handling XXXX ink low The remaining ink is low. Prepare a new ink tank. ("XXXX" is black, cyan, magenta, or yellow) Maintenance cartridge level low The maintenance cartridge is Prepare a new maintenance running out of space and is about cartridge. - Page 171 List of Error Messages/Warning Messages Warning Message Warning Content Handling Unknown warning #**** An unknown warning was Confi rm the printer driver's version. returned. If the printer driver used is not the latest version, download the latest version from the website and install. If the same error occurs again, take note of the message displayed (#****) and contact the dealer.
- Page 172 Chapter 4 Troubleshooting...
-
Page 173: Appendix
Chapter 5 Appendix Moving Printer ..................................168 Uninstall Printer Driver ..............................179 About Network Utility................................181... -
Page 174: Moving Printer
Chapter 5 Appendix Moving Printer Procedures for moving the printer for relocation, maintenance, etc. are described below. Select either of the following procedures according to the purpose of movement of the printer, and be sure to follow the selected procedure. ●... - Page 175 Moving Printer • When printing is in progress or any error has occurred, [Moving The Printer] cannot be executed. • [Moving The Printer] consumes ink. Execute it only when necessary. • Do not move the printer with the ink tank cover open or with the transport unit drawn out. They could be damaged or a printer failure could result.
- Page 176 Chapter 5 Appendix - Do not turn off the printer. - Do not open/close the ink tank cover and transport unit lever. - Do not operate any other component of the printer. NOTE • If the message “Maintenance cartridge full” appears, replace the maintenance cartridge with a new one, and then click [Retry].
- Page 177 Moving Printer After moving the printer to the destination, connect the power cord and interface cable. Turn on the printer. (P.7)
-
Page 178: Shipping The Printer
Chapter 5 Appendix Shipping the Printer When transporting the printer for relocation, moving, etc. over a long distance or by use of a transportation means (airplane, train, automobile, etc.) accompanied by vibrations, be sure to make preparations following the procedure described below. - Page 179 Moving Printer Open the properties window of the printer. (P.32) Execute [Shipping The Printer]. Remove ink from the ink fl ow passage so that ink does not leak during transportation. 1. Click the [Utility] tab. 2. Click [ Shipping The Printer]. A confi rmation message appears.
- Page 180 Chapter 5 Appendix NOTE • If the message “Maintenance cartridge full” appears, replace the maintenance cartridge with a new one, and then click [Retry]. For how to replace the maintenance cartridge, see “Replacing Maintenance Cartridge (P.98)” When the following message appears, remove ink tanks. 1.
- Page 181 Moving Printer Check that [Shipping The Printer] is completed. 1. Click [OK]. Turn off the printer. (P.8) IMPORTANT • When the Power lamp is lit or blinking, do not remove the power plug from the outlet. A printer failure could result.
- Page 182 Chapter 5 Appendix 3. Move the lock lever (A) in the direction of the arrow. 4. Close the ink tank cover. Disconnect the power cord and interface cable. Put the printer in the plastic bag. Put the printer in the original plastic bag. Put the printer in the original shipping box with the bottom down, and fi ll the vacant spaces with a suffi cient number of protectors.
- Page 183 Moving Printer After installing the printer at the destination, connect the power cord and interface cable. Remove all orange protectors. 1. Open the ink tank cover. 2. Move the lock lever (A) in the direction of the arrow. 3. Remove the protectors. Press and raise the lock knob (B) to remove the protector.
- Page 184 Chapter 5 Appendix Install the ink tank in the printer. (P.94) After installing the ink tank, close the ink tank cover. Turn on the printer. (P.7) Turning on the printer will start ink fi lling automatically. IMPORTANT • When the Status lamp (green) is blinking, ink fi lling is in progress. Before the Status lamp (green) lights up, observe the following precautions: - Do not turn off the printer.
-
Page 185: Uninstall Printer Driver
For Windows 8: Click or tap the down arrow on the bottom left of the start screen (displayed when you move the mouse cursor on the screen) and choose [Swiftcolor SCC-2000D Printer Driver Uninstall] from the all applications screen (Apps view). - Page 186 Chapter 5 Appendix 2. Click [Finish]. The [Changing System Settings] dialog box will appear. 3. Click [Yes]. Restart Windows. NOTE • If [No] is selected, always restart your computer before installing the printer driver again. • If the network utility is installed, a screen such as the following will be displayed. To continue uninstalling, follow the instructions on the screen.
-
Page 187: About Network Utility
Windows 8: Click or tap the down arrow on the bottom left of the start screen (displayed when you move the mouse cursor on the screen) and select [Swiftcolor SCC-2000D Network IF] from the all applications screen (Apps view). The network utility will be launched. -
Page 188: Confi Guring The Network
Chapter 5 Appendix • Exiting the network utility From the main screen's [Settings] menu, click [Exit Utility] (or click on the toolbar). Confi guring the Network How to confi gure the network for this printer is explained below. IMPORTANT • Regarding the Network Confi guration Password Changing the printer's network confi guration requires a password. - Page 189 About Network Utility Enter Password. 1. Enter the password. 2. Click [OK]. Confi gure the Installation Site. 1. Input the printer's installation site into [Location]. When changing the confi guration, limit it to 15 characters (single byte alphanumeric characters and some symbols. For details, refer to help.). 2.
-
Page 190: Changing The Password
Chapter 5 Appendix ■ Changing the Password Change the password necessary for changing this printer's network settings. It is recommended to change the default password from the time of purchase so that only the network administrator can change the settings. Select the printer to confi gure from the main screen. -
Page 191: Setting Ip Address
About Network Utility Confi gure the New Password. 1. Check the option [Change password]. 2. Enter the new password. Enter a password that is up to eight characters (single byte alphanumeric characters). 3. To confi rm enter the same new password again. - Page 192 Chapter 5 Appendix Enter Password. 1. Enter the password. 2. Click [OK]. Set the IP address. 1. Click on the [TCP/IP] tab. 2. Select one of the followings. [Get IP address automatically] If there is a DHCP server on the network, the printer's IP address will be acquired automatically.
- Page 193 About Network Utility ■ Saving the Printer's Log File Save the log fi les (*.log) of this printer and network communication. Follow the steps below when instructed by dealer. Normally, this is unnecessary. Select the printer to confi gure from the main screen. From the [Settings] menu, click on [Printer settings].
- Page 194 Chapter 5 Appendix Confi gure the location for saving the log fi le. 1. Click on the [Log Settings] tab. 2. Designate the destination to save. 3. Click [Save]. 4. Click [OK]. ■ Saving the Computer's Log File Save the log fi le (*.log) of network communication between this printer and the computer. Follow the steps below when instructed by dealer.
- Page 195 About Network Utility Enter Password. 1. Enter the password. 2. Click [OK]. Confi gure the location for saving the log fi le. 1. Click on the [Log Settings] tab. 2. Check the option [Computer Log]. 3. Designate the destination to save. 4.
- Page 196 Chapter 5 Appendix ■ Confi rming Communication Status Confi rm this printer's network status. Select the printer to confi gure from the main screen. From the [Settings] menu, click [Printer LAN Status]. Or click on the toolbar. The LAN's communication status will be displayed. To update to the latest information, click [Refresh].
- Page 197 About Network Utility Enter Password. 1. Enter the password. 2. Click [OK]. Confi gure the MAC address fi lter. 1. Check the option [Use MAC address fi lter]. 2. Enter MAC address. 3. Click [Add]. The MAC address will be added. A maximum of 32 addresses can be confi gured.
- Page 198 Chapter 5 Appendix ■ Initializing the Printer's Network Settings All the network settings of this printer will be initialized. Select the printer to confi gure from the main screen. From the [Setting] menu, click [Restore the factory default value]. Enter Password. 1.
-
Page 199: Confi Guring Network Using The Network Utility
About Network Utility Confi guring Network Using the Network Utility The following explains how to confi gure the network using the network utility such as setting this printer's search range and the network's time-out value ■ Setting the Range for Printer to be searched for When searching for this printer, the IP address to be searched for can be specifi ed. - Page 200 Chapter 5 Appendix Confi gure the items displayed when the printer is detected. 1. Click the [Display Items] tab. 2. Check an item (such as Installation Location) check box to display. Clicking [Restore default] will restore the content of the [Display Items] sheet to its defaults. Click [OK].
- Page 201 About Network Utility Confi gure Extension of the Time-Out Value. 1. Check the [Extend Time-Out value] check box. 2. Click [OK].
-
Page 202: Specifi Cations
Specifi cations ■ Printer Product name SCC-2000D Printing method Inkjet Print colors Full color Output resolution 1200dpi x 1200dpi Printing speed Business Card: 50 sheets/min Transport speed Auto mode: 160, 120, 80 mm/sec (Speed changes automatically) Manual mode: 160, 120, 80 mm/sec Printable area 57.4 mm (W) x 171.4 mm (L) - Page 203 Specifi cations ■ Paper Paper Dedicated paper (matte coated paper, glossy paper, plastic card) Paper size 51.0 mm - 58.0 mm (W) 81.0 mm - 91.0 mm, 157.0 mm - 172.0 mm (L) Paper thickness 0.20 mm - 0.76 mm Deck capacity Business Card (thickness 0.245 mm): 250 sheets Extra thick paper(thickness 0.76 mm)/Plastic Card: 80 sheets...
-
Page 204: Index
Index Numerics 1st Print Priority Mode ............38, 73 Half-ton ....................57 Add Custom Paper Type ..........40, 84 Ink information ................97 [Advanced Settings] sheet ............ 38 Ink Lamp ..................5, 97 Auxiliary Tray ..................2 Ink Pre-fi re On The Paper ............80 Ink Tank Cover ..................2 IP address .................. - Page 205 Index Orientation ..................35 Sleep .................... 10, 39 Output Setting Value ............39, 122 Sleep Timer Setting ............12, 39 Overlay ....................37 Special Settings ..............39, 81 Overlay printing ................69 Start Status Monitor ..............39 [Overlay Settings] sheet ............37 Status Information ..............
Need help?
Do you have a question about the SCC-2000D and is the answer not in the manual?
Questions and answers