
Subscribe to Our Youtube Channel
Related Manuals for Safe Fleet REAR VIEW SAFETY RVS-ML7


Summary of Contents for Safe Fleet REAR VIEW SAFETY RVS-ML7
- Page 1 Instruction Manual 7” Digital Color Monitor With MirrorLink RVS-ML7 Before operating the Monitor, please read this manual thoroughly and retain it for future reference...
- Page 2 Introduction......Safety Information......04-06 Before You Begin .
- Page 3 NOTE! Please read all of the installation instructions carefully before installing the product. Improper installation will void manufacturer’s warranty. Congratulations on purchasing a Rear View Backup Camera System! With this manual you will be able to properly install and operate the unit. The monitor is intended to be installed as a supplement aid to your standard rear view mirror that already exists in your vehicle.
- Page 4 Please read the entire manual and follow the instructions and warnings carefully. Failure to do so can cause serious damage and/or injury, including loss of life. Be sure to obey all applicable local traffic and motor vehicle regulations as it pertains to this product. Improper installation will void manufacturer’s warranty.
- Page 5 INSTALLATION: • Electric shock or product or disconnected wire may cause a malfunction may occur if this fire. product is installed incorrectly. • While installing the Rear View System be careful with the wire • Use this product within positioning in order to avoid wire the voltage range specified.
- Page 6 If you have questions about this product, contact: Rear View Safety 1797 Atlantic Avenue Brooklyn, NY 11233 Tel: 1.888.881.2601 IN NO EVENT SHALL SELLER OR MANUFACTURER BE LIABLE FOR ANY DIRECT OR CONSEQUENTIAL DAMAGES OF ANY NATURE, OR LOSSES OR EXPENSES RESULTING FROM ANY DEFECTIVE PRODUCT OR THE USE OF ANY PRODUCT.
- Page 7 Before drilling please check that no cable or wiring is on the other side of the wall. Please clamp all wires securely to reduce the possibility of them being damaged while vehicle is in use. Keep all cables away from hot or moving parts and electrical noisy components. We recommend doing a benchmark test before installation to insure that all components are working properly.
- Page 8 1. Do not expose the monitor to excessive heat/cold. The storage tem- perature of this device is -30°C~+80°C, and the operating tempera- ture is -20°C~+70°C. The battery operating temperature is 0°C-70°C. Humidity is Rh 90%. 2. Never use this monitor near water or in damp locations. 3.
- Page 9 Operating Precautions 1. The monitor can be powered by a 12/24 volt battery, or the vehicle's electrical system. 2. Make sure all cables are connected properly. Improper cable con- nections may damage the monitor. Remove the power cable connections when not using the device. 3.
- Page 10 Specifications 1. Size: 7" Digital Color Monitor 2. Screen Ratio: 16:9 3. Resolution: 1024 X RGB X 600 4. Two AV inputs 5. Built-in Miracast 6.Built-in Speaker (Can Be Muted) 7. Auto Reverse Trigger Wire W/Adjustable Delay (0-10 Sec) 8. USB 2.0 Input 9.
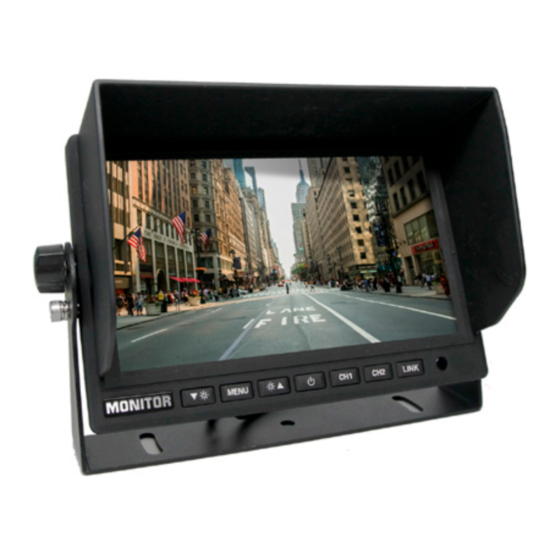
- Page 11 Monitor 1. Volume Decrease/Setting Quantity Decrease/LEFT 2. Menu 3. Volume Increase/Setting Quantity Increase/RIGHT 4. Power 5. CH 1/UP 6. CH 2/DOWN 7. LINK/Confirm Menu 8. Remote Control Sensor 9. Bracket Knob 10. Reset Button 11. Speaker Remote Reverse With Confidence ™...
- Page 12 Connection Menu Display options for each mode (AV1/AV2/LINK) can be individually set. After turning the system on, press "MENU" to enter menu and use "UP/ DOWN" to toggle menu options. Press “LEFT/RIGHT” on the remote con- trol/monitor or “LINK” on the monitor to enter into current submenu. Then press “LEFT”...
- Page 13 Brightness: Select option in the image menu, use “LEFT/RIGHT" to ad- just brightness, and press “MENU” to confirm desired choice. Press “UP/ DOWN” to select next menu option. Contrast: Select option in the image menu, use “LEFT/RIGHT" to adjust contrast, and press “MENU” to confirm desired choice. Press “UP/DOWN” to select next menu option.
- Page 14 Virtual Surround: Select option in the sound menu, and use "LEFT/ RIGHT" to toggle virtual surround on/off. Press “UP/DOWN” to select next menu option. Auto Volume: Select option in the sound menu, and use "LEFT/RIGHT" to toggle auto volume on/off. Press “UP/DOWN” to select next menu op- tion.
- Page 15 Power On Status: Select option in settings menu, and use "LEFT/ RIGHT" to toggle between three options (Last Memory/Standby/Power On). Press “UP/DOWN” to select next menu option. Blue Screen: Select option in settings menu, and use "LEFT/RIGHT" to turn blue screen on/off when there is no signal. Press “UP/DOWN” to se- lect next menu option.
- Page 16 Miracast 1. Compatible with Airplay mirroring/latest iOS system. Compatible with iPad/iPhone/Mac notebook. 2. Supports Miracast Screen Mirroring, supports Android 4.2 (and above) Windows 8.1 system (computer should support HDCP). 3. Supports DLNA pushing. 4. Supports Tablet PC or notebook with WiDi function. 5.
- Page 17 Miracast Basic Operating Introduction 1. Airplay Mirroring (for iPhone, iPad, Mac notebook) Find monitor’s hot spot (ex: DONGLE-ACA213068A04) from “Settings’’ of Apple devices and connect. Default password: 12345678 (Tips: the hot spot name has been displayed on the top of the screen and the password is behind the PIN) 1-2.
- Page 18 hot spot name, then start Airplay. The Apple device will share screen with the monitor. Open Apple device control center (Note: At this time, the Apple device is connected with the monitor, without WiFi connection, so it can only mirror local data, or mirror on- line data by using 2G/3G/4G from mobile network) Rear View Safety...
- Page 19 Enter into Airplay interface, choose the device name and then start airply iOS 6: Double-click the HOME key or at the bottom of the main screen, you will see “Airplay”. iOS 7 (or above): From main screen slide screen up, Click “Airplay” and se- lect the monitor's hot spot name.
- Page 20 Open internet browser and input web site IP “192.168.49.1” to enter into the setting page. Click the WiFi symbol, click “Scan” and find out available WiFi network (include hot spot from mobile device, such as smartphone, tablet PC and PC). For example: Click "QC" and enter password, then click “connect”.
- Page 21 Click Scan, search the available wireless network Choose the available wireless network, then input the password to connect Tips: IP is shown on the top of main interface. The monitor will be restarted and refresh automatically when connected to the WIFI network. If NO SIGNAL appears on the screen, wait for a few minutes.
- Page 22 After sucessfully connecting to the internet, the connected WIFI name after the WIFI icon and refresh the monitor’s IP address. At this time, the apple device have connected the WIFI network (QC), and can share the screen with “Mirroring”. Tip: After initial WIFI setup, any Apple device can Airplay Mirroring di- rectly after connected this WIFI network, no need setup again.
- Page 23 2-2. Miracast Mirroring ( for Windows 8.1 tablet ) 2-2-1. Move mouse to the right corner, pop up list, select “Device” Reverse With Confidence ™...
- Page 24 2-2-2. From device list, select “Project” 2-2-3. The first time to use project function, you need to add a wireless display. 2-2-4. After adding the monitor, the computer will automatically find the monitor hotspot. After this occurs click add. Rear View Safety...
- Page 25 Tip 1: The device DONGLE-ACA213068A04 in this manual is an example device. Different monitors will have different names. Please refer to the displayed name on the top of main interface. Tip 2: When adding a device, “press the button on your DON- GLE-ACA213068A04”...
- Page 26 3.DLNA Video Pushing (Apple and Android devices) Some devices have a built-in DLNA function, allowing you to push video from your wireless devices (Apple or Android) onto the monitor. You can also download third party DLNA software in the app store. If you have DLNA function, push video by selecting device.
- Page 27 ware version will display on the top right corner of the screen. Reverse With Confidence ™...
- Page 28 Miracast Restore Press reset button on the back of the monitor for 10 seconds to delete Miracast Link user data and restore to factory settings. Tip: The mon- itor will be restarted and refresh screen automatically after restoring to factory settings. If NO SIGNAL appears on the screen, wait for a few minutes.
- Page 29 Notes Reverse With Confidence ™...
- Page 30 If you have any questions about this product, contact: Rear View Safety, Inc. 1797 Atlantic Avenue Brooklyn, NY 11233 800.764.1028 Better Cameras. Better Service. IT’S OUR GUARANTEE. Rear View Safety...
Need help?
Do you have a question about the REAR VIEW SAFETY RVS-ML7 and is the answer not in the manual?
Questions and answers