
Related Manuals for KoolMore HZB-160F


Summary of Contents for KoolMore HZB-160F
- Page 1 Automatic Ice Maker Instruction Manual Model: HZB-160F To ensure proper use of this appliance and your safety, please read the following instructions carefully before operating this appliance.
-
Page 2: Table Of Contents
CONTENTS IMPORTANT SAFETY------------------------------------------------------------------------------------3 SPECIFICATION-------------------------------------------------------------------------------------------5 DIMENSION/CONNECTION--------------------------------------------------------------------5 RATING-----------------------------------------------------------------------------------------------5 GENERAL INFORMATION------------------------------------------------------------------------------6 MAIN UNIT CONSTRUCTION-----------------------------------------------------------------------6 ICE-MAKING AND ITS WATER TANK PARTS----------------------------------------------6 OPERATION PANEL-------------------------------------------------------------------------------7 OPERATING PROCEDURE AND MAINTENANCE----------------------------------------------8 UNPACKING YOUR ICE MAKER---------------------------------------------------------------8 MAIN MACHINE ASSEMBLY---------------------------------------------------------------------8 INSTALLATION LOCATION REQUIREMENT-------------------------------------------------9 ELECTRICAL REQUIREMENT & CONNECTIONS-----------------------------------------9 G -------------------------------10 WATER CONNECTIONS FOR YOUR ICE-MAKER-----------------------------------------10 OPERATION YOUR UNIT--------------------------------------------------------------------------------12 OPERATION THE ICE MAKING PROCESS-------------------------------------------------12 AUTOMATIC SELF-CLEANING PROGRAM-------------------------------------------------13... -
Page 3: Important Safety
IMPORTANT SAFETY When using electrical appliances, basic safety precautions should be followed to reduce the risk of fire, electric shock, and injury to persons or property. Read all instructions before using any appliance. Use this appliance only for its intended purpose as described in this owner’s manual. This ice-maker must be properly installed in accordance with the installation instructions before it is used. - Page 4 – WARNING: Do not damage the refrigerant circuit. – WARNING: This appliance is not intended for use by persons (including children) with reduced physical, sensory or mental capabilities, or lack of experience and knowledge, unless they have been given supervision or instruction concerning use of the appliance by a person responsible for their safety.
-
Page 5: Specification
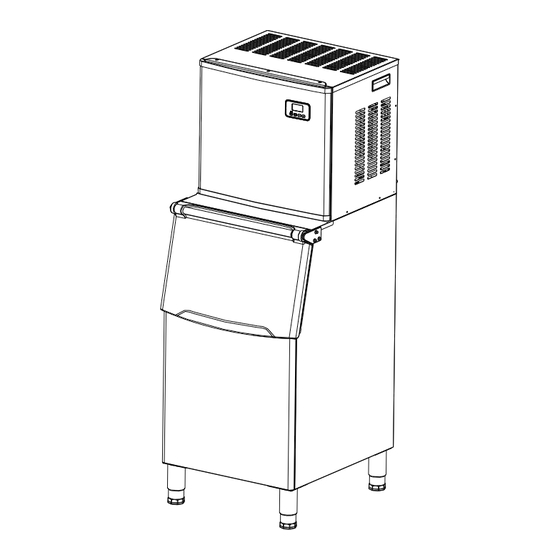
SPECIFICATIONS 1) DIMENSIONS/CONNECTIONS Water Inlet Port Water Drainage Port 2) Rating POWER SUPPLY VOLTAGE 1Phase, 110-120/60Hz MODEL HZB-160F CLIMATE CLASS 10-40℃ ELECTRICAL PROTECTION CLASS ICE MAKING RATING (Amps) 8.8Amp ICE MAKING CAPACITY (KG/24H) 160kg/24Hour REFRIGERANT CHARGE R290 3.7Oz / 105g... -
Page 6: General Information
GENERAL INFORMATION 1) Main Unit Construction ① ② ③ ④ ⑤ ⑥ ⑦ ⑧ ⑨ 1. Vents on the top: ensure smooth air flow, hot air can be taken out when making ice 2. The operation part 3. The front panel 4. -
Page 7: Operation Panel
A. Water dividing pipe: with seventeen little holes, water will flow out from these little holes. And if no water flows out, can be disassembled and cleaned B. Evaporator (ice-making module) C. Ice full detecting board: Use to detect the inner cabinet is full of ice or not, and to check the the ice-harvest process is over or not D.Water supply part E.Water level detecting switch... -
Page 8: Operating Procedure And Maintenance
OPERATING PROCEDURES & MAINTENANCE UNPACKING YOUR ICE MAKER 1. Remove the exterior and interior packaging. Check if all the accessories, including instruction manual, ice scoop, white water inlet pipe, L-type 3 ways quick connection to 3 ways plug-in , adjustable feet 4pcs ,4 ways to 3 ways water quick connector and the water draining pipe, etc., are inside or not. -
Page 9: Installation Location Requirement
INSTALLATION LOCATION REQUIREMENT a) This unit is not for outdoor use. Keep the proper room temperature and inlet water temperature according to above specification table. Otherwise it will affect the ice making performance. b) This unit should not be located near any heat resource. c) The unit should be located on a firm &... -
Page 10: C L E A N I N G Y O U R I C E M A K E R B E F R O E F I R S T U S I N
Before you move your ice maker into its final location, it is important to make sure you have the proper electrical connection. It is recommended that a separate circuit, serving only your ice maker, be provided. Use receptacles that cannot be turned off by a switch or pull chain. If the supply cord or plug to be replaced, it should be done by a qualified service engineer. - Page 11 2、Connecting the water drain pipe Screw the white drain pipe assembly in the attachment into the drain of the ice bin,and connect the other end of the white drain pipe assembly to the sewer pipe. ice bin white color water drain pipe 3.
-
Page 12: Operation Your Unit
OPERATION YOUR UNIT Operation button and display area diagram DISPLAY AREA OPERATION AREA Operation the ice-making process will flash, press“ON”/”OFF”, the 1. Turn on the ice machine: plug the power the symbol of power out tube can input the water from water tank through magnetic valve.The machine will start self-clean after the water is enough.The symbol will revolve on the LCD. -
Page 13: Automatic Self-Cleaning Program
4. When the symbol lights up, the machine stop working,it will work again after you take out the ice. Shut down the unit: During the unit making ice,press the“ON/OFF”button on the control panel,the unit shut down and into standby mode.If you press "ON/OFF" longer than 5S during ice making, then the unit enters the deicing process directly, this function can help remove the ice on the ice plate. -
Page 14: Wiring Diagram
WIRING DIAGRAM Start Relay ELECTRICAL DIAGRAM COMPRESSOR Overload Power Protector Solenoid Vale for Supply AC-N AC-N Ice-harvest AC-L COMP VALVE AC Water Pump DC drain valve DC Water Inlet Valve WATER LEVEL DETECTING SWITCH +FAN- T-ROOM T-WATER PT-L +FAN- SENSOR FOR ICE FULL DETECTING DC Fan Motor Note: Some equipment does not have the part inside the dotted line... -
Page 15: Preparing Ice Maker For Long Storage
Preparing the Ice Maker for Long Storage If the ice maker will not be used for a long time, or is to be moved to another place, it will be necessary to drain out all of the water in the system. 1. -
Page 16: Exterior Cleaning
What shouldn't be done Never keep anything in the ice storage bin that is not ice: objects like wine and beer bottles are not only unsanitary, but also it’s labels may slip off and obstruct the drain pipe. Exterior Cleaning The door and cabinet may be cleaned with a mild detergent and warm water solution such as 28g of dish washing liquid mixed with 7.5L of warm water. - Page 17 little holes of Water dividing pipe STEP 1:Remove the top 3 screws first Pull up first STEP 2:then move the front panel up Water dividing pipe Then move out Evaporator right toward 3、 When there are ice cubes on the surface of the evaporator, but can’t fall down easily, do not use the mechanical substance to remove it by force;...
-
Page 18: Ice-Machine Cleaner
Ice Making Assembly System Cleaning by Using Nu-Calgon Nickle Safe Ice-machine Cleaner Minerals that are removed from water during the freezing cycle will eventually form a hard scaly deposit in the water system. Cleaning the system regularly helps remove the mineral scale buildup. -
Page 19: Cleaning Suggestion
The ice machine cleaner contains acids. DO NOT use or mix with any other solvent-based cleaner products. Use rubber gloves to protect hands. Carefully read the material safety instructions on the container of the ice machine cleaner. DISCARD the first batch of ice troduced after cleaning. 10. -
Page 20: Normal Trouble Shooting
NORMAL TROUBLE SHOOTING Problem Possible Cause Solution Check the main water supply pressure or check the water supply hose is blocked or No water supply not, adding the water pressure or cleaning the hose necessary. Floating ball of the water level Clean the water tank and the water level detecting switch is blocked, “... -
Page 21: Correct Disposal Of This Product
ERROR INDICATOR a) Temp sensor breakdown----- Display E1 in digital window. b) The machine not make ice or the gas leak ----Display E2 in digital window ” light will be on when plugging on or just turning on the c) Magnetic control switch cut off----“ unit.
Need help?
Do you have a question about the HZB-160F and is the answer not in the manual?
Questions and answers
WHERE CAN I GET A WATER PUMP FOR THE HZB160F ICE MACHINE
The water pump for the KoolMore HZB-160F ice machine is located inside the unit and is labeled as part F in the parts list.
This answer is automatically generated