Advertisement
PRODUCT INTRODUCTION
General Introductions
The Saramonic BMCC-A01 is a two-channel XLR audio adapter, specially designed for Blackmagic Cinema Camera. A wide-variety of professional audio devices like XLR mics, wireless mics, boom mics and mixing boards can be connected to the camera via this adapter.
Audio recording is much easier with Saramonic BMCC-A01. It allows you to record high quality audio directly to the camera, eliminating the need of a separate audio recording device and syncing in the post editing work.
Audio from your microphones will be passed to your camera by BMCC-A01 with or without the use of a 9V battery. Advanced functions such as level meter, 12V/48V phantom power and LED indicator are available by using a battery.
Note: This adapter does not have a preamplifier. For best results, please use with condenser microphones that provide a strong output signal.
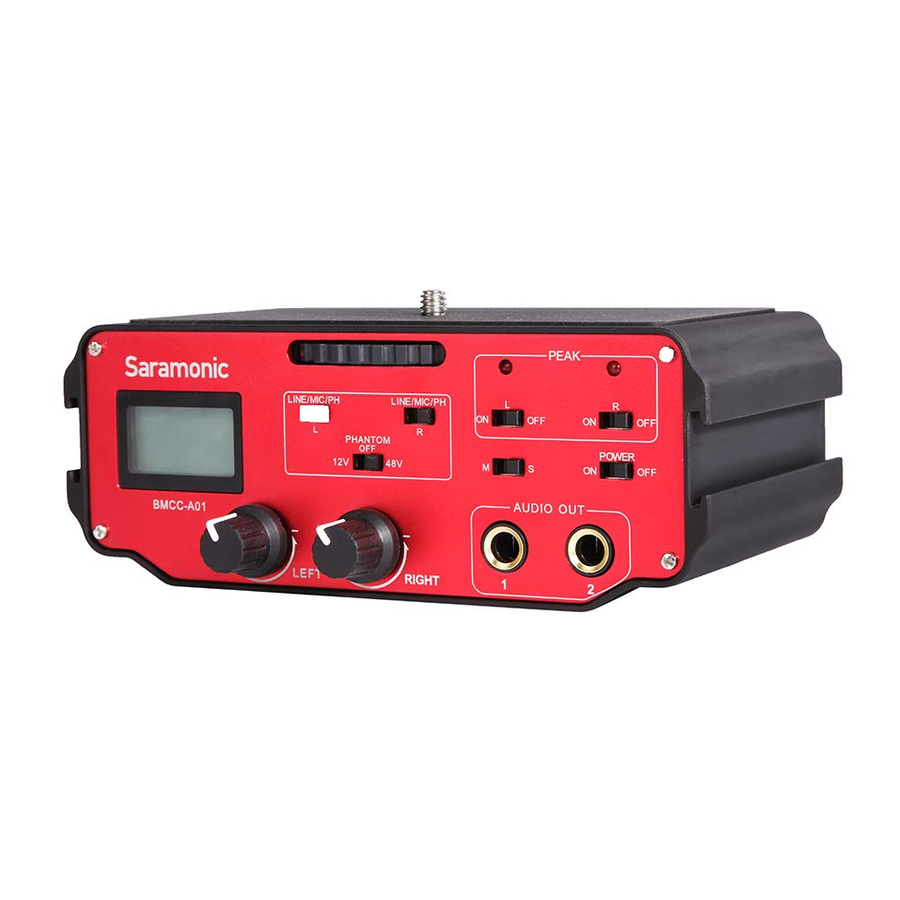
Product Structure

- Inputs
Balanced LEFT and RIGHT XLR inputs - Battery Compartment
A 9V fresh alkaline or lithium battery (not included)

- LINE/MIC/PH
Select LINE when camera is set to LINE input
Select MIC when camera is set to MIC input
Select PH when any channel need a phantom power - PHANTOM Voltage
Select PHANTOM voltage to 12V, 48V or OFF - L and R LED Indicator
When the volume of LEFT and/or RIGHT channel is too high, the red LED will light for warning, please turn the volume controller to a comfortable level - LED Indicator Switches
Turn on or off the LED indicator - Level Meter
Indicates the sound level in dB for each channel - LEFT and RIGHT Trim Controls
Individually adjust output levels of each channel - TRS 1/4" Audio Outputs: OUT 1 and OUT 2
Output jack for connecting to the camera - M/S Switch
Select Mono or Stereo mode - Power Switch
Main power switch for BMCC-A01 - 1/4" Male Screw

- 3/8" Female Screw
- 1/4" Female Screw
Quick Setup Guide
- Ensure the POWER and PHANTOM Voltage switches are set to OFF.
- Lift up and pull out the drawer from the battery compartment. Insert 9V battery into place aligning + and - polarity as shown. Slide the drawer closed until it clicks into place.
- Attach the BMCC-A01 to the base of the camera. Spin counter-clockwise to tighten up the adapter with the camera. Mount the adapter to a tripod with the tripod socket on the bottom of the adapter.
- Connect the supplied TRS cables from the AUDIO OUT 1 jack of BMCC-A01 to the AUDIO IN 1 jack on the camera; from AUDIO OUT 2 jack of the adapter to the AUDIO IN 2 jack on the camera.
- Connect your audio device to the LEFT and RIGHT XLR inputs on the BMCC-A01.
- Audio Settings on the camera:
- Microphone Input: 0%
- Ch 1 and Ch 2 Input Levels:
Mic for microphones and wireless mics
Line for mixers
- Ch 1 Input: 30%
- Ch 2 uses Ch 1 Input: Off
- Ch 2 Input: 30%
- Speaker Volume: 25%
- Set the LINE/MIC/PH switch.
When using microphones and wireless systems, set to MIC for microphone.
When using other audio devices, set to LINE for Line. Only select PH to PH on either channel if you are using a phantom powered mic attached to that channel. - Set the M/S switch.
When using one channel, switch to M for mono.
When using two channels, switch to S for stereo. - In case of any distortion, you should initially set the LEFT and RIGHT trim controls fully counter-clockwise.
- Turn on the power switch of BMCC-A01.
- Set the PHANTOM switch to either 12V or 48V if any channel requires phantom power.
- Turn on/off the L and R LED indicator switch for each channel. The LED will flash red for overload.
- Adjust the LEFT and RIGHT level controls to get an average reading of between -12dB and 0dB on the Level Meter.
- Plug an headphone into the headphone terminal on the camera to monitor the audio. Please make sure that both channels can be heard and adjust the trim controls to a comfortable level. When using one input, please set the unused channel trim control fully clockwise to isolate it from the working channel.
- You can start to record.
Specifications
| Input Level | MIC 0 dB on the Level meter at -44 dBu input LINE 0 dB on the Level meter at +10 dBu input |
| Gain | Unity |
| Frequency Response | 10Hz to 100kHZ (+/-0.5 dB) |
| THD | Less than 0.01% @ 1 kHz, -30 dBu input |
| S/N Ratio | 80 dB @ 1Khz, -30 dBu input |
| Level Meter | -18 to +3 dB in 3 dB increments |
| Battery Type | One 9 volt alkaline or lithium battery |
| Battery Duration (no phantom) | 6 hours typical with alkaline battery 12 hours typical with lithium battery |
| Dimensions | L 155 x W 98 x H 64 mm |
| Weight | 615g ( 21.7oz. ) |
Warranty
- Saramonic International provides one-year warranty under normal use and lifelong paid maintenance from the date you purchase this product.
- Saramonic International will repair or replace the product that under the warranty for free during the one-year valid period, but customers should pay for shipping and insurance charges for returning the product to Saramonic International.
- This warranty only applies where a defect has arisen, wholly or substantially, as a result of faulty manufacture, parts or workmanship during the warranty period.
- Wherever you purchased our products, you will be served very well at local retailer.
Packing List
One BMCC-A01 main unit
User manual
2 x 1/4" TRS Balanced Output Cables
Warranty card

Documents / ResourcesDownload manual
Here you can download full pdf version of manual, it may contain additional safety instructions, warranty information, FCC rules, etc.
Download Saramonic BMCC-A01 - Two-Channel XLR Audio Adapter Manual
Advertisement


Need help?
Do you have a question about the BMCC-A01 and is the answer not in the manual?
Questions and answers