Optika Italy ACCESSORIES Series Instruction Manual
Hide thumbs
Also See for ACCESSORIES Series:
- Instruction manual (72 pages) ,
- Instruction manual (42 pages) ,
- Instruction manual (66 pages)
Table of Contents
Advertisement
Quick Links
Advertisement
Table of Contents

Related Manuals for Optika Italy ACCESSORIES Series


Summary of Contents for Optika Italy ACCESSORIES Series
- Page 1 ACCESSORIES Series INSTRUCTION MANUAL Model CL-16.1 CL-18 Ver. 2.3 2023...
-
Page 2: Table Of Contents
Table of Contents Warning Safety Information Package content CL-16.1 CL-18 Unpacking Intended use Symbols and conventions Instrument description CL-16.1 CL-18 Assembling System assembling 8.1.1 Installing adapter ring 8.1.2 Installing the ringlight 8.1.3 Connecting the power supply 8.1.4 Installing the analyzer (CL-18 only) Using the ringlight CL-16.1 CL-18... -
Page 3: Warning
Warning This microscope is a scientific precision instrument designed to last for many years with a minimum of maintenance. It is built to high optical and mechanical standards and to withstand daily use. We remind you that this manual contains important information on safety and maintenance, and that it must therefore be made accessible to the instrument users. -
Page 4: Package Content
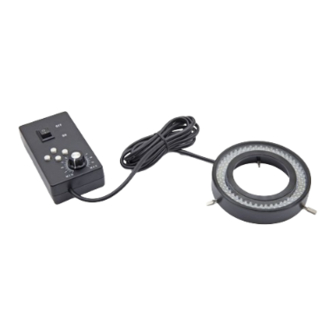
Package content CL-16.1 ② ① ④ ③ ① Ringlight illuminator ③ Adapter ring ② Control box ④ Power cord CL-18 ④ ① ③ ② ① Ringlight illuminator ③ Adapter ring ② Analyzer ④ Power supply Page 4... -
Page 5: Unpacking
Unpacking The microscope is housed in a moulded Styrofoam container. Remove the tape from the edge of the container and lift the top half of the container. Take some care to avoid that the optical items (objectives and eyepieces) fall out and get dam- aged. -
Page 6: Instrument Description
Instrument description CL-16.1 ON/OFF SWITCH ILLUMINATOR LIGHT INTENSITY ILLUMINATION SECTOR KNOB FIXING KNOBS BUTTONS CL-18 ANALYZER FIXING KNOBS POLARIZER LIGHT INTENSITY ON/OFF SWITCH KNOB Page 6... -
Page 7: Assembling
Assembling System assembling 8.1.1 Installing adapter ring 1. Screw the adapter ring at the end of the microscope body. (Fig. 1) • The adapter ring has a groove ① for the connection of the ringlight illuminator. • In case of installation on SZP series the adapter ring is not needed. -
Page 8: Installing The Analyzer (Cl-18 Only)
8.1.4 Installing the analyzer (CL-18 only) 1. Put the analyzer into the hole of the ringlight. (Fig. 5) 2. Install the assembly on the adapter ring as already explained in 8.1.2. F ig. 5 ig. 5 Page 8... -
Page 9: Using The Ringlight
Using the ringlight CL-16.1 1. Use ON/OFF switch ① to turn the ringlight on. (Fig. 6) • When the main switch is switched off, all the LEDs turn off. Switching on the main switch will not turn on the ① LED sectors. -
Page 10: 10. Maintenance
10. Maintenance Device environment This device is recommended to be used in a clean, dry and shock free environment with a temperature of 5°-40°C and a maximum relative humidity of 85 % (non condensing). Use a dehumidifier if needed. To think about when and after using the device •... -
Page 11: Equipment Disposal
Equipment disposal Art.13 Dlsg 25 July 2005 N°151. “According to directives 2002/95/EC, 2002/96/EC and 2003/108/EC relating to the reduc- tion in the use of hazardous substances in electrical and electronic equipment and waste disposal.” The basket symbol on equipment or on its box indicates that the product at the end of its useful life should be collected sep- arately from other waste. - Page 12 OPTIKA S.r.l. ® Via Rigla, 30 - 24010 Ponteranica (BG) - ITALY Tel.: +39 035.571.392 info@optikamicroscopes.com - www.optikamicroscopes.com OPTIKA Spain spain@optikamicroscopes.com OPTIKA USA usa@optikamicroscopes.com OPTIKA China china@optikamicroscopes.com OPTIKA India india@optikamicroscopes.com OPTIKA Central America camerica@optikamicroscopes.com...
Need help?
Do you have a question about the ACCESSORIES Series and is the answer not in the manual?
Questions and answers