Optika Italy B-190 Series Instruction Manual
Hide thumbs
Also See for B-190 Series:
- Instruction manual (114 pages) ,
- Instruction manual (120 pages)

Related Manuals for Optika Italy B-190 Series


Summary of Contents for Optika Italy B-190 Series
- Page 1 B-190 Series INSTRUCTION MANUAL Model B-190PL Series (B-191PL / B-191SPL / B-192PL / B-192SPL / B-193PL) B-190TBPL Ver. 7.4 2021...
-
Page 2: Table Of Contents
Table of contents Warning Symbols and conventions Safety Information Intended use Instrument description B-191PL/B-191SPL/B-192PL/B-192SPL/B-193PL B-190TBPL Unpacking B-191SPL/B-191PL/B-192SPL/B-192PL/B-193PL B-190TBPL Assembling Assembling the microscope 7.1.1 B-191SPL/B-191PL/B-192SPL/B-192PL/B-193PL 7.1.2 B-190TBPL Polarizing set (optional) Use of the microscope Switching on the microscope Light intensity adjustment Coarse focus tension adjustment Stage Adjust the interpupillary distance... -
Page 3: Symbols And Conventions
Warning This microscope is a scientific precision instrument designed to last for many years with a minimum of maintenance. It is built to high optical and mechanical standards and to withstand daily use. We remind you that this manual contains important information on safety and maintenance, and that it must therefore be made accessible to the instrument users. -
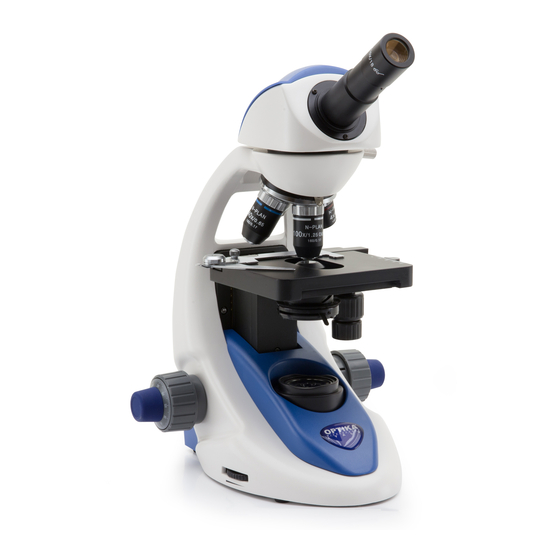
Page 4: Instrument Description B-191Pl/B-191Spl/B-192Pl/B-192Spl/B-193Pl
Instrument description B-191PL/B-191SPL/B-192PL/B-192SPL/B-193PL PHOTO TUBE (ONLY B-193PL) EYEPIECES OBSERVATION HEAD -) MONOCULAR (B-191PL / B-191SPL) -) BINOCULAR (B-192PL / B-192SPL) -) TRINOCULAR (B-193PL) OBJECTIVES SLIDE HOLDER STAGE CONDENSER X/Y MOVEMENT KNOBS TENSION ADJUSTMENT RING APERTURE DIAPHRAGM FINE FOCUS KNOB INTENSITY ADJUSTMENT DIAL COARSE FOCUS KNOB... -
Page 5: B-190Tbpl
B-190TBPL HEADPHONE MICRO HDMI TABLET PC USB TYPE C MICRO SD CARD SLOT USB-A3.0 DIGITAL HEAD POWER EYEPIECES SLIDE HOLDER OBJECTIVES STAGE COARSE FOCUS X/Y MOVEMENT KNOB KNOBS APERTURE DIAPHRAGM FINE FOCUS KNOB TENSION ADJUSTMENT INTENSITY RING ADJUSTMENT DIAL Page 5... -
Page 6: Unpacking
Unpacking The microscope is housed in a moulded Styrofoam container. Remove the tape from the edge of the container and lift the top half of the container. Take some care to avoid that the optical items (objectives and eyepieces) fall out and get damaged. Using both hands (one around the arm and one around the base), lift the microscope from the container and put it on a stable desk. -
Page 7: B-190Tbpl
B-190TBPL ① ⑧ ③ ⑥ ④ ⑤ ⑨ ⑦ ② ⑬ ⑫ ⑩ ⑪ ① Frame ⑧ Power supply ② Digital observation head ⑨ Tension adjustment tool ③ Eyepieces ⑩ Tablet PC power supply ④ Objectives (4X/10X/40X/100X) ⑪ USB cable 0,5 m ⑤ Dust cover ⑫ Touch pen for Tablet PC ⑥ Green filter ⑬ Tablet PC ⑦ Immersion oil Page 7... -
Page 8: Assembling Assembling The Microscope
Assembling Assembling the microscope 7.1.1 B-191SPL/B-191PL/B-192SPL/B-192PL/B-193PL 1. Remove the dust cap from the microscope frame and from the bottom of the observation head. 2. Insert the optical head above the stand and tighten the screw. (Fig. 1) • Hold the head with one hand during the locking in order to avoid that the head falls. -
Page 9: B-190Tbpl
7.1.2 B-190TBPL 1. Remove the dust cap from the microscope frame and from the bottom of the observation head. 2. Insert the optical head above the stand and tighten the screw. (Fig. 5) • Hold the head with one hand during the locking in order to avoid that the head falls. - Page 10 7. Plug one side of the USB cable to the digital head and ② the other side to the Tablet PC using the connector . (Fig. ③ 9-10). 8. Plug the power supply cable to the Tablet PC for battery re- charge using the connector .
-
Page 11: Polarizing Set (Optional)
Polarizing set (optional) 1. Place the polarizer on the light exit at the base of the mi- ① croscope. (Fig. 11) ① F ig. 11 ig. 11 2. Loosen the head fixing knob and remove the head from ② the microscope frame. (Fig. 12) ②... -
Page 12: Use Of The Microscope
Use of the microscope Switching on the microscope Operate on the main switch placed in the rear side of the mi- ① ① croscope, moving the selector on “I” (Fig. 14) F ig. 14 ig. 14 Light intensity adjustment Operate on the light intensity dial to increase or decrease the illumination intensity. -
Page 13: Adjust The Interpupillary Distance
Adjust the interpupillary distance ① • Except B-191PL / B-191SPL Hold the right and left parts of the observation head using both hands and adjust the interpupillary distance by turning the two parts until one circle of light can be seen. (Fig. 18) •... -
Page 14: Aperture Diaphragm
Aperture diaphragm • The Numerical Aperture (N.A.) value of the aperture dia- phragm affects the image contrast. Increasing or reducing this value one can vary resolution, contrast and depth of fo- cus of the image. Move the diaphragm ring (Fig. 21) on ①... -
Page 15: Microphotography Cameras With Projection Lens
Microphotography Cameras with projection lens 1. Remove dust caps from camera and projection lens. (Fig. 23) 2. Screw the projection lens to camera thread. F ig. 23 ig. 23 3. Insert the projection lens into the photo tube. (Fig. 24) F ig. -
Page 16: 10. Use Of Software And Digital Head
10. Use of software and digital head The camera inside the digital head is driven by PROVIEW software. For the instructions about the use of the software, please refer to the specific instruction manual. Manual can be downloaded using the QR code available on this manual or using the web site. The PDF version of the manual can be found under the name: OPTIKA - B-150D - B-190TB - B-290TB Software Setup - Instruction manual - EN IT ES FR DE PT. -
Page 17: 12. Maintenance
12. Maintenance Microscopy environment This microscope is recommended to be used in a clean, dry and shock free environment with a temperature of 5°-40°C and a maximum relative humidity of 85 % (non condensing). Use a dehumidifier if needed. To think about when and after using the microscope •... -
Page 18: 13. Troubleshooting
13. Troubleshooting Review the information in the table below to troubleshoot operating problems. PROBLEM CAUSE SOLUTION I. Optical Section: LED operates, but field of view remains Power supply is unplugged. Connect dark. Brightness is too low Set brightness to a proper level Dirt or dust is visible in the field of view. - Page 19 Equipment disposal Art.13 Dlsg 25 July 2005 N°151. “According to directives 2002/95/EC, 2002/96/EC and 2003/108/EC relating to the reduc- tion in the use of hazardous substances in electrical and electronic equipment and waste disposal.” The basket symbol on equipment or on its box indicates that the product at the end of its useful life should be collected sep- arately from other waste.
- Page 20 OPTIKA S.r.l. ® Via Rigla, 30 - 24010 Ponteranica (BG) - ITALY Tel.: +39 035.571.392 info@optikamicroscopes.com - www.optikamicroscopes.com OPTIKA Spain spain@optikamicroscopes.com OPTIKA USA usa@optikamicroscopes.com OPTIKA China china@optikamicroscopes.com OPTIKA India india@optikamicroscopes.com OPTIKA Central America camerica@optikamicroscopes.com...
- Page 21 Serie B-190 MANUALE DI ISTRUZIONI Modello Serie B-190PL (B-191PL / B-191SPL / B-192PL / B-192SPL / B-193PL) B-190TBPL Ver. 7.4 2021...
- Page 22 Sommario Avvertenza Simboli Informazioni sulla sicurezza Utilizzo previsto Descrizione dello strumento B-191SPL/B-191PL/B-192SPL/B-192PL/B-193PL B-190TBPL Disimballaggio B-191SPL/B-191PL/B-192SPL/B-192PL/B-193PL B-190TBPL Assemblaggio Procedura di assemblaggio 7.1.1 B-191SPL/B-191PL/B-192SPL/B-192PL/B-193PL 7.1.2 B-190TBPL Set di polarizzazione (opzionale) Uso del microscopio Accensione del microscopio Regolazione intensità luminosa Regolazione della frizione Tavolino Regolazione distanza interpupillare Regolazione diottrica...
-
Page 23: Simboli
Avvertenza Questo microscopio è uno strumento scientifico di alta precisione, progettato per durare a lungo con una minima manutenzione; la realizzazione è secondo i migliori standard ottici e meccanici, per poter essere utilizzato quotidianamente. Vi ricordiamo che questo manuale contiene informazioni importanti per la sicurezza e per la manutenzione dello strumento, e deve quindi essere messo a disposizione di coloro che lo utilizzeranno. -
Page 24: Descrizione Dello Strumento
Descrizione dello strumento B-191SPL/B-191PL/B-192SPL/B-192PL/B-193PL TUBO FOTOGRAFICO (SOLO B-193PL) OCULARI TESTA DI OSSERVAZIONE -) MONOCULARE (B-191PL / B-191SPL) -) BINOCULARE (B-192PL / B-192SPL) -) TRINOCULARE (B-193PL) OBIETTIVI FERMAVETRINO TAVOLINO CONDENSATORE MANOPOLE TRASLAZIONE X/Y ANELLO REGOLAZIONE TENSIONE DIAFRAMMA DI APERTURA MANOPOLA MICROMETRICA DI MESSA A FUOCO MANOPOLA REGOLAZIONE... -
Page 25: B-190Tbpl
B-190TBPL CUFFIA MICRO HDMI TABLET USB TYPE C SLOT CARD MICRO SD USB-A3.0 TESTA DIGITALE ALIMENTAZIONE OCULARI FERMAVETRINO OBIETTIVI TAVOLINO MANOPOLA MACROMETRICA MANOPOLE DI MESSA A FUOCO TRASLAZIONE X/Y DIAFRAMMA DI APERTURA MANOPOLA MICROMETRICA DI MESSA A FUOCO ANELLO MANOPOLA REGOLAZIONE REGOLAZIONE TENSIONE... -
Page 26: Disimballaggio
Disimballaggio Il microscopio si trova in un imballaggio di polistirolo espanso stampato. Dopo aver tolto il nastro adesivo da tutti gli imballi, sollevare la metà superiore dell’imballaggio. Fare attenzione a non far cadere o danneggiare i componenti ottici (obiettivi e oculari). -
Page 27: B-190Tbpl
B-190TBPL ① ⑧ ③ ⑥ ④ ⑤ ⑨ ⑦ ② ⑬ ⑫ ⑩ ⑪ ① Stativo ⑧ Alimentatore ② Testa di osservazione digitale ⑨ Chiave regolazione tensione ③ Oculari ⑩ Alimentatore tablet ④ Obiettivi (4X/10X/40X/100X) ⑪ Cavo USB 0,5 m ⑤ Copertina ⑫ Pennino per tablet ⑥ Filtro verde ⑬ Tablet ⑦ Olio da immersione Pagina 27... -
Page 28: Assemblaggio Procedura Di Assemblaggio
Assemblaggio Procedura di assemblaggio 7.1.1 B-191SPL/B-191PL/B-192SPL/B-192PL/B-193PL 1. Rimuovere il tappo di protezione dallo stativo e dalla parte sottostante della testa di osservazione. 2. Inserire la testa sullo stativo e serrare la vite di fissaggio. (Fig. 1) • Tenere sempre la testata con una mano durante il ser- raggio della vite per evitare che la stessa cada. -
Page 29: B-190Tbpl
7.1.2 B-190TBPL 1. Rimuovere il tappo di protezione dallo stativo e dalla parte sottostante della testa di osservazione. 2. Inserire la testa sullo stativo e serrare la vite di fissaggio. (Fig. 5) • Tenere sempre la testata con una mano durante il ser- raggio della vite per evitare che la stessa cada. - Page 30 7. Collegare un terminale del cavo alla testa digitale e l’altro ② terminale al Tablet usando il connettore . (Fig. 9-10). ③ 8. Collegare il cavo di alimentazione al Tablet per ricaricare la batteria usando il connettore . (Fig. 10) ④...
-
Page 31: Set Di Polarizzazione (Opzionale)
Set di polarizzazione (opzionale) 1. Posizionare il polarizzatore sulla lente di campo del mi- ① croscopio. (Fig. 11) ① F ig. 11 ig. 11 2. Allentare la manopola di fissaggio della testa e rimuovere ② la testa di osservazione dallo stativo. (Fig. 12) ②... -
Page 32: Uso Del Microscopio
Uso del microscopio Accensione del microscopio Agire sull’interruttore principale posto nella parte posteriore ① ① dello strumento portando il selettore su “I”. (Fig. 14) F ig. 14 ig. 14 Regolazione intensità luminosa Agire sulla rotellina di regolazione dell’intensità luminosa per au- mentare o diminuire il voltaggio dell’illuminazione. -
Page 33: Regolazione Distanza Interpupillare
Regolazione distanza interpupillare ① • Eccetto modelli B-191PL / B-191SPL Osservando con entrambi gli occhi, sostenere il gruppo di ocula- ri. Ruotare questi lungo l’asse comune fino ad ottenere un unico campo visivo. (Fig. 18) • La scala graduata sull’indicatore della distanza interpupillare ①... -
Page 34: Diaframma Di Apertura
Diaframma di apertura • Il valore di apertura numerica (A.N.) del diaframma di aper- tura influenza il contrasto dell’immagine. Aumentando o di- minuendo questo valore in funzione dell’apertura numerica dell’obiettivo si variano risoluzione, contrasto e profondità di campo dell’immagine. Spostare la ghiera del diaframma ①... -
Page 35: Microfotografia Telecamere Con Lente Di Proiezione
Microfotografia Telecamere con lente di proiezione 1. Rimuovere i tappi antipolvere dalla telecamera e dalla lente di proiezione. 2. Avvitare la lente di proiezione al filetto della telecamera. (Fig. 23) F ig. 23 ig. 23 3. Inserire la parte terminale della lente di proiezione nel tubo fotografico. -
Page 36: 10. Uso Del Software E Della Testa Digitale
10. Uso del software e della testa digitale La telecamera all’interno della testa digitale è gestita dal software PROVIEW. Per le istruzioni sull’uso del software, fare riferimento al manuale di istruzioni specifico. Il manuale può essere scaricato utilizzando il codice QR disponibile su questo manuale o utilizzando il sito web. La versione PDF del manuale si trova sotto il nome: OPTIKA - B-150D - B-190TB - B-290TB Software Setup - Instruction manual - EN IT ES FR DE PT. -
Page 37: 12. Manutenzione
12. Manutenzione Ambiente di lavoro Si consiglia di utilizzare il microscopio in un ambiente pulito e secco, privo di urti, ad una temperatura fra 0°C e 40°C e con una umidità relativa massima dell’85% (in assenza di condensazione). Si consiglia l’uso di un deu- midificatore se necessario. -
Page 38: 13. Risoluzione Dei Problemi
13. Risoluzione dei problemi Consultare le informazioni riportate nella tabella seguente per risolvere eventuali problemi operativi. PROBLEMA CAUSA SOLUZIONE I. Sezione Ottica: Il microscopio è acceso, ma il campo L’alimentatore è scollegato. Collegarlo visivo è scuro. La luminosità è troppo bassa Regolarla ad un livello adeguato Nel campo visivo si osservano sporco Sporco e polvere sul campione... -
Page 39: Smaltimento
Smaltimento Ai sensi dell’articolo 13 del decreto legislativo 25 luglio 2005 n°151. “Attuazione delle direttive 2002/95/CE, 2002/96/CE e 2003/108/CE, relative alla riduzione dell’uso di sostanze pericolose nelle apparecchiature elettriche ed elettroniche, nonché allo smaltimento dei rifiuti”. Il simbolo del cassonetto riportato sulla apparecchiatura o sulla sua confezione indica che il prodotto alla fine della propria vita utile deve essere raccolto separatamente degli altri rifiuti. - Page 40 OPTIKA S.r.l. ® Via Rigla, 30 - 24010 Ponteranica (BG) - ITALY Tel.: +39 035.571.392 info@optikamicroscopes.com - www.optikamicroscopes.com OPTIKA Spain spain@optikamicroscopes.com OPTIKA USA usa@optikamicroscopes.com OPTIKA China china@optikamicroscopes.com OPTIKA India india@optikamicroscopes.com OPTIKA Central America camerica@optikamicroscopes.com...
- Page 41 Serie B-190 MANUAL DE INSTRUCCIONES Modelo Serie B-190PL (B-191PL / B-191SPL / B-192PL / B-192SPL / B-193PL) B-190TBPL Ver. 7.4 2021...
- Page 42 Indice Advertencias Símbolos Información de seguridad Utilización Descripción del instrumento B-191PL/B-191SPL/B-192PL/B-192SPL/B-193PL B-190TBPL Desembalaje B-191SPL/B-191PL/B-192SPL/B-192PL/B-193PL B-190TBPL Montaje Procedimiento de montaje 7.1.1 B-191SPL/B-191PL/B-192SPL/B-192PL/B-193PL 7.1.2 B-190TBPL Kit de polarización (opcional) Uso del microscopio Encender el microscopio Regulación de la intensidad de luz Ajuste de la tensión Platina Ajuste de la distancia interpupilar Ajuste dioptrico...
-
Page 43: Símbolos
Advertencias El presente microscopio es un instrumento científico de precisión proyectado para durar muchos años con un mínimo nivel de mantenimiento. Para su construcción se han utilizado los mejores modelos ópticos y mecáni- cos, que lo convierten en el instrumento ideal para ser utilizado a diario. Optika avisa que el presente manual contiene información importante para un uso seguro y el correcto mante- nimiento del instrumento. -
Page 44: Descripción Del Instrumento
Descripción del instrumento B-191PL/B-191SPL/B-192PL/B-192SPL/B-193PL TUBO DE FOTO (SÓLO B-193) OCULARES CABEZAL DE OBSERVACIÓN -) MONOCULAR (B-191 / B-191S) -) BINOCULAR (B-192 / B-192S) -) TRINOCULAR (B-193) OBJETIVOS PINZA DE SUJECIÓN PLATINA DE MUESTRAS CONDENSADOR MANDO DE TRASLACIÓN X/Y MANDO DE REGULACIÓN DE LA TENSIÓN DIAFRAGMA DE... - Page 45 B-190TBPL AURICULARES MICRO HDMI USB TYPE C RANURA TARJETA TABLETA MICRO SD USB-A3.0 CABEZAL DIGITAL ALIMENTACIÓN OCULARES PINZA DE SUJECIÓN DE MUESTRAS OBJETIVOS PLATINA MANDO DE ENFOQUE MANDO DE MACROMÉTRICO TRASLACIÓN X/Y DIAFRAGMA DE APERTURA MANDO DE ENFOQUE MICROMÉTRICO MANDO DE REGULACIÓN DE MANDO DE REGULACIÓN LA TENSIÓN...
-
Page 46: Desembalaje
Desembalaje El microscopio se entrega con un embalaje de poliestireno. Después de abrir el embalaje, abrir la parte superior del mismo. Prestar atención para evitar dañar los componentes ópticos (objetivos y oculares) y para evitar que el instrumento se caiga. Extraer el microscopio de su embalaje con ambas manos (con una mano sostener el brazo y con la otra la base) y apoyarlo en una superficie estable No toque las superficies ópticas, como lentes, filtros o gafas con las manos descubiertas. -
Page 47: B-190Tbpl
B-190TBPL ① ⑧ ③ ⑥ ④ ⑤ ⑨ ⑦ ② ⑬ ⑫ ⑩ ⑪ ① Cuerpo del microscopio ⑧ Fuente de alimentación ② Cabezal de observación digital ⑨ Tecla de ajuste de tensiòn ③ Oculares ⑩ Fuente de alimentación tablet ④ Objetivos (4X/10X/40X/100X) ⑪ Cavo USB 0,5 m ⑤ Cubierta ⑫ Plumín de la tablet ⑥ Filtro verde ⑬ Tableta ⑦ Aceite de inmersion Página 47... -
Page 48: Montaje
Montaje Procedimiento de montaje 7.1.1 B-191SPL/B-191PL/B-192SPL/B-192PL/B-193PL 1. Retire la tapa protectora del soporte y la parte inferior del cabezal de observación. 2. Inserte la cabeza en el soporte y apriete el tornillo de fijación. (Fig. 1) • Sujete siempre la cabeza con una mano al apretar el tor- nillo para evitar que se caiga. - Page 49 7.1.2 B-190TBPL 1. Retire la tapa protectora del soporte y la parte inferior del cabezal de observación. 2. Inserte la cabeza en el soporte y apriete el tornillo de fijación. (Fig. 5) • Sujete siempre la cabeza con una mano al apretar el tor- nillo para evitar que se caiga.
- Page 50 7. Conecte un terminal del cable al cabezal digital y el otro ② terminal a la Tableta usando el conector . (Fig. 9-10) ③ 8. Conecte el cable de alimentación a la Tableta para recargar la batería usando el conector .
-
Page 51: Kit De Polarización (Opcional)
Kit de polarización (opcional) 1. Coloque el polarizador en la lente de campo del micros- ① copio. (Fig. 11) ① F ig. 11 ig. 11 2. Afloje la perilla de fijación del cabezal y retire el cabezal ② de observación del soporte. (Fig. 12) ②... -
Page 52: Uso Del Microscopio
Uso del microscopio Encender el microscopio Gire el interruptor principal en la parte posterior del instru- ① ① mento girando el interruptor a “I”. (Fig. 14) F ig. 14 ig. 14 Regulación de la intensidad de luz Ajuste el mando de ajuste de la intensidad para aumentar o dis- minuir el voltaje de iluminación. -
Page 53: Ajuste De La Distancia Interpupilar
Ajuste de la distancia interpupilar ① • Excepto B-191PL / B-191SPL Observando con ambos ojos, apoye el grupo de oculares. Gí- relos a lo largo del eje común hasta obtener un solo campo de visión. (Fig. 18) • La escala graduada en el indicador de distancia interpupilar , indicada por el punto “.”... -
Page 54: Diafragma De Apertura
Diafragma de apertura • El valor de apertura numérica (A.N.) del diafragma de aper- tura influye en el contraste de la imagen. Aumentar o dis- minuir este valor dependiendo de la apertura numérica de la lente variará la resolución, el contraste y la profundidad de campo de la imagen. -
Page 55: Microfotografía
Microfotografía Cámaras con lente de proyección 1. Retire los tapones de la cámara y la lente de proyección. 2. Atornille la lente de proyección a la rosca de la cámara. (Fig. F ig. 23 ig. 23 3. Inserte el extremo de la lente de proyección en el tubo de foto. -
Page 56: 10. Uso Del Software Y Del Cabezal Digital
10. Uso del software y del cabezal digital La cámara dentro de la cabeza digital es administrada por el software PROVIEW. Para instrucciones sobre el uso del software, consulte el manual de instrucciones específico. El manual puede ser descargado usando el código QR disponible en este manual o usando la página web. La versión PDF del manual se encuentra bajo el nombre de: OPTIKA - B-150D - B-190TB - B-290TB Software Setup - Instruction manual - EN IT ES FR DE PT. -
Page 57: 12. Mantenimiento
12. Mantenimiento Ambiente de trabajo Se aconseja utilizar este microscopio en un ambiente limpio y seco; también se deben evitar los impactos. La temperatura de trabajo recomendada es de 0-40°C y la humedad relativa máxima es de 85 % (en ausencia de condensación). Si es necesario, utilizar un deshumidificador. -
Page 58: 13. Resolución De Problemas
13. Resolución de problemas Consulte la información en la siguiente tabla para resolver cualquier problema operacional. PROBLEMA CAUSA SOLUCIÓN I. Sección Óptica: El microscopio está encendido, pero el La fuente de alimentación está desco- Conectar campo de visión es oscuro. nectada. -
Page 59: Disposición
Disposición De conformidad con el artículo 13 del decreto legislativo de 25 de julio de 2005 n. 151. “Aplicación de las Directivas 2002/95 / CE, 2002/96 / CE y 2003/108 / CE, relativas a la reducción del uso de sustancias peligrosas en equipos eléctricos y elec- trónicos, así... - Page 60 OPTIKA S.r.l. ® Via Rigla, 30 - 24010 Ponteranica (BG) - ITALY Tel.: +39 035.571.392 info@optikamicroscopes.com - www.optikamicroscopes.com OPTIKA Spain spain@optikamicroscopes.com OPTIKA USA usa@optikamicroscopes.com OPTIKA China china@optikamicroscopes.com OPTIKA India india@optikamicroscopes.com OPTIKA Central America camerica@optikamicroscopes.com...
- Page 61 Série B-190 MANUEL D’UTILISATION Modèle (B-191PL / B-191SPL / B-192PL / B-192SPL / B-193PL) B-190TBPL Ver. 7.4 2021...
- Page 62 Sommaire Avertissement Symboles Précautions Emploi prévu Description de l’instrument B-191PL/B-191SPL/B-192PL/B-192SPL/B-193PL B-190TBPL Déballage B-191PL/B-191SPL/B-192PL/B-192SPL/B-193PL B-190TBPL Assemblage Procédure de montage 7.1.1 B-191SPL/B-191PL/B-192SPL/B-192PL/B-193PL Jeu de polarisation (en option) Utilisation du microscope Allumage du microscope Réglage de l’intensité lumineuse Réglage de la friction Platine Réglage de la distance interpupillaire Compensation dioptrique Utilisation d’objectif à...
-
Page 63: Symboles
Avertissement Le présent microscope est un appareil scientifique de précision créé pour offrir une durée de vie de plusieurs années avec un niveau d’entretien minimum. Les meilleurs composants optiques et mécaniques ont été utilisés pour sa conception ce qui fond de lui un appareil idéal pour une utilisation journalière. Ce guide contient des informations importantes sur la sécurité... -
Page 64: Description De L'instrument
Description de l’instrument B-191PL/B-191SPL/B-192PL/B-192SPL/B-193PL TUBE PHOTO (B-193PL SEULEMENT) OCULAIRES TÊTE DE OBSERVATION -) MONOCULAIRE (B-191PL / B-191SPL) -) BINOCULAIRE (B-192PL / B-192SPL) -) TRINOCULAIRE (B-193PL) OBJECTIFS SURPLATINE PLATINE CONDENSATEUR VIS DE RÉGLAGE DES AXES X-Y ÉCROU DE RÉGLAGE DE TENSION DIAPHRAGME DE OUVERTURE POIGNÉE... -
Page 65: B-190Tbpl
B-190TBPL AURICULAIRES MICRO HDMI USB TYPE C FENTE POUR TABLETTE CARTE MICRO SD USB-A3.0 TÊTE NUMERIQUE ALIMENTATION OCULAIRES SURPLATINE OBJECTIFS PLATINE POIGNÉE MACROMÉTRIQUE VIS DE RÉGLAGE DES AXES X-Y DIAPHRAGME DE OUVERTURE POIGNÉE MICROMÉTRIQUE ÉCROU DE RÉGLAGE DE TENSION SÉLECTEUR DE RÉGLAGE DE LA LUMINOSITÉ... -
Page 66: Déballage
Déballage Le microscope est emballé dans du polystyrène expansé. Enlever le ruban adhésif et retirer la partie supérieure de l’emballage. Retirer soigneusement le microscope et ses composants de l’emballage, utiliser les deux mains pour éviter de faire tomber et de casser les accessoires qu’il contient. L’appareil doit toujours être posé sur une surface stable, lisse et horizontale. -
Page 67: B-190Tbpl
B-190TBPL ① ⑧ ③ ⑥ ④ ⑤ ⑨ ⑦ ② ⑬ ⑫ ⑩ ⑪ ① Corps de microscope ⑧ Alimentation électrique ⑨ Clé de régulation de tension ② Tête de observation ⑩ Alimentation électrique tablette ③ Oculaires ⑪ Câble USB 0,5 m ④ Objectifs (4X / 10X / 40X / 100X) ⑫ Plume pour tablette ⑤ Couverture ⑬ Tablette ⑥ Filtre vert ⑦ Huile d’immersion Page 67... -
Page 68: Assemblage Procédure De Montage
Assemblage Procédure de montage 7.1.1 B-191SPL/B-191PL/B-192SPL/B-192PL/B-193PL 1. Retirez le capuchon de protection du support et de la face inférieure de la tête d’observation. 2. Insérer la tête sur le support et serrer la vis de fixation. (Fig. • Tenez toujours la tête d’une main lorsque vous serrez la vis pour éviter qu’elle ne tombe. - Page 69 7.1.2 B-190TBPL 1. Retirez le capuchon de protection du support et de la face inférieure de la tête d’observation. 2. Insérer la tête sur le support et serrer la vis de fixation. (Fig. • Tenez toujours la tête d’une main lorsque vous serrez la vis pour éviter qu’elle ne tombe.
- Page 70 7. Connectez une borne du câble à la tête numérique et ② l’autre borne à la tablette en utilisant le connecteur . (Fig. ③ 9-10). 8. Connectez le câble de alimantation à la tablette pour rechar- ger la batterie en utilisant le connecteur .
-
Page 71: Jeu De Polarisation (En Option)
Jeu de polarisation (en option) 1. Placez le polariseur sur la lentille de champ du micros- ① cope. (Fig. 11) ① F ig. 11 ig. 11 2. Desserrer le bouton de fixation de la tête et retirer la tête ② d’observation du statif. -
Page 72: Utilisation Du Microscope Allumage Du Microscope
Utilisation du microscope Allumage du microscope Tournez l’interrupteur principal à l’arrière de l’appareil en pla- ① ① çant le sélecteur sur “I”. (Fig. 14) F ig. 14 ig. 14 Réglage de l’intensité lumineuse Tourner la molette de réglage de l’intensité lumineuse pour aug- menter ou diminuer la tension de l’illumination. -
Page 73: Réglage De La Distance Interpupillaire
Réglage de la distance interpupillaire ① • Sauf B-191 / B-191S Observer avec les deux yeux, soutenir le groupe des oculaires. Faites-les pivoter le long de l’axe commun jusqu’à obtenir un seul champ de vision. (Fig. 18) • L’échelle graduée de l’indicateur de distance interpupillaire , indiquée par le point “.”... -
Page 74: Diaphragme De Ouverture
Diaphragme de ouverture • La valeur numérique de l’ouverture (A.N.) du diaphragme d’ouverture affecte le contraste de l’image. L’augmentation ou la diminution de cette valeur en fonction de l’ouverture numérique de l’objectif modifie la résolution, le contraste et la profondeur de champ de l’image. Déplacez la bague d’ouver- ture (Fig. -
Page 75: Microphotographie Caméras Avec Lentille De Projection
Microphotographie Caméras avec lentille de projection 1. Enlever les capuchons anti-poussière de la caméra et de la lentille de projection. 2. Visser la lentille de projection sur le filetage de la caméra (Fig. 23) F ig. 23 ig. 23 3. Insérez l’extrémité de la lentille de projection dans le tube photo. -
Page 76: 10. Utilisation Du Logiciel Et De La Tête Numérique
10. Utilisation du logiciel et de la tête numérique L’appareil photo à l’intérieur de la tête numérique est géré par le logiciel PROVIEW. Pour les instructions relatives à l’utilisation du logiciel, veuillez vous référer au manuel d’instructions spécifique. Le manuel peut être téléchargé en utilisant le code QR disponible sur ce manuel ou en utilisant le site web. La version PDF du manuel se trouve sous le nom: OPTIKA - B-150D - B-190TB - B-290TB Software Setup - Instruction manual - EN IT ES FR DE PT. -
Page 77: 12. Réparation Et Entretien
12. Réparation et entretien Environnement de travail Il est conseillé d’utiliser le microscope dans un environnement propre et sec, protégé des impactes, à une température comprise entre 0°C y 40°C et avec une humidité relative maximale de 85% (en absence de condensation). Il est conseillé d’utiliser un déshumidificateur si nécessaire. -
Page 78: 13. Résolution De Problèmes
13. Résolution de problèmes Consulter les informations ci-dessous pour la résolution de problèmes durant l’utilisation. PROBLÈME CAUSE SOLUTION I. Section Optique: La lampe est allumée mais le champ L’alimentation n’est pas branchée. Branchez-le correctement visuel est sombre. L’intensité lumineuse est trop faible Procéder au réglage Des saletés ou des poussières sont La préparation est sale... -
Page 79: Ramassage
Ramassage Conformément à l’Article 13 du D.L du 25 Juillet 2005 nº151 Action des Directives 2002/95/CE, 2002/96/CE et 2003/108/CE, relatives à la réduction de l’utilisation de substances dan- gereuses dans l’appareil électrique et électronique et à l’élimination des résidus. Le Symbole du conteneur qui figure sur l’appareil électrique ou sur son emballage indique que le produit devra être, à la fin de sa vie utile, séparé... - Page 80 OPTIKA S.r.l. ® Via Rigla, 30 - 24010 Ponteranica (BG) - ITALY Tel.: +39 035.571.392 info@optikamicroscopes.com - www.optikamicroscopes.com OPTIKA Spain spain@optikamicroscopes.com OPTIKA USA usa@optikamicroscopes.com OPTIKA China china@optikamicroscopes.com OPTIKA India india@optikamicroscopes.com OPTIKA Central America camerica@optikamicroscopes.com...
- Page 81 Serie B-190 BEDIENUNGSANLEITUNG Modell Serie B-190 (B-191PL / B-191SPL / B-192PL / B-192SPL / B-193PL) B-190TBPL Ver. 7.4 2021...
- Page 82 Inhalt Hinweis Wartung- und Gefahrzeichen Sicherheitsinformationen Verwendung Beschreibung des Instruments B-191PL/B-191SPL/B-192PL/B-192SPL/B-193PL B-190TBPL Auspacken B-191SPL/B-191PL/B-192SPL/B-192PL/B-193PL B-190TBPL Montage Montage verfahren 7.1.1 B-191SPL/B-191PL/B-192SPL/B-192PL/B-193PL 7.1.2 B-190TBPL Polarisationsset (optional) Verwendung des Mikroskops Einschalten des Mikroskops Einstellung der Lichtintensität Kupplungseinstellung Objekttisch Einstellen des Augenabstandes Dioptrienverstellung Verwendung des Ölimmersionsobjektivs Aperturblende Verwendung mit Polarisator (optional) Mikrofotografie...
-
Page 83: Wartung- Und Gefahrzeichen
Hinweis Dieses Mikroskop ist ein wissenschaftliches Präzisionsgerät, es wurde entwickelt für eine jahrelange Verwendung bei einer minimalen Wartung. Dieses Gerät wurde nach den höchsten optischen und mechanischen Standards und zum täglichen Gebrauch hergestellt. Diese Bedienungsanleitung enthält wichtige Informationen zur korrekten und sicheren Benutzung des Geräts. -
Page 84: Beschreibung Des Instruments
Beschreibung des Instruments B-191PL/B-191SPL/B-192PL/B-192SPL/B-193PL FOTOTUBUS (NUR B-193)PL OKULARE BEOBACHTUNGSKOPF -) MONOKULARER (B-191PL / B-191SPL) -) BINOKULARER (B-192PL / B-192SPL) -) TRINOKULARER (B-193PL) OBJEKTIV GLASLEISTEN OBJEKTTISCH KONDENSATOR KNÖPFE VERSCHIEBUNG OBJEKTTISCH FOKUSVERSTELLUNG APERTURBLENDE FEINTRIEBDREHKNOPF EINSTELLWAHLSCHALTER LEUCHTKRAFT GROBTRIEBDREHKNOPF Seite 84... - Page 85 B-190TBPL KOPFHÖRER MICRO HDMI USB TYPE C MICRO SD KARTEN- STECKPLATZ TABLETT USB-A3.0 DIGITALE BEOBACHTUNGSKOPF NETZGERÄT OKULARE GLASLEISTEN OBJEKTIV OBJEKTTISCH GROBTRIEBDREHKNOPF KNÖPFE VERSCHIEBUNG OBJEKTTISCH APERTURBLENDE FEINTRIEBDREHKNOPF FOKUSVERSTELLUNG EINSTELLWAHLSCHALTER LEUCHTKRAFT Seite 85...
- Page 86 Auspacken Das Mikroskop ist in einer Schachtel aus Styroporschicht enthalten. Entfernen Sie das Klebeband von der Schachtel und öffnen Sie mit Vorsicht den oberen Teil, ohne Objektive und Okulare zu beschädigen. Mit beiden Händen (eine um dem Stativ und eine um der Basis) ziehen Sie das Mikroskop aus der Schachtel heraus und stellen Sie es auf eine stabile Ober- fläche.
- Page 87 B-190TBPL ① ⑧ ③ ⑥ ④ ⑤ ⑨ ⑦ ② ⑬ ⑫ ⑩ ⑪ ① Hauptkörper ⑧ Netzteil ② Digitale Beobachtungskopf ⑨ Spannungsregelschlüssel ③ Okulare ⑩ Netzteil tablett ④ Objektive (4X / 10X / 40X / 100X) ⑪ USB-Kabel 0,5 m ⑤ Staubschutzhaube ⑫ Tabletten-Feder ⑥ Grünfilter ⑬ Tablett ⑦ Immersionsöl Seite 87...
-
Page 88: B-191Spl/B-191Pl/B-192Spl/B-192Pl/B-193Pl
Montage Montage verfahren 7.1.1 B-191SPL/B-191PL/B-192SPL/B-192PL/B-193PL 1. Entfernen Sie die Schutzkappe vom Ständer und der Unter- seite des Beobachtungskopfes. 2. Setzen Sie den Kopf auf den Ständer und ziehen Sie die Befestigungsschraube an. (Fig. 1) • Halten Sie den Kopf beim Anziehen der Schraube immer mit einer Hand fest, damit die Schraube nicht herausfallt. -
Page 89: Polarisationsset (Optional)
7.1.2 B-190TBPL 1. Entfernen Sie die Schutzkappe vom Ständer und der Unter- seite des Beobachtungskopfes. 2. Setzen Sie den Kopf auf den Ständer und ziehen Sie die Befestigungsschraube an. (Fig. 5) • Halten Sie den Kopf beim Anziehen der Schraube immer mit einer Hand fest, damit die Schraube nicht herausfallt. - Page 90 7. Stecken Sie eine Seite des USB-Kabels an den Digital- ② kopf und die andere Seite über den Stecker an den Tab- ③ let-PC) . (Fig. 9-10). 8. Schließen Sie das Stromversorgungskabel zum Aufladen des Akkus über den Anschluss an den Tablet PC an.(Fig. ④...
- Page 91 Polarisationsset (optional) 1. Setzen Sie den Polarisator auf die Feldlinse des Mikros- ① kops. (Fig. 11) ① F ig. 11 ig. 11 2. Lösen Sie den Kopfbefestigungsknopf und entfernen Sie ② den Kopf vom Mikroskopstativ. (Fig. 12) ② F ig. 12 ig.
-
Page 92: Einschalten Des Mikroskops
Verwendung des Mikroskops Einschalten des Mikroskops Drehen Sie den Hauptschalter auf der Rückseite des Geräts, ① ① indem Sie den Wahlschalter auf “I” stellen. (Fig. 14) F ig. 14 ig. 14 Einstellung der Lichtintensität Drehen Sie das Einstellrad für die Lichtintensität, um die Be- leuchtungsspannung zu erhöhen oder zu verringern. -
Page 93: Einstellen Des Augenabstandes
Einstellen des Augenabstandes ① • Mit Ausnahme der Modelle B-191PL / B-191SPL Beobachten Sie mit beiden Augen, unterstützen Sie die Augen- gruppe. Drehen Sie diese entlang der gemeinsamen Achse, bis Sie ein einziges Sichtfeld erhalten. (Fig. 18) • Die Skala auf der Augenabstandsanzeige , gekennzeich- ①... -
Page 94: Aperturblende
Aperturblende • Der numerische Öffnungswert (A.N.) der Aperturblende be- einflusst den Kontrast des Bildes. Das Erhöhen oder Ver- ringern dieses Wertes in Abhängigkeit von der numerischen Apertur des Objektivs ändert die Auflösung, den Kontrast und die Tiefenschärfe des Bildes. Bewegen Sie den Blen- denhebel (Fig. -
Page 95: Mikrofotografie Kameras Mit Projektionslinse
Mikrofotografie Kameras mit Projektionslinse 1. Staubschutzkappen von Kamera und Projektionslinse entfer- nen. 2. Schrauben Sie das Projektionslinse auf das Gewinde der Ka- . (Fig. 23) mera F ig. 23 ig. 23 3. Führen Sie das Ende des Projektionslinse in den Fototubus. (Fig. -
Page 96: 10. Verwendung Der Software Und Des Digitalen Kopfes
10. Verwendung der Software und des digitalen Kopfes Die Kamera im Inneren des Digitalkopfes wird von der PROVIEW-Software verwaltet. Anweisungen zur Verwendung der Software finden Sie in der spezifischen Bedienungsanleitung. Das Handbuch kann mit dem in diesem Handbuch verfügbaren QR-Code oder über die Website heruntergeladen werden. Die PDF-Version des Handbuchs finden Sie unter dem Namen: OPTIKA - B-150D - B-190TB - B-290TB Software Setup - Instruction manual - EN IT ES FR DE PT. - Page 97 12. Wartung Arbeitsumfeld Es wird empfohlen, das Mikroskop an einem sauberen, trockenen und stoßsicheren Ort zu verwenden, bei einer Temperatur zwischen 0° und 40° und einer Feuchtigkeit nicht über 85% (ohne Kondensation). Wenn nötig wird die Verwendung eines Luftentfeuchters empfohlen Vor und nach dem Gebrauch des Mikroskops •...
- Page 98 13. Probleme und Lösungen Lesen Sie die Informationen in der folgenden Tabelle, um Probleme bei der Bedienung zu beheben. PROBLEM URSACHE LÖSUNG I. Optisches System: Die Beleuchtung ist eingeschaltet, aber Stromversorgungsstecker sind nicht gut Verbinden Sie das Sichtfeld ist dunkel. angeschlossen.
-
Page 99: Wiederverwertung
Wiederverwertung Gemäß dem Artikel 13 vom Dekret Nr. 151 vom 25.07.2005 “Umsetzung der Richtlinien 2002/95/EG, 2002/96/EG und 2003/108/EG in Bezug auf die Verwendung gefährlicher Stoffe in elektrischen und elektronischen Geräten sowie die Abfal- lentsorgung”. Das Symbol vom Müllcontainer erscheint auf dem Gerät oder der Verpackung und weist darauf hin, dass das Produkt Ende des Lebens separat von anderen Abfällen entsorgt werden muss. - Page 100 OPTIKA S.r.l. ® Via Rigla, 30 - 24010 Ponteranica (BG) - ITALY Tel.: +39 035.571.392 info@optikamicroscopes.com - www.optikamicroscopes.com OPTIKA Spain spain@optikamicroscopes.com OPTIKA USA usa@optikamicroscopes.com OPTIKA China china@optikamicroscopes.com OPTIKA India india@optikamicroscopes.com OPTIKA Central America camerica@optikamicroscopes.com...
- Page 101 Série B-190 MANUAL DE INSTRUÇÕES Modelo Série B-190 (B-191PL / B-191SPL / B-192PL / B-192SPL / B-193PL) B-190TBPL Ver. 7.4 2021...
-
Page 102: B-190Tbpl
Tabela de Conteúdos Advertência Símbolos Informações sobre a segurança Utilização prevista Descrição do instrumento B-191PL/B-191SPL/B-192PL/B-192SPL/B-193PL B-190TBPL Desembalando B-191SPL/B-191PL/B-192SPL/B-192PL/B-193PL B-190TBPL Montagem Procedimento de montagem 7.1.1 B-191SPL/B-191PL/B-192SPL/B-192PL/B-193PL 7.1.2 B-190TBPL Set de polarização (opcional) Utilização do microscópio Ligação do microscópio Ajuste da intensidade luminosa Ajuste da embraiagem Platina Ajuste da distância interpupilar... -
Page 103: Informações Sobre A Segurança
Advertência Este microscópio é um instrumento científico de alta precisão, projectado para durar um longo tempo com manutenção mínima; a sua realização respeita os melhores padrões ópticos e mecânicos, para que possa ser utilizado diariamente. Recordamos que este manual contém informações importantes para a segurança e a manutenção do instrumento, portanto deve ser colocado à... -
Page 104: Descrição Do Instrumento
Descrição do instrumento B-191PL/B-191SPL/B-192PL/B-192SPL/B-193PL TUBO FOTOGRÁFICO (APENAS B-193PL) OCULARES CABEÇA DE OBSERVAÇÃO -) MONOCULAR (B-191PL / B-191SPL) -) BINOCULAR (B-192PL / B-192SPL) -) TRINOCULAR (B-193PL) OBJETIVAS SUPORTE DE PLATINA LÂMINAS BOTÕES DE CONDENSADOR MOVIMENTO X/Y PARAFUSO DE TENSÃO DIAFRAGMA DE ABERTURA FOCAGEM MICROMÉTRICA... -
Page 105: B-190Tbpl
B-190TBPL AURICULAR MICRO HDMI USB TYPE C RANHURA PARA CARTÃO MICRO SD TABLET USB-A3.0 CABEÇA DE OBSERVAÇÃO DIGITAL ALIMENTAÇÃO OCULARES SUPORTE DE LÂMINAS OBJETIVAS PLATINA FOCAGEM MACROMÉTRICA BOTÕES DE MOVIMENTO X/Y DIAFRAGMA DE ABERTURA FOCAGEM MICROMÉTRICA PARAFUSO DE BOTÃO PARA AJUSTE TENSÃO DA INTENSIDADE Pagina 105... - Page 106 Desembalando O microscópio é alojado em um recipiente de isopor moldado. Remova a fita da borda do recipien- te e levante a metade superior do recipiente. Tome algum cuidado para evitar que os itens ópti- cos (objectivos e oculares) cair e ficar danificado. Usando ambas as mãos (uma ao redor do bra- ço e outra ao redor da base), levante o microscópio do recipiente e coloque-o em uma mesa estável.
- Page 107 B-190TBPL ① ⑧ ③ ⑥ ④ ⑤ ⑨ ⑦ ② ⑬ ⑫ ⑩ ⑪ ① Estrutura ⑧ Fonte de alimentação ② Cabeça de observação digital ⑨ Ferramenta de ajuste da tensão ③ Oculares ⑩ Fonte de alimentação tablet ④ Objetivas (4X/10X/40X/100X) ⑪ Cabo USB 0,5 m ⑤ Cobertura contra pó ⑫ Ponta do tablet ⑥ Filtro verde ⑬ Tablet ⑦ Óleo de imersão Pagina 107...
-
Page 108: Montagem
Montagem Procedimento de montagem 7.1.1 B-191SPL/B-191PL/B-192SPL/B-192PL/B-193PL 1. Remova a tampa protectora do suporte e a parte inferior da cabeça de observação. 2. Insira a cabeça no suporte e aperte o parafuso de fixação. (Fig. 1) • Sempre segure a cabeça com uma mão ao apertar o pa- rafuso para evitar que o parafuso caia para fora. - Page 109 7.1.2 B-190TBPL 1. Remova a tampa protectora do suporte e a parte inferior da cabeça de observação. 2. Insira a cabeça no suporte e aperte o parafuso de fixação. (Fig. 5) • Sempre segure a cabeça com uma mão ao apertar o pa- rafuso para evitar que o parafuso caia para fora.
- Page 110 7. Conecte um terminal do cabo à cabeça digital e o outro ② utilizando o conector ③ terminal ao Tablet . (Fig. 9-10). 8. Ligue o cabo de alimentação ao Tablet para recarregar a ba- utilizando o conector ④. (Fig. 10) teria •...
-
Page 111: Set De Polarização (Opcional)
Set de polarização (opcional) 1. Coloque o polarizador ① na saída de luz na base do micros- cópio. (Fig. 11) ① F ig. 11 ig. 11 2. Solte o botão de fixação da cabeça ② e remova a cabeça da armação do microscópio. -
Page 112: Utilização Do Microscópio
Utilização do microscópio Ligação do microscópio Gire o interruptor principal na parte de trás do instrumento, ① ① girando o interruptor selector para “I”. (Fig. 14) F ig. 14 ig. 14 Ajuste da intensidade luminosa Utilize a roda de ajuste da intensidade da luz para ligar e desligar o instrumento e para aumentar ou diminuir a tensão de ilumina- ção. -
Page 113: Ajuste Da Distância Interpupilar
Ajuste da distância interpupilar ① • Excepto B-191PL / B-191SPL Observando com ambos os olhos, apoiar o grupo de oculares. Gire-os ao longo do eixo comum até obter um único campo de visão. (Fig. 18) • A escala graduada no indicador de distância interpupilar ①... -
Page 114: Diafragma De Abertura
Diafragma de abertura • O valor de abertura numérica (A.N.) do diafragma de abertu- ra afecta o contraste da imagem. Aumentar ou diminuir este valor em função da abertura numérica da objectiva altera a resolução, o contraste e a profundidade de campo da ima- gem. -
Page 115: Microfotografia Câmaras Com Lente De Projecção
Microfotografia Câmaras com lente de projecção 1. Remover as tampas de poeira da câmara e da lente de pro- jecção. . (Fig. 2. Aparafusar a lente de projecção à rosca da câmara F ig. 23 ig. 23 3. Insira a extremidade da lente de projecção no tubo fotográ- fico. -
Page 116: 10. Usando O Software E A Cabeça Digital
10. Usando o software e a cabeça digital A câmara dentro da cabeça digital é gerida pelo software PROVIEW. Para instruções de utilização do software, por favor consulte o manual de instruções específico. O manual pode ser baixado usando o código QR disponível neste manual ou usando o website. A versão PDF do manual pode ser encontrada sob o nome: OPTIKA - B-150D - B-190TB - B-290TB Software Setup - Instruction manual - EN IT ES FR DE PT. -
Page 117: 12. Manutenção
12. Manutenção Ambiente de trabalho Recomenda-se de utilizar o microscópio em um ambiente limpo e seco, sem o risco de colisões, a uma tempe- ratura entre 0°C e 40°C e com uma humidade relativa máxima de 85% (em ausência de condensação). Reco- menda-se o uso de um desumidificador, se necessário. -
Page 118: 13. Resolução De Problemas
13. Resolução de problemas Reveja a informação na tabela abaixo para tentar solucionar problemas de operação. PROBLEMA CAUSA SOLUÇÃO I. Secção Óptica: O microscópio está ligado, mas o cam- A fonte de alimentação está desligada. Conectar po de visão é escuro. O brilho é... -
Page 119: Eliminação
Eliminação Art.13 Dlsg 25 de Julho de 2005 N°151. “De acordo com as Directivas 2002/95/CE, 2002/96/CE e 2003/108/CE relativas à redução do uso de substâncias perigosas em equipamentos eléctricos e electrónicos e à eliminação de resíduos. O símbolo do cesto no equipamento ou na sua caixa indica que o produto no final da sua vida útil deve ser recolhido separadamente dos outros resíduos. - Page 120 OPTIKA S.r.l. ® Via Rigla, 30 - 24010 Ponteranica (BG) - ITALY Tel.: +39 035.571.392 info@optikamicroscopes.com - www.optikamicroscopes.com OPTIKA Spain spain@optikamicroscopes.com OPTIKA USA usa@optikamicroscopes.com OPTIKA China china@optikamicroscopes.com OPTIKA India india@optikamicroscopes.com OPTIKA Central America camerica@optikamicroscopes.com...
Need help?
Do you have a question about the B-190 Series and is the answer not in the manual?
Questions and answers