
Subscribe to Our Youtube Channel
Related Manuals for Dometic 9600000350


Summary of Contents for Dometic 9600000350
- Page 1 DRIVING SUPPORT PERFECTVIEW MC 402 Moniceiver Installation and Operating Manual...
- Page 3 MC402 EJECT ZOOM...
- Page 4 MC402 EJECT SLOW...
- Page 5 MC402...
- Page 6 MC402...
- Page 7 MC402...
- Page 8 MC402 black Rear display AV system Camera black yellow black Radio antenna A + B...
- Page 9 MC402...
-
Page 10: Table Of Contents
MC402 Please read this instruction manual carefully before installation and first use, and store it in a safe place. If you pass on the product to another person, hand over this instruction manual along with it. Table of contents Explanation of symbols ........12 Safety information . - Page 11 MC402 Using Bluetooth devices ........45 11.1 Menus .
-
Page 12: Explanation Of Symbols
Explanation of symbols MC402 Explanation of symbols WARNING! Safety instruction: Failure to observe this instruction can cause fatal or serious injury. CAUTION! Safety instruction: Failure to observe this instruction can lead to injury. NOTICE! Failure to observe this instruction can cause material damage and impair the function of the product. - Page 13 MC402 Safety information NOTICE! To prevent the risk of short circuits, always disconnect the negative termi- nal of the vehicle's electrical system before working on it. If the vehicle has an additional battery, its negative terminal should also be disconnected. Please observe the following instructions: •...
- Page 14 Safety information MC402 • Secure any parts of the system covered by the bodywork in such a manner that they cannot be come loose or damage other parts and cables or impair vehicle functions (steering, pedals, etc). • Always follow the safety instructions of the vehicle manufacturer. Some work (e.g.
-
Page 15: Operating The Device Safely
MC402 Safety information Operating the device safely WARNING! • Never play videos while you are driving to avoid dangerous situations in road traffic. Adhere to the country-specific laws and regulations. • Only use the device in its function as a reversing video system while driving. -
Page 16: Scope Of Delivery
Scope of delivery MC402 Scope of delivery No. in Quantity Description Ref. no. fig. 1, page 3 Moniceiver 9600000350 2 DIN installation sleeve Remote control (incl. batteries) Cover frame Fastening brackets – Display cleaning cloth – Stylus – Set of connection cables –... -
Page 17: Intended Use
Intended use Intended use The moniceiver (ref. no. 9600000350) is intended for installation and use in a vehicle with an on-board 12 Vg power supply and must be installed in a double DIN slot. The device combines the functions of a car radio, CD player, DVD player, playback device for external audio and video sources and a hands-free system for mobile phones. -
Page 18: Technical Description
Technical description MC402 Technical description The moniceiver is located in a housing which occupies two slots in the vehicle's centre console. The device can be connected to the handbrake switch. In this way, and for safety reasons, no video can be played on the installed display while you are driving. The display will only switch on if the vehicle is stationary and the handbrake is in use. - Page 19 MC402 Technical description MP3 discs must have the following features: • ISO 9660 or ISO 9660, Joliet format, file names with max. of 30 characters • Max.of 8 directory levels • Max. of 99 albums • Max. of 999 tracks •...
-
Page 20: Control Elements On The Moniceiver
Technical description MC402 Control elements on the moniceiver Front No. in Description Description fig. 2, page 3 EJECT button Ejects the disc from the disc compartment MENU button Switches between the main menu and the audio/video source menu • Switches the device on and off ON/OFF/VOLUME knob •... -
Page 21: Remote Control
MC402 Technical description Remote control No. in Description Description fig. 4, page 4 Selects the audio/video source • Radio • Disc • SD/MMC memory card • USB • AV-IN 1 (audio input on the front of the device) • AV-IN 2 (audio input on the back of the device) •... - Page 22 Technical description MC402 No. in Description Description fig. 4, page 4 REPT A–B Repeats from A – B of a track REPT Plays again Plays slowly Plays tracks in a random order • Set the radio station • Skip/select track (CD/DVD/VCD) Hangs up/cancels a call VOL +/–...
-
Page 23: Installing The Moniceiver
MC402 Installing the moniceiver Installing the moniceiver NOTICE! Beware of damage! Before installing the monoceiver, remove the two screws used to protect it during transport so that the DVD player can function. Notes on the electrical connections Please observe the following instructions relating to the electrical connection: •... -
Page 24: Installing And Connecting The Moniceiver
Installing the moniceiver MC402 Installing and connecting the moniceiver NOTICE! Beware of damage! • When drilling holes, check beforehand that there is sufficient space on the other side for the drill head to come out. • Cables and connections that are not properly installed will cause malfunctions or damage to components. - Page 25 MC402 Installing the moniceiver Label Description DAB BUS Connection for compatible DAB receiver CAMERA IN Camera input USB port DVR BUS No function assigned DVR VIDEO No function assigned Microphone for hands-free system Pin assignment see fig. b A+B, page 8: Label Description Power and voltage connector...
-
Page 26: Operating The Moniceiver
Operating the moniceiver MC402 To perform the installation and the electrical connection, proceed as follows: ➤ Disconnect the negative terminal of the battery. ➤ Remove any existing audio system. ➤ Install the 2 DIN installation sleeve (fig. 7, page 5). ➤... -
Page 27: Basic Functions
MC402 Operating the moniceiver Basic functions NOTE The moniceiver can be operated using the buttons and the device display or using the remote control. Switching the appliance on ➤ Press the ON/OFF/VOLUME knob (fig. 2 3, page 3) to switch on the device. ➤... - Page 28 Operating the moniceiver MC402 Switching the sound off ➤ Press the ON/OFF/VOLUME knob(fig. 2 3, page 3) briefly to switch the sound of the device to mute. ➤ Press the MUTE button (fig. 4 27, page 4) on the remote control to switch the sound of the device to mute.
- Page 29 MC402 Operating the moniceiver Selecting the audio/video source ➤ Press the SRC button (fig. 4 1, page 4) on the remote control until you have selected the source required. ➤ Touch the on the display, specifically the upper left corner of the display (fig.
-
Page 30: Using The Remote Control
Operating the moniceiver MC402 Using the remote control NOTE The moniceiver can be operated using the buttons and the device display or using the remote control. The remote control has an operating range of 3 to 5 metres. Selecting functions You can select the functions shown directly via the display. -
Page 31: Playing Media
MC402 Playing media Playing media Menus CD menu Symbol Description Displays the SOURCE menu 1/11 Current track number Displays track list 00:08 Current time Open/close menu Prev/ Select track Next Play/ Starts/interrupts playback Pause Sets equaliser Random Plays random tracks Repeat Replays track Goto... - Page 32 Playing media MC402 DVD menu Symbol Description Displays the SOURCE menu TTL:2/10 Current title/chapter number CHP:1/2 13:10 Current time Open/close menu Prev/ Select track Next Play/ Starts/interrupts playback Pause Set equaliser Goto Enters a desired track Menu Opens the DVD main menu A–B Repeats from A –...
- Page 33 MC402 Playing media Menus for discs, memory cards or external sources containing mixed content (music, videos and photos) Symbol Description Displays the SOURCE menu 1/15 Current track number 00:59 Current time Available music on data carrier Available videos on data carrier Available photos on data carrier NOTE The functions in the menus for music and videos are identical to the...
- Page 34 Playing media MC402 Menu for photos Symbol Description Displays the SOURCE menu 10/10 Title number 01:09 Current time Open/close menu Function not available Prev/ Select photo Next Play/ Starts/interrupts playback Pause Goto Enters the photo desired Origin Displays photo in original size Rotate Rotates image Zoom...
-
Page 35: Inserting And Ejecting A Disc
MC402 Playing media Inserting and ejecting a disc Inserting a disc NOTE • Make sure that the disc compartment is empty before you insert a disc. • The device immediately switches to the correct audio/video source when you insert a disc. •... -
Page 36: Inserting And Removing A Storage Medium
Playing media MC402 Inserting and removing a storage medium Inserting a memory card ➤ Open the cover and insert an SD or MMC memory card into the slot until it clicks into place (fig. 2 8, page 3). ✓ The device reads the files on the data carrier and shows them on the display. Removing a memory card ➤... -
Page 37: Connecting External Audio And Video Sources
MC402 Playing media Connecting external audio and video sources Connecting the device ➤ Open the cover and inset the 3.5 mm stereo jack plug on the connection cable of your audio/video device into the AV socket (fig. 2 6, page 3). ✓... - Page 38 Playing media MC402 Selecting titles There are several ways to select and play a title directly. ➤ Press the GOTO button and enter the number of the title, chapter or running time. ✓ The selected title will be played. ➤ Press the play list on the display and press directly on the title, chapter or running time on the display.
- Page 39 MC402 Playing media Skipping tracks NOTE You can use the numbers 0 - 9 and 10+ on the remote control to select the desired title or chapter number. ➤ Press the button to skip a title or a track. Fast search forwards/backwards ➤...
-
Page 40: Media Settings
Playing media MC402 Repeats from A – B of a title ➤ Press the A–B button to set the start point in the desired position of the title played. ✓ The REPEAT A message appears on the display. ➤ Press the A–B button again to set the end point. ✓... - Page 41 MC402 Playing media Select the DVD viewing angle (if available) ➤ Press the ANGLE button as often as necessary until you have selected the desired viewing angle on the DVD. Adjusting DVD image settings Brightness, contrast and saturation can be set at levels of 0–16. ➤...
-
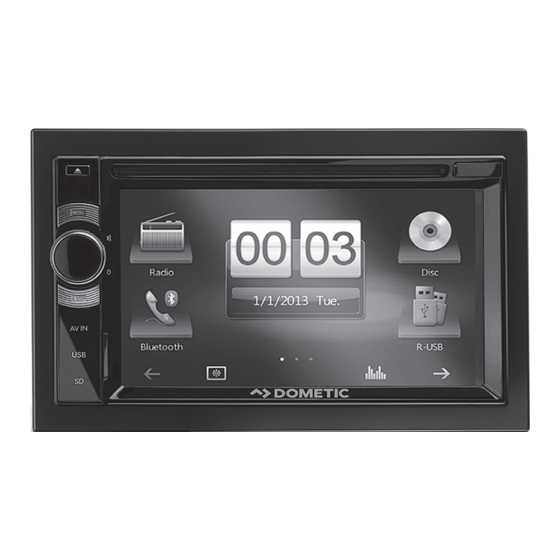
Page 42: Using The Radio
Using the radio MC402 Using the radio 10.1 Menus Symbol Description Displays the SOURCE menu P1–P6 Selects presets 00:03 Current time Scan Searches for and stores the six radio stations with the strongest reception. Prev/ Selects frequency Next Band Changes the frequency band Option Radio settings Memory... -
Page 43: Listening To Radio
MC402 Using the radio 10.2 Listening to radio The radio has the FM1, FM2, FM3, AM1 and AM2 frequency bands. Six presets are available for each frequency band. Selecting the radio as audio/video source ➤ Select the audio/video source, see chapter “Selecting the audio/video source” on page 29. -
Page 44: Radio Settings
Using the radio MC402 10.3 Radio settings NOTE For an overview of all possible settings: chapter “System settings” on page 53. NOTE The RDS services (Radio Data System) consist of data that is sent and interpreted by the radio reception device according to the type of data. Programme names and other information (e.g. -
Page 45: Using Bluetooth Devices
MC402 Using Bluetooth devices Setting alternative frequencies The alternative frequency function (AF) (alternative frequencies) enables the receiving frequency to be changed when the reception area for the radio station is left. ➤ Set AF to ON or OFF. Setting programme type Programme Type (PTY) denotes the classification of radio stations by type. -
Page 46: Menus
Using Bluetooth devices MC402 11.1 Menus Telephone menu Symbol Description Displays the SOURCE menu Using the telephone function Using the audio player function 00:07 Current time Input screen 0 –9, #, * Numeric keypad Deletes numbers Displays phone book Displays call lists Starts the dialling process Breaks the Bluetooth connection Telephone settings... - Page 47 MC402 Using Bluetooth devices Music menu Symbol Description Displays the SOURCE menu Using the telephone function Using the music function 00:07 Current time Breaks the Bluetooth connection Prev/ Select track Next Play/ Starts/interrupts playback Pause Sets equaliser...
-
Page 48: Coupling Bluetooth Devices
Using Bluetooth devices MC402 11.2 Coupling Bluetooth devices The coupling establishes the Bluetooth connection between your Bluetooth device (e.g. mobile phone or audio/video device) and the moniceiver. ➤ Press the SRC button on the remote control until you have selected Bluetooth. ➤... -
Page 49: Making Calls
MC402 Using Bluetooth devices 11.3 Making calls Selecting the Bluetooth device as audio/video source ➤ Select the audio/video source, see chapter “Selecting the audio/video source” on page 29. Dialling ➤ Enter the telephone number. Press the button to delete numbers. ➤... -
Page 50: Using Audio/Video Devices
Using Bluetooth devices MC402 Receiving call NOTE Once the mobile phone and the moniceiver are coupled, the device automatically switches to the Bluetooth menu as soon as an incoming call is received. ➤ Press the button on the remote control or on the display to accept an incoming call. -
Page 51: Bluetooth Device Settings
MC402 Using Bluetooth devices ✓ The code for the coupling (factory setting: 0000) is requested. ➤ Enter the code. ✓ The connection is made. ➤ The Bluetooth symbol lights up. NOTE You are able to pause the music being played at any time if you either make or would like to receive a call. - Page 52 Using Bluetooth devices MC402 Setting the automatic connection ➤ Set the automatic connection to ON or OFF. When ON is selected, the mobile phone automatically connects to the moniceiver, as soon as it is within a range of 10 m. When OFF is selected, the connection has to be created manually.
-
Page 53: System Settings
MC402 System settings System settings 12.1 Setting the equalizer (EQ) You are able to adjust the EQ mode and parameters such as, for example, base (bas)/mid (mid)/treble (tre). ➤ Press on the display or the SEL button on the remote control to set the equalizer or fader/balance. -
Page 54: Opening Settings
System settings MC402 12.2 Opening settings ➤ Press the button on the display in the SOURCE menu (see chapter “Selecting the audio/video source” on page 29) 12.3 General menu settings Symbol Description Displays the SOURCE menu 12:58 Current time Language: Setting the language ➤... - Page 55 MC402 System settings Symbol Description Calibration Calibrate the touch screen as follows: ➤ Press calibration. ➤ Press start. ➤ Touch the display on the +-symbol in the centre for 2 seconds to start the calibration. The +-symbol moves in five steps and produces a path which you have to follow with the finger.
-
Page 56: Time Settings Menu
System settings MC402 12.4 Time settings menu Symbol Description Displays the SOURCE menu 00:04 Current time Date ➤ Set the day, month and year with the button. ➤ Set the format for the time display Time Mode 12 hour (12H) or 24 hours (24H) display. Time ➤... -
Page 57: Sound Settings Menu
MC402 System settings 12.5 Sound settings menu Symbol Description Displays the SOURCE menu 13:02 Current time ➤ Set the crossover frequency of the subwoofers to Flat, 80 Hz, Sub Woofer Filter 120 Hz or 160 Hz. ➤ Set the loud function to ON or OFF. Loud When ON is selected, the bass and treble frequencies will be increased at lower volumes. -
Page 58: Video Settings Menu
System settings MC402 12.6 Video settings menu Symbol Description Displays the SOURCE menu 13:02 Current time ➤ Set the mirror function to Normal or Mirror. Backview Mirror In the mirror image, the image from the reversing video camera will be displayed as if you were looking out of the rear window. ➤... -
Page 59: Disc Settings Menu
MC402 System settings 12.7 Disc settings menu Symbol Description Displays the SOURCE menu 13:03 Current time ➤ Press the **** button to open the number field. Set Password You can set up a password that must be entered in order to play videos with an age rating. - Page 60 System settings MC402 Symbol Description ➤ Set the desired subtitle language. DVD Subtitle If the DVD has the present language for subtitles within its range of languages, it will be automatically played in this language. ➤ Set the desired menu language. Disc Menu If the DVD has the present language within its range of languages, the menu will automatically be displayed in this language.
-
Page 61: Volume Settings Menu
MC402 System settings 12.8 Volume settings menu Symbol Description Displays the SOURCE menu 13:04 Current time Media The volume can be set at levels of 0–12. Radio The radio volume can be set at levels of 0–12. Bluetooth The Bluetooth volume can be set at levels of 0–12. AV-IN1 The volume for AV-IN1 can be set at levels of 0–12. -
Page 62: Use Of Steering Wheel Control (Optional)
Cleaning and caring for the moniceiver MC402 12.10 Use of steering wheel control (optional) SWC menu Setting steering wheel control ➤ Press the SWC (Steering Wheel Control) button on the display in the SOURCE menu (see chapter “Selecting the audio/video source” on page 29). Programming the steering wheel control ➤... -
Page 63: Troubleshooting
MC402 Troubleshooting Troubleshooting Problem Cause Remedy The device will not switch on. The vehicle is not switched Switch the ignition to ACC/ON or START. The cables have not been Check whether the cables connected correctly. are correctly connected. The fuse is faulty. Replace the fuse with a new one of the same type (5 A). -
Page 64: Warranty
Warranty MC402 Problem Cause Remedy The USB flash drive or The USB flash drive or Insert the USB flash drive or memory card cannot be memory card have been memory card the other way inserted. inserted the wrong way round. round. -
Page 65: Technical Data
MC402 Technical data Technical data PerfectView MC402 Ref. no.: 9600000350 Operating voltage: 12 Vg (10.5 V–15.8 V) Max. operating voltage 15 A Maximum output power: 40 W x 4 channels Constant output power: 25 W x 4 channels Operating temperature: –10 to 60 °C... - Page 66 Technical data MC402 Disc-Player Signal/noise ratio: 80 dB Dynamic range: 80 dB ≤ 1,0 % Distortion factor: Frequency response (+3 dB): 20 Hz – 20 kHz 4 Ω Input impedance: Display Resolution: 800 x 480 Display size: 6.2" (diagonal), 16:9 Brightness: 280 cd/m AUX IN...
- Page 67 MC402 Technical data Approvals The device has E4 certification.
- Page 68 Dometic (Pty) Ltd. Dometic Austria GmbH MEXICO Regional Office Neudorferstraße 108 Dometic Mx, S. de R. L. de C. V. South Africa & Sub-Saharan Africa A-2353 Guntramsdorf Circuito Médicos No. 6 Local 1 2 Avalon Road +43 2236 908070 Colonia Ciudad Satélite...
Need help?
Do you have a question about the 9600000350 and is the answer not in the manual?
Questions and answers
Mistä löydän radion koodin?