Table of Contents
Advertisement
Quick Links
Thank you for purchasing a Panasonic product.
This document explains how to configure the access point, front door camera and
optional outdoor camera using a mobile device. These steps must be followed
before you can use the system.
For details about how to use the system, refer to the User's Guide (page 32).
Charge the cameras for about 7 hours before camera installation (page 22).
Please read this document before using the unit and save it for future reference.
For assistance, please contact us at 1-800-272-7033 or visit our Web site:
http://shop.panasonic.com/support for customers in the U.S.A.
Please register your product: http://shop.panasonic.com/support
Printed in China
HN1007_(en_en)_0308_ver.020.pdf
Home Monitoring Camera
HomeHawk Front Door/Outdoor
1
Installation Guide
KX-HN1007
Model No.
2018/03/07
16:48:48
Advertisement
Table of Contents

Related Manuals for Panasonic KX-HN1007


Summary of Contents for Panasonic KX-HN1007
- Page 1 HomeHawk Front Door/Outdoor KX-HN1007 Model No. Thank you for purchasing a Panasonic product. This document explains how to configure the access point, front door camera and optional outdoor camera using a mobile device. These steps must be followed before you can use the system.
-
Page 2: Table Of Contents
Table of Contents Introduction Limited Warranty (ONLY FOR U.S.A.) ..36 Model composition ........3 Accessory information ........3 Expanding your camera .......4 Important Information Graphical symbols for use on equipment and their descriptions ..........5 About this system .........5 For your safety ..........5 Important safety instructions ......7 Security cautions ..........7 For best performance ........8... -
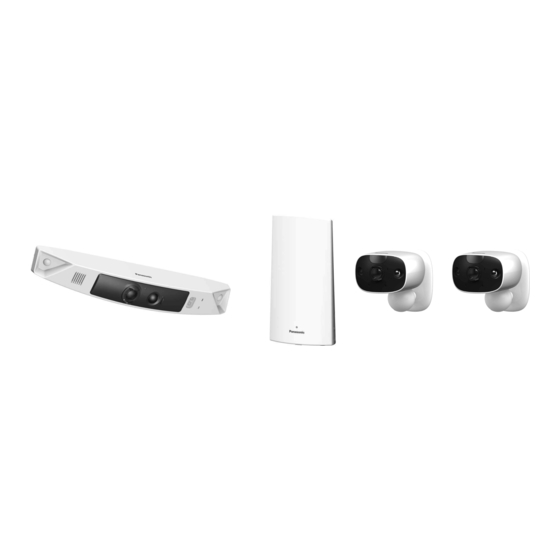
Page 3: Model Composition
The supplied screws can be used as follows. – 3 screws for the front door camera – 2 screws for each wall mounting adaptor for outdoor camera – 1 screw for suspension wire tool For assistance, please visit http://shop.panasonic.com/support HN1007_(en_en)_0308_ver.020.pdf 2018/03/07 16:48:49... -
Page 4: Expanding Your Camera
R HomeHawk Outdoor is referred to as outdoor camera or camera in this document. Expanding your camera Outdoor camera (optional): KX-HNC710 You can expand your camera system by registering optional camera units (16 max.) to the access point. For assistance, please visit http://shop.panasonic.com/support HN1007_(en_en)_0308_ver.020.pdf 2018/03/07 16:48:49... -
Page 5: Important Information
R This system is an auxiliary system; it is not WARNING designed to provide complete protection from property loss. Panasonic will not be Power connection held responsible in the event that property loss occurs while this system is in operation. - Page 6 *IP6X indicates that the product is protected against grit and dust: this product has shown the capabilities of preventing For assistance, please visit http://shop.panasonic.com/support HN1007_(en_en)_0308_ver.020.pdf 2018/03/07 16:48:49...
-
Page 7: Important Safety Instructions
Take appropriate measures to avoid the R If this product experiences a power outage, following security breaches when using this its date and time setting may become product. For assistance, please visit http://shop.panasonic.com/support HN1007_(en_en)_0308_ver.020.pdf 2018/03/07 16:48:49... -
Page 8: For Best Performance
R Do not place heavy objects on top of the R Wipe the outer surface of the product with a product. soft moist cloth. R When you leave the product unused for a long period of time, do as follows: For assistance, please visit http://shop.panasonic.com/support HN1007_(en_en)_0308_ver.020.pdf 2018/03/07 16:48:49... - Page 9 Notice for built-in battery ATTENTION: A lithium ion battery that is recyclable powers the product you have purchased. Please call For assistance, please visit http://shop.panasonic.com/support HN1007_(en_en)_0308_ver.020.pdf 2018/03/07 16:48:49...
- Page 10 (B). Battery Stickers R Perform steps A to H, lift the battery ( Battery and then remove it. R Perform steps A to F, lift the battery ( and then remove it. For assistance, please visit http://shop.panasonic.com/support HN1007_(en_en)_0308_ver.020.pdf 2018/03/07 16:48:49...
- Page 11 Important Information Notice For assistance, please visit http://shop.panasonic.com/support HN1007_(en_en)_0308_ver.020.pdf 2018/03/07 16:48:49...
-
Page 12: Installation Location
R The camera’s sensor features are not designed to be used in situations that require high reliability. We do not recommend use of the sensor features in these situations. R Panasonic takes no responsibility for any injury or damage caused by the use of the camera’s sensor features. -
Page 13: Information About Night Vision Mode
The visibility range for [Monochrome] in dark conditions is longer than for [Color]. R If the camera is installed in front of a window and points directly at the window, images may be poor when night vision mode is active. For assistance, please visit http://shop.panasonic.com/support HN1007_(en_en)_0308_ver.020.pdf 2018/03/07... -
Page 14: Installation Location Examples
Only visitors pass in front of the camera and there are no objects to cause false detections. Note: R The visual detection range is as follows. – Horizontal: 150° – Vertical: 85° For assistance, please visit http://shop.panasonic.com/support HN1007_(en_en)_0308_ver.020.pdf 2018/03/07 16:48:49... - Page 15 Visitors pass in front of the camera from side to side, cars in the street are less likely to cause false detections. Note: R The visual detection range is as follows. – Horizontal: 150° – Vertical: 85° For assistance, please visit http://shop.panasonic.com/support HN1007_(en_en)_0308_ver.020.pdf 2018/03/07 16:48:49...
- Page 16 R To prevent faces from being obscured by tall vehicles, adjust the installation position and angle of the camera. Note: R The visual detection range is as follows. – Horizontal: 150° – Vertical: 85° For assistance, please visit http://shop.panasonic.com/support HN1007_(en_en)_0308_ver.020.pdf 2018/03/07 16:48:49...
-
Page 17: Do Not Install In These Locations
– Bright areas such as those exposed to walkways (outdoor camera) direct sunlight R Areas where objects such as trees or hanging laundry move due to wind For assistance, please visit http://shop.panasonic.com/support HN1007_(en_en)_0308_ver.020.pdf 2018/03/07 16:48:49... -
Page 18: Setup
You can configure the access point so that its LED indicator does not light during normal operation. For more information, refer to the User’s Guide (page 32). It may take some time for the access point to finish starting up. For assistance, please visit http://shop.panasonic.com/support HN1007_(en_en)_0308_ver.020.pdf 2018/03/07... - Page 19 B Speaker I Lock key C Lens J micro-USB connector D Light sensor K Charging LED indicator E White LED lens L MSETUPN F LED indicator M Power slide switch G Microphone For assistance, please visit http://shop.panasonic.com/support HN1007_(en_en)_0308_ver.020.pdf 2018/03/07 16:48:49...
- Page 20 C Infrared sensors J Power slide switch D LED indicator K Charging LED indicator E Microphone L Camera nut F Light sensor M USB cover/micro-USB connector G Interface cover N Wall mounting adaptor For assistance, please visit http://shop.panasonic.com/support HN1007_(en_en)_0308_ver.020.pdf 2018/03/07 16:48:49...
- Page 21 The LED indicator lights in amber for 5 seconds after the power is turned on for the camera. The signal level (strong, good, weak, out of range) is shown after pressing MSETUPN for 3 seconds. For assistance, please visit http://shop.panasonic.com/support HN1007_(en_en)_0308_ver.020.pdf 2018/03/07...
-
Page 22: Setup Overview
10 seconds, perform the following. – If you are not using the supplied USB cable, use it. – If the indicator still turns off within 10 seconds, try connecting the USB cable For assistance, please visit http://shop.panasonic.com/support HN1007_(en_en)_0308_ver.020.pdf 2018/03/07 16:48:49... -
Page 23: Turning The Power On For The Cameras
If the indicator stops blinking and turns off iPhone, iPad users within 10 seconds, perform the following. Search for “Panasonic HomeHawk”. iPad – If you are not using the supplied USB users should search in the “iPhone only” cable, use it. -
Page 24: Connections For Access Point
– Make sure your access point and mobile device are connected to your wireless router – Make sure your mobile device can connect to the Internet For assistance, please visit http://shop.panasonic.com/support HN1007_(en_en)_0308_ver.020.pdf 2018/03/07 16:48:50... -
Page 25: Registering The Cameras
You can register each camera by using the R When registration is completed, the registration buttons or the [HomeHawk] app. camera sounds one long beep. Note: R If registration fails, the camera sounds several short beeps. For assistance, please visit http://shop.panasonic.com/support HN1007_(en_en)_0308_ver.020.pdf 2018/03/07 16:48:50... -
Page 26: Confirming The Camera Installation Area
If this is not possible due to the thickness of the siding, use commercially-available screws ø4 mm ´ longer than 25 mm (ø inches ´ longer than 1 inch). For assistance, please visit http://shop.panasonic.com/support HN1007_(en_en)_0308_ver.020.pdf 2018/03/07 16:48:50... - Page 27 R Do not use the included screws. R Consult the builder or licensed professional regarding the type of anchor appropriate for the installation location and materials. R Do not install on gypsum board or concrete blocks. For assistance, please visit http://shop.panasonic.com/support HN1007_(en_en)_0308_ver.020.pdf 2018/03/07 16:48:50...
- Page 28 Rotate the camera towards the wall (A), and then pull it away from the wall mounting adaptor (B). Important: R Make sure to close the interface cover securely. Weatherproofness cannot be assured if the interface cover is open. For assistance, please visit http://shop.panasonic.com/support HN1007_(en_en)_0308_ver.020.pdf 2018/03/07 16:48:50...
- Page 29 R Use the following template when determining the location of the screw holes. 25.4 mm (1 inch) Important: R Make sure to close the interface cover securely. Weatherproofness cannot be assured if the interface cover is open. For assistance, please visit http://shop.panasonic.com/support HN1007_(en_en)_0308_ver.020.pdf 2018/03/07 16:48:50...
-
Page 30: Testing The Motion Detection Range
R Attach the safety wire high on the wall so that the camera does not strike anyone in the event the camera detaches from the wall. R Do not hang from the camera or wall mounting adaptor. For assistance, please visit http://shop.panasonic.com/support HN1007_(en_en)_0308_ver.020.pdf 2018/03/07 16:48:50... -
Page 31: Registering Another Mobile Device
[OK]. When prompted, enter a name for your mobile device and then tap [OK]. R The app’s home screen is displayed when initial setup is completed. For assistance, please visit http://shop.panasonic.com/support HN1007_(en_en)_0308_ver.020.pdf 2018/03/07 16:48:50... -
Page 32: Appendix
Front door camera/Outdoor camera: 172° R Motion detection method https://panasonic.net/cns/pcc/support/ Pyroelectric infrared sensor (PIR sensor) homehawk/manual/ and visual sensor R Microsoft ® Windows ® Internet Explorer ® and earlier versions are not supported. For assistance, please visit http://shop.panasonic.com/support HN1007_(en_en)_0308_ver.020.pdf 2018/03/07 16:48:50... -
Page 33: Open Source Software Notice For Access Point
IP65 At least three (3) years from delivery of this R Dimensions (height × width × depth) product, Panasonic Corporation will give to Access point: any third party who contacts us at the Approx. 179 mm ´ 94 mm ´ 52 mm (7 contact information provided below, for a inches ´... -
Page 34: Fcc And Other Information
KX-HNB700 NOTE: Responsible Party: This equipment has been tested and found to Panasonic Corporation of North America comply with the limits for a Class B digital Two Riverfront Plaza, device, pursuant to Part 15 of the FCC Rules. Newark, NJ 07102-5490 These limits are designed to provide http://www.panasonic.com/contactinfo... -
Page 35: Customer Services
Appendix Customer services Shop Accessories! for all your Panasonic gear Go to http://shop.panasonic.com/support Get everything you need to get the most out of your Panasonic products Accessories & Parts for your Camera, Phone, A/V products, TV, Computers & Networking, Personal Care, Home Appliances, Headphones, Ba eries, Backup Chargers &... - Page 36 If your product does not work properly because of a defect in materials or workmanship, Panasonic Corporation of North America (referred to as “the warrantor”) will, for the length of the period indicated on the chart below, which starts with the date of original purchase (“warranty period”), at its option either (a) repair your product with new or refurbished parts,...
- Page 37 Service Center. If the problem is not handled to your satisfaction, then write to: Consumer Affairs Department Panasonic Corporation of North America 661 Independence Pkwy Chesapeake, VA 23320 PARTS AND SERVICE, WHICH ARE NOT COVERED BY THIS LIMITED WARRANTY, ARE YOUR RESPONSIBILITY.
- Page 38 Turn the power slide switch of the camera ON/OFF. Use the HomeHawk app to access the User’s Guide. and refer to the Troubleshooting section. Visit our Web site: http://shop.panasonic.com/support • FAQ and troubleshooting hints are available. For your future reference We recommend keeping a record of the following information to assist with any repair under warranty.
Need help?
Do you have a question about the KX-HN1007 and is the answer not in the manual?
Questions and answers