Table of Contents
Advertisement
Available languages
Available languages
Quick Links
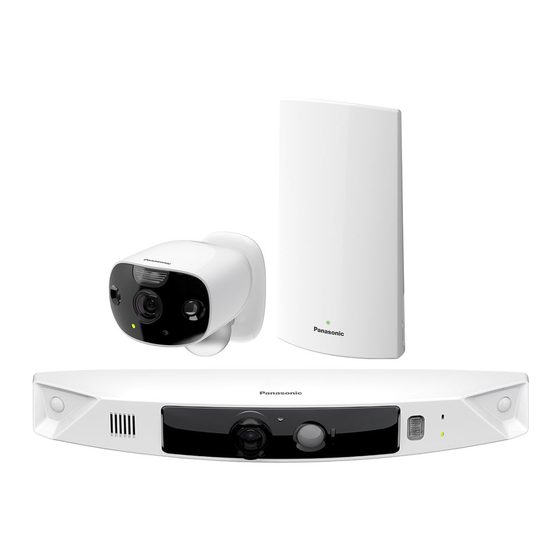
Model shown is KX-HN7001.
Thank you for purchasing a Panasonic product.
This document explains how to configure the access point, front door camera and
optional outdoor camera using a mobile device. These steps must be followed
before you can use the system.
For details about how to use the system, refer to the User's Guide (page 32).
Charge the cameras for about 7 hours before camera installation (page 22).
Please read this document before using the unit and save it for future reference.
For assistance, please contact us at 1-800-272-7033 or visit our Web site:
http://shop.panasonic.com/support for customers in the U.S.A.
Please register your product: http://shop.panasonic.com/support
Printed in China
Home Monitoring Camera
HomeHawk Front Door
HomeHawk Front Door/Outdoor
Installation Guide
Model No.
KX-HN7001
Model No.
KX-HN7002
KX-HN7003
Advertisement
Chapters
Table of Contents

Related Manuals for Panasonic KX-HN7001


Summary of Contents for Panasonic KX-HN7001
-
Page 1: Installation Guide
KX-HN7002 KX-HN7003 Model shown is KX-HN7001. Thank you for purchasing a Panasonic product. This document explains how to configure the access point, front door camera and optional outdoor camera using a mobile device. These steps must be followed before you can use the system. -
Page 2: Table Of Contents
Table of Contents Introduction Limited Warranty (ONLY FOR U.S.A.) ..36 Model composition ........3 Accessory information ........3 Expanding your camera .......4 Important Information Graphical symbols for use on equipment and their descriptions ..........5 About this system .........5 For your safety ..........5 Important safety instructions ......7 Security cautions ..........7 For best performance ........8... -
Page 3: Model Composition
The supplied screws can be used as follows. – 3 screws for the front door camera – 2 screws for each wall mounting adaptor for outdoor camera – 1 screw for suspension wire tool For assistance, please visit http://shop.panasonic.com/support... -
Page 4: Expanding Your Camera
R HomeHawk Outdoor is referred to as outdoor camera or camera in this document. Expanding your camera Outdoor camera (optional): KX-HNC710 You can expand your camera system by registering optional camera units (16 max.) to the access point. For assistance, please visit http://shop.panasonic.com/support... -
Page 5: Important Information
R This system is an auxiliary system; it is not WARNING designed to provide complete protection from property loss. Panasonic will not be Power connection held responsible in the event that property loss occurs while this system is in operation. - Page 6 In the event they are code, do not intentionally expose it to grit swallowed, seek medical advice and dust. immediately. *IP6X indicates that the product is protected against grit and dust: this product has shown the capabilities of preventing For assistance, please visit http://shop.panasonic.com/support...
-
Page 7: Important Safety Instructions
R If this product experiences a power outage, following security breaches when using this its date and time setting may become product. incorrect. In this case, the date and time – Leaks of private information For assistance, please visit http://shop.panasonic.com/support... -
Page 8: For Best Performance
R Do not place heavy objects on top of the product. R Wipe the outer surface of the product with a R When you leave the product unused for a soft moist cloth. long period of time, do as follows: For assistance, please visit http://shop.panasonic.com/support... - Page 9 Notice for built-in battery ATTENTION: A lithium ion battery that is recyclable powers the product you have purchased. Please call For assistance, please visit http://shop.panasonic.com/support...
- Page 10 R Remove the stickers (A) before removing the screws (B). Battery Stickers R Perform steps A to H, lift the battery ( Battery and then remove it. R Perform steps A to F, lift the battery ( and then remove it. For assistance, please visit http://shop.panasonic.com/support...
- Page 11 Important Information Notice For assistance, please visit http://shop.panasonic.com/support...
-
Page 12: Installation Location
R The camera’s sensor features are not designed to be used in situations that require high reliability. We do not recommend use of the sensor features in these situations. R Panasonic takes no responsibility for any injury or damage caused by the use of the camera’s sensor features. -
Page 13: Information About Night Vision Mode
The visibility range for [Monochrome] in dark conditions is longer than for [Color]. R If the camera is installed in front of a window and points directly at the window, images may be poor when night vision mode is active. For assistance, please visit http://shop.panasonic.com/support... -
Page 14: Installation Location Examples
Only visitors pass in front of the camera and there are no objects to cause false detections. Note: R The visual detection range is as follows. – Horizontal: 150° – Vertical: 85° For assistance, please visit http://shop.panasonic.com/support... - Page 15 Visitors pass in front of the camera from side to side, cars in the street are less likely to cause false detections. Note: R The visual detection range is as follows. – Horizontal: 150° – Vertical: 85° For assistance, please visit http://shop.panasonic.com/support...
- Page 16 R To prevent faces from being obscured by tall vehicles, adjust the installation position and angle of the camera. Note: R The visual detection range is as follows. – Horizontal: 150° – Vertical: 85° For assistance, please visit http://shop.panasonic.com/support...
-
Page 17: Do Not Install In These Locations
– Bright areas such as those exposed to walkways (outdoor camera) direct sunlight R Areas where objects such as trees or hanging laundry move due to wind For assistance, please visit http://shop.panasonic.com/support... -
Page 18: Setup
You can configure the access point so that its LED indicator does not light during normal operation. For more information, refer to the User’s Guide (page 32). It may take some time for the access point to finish starting up. For assistance, please visit http://shop.panasonic.com/support... - Page 19 H Interface cover B Speaker I Lock key C Lens J micro-USB connector D Light sensor K Charging LED indicator E White LED lens L MSETUPN F LED indicator M Power slide switch G Microphone For assistance, please visit http://shop.panasonic.com/support...
- Page 20 I MSETUPN C Infrared sensors J Power slide switch D LED indicator K Charging LED indicator E Microphone L Camera nut F Light sensor M USB cover/micro-USB connector G Interface cover N Wall mounting adaptor For assistance, please visit http://shop.panasonic.com/support...
- Page 21 The LED indicator lights in amber for 5 seconds after the power is turned on for the camera. The signal level (strong, good, weak, out of range) is shown after pressing MSETUPN for 3 seconds. For assistance, please visit http://shop.panasonic.com/support...
-
Page 22: Setup Overview
If the indicator stops blinking and turns off within 10 seconds, perform the following. – If you are not using the supplied USB cable, use it. – If the indicator still turns off within 10 seconds, try connecting the USB cable For assistance, please visit http://shop.panasonic.com/support... -
Page 23: Turning The Power On For The Cameras
If the indicator stops blinking and turns off iPhone, iPad users within 10 seconds, perform the following. Search for “Panasonic HomeHawk”. iPad – If you are not using the supplied USB users should search in the “iPhone only” cable, use it. -
Page 24: Connections For Access Point
LED indicator is blinking quickly in amber or lit in green – Make sure your access point and mobile device are connected to your wireless router – Make sure your mobile device can connect to the Internet For assistance, please visit http://shop.panasonic.com/support... -
Page 25: Registering The Cameras
You can register each camera by using the R When registration is completed, the registration buttons or the [HomeHawk] app. camera sounds one long beep. KX-HN7002/KX-HN7003 (page 3) For assistance, please visit http://shop.panasonic.com/support... -
Page 26: Confirming The Camera Installation Area
Make sure you mount the camera in a location where the structure behind the siding can be used to support the weight of the camera. If this is not possible due to the thickness of the siding, For assistance, please visit http://shop.panasonic.com/support... - Page 27 R Do not use the included screws. R Consult the builder or licensed professional regarding the type of anchor appropriate for the installation location and materials. R Do not install on gypsum board or concrete blocks. For assistance, please visit http://shop.panasonic.com/support...
- Page 28 Rotate the camera towards the wall (A), and then pull it away from the wall mounting adaptor (B). Important: R Make sure to close the interface cover securely. Water resistance cannot be assured if the interface cover is open. For assistance, please visit http://shop.panasonic.com/support...
- Page 29 R Use the following template when determining the location of the screw holes. 25.4 mm (1 inch) Important: R Make sure to close the interface cover securely. Water resistance cannot be assured if the interface cover is open. For assistance, please visit http://shop.panasonic.com/support...
-
Page 30: Testing The Motion Detection Range
R Attach the safety wire high on the wall so that the camera does not strike anyone in the event the camera detaches from the wall. R Do not hang from the camera or wall mounting adaptor. For assistance, please visit http://shop.panasonic.com/support... -
Page 31: Registering Another Mobile Device
[OK]. When prompted, enter a name for your mobile device and then tap [OK]. R The app’s home screen is displayed when initial setup is completed. For assistance, please visit http://shop.panasonic.com/support... -
Page 32: Appendix
R Angular field of view (camera angle) Front door camera/Outdoor camera: https://panasonic.net/cns/pcc/support/ 172° homehawk/manual/ R Motion detection method ® ® ® R Microsoft Windows Internet Explorer Pyroelectric infrared sensor (PIR sensor) and earlier versions are not supported. and visual sensor For assistance, please visit http://shop.panasonic.com/support... -
Page 33: Open Source Software Notice For Access Point
IP65 At least three (3) years from delivery of this R Dimensions (height × width × depth) product, Panasonic Corporation will give to Access point: any third party who contacts us at the Approx. 179 mm ´ 94 mm ´ 52 mm (7 contact information provided below, for a inches ´... -
Page 34: Fcc And Other Information
KX-HNB700 NOTE: Responsible Party: This equipment has been tested and found to Panasonic Corporation of North America comply with the limits for a Class B digital Two Riverfront Plaza, device, pursuant to Part 15 of the FCC Rules. Newark, NJ 07102-5490 These limits are designed to provide http://www.panasonic.com/contactinfo... -
Page 35: Customer Services
Appendix Customer services Shop Accessories! for all your Panasonic gear Go to http://shop.panasonic.com/support Get everything you need to get the most out of your Panasonic products Accessories & Parts for your Camera, Phone, A/V products, TV, Computers & Networking, Personal Care, Home Appliances, Headphones, Ba eries, Backup Chargers &... - Page 36 If your product does not work properly because of a defect in materials or workmanship, Panasonic Corporation of North America (referred to as “the warrantor”) will, for the length of the period indicated on the chart below, which starts with the date of original purchase (“warranty period”), at its option either (a) repair your product with new or refurbished parts,...
- Page 37 Service Center. If the problem is not handled to your satisfaction, then write to: Consumer Affairs Department Panasonic Corporation of North America 661 Independence Pkwy Chesapeake, VA 23320 PARTS AND SERVICE, WHICH ARE NOT COVERED BY THIS LIMITED WARRANTY, ARE YOUR RESPONSIBILITY.
- Page 38 Notes...
- Page 39 Notes...
- Page 40 Turn the power slide switch of the camera ON/OFF. Use the HomeHawk app to access the User’s Guide. and refer to the Troubleshooting section. Visit our Web site: http://shop.panasonic.com/support • FAQ and troubleshooting hints are available. For your future reference We recommend keeping a record of the following information to assist with any repair under warranty.
- Page 41 Lea este documento antes de usar la unidad, y guárdelo para consultarlo en el futuro. Para obtener ayuda, comuníquese con nosotros llamando al 1-800-272-7033 o visite nuestro sitio web: http://shop.panasonic.com/support para clientes en los EE. UU. (solo en inglés) Por favor, registre su producto: http://shop.panasonic.com/support...
- Page 42 Tabla de Contenido Ubicación de la instalación Alcance de la comunicación inalámbrica .....3 Información acerca de las características del sensor ..............3 Información acerca del modo de visión nocturna ...............4 Ejemplos de ubicaciones para instalación ...5 No instale en las ubicaciones siguientes .....8 Configuración Nombres de los componentes y funciones ..9 Resumen de configuración ........13...
-
Page 43: Ubicación De La Instalación
No recomendamos el uso de las características del sensor en esas situaciones. R Panasonic no asume ninguna responsabilidad por lesiones o daños provocados por el uso de las características del sensor de la cámara. Método de detección... -
Page 44: Información Acerca Del Modo De Visión Nocturna
(Rango angosto)]. R Si la cámara está instalada frente a una ventana y apunta directamente a la ventana, es posible que la calidad de las imágenes sea baja cuando el modo de visión nocturna esté activo. Para obtener ayuda, visite http://shop.panasonic.com/support... -
Page 45: Ejemplos De Ubicaciones Para Instalación
Solo los visitantes pasan en frente de la cámara y no hay objetos que causen detecciones falsas. Nota: R El rango de detección visual es el siguiente. – Horizontal: 150° – Vertical: 85° Para obtener ayuda, visite http://shop.panasonic.com/support... - Page 46 Los visitantes pasan en frente de la cámara de la- do a lado, y es poco probable que los vehículos en la calle generen detecciones falsas. Nota: R El rango de detección visual es el siguiente. – Horizontal: 150° – Vertical: 85° Para obtener ayuda, visite http://shop.panasonic.com/support...
- Page 47 R Para evitar que los vehículos altos oscurezcan los rostros, ajuste la posición de instalación y el ángulo de la cámara. Nota: R El rango de detección visual es el siguiente. – Horizontal: 150° – Vertical: 85° Para obtener ayuda, visite http://shop.panasonic.com/support...
-
Page 48: No Instale En Las Ubicaciones Siguientes
– Áreas brillantes como aquellas expuestas a directa y frontal a la cámara, como en pasillos la luz del sol angostos (cámara exterior) R Áreas donde objetos como árboles o ropa colgada se mueven por efecto del viento (es Para obtener ayuda, visite http://shop.panasonic.com/support... -
Page 49: Configuración
Puede configurar el punto de acceso de forma tal que el Led indicador no se encienda durante el funcionamiento normal. Para obtener más información, consulte la Guía del usuario (página 22). Es posible que el punto de acceso tarde un tiempo en terminar de iniciar. Para obtener ayuda, visite http://shop.panasonic.com/support... - Page 50 B Altavoz I Tecla de bloqueo C Lente J Conector micro-USB D Sensor de luz K Carga de Led indicador E Lente LED blanco L MSETUPN (Configuración) F Led indicador M Interruptor de encendido G Micrófono Para obtener ayuda, visite http://shop.panasonic.com/support...
- Page 51 J Interruptor de encendido D Led indicador K Carga de Led indicador E Micrófono L Tuerca de cámara F Sensor de luz M Tapa USB/conector micro-USB G Tapa de interfaz N Adaptador de instalación en pared Para obtener ayuda, visite http://shop.panasonic.com/support...
- Page 52 El indicador LED se ilumina en ámbar durante 5 segundos después de que se encienda la alimentación para la cámara. El nivel de la señal (fuerte, bueno, débil, fuera del alcance) se muestra después de presionar MSETUPN (Configuración) durante 3 segundos. Para obtener ayuda, visite http://shop.panasonic.com/support...
-
Page 53: Resumen De Configuración
Si el indicador deja de parpadear y se apaga rango. dentro de los siguientes 10 segundos, realice lo siguiente. – Si no está usando el cable USB suministrado, úselo. Para obtener ayuda, visite http://shop.panasonic.com/support... -
Page 54: Cómo Encender La Alimentación Para Las Cámaras
10 segundos, realice lo Usuarios de iPhone y iPad siguiente. Busque “Panasonic HomeHawk”. Los usuarios de – Si no está usando el cable USB iPad deberán buscar en la categoría “solo para suministrado, úselo. iPhone”. -
Page 55: Conexiones Para El Punto De Acceso
– Asegúrese de haber instalado la aplicación [HomeHawk] en su dispositivo móvil – Asegúrese de que el punto de acceso y su enrutador inalámbrico estén encendidos y que el Led indicador del punto de acceso esté encendido en ámbar o verde Para obtener ayuda, visite http://shop.panasonic.com/support... -
Page 56: Cómo Registrar Las Cámaras
Cámara exterior D) parpadee lentamente en introduzca un nombre para el punto de acceso verde. y para el dispositivo móvil y toque [Aceptar]. R Aparecerá la pantalla de inicio de la aplicación una vez completada la configuración inicial. Para obtener ayuda, visite http://shop.panasonic.com/support... -
Page 57: Confirmación Del Área De Instalación De La Cámara
R Lea con atención las instrucciones suministradas con los taquetes. Siga las instrucciones sobre el diámetro de la broca, profundidad del orificio, etc. R Taladre un orificio guía. Retire todos los restos después de taladrar el orificio guía. Para obtener ayuda, visite http://shop.panasonic.com/support... - Page 58 R Taladre un orificio guía. Retire todos los restos después de taladrar el orificio guía. R Selle el orificio guía con un sellador resistente al agua disponibles de forma comercial. Para obtener ayuda, visite http://shop.panasonic.com/support...
- Page 59 R Asegúrese de cerrar la tapa de la interfaz de forma segura. No se puede asegurar la resistencia al agua si la tapa de la interfaz está abierta. Uso del separador Use el separador suministrado para ajustar el ángulo de instalación de la cámara. Para obtener ayuda, visite http://shop.panasonic.com/support...
- Page 60 Coloque en la pared los tornillos de instalación en pared. Más largo que 25 mm (1 pulgada) Espacio de 2.8 mm ( pulgadas) Ajuste el ángulo de la cámara. Para obtener ayuda, visite http://shop.panasonic.com/support...
-
Page 61: Cómo Probar El Alcance De Detección De Movimiento
Guía del usuario (página 22). Cómo probar el micrófono Para probar el micrófono, hable fuerte y claro en el micrófono mientras un usuario de dispositivo móvil observa las imágenes en vivo desde la cámara. Para obtener ayuda, visite http://shop.panasonic.com/support... -
Page 62: Apéndice
R Se recomienda Android 4.1 y versiones posteriores. R También puede acceder a la Guía del usuario mediante la página web a continuación. https://panasonic.net/cns/pcc/support/ homehawk/manual/ R No se admite Microsoft ® Windows ® Internet ® Explorer 8 y versiones anteriores. Para obtener ayuda, visite http://shop.panasonic.com/support... - Page 63 Notas...
Need help?
Do you have a question about the KX-HN7001 and is the answer not in the manual?
Questions and answers