Table of Contents
Advertisement
Quick Links
Download this manual
See also:
Installation Manual
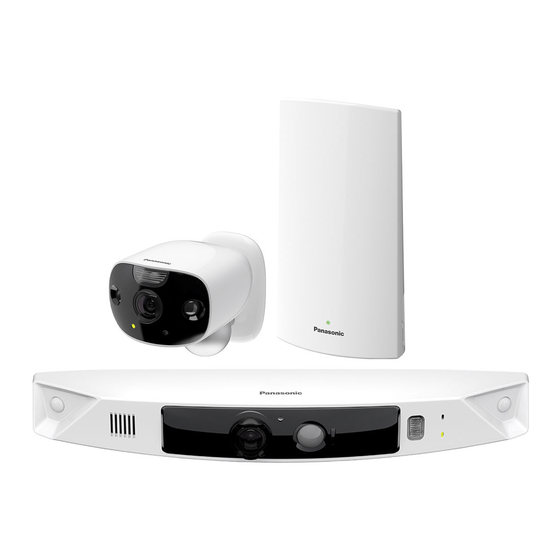
Model shown is KX-HN7001.
Thank you for purchasing a Panasonic product.
This document explains how to configure the access point, front door camera and
optional outdoor camera using a mobile device. These steps must be followed
before you can use the system.
For details about how to use the system, refer to the User's Guide (page 31).
Charge the batteries for about 8 hours before camera installation
(page 22).
Please read this document before using the unit and save it for future reference.
For assistance, please contact us at 1-800-272-7033 or visit our Web site:
http://shop.panasonic.com/support for customers in the U.S.A.
Please register your product: http://shop.panasonic.com/support
Printed in China
HN7001_(en_en)_1228_ver.030.pdf 1
Installation Guide
HomeHawk Front Door
Model No.
HomeHawk Front Door/Outdoor
Model No.
KX-HN7001
KX-HN7002
KX-HN7003
KX-HN1007
2017/12/28 16:21:52
Advertisement
Table of Contents

Subscribe to Our Youtube Channel
Related Manuals for Panasonic KX-HN7001


Summary of Contents for Panasonic KX-HN7001
- Page 1 KX-HN7003 KX-HN1007 Model shown is KX-HN7001. Thank you for purchasing a Panasonic product. This document explains how to configure the access point, front door camera and optional outdoor camera using a mobile device. These steps must be followed before you can use the system.
-
Page 2: Table Of Contents
Table of Contents Introduction Limited Warranty (ONLY FOR U.S.A.) ..36 Model composition ........3 Accessory information ........3 Expanding your camera .......5 Important Information Graphical symbols for use on equipment and their descriptions ..........6 About this system .........6 For your safety ..........6 Important safety instructions ......8 Security cautions ..........8 For best performance ........9... -
Page 3: Model Composition
The screw for attaching the safety wire to a wall or ceiling 10 mm inches)/xxxx – Screw safety wire: 1 The screw safety wire for attaching the safety wire to the camera For assistance, please visit http://shop.panasonic.com/support HN7001_(en_en)_1228_ver.030.pdf 3 2017/12/28 16:21:52... - Page 4 “microSD card” is used as a generic term for any of the supported cards. R HomeHawk Front Door is referred to as front door camera or camera in this document. R HomeHawk Outdoor is referred to as outdoor camera or camera in this document. For assistance, please visit http://shop.panasonic.com/support HN7001_(en_en)_1228_ver.030.pdf 4 2017/12/28 16:21:52...
-
Page 5: Expanding Your Camera
Introduction Expanding your camera Outdoor camera (optional): KX-HNC710 You can expand your camera system by registering optional camera units (16 max.) to the access point. For assistance, please visit http://shop.panasonic.com/support HN7001_(en_en)_1228_ver.030.pdf 5 2017/12/28 16:21:52... -
Page 6: Important Information
R This system is an auxiliary system; it is not WARNING designed to provide complete protection from property loss. Panasonic will not be Power connection held responsible in the event that property loss occurs while this system is in operation. - Page 7 *IP6X indicates that the product is protected against grit and dust: this product has shown the capabilities of preventing For assistance, please visit http://shop.panasonic.com/support HN7001_(en_en)_1228_ver.030.pdf 7 2017/12/28 16:21:52...
-
Page 8: Important Safety Instructions
R This product may be used in ways that encryption for all wireless communication. violate the privacy or publicity rights of R You may be vulnerable to security breaches if the unit is used with the login For assistance, please visit http://shop.panasonic.com/support HN7001_(en_en)_1228_ver.030.pdf 8 2017/12/28 16:21:52... -
Page 9: For Best Performance
-20 °C (-4 °F) actual colors. or greater than 50 °C (122 °F). Damp – When there is light behind the subject basements should also be avoided. (i.e., backlighting), faces may appear dark. For assistance, please visit http://shop.panasonic.com/support HN7001_(en_en)_1228_ver.030.pdf 9 2017/12/28 16:21:52... - Page 10 Remove the built-in rechargeable battery before disposing of the cameras. Do not dismantle or replace the battery so that you can use the camera again. This could cause For assistance, please visit http://shop.panasonic.com/support HN7001_(en_en)_1228_ver.030.pdf 10 2017/12/28 16:21:52...
- Page 11 Important Information n Outdoor camera Notice R Disconnect the power cord from the camera when removing the battery. R Perform steps (A) to (G), lift the battery, and then remove it. For assistance, please visit http://shop.panasonic.com/support HN7001_(en_en)_1228_ver.030.pdf 11 2017/12/28 16:21:52...
-
Page 12: Installation Location
R The camera’s sensor features are not designed to be used in situations that require high reliability. We do not recommend use of the sensor features in these situations. R Panasonic takes no responsibility for any injury or damage caused by the use of the camera’s sensor features. -
Page 13: Information About Night Vision Mode
The visibility range for [Monochrome] in dark conditions is longer than for [Color]. R If the camera is installed in front of a window and points directly at the window, images may be poor when night vision mode is active. For assistance, please visit http://shop.panasonic.com/support HN7001_(en_en)_1228_ver.030.pdf 13 2017/12/28 16:21:53... -
Page 14: Installation Location Examples
Flower vases on the side of the door are more likely to cause false detections. Note: R The visual detection range is as follows. – Horizontal: 150° – Vertical: 90° For assistance, please visit http://shop.panasonic.com/support HN7001_(en_en)_1228_ver.030.pdf 14 2017/12/28 16:21:53... - Page 15 – Horizontal: 150° – Vertical: 90° I want to detect people entering the garage Refer to the table below for detecting people entering a garage without detecting cars in the street. For assistance, please visit http://shop.panasonic.com/support HN7001_(en_en)_1228_ver.030.pdf 15 2017/12/28 16:21:53...
- Page 16 R To prevent faces from being obscured by tall vehicles, adjust the installation position and angle of the camera. Note: R The visual detection range is as follows. – Horizontal: 150° – Vertical: 90° For assistance, please visit http://shop.panasonic.com/support HN7001_(en_en)_1228_ver.030.pdf 16 2017/12/28 16:21:53...
-
Page 17: Do Not Install In These Locations
(outdoor camera) – Bright areas such as those exposed to R Areas where objects such as trees or direct sunlight hanging laundry move due to wind For assistance, please visit http://shop.panasonic.com/support HN7001_(en_en)_1228_ver.030.pdf 17 2017/12/28 16:21:53... -
Page 18: Setup
Green, blinking slowly Registration mode Green, blinking quickly IP address is not obtained, or accessing a microSD card Alternating: Updating completed Green, lit « Amber, lit Red, lit Registration failed For assistance, please visit http://shop.panasonic.com/support HN7001_(en_en)_1228_ver.030.pdf 18 2017/12/28 16:21:53... - Page 19 K Charging LED E White LED lens L MSETUPN button F LED indicator M Power slide switch G Microphone Used to connect the USB cable when charging. Used when performing initial setup. For assistance, please visit http://shop.panasonic.com/support HN7001_(en_en)_1228_ver.030.pdf 19 2017/12/28 16:21:53...
- Page 20 Registration successfully completed or signal level is strong Green, blinking quickly Camera is searching for an access point Red, lit Registration failed, signal level is weak , or detecting motion Red, blinking quickly Streaming data For assistance, please visit http://shop.panasonic.com/support HN7001_(en_en)_1228_ver.030.pdf 20 2017/12/28 16:21:53...
- Page 21 Green, blinking slowly Registration mode Red, blinking slowly Camera is out of range of the access point The signal level (strong, good, weak) is shown after pressing the MSETUPN button for 3 seconds. For assistance, please visit http://shop.panasonic.com/support HN7001_(en_en)_1228_ver.030.pdf 21 2017/12/28 16:21:53...
-
Page 22: Setup Overview
R Charge the battery in a location with a temperature between 5 °C and 40 °C. The battery cannot charge in locations outside of these temperatures. For assistance, please visit http://shop.panasonic.com/support HN7001_(en_en)_1228_ver.030.pdf 22 2017/12/28 16:21:53... -
Page 23: Turning The Power On For Cameras
Insert a microSD card into the units microSD card (C) slot. https://panasonic.net/cns/pcc/support/ homehawk Using your device’s app store iPhone, iPad users Search for “Panasonic HomeHawk”. iPad users should search in the “iPhone only” category. Android™ device users Search for “Panasonic HomeHawk”. Compatible mobile devices iPhone 5s or later or iPad ®... -
Page 24: Initial Setup
Next, follow the on-screen instructions, the AC adaptors of the access point and wait for a while, and then check the camera are connected and each device is color of the LED lights again. powered. For assistance, please visit http://shop.panasonic.com/support HN7001_(en_en)_1228_ver.030.pdf 24 2017/12/28 16:21:53... -
Page 25: Confirming The Camera Installation Area
User’s Guide (page 31). Confirming the camera installation area Before deciding where to install the camera, carefully read the chapter “Installation Location”, beginning on page 12, to confirm the installation location and direction. For assistance, please visit http://shop.panasonic.com/support HN7001_(en_en)_1228_ver.030.pdf 25 2017/12/28 16:21:53... - Page 26 R Drill a pilot hole. Remove any debris after drilling the pilot hole. R Seal the pilot hole with a commercially-available waterproof sealant. For assistance, please visit http://shop.panasonic.com/support HN7001_(en_en)_1228_ver.030.pdf 26 2017/12/28 16:21:53...
- Page 27 (F). Attach the camera to the wall mounting adaptor. Note: R Make sure to close the button cover securely. Water resistance cannot be assured if the button cover is open. For assistance, please visit http://shop.panasonic.com/support HN7001_(en_en)_1228_ver.030.pdf 27 2017/12/28 16:21:53...
- Page 28 Wall mounting screws 28 mm (1 inches) Drive the wall mounting screws into the wall. Longer than 20 mm ( inches) Space 1.3 mm ( inches) For assistance, please visit http://shop.panasonic.com/support HN7001_(en_en)_1228_ver.030.pdf 28 2017/12/28 16:21:53...
-
Page 29: Testing The Motion Detection Range
R Your mobile device will be registered Tap [Camera settings] and select the to the access point. camera to be tested. Tap [Detection] ® [Detection Test]. For assistance, please visit http://shop.panasonic.com/support HN7001_(en_en)_1228_ver.030.pdf 29 2017/12/28 16:21:53... - Page 30 R The mobile device name setting is used by the access point and other system users to identify your mobile device. This is useful when performing certain operations, such as deregistering. For assistance, please visit http://shop.panasonic.com/support HN7001_(en_en)_1228_ver.030.pdf 30 2017/12/28 16:21:53...
-
Page 31: Appendix
– Notification You can configure the camera to send a notification to the [HomeHawk] app when the camera detects motion. https://panasonic.net/cns/pcc/support/ homehawk/manual/ For assistance, please visit http://shop.panasonic.com/support HN7001_(en_en)_1228_ver.030.pdf 31 2017/12/28 16:21:53... -
Page 32: Specifications
1.0 megapixel CMOS R Mass (weight) R Minimum illuminance required Access point: Front door camera/Outdoor camera: Approx. 196 g (0.43 lb) IR-LED: 0 lx Front door camera: White LED: 1 lx For assistance, please visit http://shop.panasonic.com/support HN7001_(en_en)_1228_ver.030.pdf 32 2017/12/28 16:21:53... -
Page 33: Open Source Software Notice For Access Point
At least three (3) years from delivery of this product, Panasonic Corporation will give to any third party who contacts us at the contact information provided below, for a charge of no more than the cost of... -
Page 34: Fcc And Other Information
Model Number: KX-HNB700 reasonable protection against harmful Responsible Party: interference in a residential installation. This Panasonic Corporation of North America equipment generates, uses, and can radiate Two Riverfront Plaza, radio frequency energy and, if not installed Newark, NJ 07102-5490 and used in accordance with the instructions, http://www.panasonic.com/contactinfo... -
Page 35: Customer Services
Appendix Customer services Shop Accessories! for all your Panasonic gear Go to http://shop.panasonic.com/support Get everything you need to get the most out of your Panasonic products Accessories & Parts for your Camera, Phone, A/V products, TV, Computers & Networking, Personal Care, Home Appliances, Headphones, Ba eries, Backup Chargers &... - Page 36 If your product does not work properly because of a defect in materials or workmanship, Panasonic Corporation of North America (referred to as “the warrantor”) will, for the length of the period indicated on the chart below, which starts with the date of original purchase (“warranty period”), at its option either (a) repair your product with new or refurbished parts,...
- Page 37 Service Center. If the problem is not handled to your satisfaction, then write to: Consumer Affairs Department Panasonic Corporation of North America 661 Independence Pkwy Chesapeake, VA 23320 PARTS AND SERVICE, WHICH ARE NOT COVERED BY THIS LIMITED WARRANTY, ARE YOUR RESPONSIBILITY.
- Page 38 Notes HN7001_(en_en)_1228_ver.030.pdf 38 2017/12/28 16:21:54...
- Page 39 Notes HN7001_(en_en)_1228_ver.030.pdf 39 2017/12/28 16:21:54...
- Page 40 Turn the power switch of the camera ON/OFF. Use the HomeHawk app to access the User’s Guide. and refer to the Troubleshooting section. Visit our Web site: http://shop.panasonic.com/support • FAQ and troubleshooting hints are available. For your future reference We recommend keeping a record of the following information to assist with any repair under warranty.
Need help?
Do you have a question about the KX-HN7001 and is the answer not in the manual?
Questions and answers