Pioneer Super Tuner IIID AVIC-X710BT Operation Manual
Flash memory multimedia av navigation receiver
Hide thumbs
Also See for Super Tuner IIID AVIC-X710BT:
- Installation manual (58 pages) ,
- Quick start manual (2 pages) ,
- Brochure (9 pages)
Table of Contents
Advertisement
Operation Manual
FLASH MEMORY MULTIMEDIA AV NAVIGATION
RECEIVER
AVIC-X910BT
AVIC-X710BT
Notice to all users:
This software requires that the navigation system is
properly connected to your vehicle's parking brake and
depending on your vehicle, additional installation may
be required. For more information, please contact your
Authorized Pioneer Electronics retailer or call us at
(800) 421-1404.
English
Advertisement
Table of Contents

Related Manuals for Pioneer Super Tuner IIID AVIC-X710BT


Summary of Contents for Pioneer Super Tuner IIID AVIC-X710BT
-
Page 1: Operation Manual
This software requires that the navigation system is properly connected to your vehicle’s parking brake and depending on your vehicle, additional installation may be required. For more information, please contact your Authorized Pioneer Electronics retailer or call us at (800) 421-1404. English... -
Page 2: Table Of Contents
Contents Thank you for buying this Pioneer product. Please read through these operating instructions so you will know how to operate your model properly. After you have finished reading the instructions, keep this man- ual in a safe place for future reference. - Page 3 Contents – Changing the scale of the map 38 – Scrolling the map to the position you want to see 39 – Changing the tilt and rotation angle of the map 39 The basic flow of creating your route 40 Operating list screens (e.g.
- Page 4 Contents – Activating the MSN Direct function 65 Browsing gas prices 65 Browsing movie times 66 – Searching for a theater by selecting a movie title 66 – Searching for a movie title by selecting a theater 67 Browsing weather information 68 –...
- Page 5 Contents – Resuming playback (Bookmark) 93 – Searching for a specific scene and starting playback from a specified time 93 – Direct number search 93 – Operating the DVD menu 93 – Frame-by-frame playback 94 – Slow motion playback 94 Using the “Function”...
- Page 6 Contents – Switching between the detailed information display and the preset list display 121 – Storing and recalling broadcast frequencies 121 Using the “Function” menu 121 – Storing the strongest broadcast frequencies 121 – Tuning in strong signals 122 Using the HD Radio (Digital Radio) Reading the screen 123 Using the touch panel keys 123 –...
- Page 7 Contents Customizing preferences The options in the “Navi Settings” menu 143 – Basic operations in the “Navi Settings” menu 143 – GPS & Time Settings 143 – Time Settings 144 – POI Settings 145 – 3D Settings 145 – Map Settings 145 –...
- Page 8 Contents – Voice commands related to hands-free phoning 171 Tips for Voice Operation 172 Other functions Setting the anti-theft function 173 – Setting the password 173 – Entering the password 173 – Deleting the password 173 – Forgotten passwords 173 Returning the navigation system to the default or factory settings 174 –...
-
Page 9: Introduction
FCC ID : AJDK020 MODEL NO. : AVIC-X910BT IC : 775E-K020 FCC ID : AJDK020 MODEL NO. : AVIC-X710BT IC : 775E-K020 This device complies with Part 15 of FCC Rules and RSS-Gen of IC Rules. Operation is subject to the following two conditions: (1) this device... -
Page 10: License Agreement
Agreement. DISCLAIMER OF WARRANTY The Software and related documentation are provided to you “AS IS”. PIONEER AND ITS LI- CENSOR(S) (for the purpose of provisions 2 and 3, Pioneer and its licensor(s) shall be col- lectively referred to as “Pioneer”) MAKES AND... - Page 11 EXPORT LAW ASSURANCES You agree and certify that neither the Software nor any other technical data received from Pioneer, nor the direct product thereof, will be exported outside the United States except as authorized and as permitted by the laws and regulations of the United States.
-
Page 12: Pioneer Avic-X910Bt, Avic-X710Bt - For Canada
Agreement. DISCLAIMER OF WARRANTY The Software and related documentation are provided to you “AS IS”. PIONEER AND ITS LI- CENSOR(S) (for the purpose of provisions 2 and 3, Pioneer and its licensor(s) shall be col- lectively referred to as “Pioneer”) MAKES AND... - Page 13 EXPORT LAW ASSURANCES You agree and certify that neither the Software nor any other technical data received from Pioneer, nor the direct product thereof, will be exported outside Canada except as authorized and as permitted by the laws and regulations of Canada.
-
Page 14: Terms And Conditions For The Tele Atlas Data
Chapter Introduction Terms and Conditions for the Tele Atlas Data THIS IS A LEGAL AGREEMENT (THE “AGREE- MENT”) BETWEEN YOU, THE END USER, AND TELE ATLAS NORTH AMERICA, INC. (“Tele Atlas”). BY USING YOUR COPY OF THE TELE ATLAS DATA, YOU AGREE TO THE TERMS AND CONDITIONS OF THIS AGREEMENT. - Page 15 Introduction Indemnity. You agree to indemnify, defend and hold Tele Atlas, its Licensors, and its Suppliers (includ- ing their respective licensors, suppliers, as- signees, subsidiaries, affiliated companies, and the respective officers, directors, employ- ees, shareholders, agents and representatives) free and harmless from and against any liabili- ty, loss, injury (including injuries resulting in death), demand, action, cost, expense, or claim of any kind or character, including but...
-
Page 16: Licenses
Chapter Introduction In addition to the Warranties contained in the Agreement, YOU UNDERSTAND THAT THE POIS ARE LICENSED ON AN “AS IS” BASIS WITHOUT GUARANTEE, AND THERE ARE NO OTHER WARRANTIES MADE WHETHER, EXPRESS OR IMPLIED, INCLUDING WITHOUT LIMITATION, ANY EXPRESS OR IMPLIED WARRANTIES OF MERCHANTABILITY OR FITNESS FOR A PARTICULAR PURPOSE. - Page 17 Introduction You should have received a copy of the GNU Lesser General Public License along with this library; if not, write to the Free Software Foun- dation, Inc., 59 Temple Place, Suite 330, Bos- ton, MA 02111-1307 USA unRAR restriction The decompression engine for RAR archives was developed using source code of unRAR program.
- Page 18 Chapter Introduction Object Code Incorporating Material from Library Header Files. The object code form of an Application may in- corporate material from a header file that is part of the Library. You may convey such ob- ject code under terms of your choice, provided that, if the incorporated material is not limited to numerical parameters, data structure lay- outs and accessors, or small macros, inline...
-
Page 19: About The Database
Introduction Revised Versions of the GNU Lesser General Public License. The Free Software Foundation may publish re- vised and/or new versions of the GNU Lesser General Public License from time to time. Such new versions will be similar in spirit to the present version, but may differ in detail to address new problems or concerns. -
Page 20: Copyright Notices For North American Data
(ACC OFF) immediately and consult your deal- er or the nearest authorized Pioneer Service Station. Do not use the navigation system in this condition because doing so may result in a fire, electric shock, or other failure. - Page 21 Introduction CAUTION ! When a route is calculated, the route and voice guidance for the route are automatically set. Also, for day or time traffic regulations, only information about traffic regulations ap- plicable at the time when the route was calcu- lated is shown.
-
Page 22: Goog-411" Sevice
Chapter Introduction “GOOG-411” sevice p Pioneer does not bear responsibility for the accuracy of the information. p Pioneer does not bear responsibility for changes to information services provided by related companies, such as cancellation of services or changing to pay-services. -
Page 23: When Using A Display Connected To Rear Monitor Output
Should the navigation system fail to operate properly, contact your dealer or nearest authorized Pioneer Service Station. After-sales service for Pioneer products Please contact the dealer or distributor from which you purchased the product for after- sales service (including warranty conditions) or any other information. -
Page 24: Visit Our Web Site
Chapter Introduction Visit Our Web site Visit us at the following site: http://www.pioneerelectronics.com In Canada http://www.pioneerelectronics.ca 1 Register your product. We will keep the details of your purchase on file to help you refer to this information in the event of an insurance claim such as loss or theft. -
Page 25: Notice Regarding Video Viewing
In this manual, iPod and iPhone will be re- ferred to as iPod. p When you use this navigation system with a Pioneer USB interface cable for iPod (CD- IU230V) (sold separately), you can control an iPod compatible with this navigation system. -
Page 26: Map Coverage
Chapter Introduction p For more details about iPod compatibility with this navigation system, refer to the in- formation on our website. Map coverage For more details about the map coverage of this navigation system, refer to the information on our website. Protecting the LCD panel and screen p Do not allow direct sunlight to fall on the... - Page 27 Introduction Press the RESET button with a pen tip or other pointed implement. RESET button p If you have connected other equipment to this navigation system with IP-BUS, be sure to reset that equipment too. Chapter...
-
Page 28: Basic Operation
Chapter Basic operation Checking part names and functions This chapter gives information about the names of the parts and the main features using the buttons. 1 Disc loading slot Insert a disc to play. = For details concerning operations, refer to Inserting and ejecting a disc on the next page. -
Page 29: Inserting And Ejecting A Disc
! If data loss or corruption occurs on the sto- rage device for any reason, it is usually not possible to recover the data. Pioneer accepts no liability for damages, costs or expenses arising from data loss or corruption. -
Page 30: Inserting An Sd Memory Card
! If data loss or corruption occurs on the sto- rage device for any reason, it is usually not possible to recover the data. Pioneer accepts no liability for damages, costs or expenses arising from data loss or corruption. -
Page 31: Connecting And Disconnecting An Ipod
! If data loss or corruption occurs on the sto- rage device for any reason, it is usually not possible to recover the data. Pioneer accepts no liability for damages, costs or expenses arising from data loss or corruption. -
Page 32: Regular Startup
Chapter Basic operation Touch the language that you want to use for the voice guidance. The navigation system will now restart. Touch [Destination] to display Destina- tion menu. The disclaimer appears. Read the disclaimer carefully, checking its details, and then touch [OK] if you agree to the conditions. - Page 33 Chapter Basic operation...
-
Page 34: How To Use The Navigation Menu Screens
Chapter Basic operation How to use the navigation menu screens Screen switching overview... -
Page 35: What You Can Do On Each Menu
Basic operation What you can do on each menu 1 Top Menu Press the MENU button to display the “Top Menu”. This is the starting menu to access the desired screens and operate the various functions. 2 Destination Menu You can search for your destination on this menu. -
Page 36: How To Use The Map
Chapter Basic operation How to use the map Most of the information provided by your navigation system can be seen on the map. You need to be- come familiar with how information appears on the map. How to read the map screen This example shows an example of a 2D map screen. - Page 37 Basic operation This key will be displayed while you activate the dummy run (“Fly over” or “Demo Mode”). Touch the key to cancel the dummy run. = For details, refer to Demo Mode on page 149. = For details, refer to Playing simulated tra- vel at high speed on page 60.
-
Page 38: Switching The Map Mode
Chapter Basic operation p This information is based on the map data- base. Thus, the information may differ from actual conditions. Use it as just a direc- tional reference for your driving. Note regarding the route highlighted in purple p A route highlighted in purple on the map indicates that your route includes a road not matching your preference on the fol- lowing settings in “Route”;... -
Page 39: Scrolling The Map To The Position You Want To See
Basic operation Move MULTI-CONTROL down or up to zoom in or out. Moving MULTI-CONTROL upward or down- ward once allows you to change the map scale one step at a time. Holding MULTI-CON- TROL while moving it up or down allows you to change the scale sequentially. -
Page 40: The Basic Flow Of Creating Your Route
Chapter Basic operation Touch anywhere on the map briefly to show the tilt controls and rotation angle. Controls for tilt and rotation angle p Touching hides the tilt controls and rota- tion angle. Touch the controls to adjust the tilt and rotation angle. -
Page 41: Operating The On-Screen Keyboard
Basic operation 2 Current page/total pages Returns the previous screen. Touching on the scroll bar scrolls through the list and allows you to view the re- maining items. 5 Listed items Touching an item on the list allows you to nar- row down the options and proceed to the next operation. -
Page 42: Searching For And Selecting A Location
Chapter Searching for and selecting a location CAUTION For safety reasons, these route-setting functions are not available while your vehicle is in motion. To enable these functions, you must stop in a safe place and put on the parking brake before setting your route. - Page 43 Searching for and selecting a location Touch the key next to “State:” and touch the desired state, province, or terri- tory on the list. The screen returns to the previous screen. Touch the key next to “City:” to enter the city name. Enter the city name or Zip code.
-
Page 44: Searching For The Vicinity Points Of Interest (Poi)
Chapter Searching for and selecting a location 11 Touch one of the options at the bottom of the “Map Confirmation Screen” to select the next operation. Touch [Route...] then [Go Here Now] to set your selected position as your destination and calculate the route up that point. -
Page 45: Searching For A Nearby Poi
Searching for and selecting a location Touch the POI you want. ! Touching the [Name] tab sorts the options in the list in alphabetical order. ! Touching the [Distance] tab sorts the op- tions in the list in order by distance. p Icons are helpful for quickly telling the cate- gory of facilities with the same name. -
Page 46: Using "Saved Criteria
Chapter Searching for and selecting a location Enter the address you want. = For details, refer to Searching for a location by address on page 42. Touch the category you want. = For the subsequent operations, refer to Searching for POIs around the cursor on page 44. - Page 47 Searching for and selecting a location ! Touching [Save Criteria] without selecting a category allows you to store only your se- lected search method including all cate- gories. ! If there aren’t any more detailed categories, a blank list appears. In that case, touching [Save Criteria] allows you to store it as the currently selected category.
-
Page 48: Searching For Pois By Using The Data On External Storage Devices (Usb, Sd)
Chapter Searching for and selecting a location Touch [Delete] on the right of the item that you want to delete. Searching for POIs by using the data on external storage devices (USB, SD) Creating a customized POI is possible by using the utility program “AVIC FEEDS”... -
Page 49: Searching For A Location By Coordinates
Searching for and selecting a location Searching for a location by coordinates Entering a latitude and longitude pinpoints the location. Touch [Destination] on the “Top Menu”, and then touch [Route Function]. Touch [Coordinate]. Touch either the latitude key or the longitude key, whichever you want to enter. -
Page 50: Selecting A Location You Searched For Recently
Chapter Searching for and selecting a location Touch [Route...] then [Go Here Now] to set your selected position as your destination and calculate the route up that point. = For details of other operations on the “Map Confirmation Screen”, refer to What you can do with the “Map Confirmation Screen”... -
Page 51: Deleting An Entry In "Favorites
Searching for and selecting a location Touch the entry you want. Touch one of the options at the bottom of the “Map Confirmation Screen” to select the next operation. Touch [Route...] then [Go Here Now] to set your selected position as your destination and calculate the route up that point. -
Page 52: Searching For A Location By Scrolling The Map
Chapter Searching for and selecting a location Touch the entry you want. If no route has been set yet, the saved route is recalled and the guidance will start im- mediately. Searching for a location by scrolling the map Specifying a location after scrolling the map enables you to set the position as an operable target in the “Map Confirmation Screen”. - Page 53 Chapter Searching for and selecting a location...
-
Page 54: After The Location Is Decided
Chapter After the location is decided (Map Confirmation Screen) What you can do with the “Map Confirmation Screen” Under most conditions after searching for a location, the “Map Confirmation Screen” appears, so you can select the next operation. The options shown below are available on this screen: Shows a full-screen 2D map centered on the cursor position. -
Page 55: Save As
After the location is decided (Map Confirmation Screen) = For more details of the operation, refer to Replacing the location as the new final desti- nation on this page. Starting Point Sets the location as a starting point. = For more details of the operation, refer to Setting the location as the start point on this page. -
Page 56: Viewing Information About A Specified Location
Chapter After the location is decided (Map Confirmation Screen) Touch [Starting Point]. p When the cursor overlaps with a starting point already set, it changes to [Remove Start]. All waypoints already set are deleted. Viewing information about a specified location Locating the cursor to your desired position enables you to view detailed information about the location by using the... -
Page 57: Removing A Map Pin
After the location is decided (Map Confirmation Screen) Search for a location or position the cursor on the desired area by scrolling the map and displaying the “Map Confirmation Screen”. Touch [Save as...] on the “Map Confirmation Screen”. Touch [Add Pin]. The pin icon is placed on the map and the screen returns to the map screen. -
Page 58: Storing The Location In "Favorites
Chapter After the location is decided (Map Confirmation Screen) Storing the location in “Favorites” Storing your favorite locations as “Favorites” provides you with the opportunity to save the time and effort of re-entering this information. Stored items can be made available on “Fa- vorites”... -
Page 59: Checking The Current Route
Checking the current route Checking the current route conditions The “Route Information” screen provides you with various detailed information about the current route. This is an example showing a route with two waypoints. p This function is available only when the route is set and your vehicle position is on the route. -
Page 60: Playing Simulated Travel At High Speed
Chapter Checking the current route Touch [Dest.] to switch to the first way- point screen. The “Route Information (to via)” screen ap- pears. Touch [Via] to switch to the second waypoint screen. The “Route Information (to via)” screen for next waypoint appears. Touch [Via] to return to the screen for whole route. - Page 61 Checking the current route Alternative options: ! Detailed Instructions All turning points, passed streets and other information is shown. ! Instructions All turning points (where voice guidance is given) are shown. ! Road List Displays the turning points in the most sim- plified form (duplicated route names are merged into one).
-
Page 62: Editing Waypoints And The Destination
Chapter Editing waypoints and the destination Editing waypoints You can edit waypoints (locations you want to visit on the way to your destination) and recal- culate the route so that is passes through these locations. Adding a waypoint Search for a location. = For more details, refer to the descriptions from page 42 to page 52. -
Page 63: Deleting The Entry In "Saved Routes
Editing waypoints and the destination Enter the name and then touch [Done] to complete the entry. The previous screen appears. p Saved route can be recalled later. = For details, refer to Setting a route by recal- ling a saved route on page 51. Deleting the entry in “Saved Routes”... -
Page 64: Browsing Information On Msn Direct
— This function is available for AVIC-X910BT only. Notice about MSN Direct™ Pioneer is not responsible for the accuracy of the MSN Direct content. The MSN Direct con- tent may not be current or available at times, and is subject to change without notice. To re-... -
Page 65: Subscribing To The Msn Direct Service
Within two days of completing the subscription, execute Activating the MSN Direct function. Access the following URL and read the description. http://www.msndirect.com/pioneer Be sure to check the coverage area and other availabilities of MSN Direct on the web page. Go to the page for activation and enter your product key. -
Page 66: Browsing Movie Times
Chapter Browsing information on MSN Direct ! [Distance] (default): Sorts the items in the list in order by dis- tance from the vehicle position. ! [Name]: Sorts the items in the list alphabetically. ! [Price]: Sorts the items in the list by price. Touch on the item that you want to view in detail. -
Page 67: Searching For A Movie Title By Selecting A Theater
Browsing information on MSN Direct Touch the desired tab to change the sort order. Available options; ! [Distance] (default): Sorts the items in the list in order by dis- tance from the vehicle position. ! [Name]: Sorts the items in the list alphabetically. Touch on the item that you want to view in detail. -
Page 68: Browsing Weather Information
Chapter Browsing information on MSN Direct Browsing weather information Local weather information can be displayed on a list. Switching the screen allows you to see worldwide weather conditions. Although the MSN Direct service regularly up- dates weather information, the information provided may not necessarily correspond to ac- tual weather conditions. -
Page 69: Viewing The Traffic Flow
Browsing information on MSN Direct Although the MSN Direct service regularly up- dates traffic information, the information pro- vided may not necessarily correspond to actual traffic conditions. Please refer to Notice about MSN Direct™ on page 64. Touch [Destination] on the “Top Menu”, and then touch [MSN Direct]. -
Page 70: Setting The Traffic Information
Chapter Browsing information on MSN Direct 1 Flow-related icon 2 Street or location and direction 3 Distance to the location and event 4 Switching to traffic event list = For more details concerning the opera- tion, refer to Viewing the traffic event on page 68. -
Page 71: Browsing News Headlines
Browsing information on MSN Direct Calculates the route without taking traffic jam into account in the initial calculation. Browsing news headlines Recent news headlines are displayed in a list. Although the MSN Direct service regularly up- dates news headlines, the information pro- vided may not necessarily correspond to current news headlines. -
Page 72: Browsing Stock Quotes
Chapter Browsing information on MSN Direct Touch [Select] to display there with the map. The “Map Confirmation Screen” appears. Touch one of the options at the bottom of the “Map Confirmation Screen” to select the next operation. = For details of other operations on the “Map Confirmation Screen”, refer to What you can do with the “Map Confirmation Screen”... -
Page 73: Using Hands-Free Phoning
Three registration methods are available: ! Searching for nearby phones ! Searching for a specified phone ! Pairing from your cellular phone p The default device name displayed on the cellular phone is “Pioneer Navi”. The PIN code is “1111”. Chapter... -
Page 74: Searching For Nearby Phones
Chapter Using hands-free phoning Searching for nearby phones The system searches for available cellular phones near the navigation system, displays them in a list, and registers them for connec- tion. Activate the Bluetooth wireless tech- nology on your cellular phone. For some cellular phones, no specific action is necessary to activate Bluetooth wireless tech- nology. -
Page 75: Pairing From Your Cellular Phone
Using hands-free phoning Touch the model name of the cellular phone to be connected. The system searches for cellular phones fea- turing Bluetooth technology that are waiting for the connection and displays them in the list if the device has found. p If you cannot find the desired model name on the list, touch [Other phones] to search the cellular phones available nearby. -
Page 76: Connecting A Registered Cellular Phone
Chapter Using hands-free phoning Connecting a registered cellular phone The navigation system automatically connects the cellular phone selected as the target of connection. However, connect the cellular phone manually in the following cases: ! Two or more cellular phones are registered, and you want to manually select the cellu- lar phone to be used. -
Page 77: Receiving A Phone Call
Using hands-free phoning Receiving a phone call You can perform hands-free answering by using the navigation system. Answering an incoming call The system informs you that it is receiving a call by displaying a message and producing a ring sound. If [Auto Answer Preference] is set to [Off], answer the call manually. -
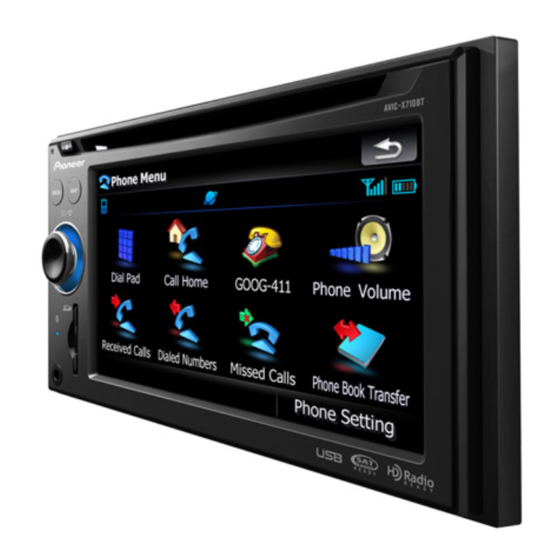
Page 78: Direct Dialing
Chapter Using hands-free phoning Direct dialing Touch [Dial Pad] on the “Phone Menu”. = For details, refer to Displaying the Phone Menu on page 73. The direct dial screen appears. Touch the number keys to enter the phone number. The phone number that was input is dis- played. -
Page 79: Calling A Number In The "Contacts" Screen
Using hands-free phoning If you touch an entry on the list, dialing starts. p If you touch [Detail], you can check the de- tails of the party before making a phone call. p To cancel the call after the system starts dialing, touch Touch to end the call. -
Page 80: Dialing Goog-411
Chapter Using hands-free phoning p If you have not registered your home num- ber, a message appears. Touch [Yes] to start registration. = For more details about “Set Home”, refer to Setting your home position on page 154. Dialing GOOG-411 CAUTION Local and/or long distance charges for making a phone call may apply. -
Page 81: Clearing Memory
Using hands-free phoning p Depending on the cellular phone that is connected to this navigation system via Bluetooth technology, this navigation sys- tem may not be able to display the phone book correctly. (Some characters may be garbled.) p If the phone book in the cellular phone con- tains image data, the phone book may not be correctly transferred. -
Page 82: Setting The Phone
Chapter Using hands-free phoning Touch [OK]. Data on the selected item is cleared from this navigation system’s memory. p If you do not want to clear memory that you have selected, touch [Cancel]. Setting the phone Setting the phone volume The volume level for hands-free phoning can be adjusted. -
Page 83: Setting The Automatic Rejection Function
Editing the device name You can change the device name to be dis- played on your cellular phone. (Default is [Pioneer Navi].) Touch [Phone Settings] on the “Phone Menu”. = For details, refer to Displaying the Phone Menu on page 73. -
Page 84: Notes For Hands-Free Phoning
Chapter Using hands-free phoning p Up to 30 characters can be entered for a de- vice name. Notes for hands-free phoning General notes ! Connection to all cellular phones featuring Bluetooth wireless technology is not guar- anteed. ! The line-of-sight distance between this na- vigation system and your cellular phone must be 10 meters or less when sending and receiving voice and data via Bluetooth... -
Page 85: Updating The Bluetooth Wireless Technology Software
Using hands-free phoning ! With some cellular phones, it may not be possible to transfer all items in the phone book at one time. In this case, transfer items one by one from your cellular phone. ! Depending on the cellular phone, this navi- gation system may not display the phone book correctly. -
Page 86: Playing Audio Cds
Chapter Playing audio CDs You can play a normal music CD using the built-in drive of the navigation system. This section describes how. Insert the disc you want to play into disc-loading slot. Playback starts from the first track of the CD. Touch [DISC] on the “AV Source”... -
Page 87: Selecting A Track From The List
Playing audio CDs Selecting a track from the list The list lets you see the list of track titles, file names or folder names on a disc and select one of them to play. Touch [List]. Touch the track you want to play. The track currently playing is highlighted. -
Page 88: Playing Music Files On Rom
Chapter Playing music files on ROM You can play a disc that contains compressed audio files using the built-in drive of the navi- gation system. This section describes these operations. p In the following description, the MP3, WMA, AAC, WAV files are collectively re- ferred to as “Compressed audio file”. -
Page 89: Browsing Embedded Text Information
Playing music files on ROM = For details, refer to Recalling equalizer curves on page 160. 3 Display the “Function” menu = For details, refer to Using the “Function” menu on the next page. 4 Select the previous or next folder p Touching these keys enables you to se- lect the previous or next folder and play- back the first track on the folder. -
Page 90: Using The "Function" Menu
Chapter Playing music files on ROM p If you operate no functions for about 30 sec- onds, the display automatically returns to the ordinary display. Using the “Function” menu Touch [DISC] on the “AV Source” menu to display the “ROM” screen. = For details concerning operations, refer to Screen switching overview on page 34. -
Page 91: Playing A Dvd-Video
Playing a DVD-Video You can play a DVD-Video using the built-in drive of the navigation system. This section de- scribes operations for playing a DVD-Video. p AVIC-X710BT cannot play DVDs. Reading the screen 1 2 3 1 Source icon Shows which source has been selected. - Page 92 Chapter Playing a DVD-Video = For details, refer to Using the “Function” menu on page 94. 3 Display the DVD menu You can display the menu by touching [Menu] or [TOP M.] while a disc is playing. Touching either of these keys again lets you start play- back from the location selected from the menu.
-
Page 93: Resuming Playback (Bookmark)
Playing a DVD-Video Resuming playback (Bookmark) The Bookmark function lets you resume play- back from a selected scene the next time the disc is loaded. Touching [B.Mark]: You can bookmark one point for each of up to five discs. If you try to memorize another point for the same disc, the oldest bookmark will be overwritten by the newest one. -
Page 94: Frame-By-Frame Playback
Chapter Playing a DVD-Video Touch the desired menu item. Using DVD menu by touch panel keys If items on the DVD menu appear at the bot- tom of the screen, the touch panel keys may overlay them. If so, select an item using those touch panel keys. - Page 95 Playing a DVD-Video When playing DVDs recorded with LPCM audio, you can switch the audio output. Touch [L/R Select] repeatedly until the de- sired audio output appears in the display. Each touch of [L/R Select] changes the set- tings as follows: ! L+R —...
-
Page 96: Playing A Dvd-Vr Disc
You can play a DVD-VR (DVD Video Recording Format) disc using the built-in drive of the na- vigation system. This section describes opera- tions for DVD-VR discs. p AVIC-X710BT cannot play DVD-VR discs. Reading the screen 1 Source icon Shows which source has been selected. -
Page 97: Searching For A Specific Scene And Starting Playback From A Specified Time
Playing a DVD-VR disc p Moving MULTI-CONTROL left or right enables you to perform the equivalent operations. 6 Playback and Pause Touching [f] switches between “playback” and “pause”. 7 Switch the display Touching [Disp] changes the information as follows: Disc information display — Repeat range dis- play 8 Display the map screen 9 Display the title list... -
Page 98: Switch The Playback Mode
Chapter Playing a DVD-VR disc ! To select 71 minutes 00 seconds, touch [7], [1], [0], [0] and [Enter] in order. p To cancel the input numbers, touch [Clear]. Switch the playback mode You have two methods for playing DVD-VR discs;... -
Page 99: Using The "Function" Menu
Playing a DVD-VR disc Using the “Function” menu Touch [DISC] on the “AV Source” menu to display the “DVD-VR” screen. = For details concerning operations, refer to Screen switching overview on page 34. Touch the screen to display the touch panel keys. -
Page 100: Playing A Divx Video
Playing a DivX video You can play a DivX disc using the built-in drive of the navigation system. This section de- scribes that operations. p AVIC-X710BT cannot play DivX files. Reading the screen 1 Source icon Shows which source has been selected. -
Page 101: Frame-By-Frame Playback
Playing a DivX video 6 Switch the information Touching [Disp] changes the content of the in- formation panel as follows: Disc information display — Current folder dis- play — File name display 7 Display the map screen 8 Switch the media file type played When playing a disc containing a mixture of various media file types, you can switch be- tween media files types to play. -
Page 102: Using The "Function" Menu
Chapter Playing a DivX video Touch the keys to input the target num- ber or time and then touch [Enter]. For folders, files ! To select 3, touch [3] and [Enter] in order. ! To select 10, touch [1] and [0] and [Enter] in order. -
Page 103: Dvd-Video, Dvd-Vr, Divx Setup
DVD-Video, DVD-VR, DivX setup Configure the DVD-Video/DVD-VR/DivX player. Displaying DVD Setup menu Play the disc that contains DVD-Video, DVD-VR or DivX. Touch [DISC] on the “AV Source” menu to display the normal playback screen. = For details concerning operations, refer to Screen switching overview on page 34. -
Page 104: Setting The Aspect Ratio
Chapter DVD-Video, DVD-VR, DivX setup Setting the aspect ratio There are two kinds of displays. A wide screen display has a width-to-height ratio (TV aspect) of 16:9, while a regular display has a TV aspect of 4:3. If you use a regular rear display with a TV aspect of 4:3, you can set the aspect ratio suitable for your rear display. -
Page 105: Displaying Your Divx Vod Registration Code
DVD-Video, DVD-VR, DivX setup Displaying your DivX VOD registration code In order to play DivX VOD (video on demand) content on this navigation system, you first need to register the unit with your DivX VOD content provider. You do this by generating a DivX VOD registration code, which you submit to your provider. -
Page 106: Language Code Chart For Dvds
Chapter DVD-Video, DVD-VR, DivX setup Language code chart for DVDs Language (code), input code Japanese (ja), 1001 English (en), 0514 French (fr), 0618 Spanish (es), 0519 German (de), 0405 Italian (it), 0920 Chinese (zh), 2608 Dutch (nl), 1412 Portuguese (pt), 1620 Swedish (sv), 1922 Russian (ru), 1821 Korean (ko), 1115... -
Page 107: Playing Music Files (From Usb Or Sd)
Playing music files (from USB or SD) You can play the compressed audio files stored in the external storage device (USB, SD). p In the following description, the SD mem- ory card and USB memory device are col- lectively referred to as the “external storage device (USB, SD)”. -
Page 108: Using The Touch Panel Keys (Music)
Chapter Playing music files (from USB or SD) Shows the artist name currently playing (when available). a Album title indicator* Shows the title of the album for the current track (when available). b Playback condition indicator The marks shown below appears and indi- cates the current playback condition. -
Page 109: Selecting A Track From The List
Playing music files (from USB or SD) Selecting a track from the list The list lets you see the list of track titles or folder names on an external storage device (USB, SD). Touch a folder on the list to view its contents. - Page 110 Chapter Playing music files (from USB or SD) p If you turn [Random] to “On” while the repeat play range is set to “Track”, the repeat play range changes to “Folder” automatically. 3 Scan folders and tracks Scan play lets you hear the first 10 seconds of each track.
-
Page 111: Playing Video Files (From Usb Or Sd)
Playing video files (from USB or SD) You can play the video files stored in the exter- nal storage device (USB, SD). p In the following description, the SD mem- ory card and USB memory device are col- lectively referred to as the “external storage device (USB, SD)”. -
Page 112: Using The Touch Panel Keys (Video)
Chapter Playing video files (from USB or SD) Using the touch panel keys (Video) 1 Recall equalizer curves = For details, refer to Recalling equalizer curves on page 160. 2 Display the “Function” menu = For details, refer to Using the “Function”... -
Page 113: Using The "Function" Menu
Playing video files (from USB or SD) For folders, files ! To select 3, touch [3] and [Enter] in order. ! To select 10, touch [1] and [0] and [Enter] in order. For time (time search) ! To select 5 minutes 03 seconds, touch [5], [0], [3] and [Enter] in order. -
Page 114: Using An Ipod (Ipod)
Chapter Using an iPod (iPod) Using the USB interface cable for iPod en- ables you to connect your iPod to the naviga- tion system. p A USB interface cable for iPod (CD-IU230V) (sold separately) is required for connection. Starting procedure % Connect your iPod. -
Page 115: Using The Touch Panel Keys (Music)
Using an iPod (iPod) p If characters recorded on the iPod are not compatible with this navigation system, they may turn into garbled characters. Using the touch panel keys (Music) 1 Album artwork Touch the key to enlarge the album artwork. If you touch again, the artwork returns to its nor- mal size. -
Page 116: Starting The Video Playback
Chapter Using an iPod (iPod) Touching switches the selection to the next or previous page in the list. Touch the item that you want to refine. Refine the item until the track title is displayed on the list. p Touching [All] on the list includes all op- tions in the current list. -
Page 117: Using The Touch Panel Keys (Video)
Using an iPod (iPod) Touch your desired item on the list to narrow down them until the video list ap- pears. = For details concerning operations, refer to Browsing for a video on this page. On the video list, touch the video you want to play. -
Page 118: Using The "Function" Menu
Chapter Using an iPod (iPod) Narrowing down a video with the list Touch the category you want. Touching switches the selection to the next or previous page in the list. Touch the item that you want to refine. Refine the item until the track title is displayed on the list. - Page 119 Using an iPod (iPod) ! Albums — Selects an album randomly, and then plays back all songs in that album in order 3 Setting the audiobook play speed While listening to an audiobook on iPod, playback speed can be changed. Each touch of [Audio Book] changes the setting as follows: ! Normal —...
-
Page 120: Using The Radio (Fm)
Chapter Using the radio (FM) You can listen to the radio by using the naviga- tion system. This section describes operations for radio (FM). % Touch [FM] on the “AV Source” menu to display the “FM” screen. = For details concerning operations, refer to Screen switching overview on page 34. -
Page 121: Display
Using the radio (FM) Switching between the detailed information display and the preset list display You can switch the left side of the basic screen according to your preference. % Touch [Preset] (or [Detail]). Each touch of [Preset] (or [Detail]) changes the detailed information display or preset list display. -
Page 122: Using The Radio (Fm)
Chapter Using the radio (FM) Touch [Start] to start “BSM”. BSM begins to flash. While BSM is flashing, the six strongest broadcast frequencies will be stored under the preset tuning keys [P1] to [P6] in order of their signal strength. When this is complete, BSM stops flashing. -
Page 123: Using The Hd Radio (Digital Radio)
Using the HD Radio (Digital Radio) You can listen to the radio by using the naviga- tion system. This section describes operations for HD Radio™. p For details concerning operation, refer to the HD Radio tuner’s operation manual. % Touch [Digital Radio] on the “AV Source”... -
Page 124: Storing And Recalling Broadcast Frequencies
Chapter Using the HD Radio (Digital Radio) Switching between the detailed information display and the preset list display You can switch the left side of the basic screen according to your preference. % Touch [List] (or [Detail]). Each touch of [List] (or [Detail]) changes the detailed information display or preset list dis- play. -
Page 125: Storing The Strongest Broadcast Frequencies
Using the HD Radio (Digital Radio) 2 Switching the seek mode = For details, refer to this page. 3 Tuning in strong signals = For details, refer to this page. 4 Switching the reception mode = For details, refer to this page. Storing the strongest broadcast frequencies “BSM”... -
Page 126: Using The Touch Panel Keys
Chapter Using the radio (AM) You can listen to the radio using this naviga- tion system. This section describes operations for radio (AM). % Touch [AM] on the “AV Source” menu to display the “AM” screen. = For details concerning operations, refer to Screen switching overview on page 34. -
Page 127: Storing And Recalling Broadcast Frequencies
Using the radio (AM) Storing and recalling broadcast frequencies With a touch of any of the preset tuning keys ([P1] to [P6]), you can easily store up to six broadcast frequencies for later recall (also with the touch of a key). Preset tuning keys When you find a frequency that you want to store in memory, touch and hold a... - Page 128 Chapter Using the radio (AM) Touch [cPrev] or [Nextd] to set the sen- sitivity. There are two levels of sensitivity for AM. Level: 1 — 2 p The level “2” setting allows reception of only the strongest stations, while lower settings let you receive weaker stations.
-
Page 129: Using The Xm Tuner
Using the XM tuner You can use the navigation system to control an XM satellite digital tuner, which is sold se- parately. For details concerning operation, refer to the XM tuner’s operation manuals. This section provides information on XM operations with the navigation system which differs from that described in the XM tuner’s operation man- ual. -
Page 130: Using The Touch Panel Keys
Chapter Using the XM tuner Shows the detailed information of the broad- cast channel currently being received. Using the touch panel keys % Touch [XM] on the “AV Source” menu to display the “XM” screen. = For details concerning operations, refer to Screen switching overview on page 34. -
Page 131: Displaying The Radio Id
Using the XM tuner While the input number is displayed, touch [Enter]. The XM channel that was entered is selected. Touch You return to the previous display. Displaying the Radio ID If you select CH: 000, the Radio ID is dis- played. -
Page 132: Using "My Mix" Function
Chapter Using the XM tuner Using “My Mix” function “My Mix” function memorizes the song title and artist name of the song currently being re- ceived. When the song that matches the mem- orized song title and artist name is being broadcast on a station other than the one you are listening to, you will be alerted, and you can switch the station to listen to that song. -
Page 133: Using The "Function" Menu
Using the XM tuner Using the “Function” menu Touch [XM] on the “AV Source” menu to display the “XM” screen. = For details concerning operations, refer to Screen switching overview on page 34. Touch [Func]. 1 Setting the memorized songs Setting the memorized songs Selecting the songs to alert The list of song titles memorized for the MyMix... -
Page 134: Using The Sirius Tuner
When you use the SiriusConnect universal tuner (sold separately) with this navigation system, Pioneer SIRIUS BUS INTERFACE is required. For details concerning operation, refer to the owner’s manual of Pioneer SIR- IUS BUS INTERFACE and SiriusConnect universal tuner. Reading the screen... -
Page 135: Selecting A Sirius Channel Directly
Using the SIRIUS tuner Category Mode 1 Memorize the current song = For details, refer to Memorizing the song on the next page. 2 Switch the SIRIUS Instant replay mode = For details, refer to Using the “Instant Replay” function on page 137. 3 Recall equalizer curves = For details, refer to Recalling equalizer curves on page 160. -
Page 136: Storing And Recalling Broadcast Stations
Chapter Using the SIRIUS tuner Touch [Direct]. Input [000] and then touch [Enter]. If you select another channel, display of the Radio ID is canceled. Storing and recalling broadcast stations With a touch of any of the preset tuning keys [P1] to [P6], you can easily store up to six broadcast stations for later recall (also with the touch of a key). -
Page 137: Using The "Instant Replay" Function
Using the SIRIUS tuner Memorizing an traffic channel Tune in to a traffic channel. Touch and hold [TRAFFIC] for two sec- onds or more. The traffic channel will be memorized. p Even if you use this with the XM satellite radio tuner, only one station can be memor- ized. -
Page 138: Setting The Memorized Songs
Chapter Using the SIRIUS tuner Setting the memorized songs Selecting the songs to alert Display the song title list memorized for the MyMix Function (MyMix list). You can change the setting of the notification when the song is broadcast again. You can enable or disable no- tification for each song. -
Page 139: Displaying Game Information
Using the SIRIUS tuner Touch [Alert On]. Changing the alert setting You can enable or disable the alert for selected items. This function is useful when to want to turn the alert off temporarily without changing the setting of each selected team. Touch [Game Alert]. -
Page 140: Using Av Input
Chapter Using AV input You can display “video image” output by AV1 Input or AV2 Input to the screen of the navi- gation system. For details of the connection method, refer to “Installation Manual”. CAUTION For safety reasons, video images cannot be viewed while your vehicle is in motion. -
Page 141: Using The External Unit (Ext1, Ext2)
Using the external unit (EXT1, EXT2) The term “external unit” refers to future Pioneer devices that are not currently planned for, or to devices that allow control of basic functions although they are not fully con- trolled by the navigation system. Two external units can be controlled by this navigation sys- tem. - Page 142 Chapter Using the external unit (EXT1, EXT2) The external unit can be operated by trans- mitting the operating commands set to 1 key — 6 key. p Operation varies depending on the exter- nal unit connected. (In some cases, some functions may not be used until you touch and hold the key.) 7 Use F1 —...
-
Page 143: Customizing Preferences
Customizing preferences The options in the “Navi Settings” menu Basic operations in the “Navi Settings” menu Preferences related to the navigation functions can be set. A method for changing the volume setting for the navigation guidance and beep is described here, along with an operational example. -
Page 144: Time Settings
Chapter Customizing preferences 1 Positions of the GPS constellation being re- ceived by the navigation system Signal com- Color munication Green Gray 2 Shows the current comprehensive accu- racy, altitude and speed. 3 Shows each satellite’s signal strength. 4 Shows the connection status or reception condition of GPS antenna. -
Page 145: Poi Settings
Customizing preferences ! “Time” Enables you to adjust the time difference by one hour. Touch a or b to adjust it. p “Time Zone” and “Time” are activated only when [Off] is selected. POI Settings Touch [Map Visual] on the “Navi Set- tings”... -
Page 146: Displayed Info
Chapter Customizing preferences [Night]: Always displays the map in the color de- fined on “Night color profile:”. [Day]: Always displays the map in the color de- fined on “Daylight color profile:”. ! “Elevation on 2D Map” You can select whether to draws or refrain from drawing the terrain with a realistic landscape on the map, such as a green space, water place, undulating surface. -
Page 147: Overview Mode
Customizing preferences Available options; ! “Zoom-in limit:” Allows you to set the limit for zoom-in beha- vior. ! “Zoom-out limit:” Allows you to set the limit for zoom-out be- havior. ! “Restore Smart Zoom” Allows you to set whether “Smart Zoom” is to be reactivated after changing the map scale, tilt, or rotation. -
Page 148: Warnings
Chapter Customizing preferences Determines which condition takes priority for route calculation. [Fast]: Calculates a route with the shortest travel time to your destination as a priority. [Short]: Calculates a route with the shortest dis- tance to your destination as a priority. [Easy]: Calculates a route to your destination with the fewest turning points possible as a... -
Page 149: Regional Settings
Customizing preferences The speed limit is based on the map data- base. The speed limit in the database may not match the actual speed limit of the cur- rent road. This is not a definite value. Be sure to drive according to the actual speed limit. -
Page 150: About
Chapter Customizing preferences ! “Keys” [On]: Sounds a beep. [Off]: Does not sound a beep. ! “Dynamic Volume” Increases and decreases the master vo- lume of the navigation guidance and beep automatically according to the current speed. This function is very helpful when you are driving at high speed and there is too much noise to hear the guidance in- structions and beep. -
Page 151: Creating New Categories
Customizing preferences Touch the desired key to customize it. Available options; ! “POI Icon Visibility Distance” Touch this key to show options. Touch one of them to set the desired visibility. When “Satellite” is selected, the POI icons will appear even though they are far away from your current position. -
Page 152: Editing Your Customized Poi
Chapter Customizing preferences Editing your customized POI If you have already stored the customized POI, you can edit its POI properties. p If the custom POI is found on an external storage device (USB, SD), the navigation system will show a POI list which includes them. - Page 153 Customizing preferences Touch [Record] to activate the track log- ger. The key then changes to [Stop Recording]. Touching [Stop Recording] allows you to de- activate the track logger. Touching [Export all track logs] exports all track logs currently stored to the external sto- rage device (USB or SD) at once.
-
Page 154: Setting Your Home Position
Chapter Customizing preferences Touch the desired key to operate it. Available options; ! “Update interval:” Sets how often the system updates the log. ! “Current autosave track size:” Sets a size limit on automatic logging. This setting will be effective only when “Enable Auto-saving”... -
Page 155: Selecting The Language
Customizing preferences Selecting the language You can set the languages used on the pro- gram and voice guidance. Each language can be set separately. p If you use voice operation, select [English] in [Program language:] of “Language”. If you select other languages, voice operation will not be available. -
Page 156: Setting The Rear View Camera
View] on the “AV Source” menu. [RearView] is useful if you want to monitor an attached trailer, etc. CAUTION Pioneer recommends the use of a camera which outputs mirror reversed images, otherwise the screen image may appear reversed. p Immediately verify whether the display... -
Page 157: Adjusting The Response Positions Of The Touch Panel (Touch Panel Calibration)
Customizing preferences Adjusting the response positions of the touch panel (touch panel calibration) If you feel that the touch panel keys on the screen deviate from the actual positions that respond to your touch, adjust the response po- sitions of the touch panel screen. p Do not use a sharp pointed tool such as a ballpoint pen or a mechanical pen, which could damage the screen. -
Page 158: Checking The Version Information
Chapter Customizing preferences Touch the color you want. Available options; ! Colored keys — Selects the desired preset color ! Memory 1/Memory 2/Memory 3 — Col- ors registered in the memory = For details, refer to Creating a user-de- fined color and storing it to memory on this page. -
Page 159: Turning Off The Screen
Customizing preferences Touch [Restore/Delete] on the “System Settings” menu. Touch [Restore Factory Settings] or [De- lete user information]. p Because deleted data cannot be restored, take extra care not to mistakenly delete items. Touch [OK]. The navigation system will now restart. Turning off the screen By turning off the backlight of the LCD screen, you can turn off the screen display without... -
Page 160: Using The Equalizer
Chapter Customizing preferences “Front:15” to “Rear:15” is displayed as the front/rear speaker balance moves from front to rear. Setting “Front:” and “Rear:” to “0” is correct when using a two speaker system. Touch [c] or [d] to adjust left/right speaker balance. Each time you touch [c] or [d], the left/right speaker balance moves towards the left or the right. -
Page 161: Adjusting Loudness
Customizing preferences — CD, ROM (for AVIC-X710BT) — XM and SIRIUS — AV1 and AV2 — EXT1 and EXT2 ! The different source volume level can be set between iPod and USB. ! When [Flat] is selected, no supplement or correction is made to the sound. -
Page 162: Using Subwoofer Output
The following AV sources are set to the same source level adjustment volume automatically. ! CD, ROM, DivX (for AVIC-X910BT) ! CD, ROM (for AVIC-X710BT) ! XM and SIRIUS ! AV1 and AV2 ! EXT1 and EXT2... -
Page 163: Enhancing Bass (Bass Booster)
! iPod — iPod connected with the USB Inter- face cable for iPod (CD-IU230V) ! Video — External video component ! EXT — Pioneer external unit connected with the RCA video cable ! Off — No video component is connected... -
Page 164: Switching The Auto Antenna Setting
Chapter Customizing preferences Each touch of [AV2 Input] changes the set- ting as follows: ! Off — No video component is connected ! Video — External video component p Use AV2 Input when connecting CD-RM10 (sold separately) through the external video component. -
Page 165: Setting The Rear Output
Customizing preferences ! ATT — Attenuation ! Normal — Volume does not change p Operation returns to normal when the cor- respond action is ended. p When “SD” or “USB” selected as the AV source, the sounds are not muted or attenu- ated even when the navigation guidance and beep outputs. - Page 166 Chapter Customizing preferences p Once you start the cataloging process, only a few basic voice commands can be used for iPod until the process has completely finished. p If unreadable characters are included in the data on your iPod, names or types may not be available as voice commands.
-
Page 167: Operating Your Navigation System With
Basics of Voice Operation Your Pioneer navigation system uses the latest in voice recognition technology. You can use voice commands to operate many of its func- tions. This chapter describes where you can use voice commands, and also what com- mands the system accepts. -
Page 168: Starting Voice Operation
Say “Play the album Pioneer” to play- back the album name “Pioneer”. If the command is recognized properly, play- back starts from the first song of “Pioneer”. Calling the entry on “Contacts” A method for dialing the entry named “Nancy”... -
Page 169: Available Basic Voice Commands
Operating Your Navigation System with Voice Available Basic Voice Commands The navigation system can also recognize the words in the following list. Basic commands Voice commands and operations Back d Returns the previous screen. Cancel d Cancels the voice operation. Help d Outputs the brief operating instruction by voice. -
Page 170: Voice Operation For Av Source (Other Than Ipod)
Chapter Operating Your Navigation System with Voice Show playlists d Displays the playlist together with sub-screen to continue the voice operation. d Touch the de- sired item on the list or say the desired voice commands. Show the playlist <Playlist name> d Displays the song list of the selected playlist together with sub-screen to con- tinue the voice operation. -
Page 171: Voice Commands Related To Hands-Free Phoning
Operating Your Navigation System with Voice Voice commands related to hands-free phoning p You can make a phone call by voice dialing if the cellular phone featuring Bluetooth wireless technology is being paired with the navigation system. p For <entry’s name> shown on the follow- ing chart, say the name of the entry stored in “Contacts”. -
Page 172: Tips For Voice Operation
Chapter Operating Your Navigation System with Voice Tips for Voice Operation For your voice commands to be correctly re- cognized and interpreted, ensure that condi- tions are suitable for recognition. Close the vehicle windows Please note that wind through the vehicle win- dow or miscellaneous noise from outside the vehicle can interfere with voice operation. -
Page 173: Other Functions
Area3 Touch [Clear password]. The password setting screen appears. Enter the current password. Touch [Done]. Touch [Yes]. The message for deletion appears and then the current password is deleted. Forgotten passwords Contact the nearest authorized Pioneer Ser- vice Station. Chapter... -
Page 174: Returning The Navigation System To The Default Or Factory Settings
Chapter Other functions Returning the navigation system to the default or factory settings You can return settings or recorded content to the default or factory settings. There are three methods to clear user data, and the situations and the cleared content are different for each method. -
Page 175: Setting Items To Be Deleted
Other functions Setting items to be deleted The items to be deleted vary depending on the reset method. The items listed in the following table return to the default or factory settings. p Almost all items not listed below will be re- tained. - Page 176 Chapter Other functions SD, USB All settings (*1) Volume setting for AV sources (*1) All settings including the setting on the “Function” menu are to be deleted. Phone functions [Phone Volume] [Received Calls] Phone Menu (*2) [Dialed Numbers] [Missed Calls] [Phone Settings] Contacts (*2) All entries...
-
Page 177: Appendix Troubleshooting
While this list is not comprehen- sive, it should answer your most common problems. If a solution to your problem cannot be found here, contact your dealer or the nearest authorized Pioneer service facility. Problems with the navigation screen... - Page 178 Appendix Appendix You cannot position your vehicle on the map without a significant positioning error. The map color does not switch automatically between daytime and nighttime. The screen is too bright. The display is very dim. No sounds of AV source are pro- duced.
- Page 179 Appendix The setting for the rear view camera is incorrect. Nothing is displayed and the touch panel keys cannot be The shift lever was placed in [R] used. when the rear view camera was not connected. There is no response when the The touch panel keys deviate from touch panel key are touched, or the actual positions that respond to...
- Page 180 Appendix Appendix The icon 9 is displayed, and op- eration is not possible. The picture stops (pauses) and the navigation system cannot be operated. The picture is stretched, with in- correct aspect ratio. A parental lock message is dis- played and DVD playback is not possible.
- Page 181 Appendix Appendix If the screen becomes frozen... Park your vehicle in a safe place, and turn off the engine. Turn the ignition key back to “Acc off”. Then start the engine again, and turn the power to the navigation system back on. If this does not solve the problem, press the RESET button on the navigation system.
-
Page 182: Messages And How To React To Them
Appendix Appendix Messages and how to react to them The following messages may be displayed by your navigation system. Refer to the table below to identify the problem, then take the suggested corrective action. There are occasions when you may see error messages other than those shown here. In such a case, follow the instructions given on the display. -
Page 183: Messages For Audio Functions
If the error persists, record the error message and contact your dealer or your nearest Pioneer service center. The messages in “( )” will appear on the “Rear display”. - Page 184 Appendix Appendix Reading error (ERROR-15) Reading error (ERROR-23) Reading error (ERROR-22) Non-playable tracks are skipped. Impossible to play all tracks. SD/USB/iPod Message Non-playable tracks are skipped. Impossible to play all tracks. An error occurred on USB con- nection. USB devices are not available to use and iPod power supply is also unavail- able.
- Page 185 Appendix Other sources Message Cause System detected improper Parking brake lead is incorrectly connection of Parking Brake connected. lead. Please check your con- figuration for safety. Please see Operation Manual for more information regarding safe operation. UPDATING The selected channel is not in- cluded in your subscription.
-
Page 186: Positioning Technology
Positioning technology AVIC-X910BT accurately measures your cur- rent location by combining the positioning by GPS and by “Dead Reckoning”. AVIC-X710BT accurately measures your cur- rent location by the GPS positioning. Positioning by GPS The Global Positioning System (GPS) uses a network of satellites orbiting the Earth. -
Page 187: Handling Large Errors
Appendix Map matching As mentioned, the positioning systems used by this navigation system are susceptible to certain errors. Their calculations may, on occa- sion, place you in a location on the map where no road exists. In this situation, the processing system understands that vehicles travel only on roads, and can correct your position by ad- justing it to a nearby road. -
Page 188: Conditions Likely To Cause Noticeable Positioning Errors
Appendix Appendix Conditions likely to cause noticeable positioning errors For various reasons, such as the state of the road you are traveling on and the reception status of the GPS signal, the actual position of your vehicle may differ from the position dis- played on the map screen. -
Page 189: Route Setting Information
Appendix ! If you are on a steep mountain road with many height changes. ! If you enter or exit a multi-storey parking lot or similar structure using a spiral ramp. ! If your vehicle is turned on a turntable or si- milar structure. - Page 190 Appendix Appendix CAUTION When a route is calculated, the route and voice guidance for the route are automatically set. Also, for day or time traffic regulations, only infor- mation about traffic regulations applicable at the time when the route was calculated is shown. One-way streets and street closures may not be taken into consideration.
-
Page 191: Handling And Care Of Discs
Appendix Car train (start and end) Other information Supplemental information about traffic icon Icon Meanings Stop-and-go traffic Stopped traffic Closed/blocked roads Accidents, constructions, etc. Road works Road narrows, lane closures Warnings, other dangers Bad weather conditions Police ahead Handling and care of discs Some basic precautions are necessary when handling your discs. -
Page 192: Playable Discs
Appendix Appendix Playable discs DVD-Video and CD DVD and CD discs that display the logos shown below generally can be played on this built-in DVD drive. DVD-Video is a trademark of DVD Format/Logo Licensing Corporation. p It is not possible to play DVD-Audio discs. This DVD drive may not be able to play all discs bearing the marks shown above. -
Page 193: Detailed Information For Playable Media
Appendix Detailed information for playable media Compatibility Common notes about disc compatibility ! Certain functions of this product may not be available for some discs. ! Compatibility with all discs is not guaran- teed. ! It is not possible to play back DVD-ROM/ DVD-RAM discs. - Page 194 Appendix Appendix ! There may be a slight delay when starting playback of files on an external storage de- vice (USB, SD) with complex folder hierar- chies. ! Operations may vary depending on the kind of an external storage device (USB, SD).
- Page 195 Appendix ! Subtitle files that are named with the same character string as the DivX file before the extension are associated with the DivX file. The character strings before the extension must be exactly the same. However, if there is only one DivX file and one subtitle file in a single folder, the files are associated even if the file names are not the same.
-
Page 196: Media Compatibility Chart
Appendix Appendix Media compatibility chart General CD-R/-RW Media AVIC-X710BT ISO9660 level 1, File system ISO9660 level 2, Romeo and Joliet Maximum number of folders Maximum number of files MP3, WMA, Playable file types AAC, WAV MP3 compatibility CD-R/-RW Media AVIC-X710BT File extension .mp3... - Page 197 Appendix WMA compatibility CD-R/-RW Media AVIC-X710BT File extension .wma 48 kbps to Bit rate 320 kbps (CBR), Sampling frequency 32 kHz to 48 kHz Note: ! The navigation system is not compatible with the following: Windows Media Audio 9 Professional, Lossless, Voice...
-
Page 198: Divx Compatibility
Appendix Appendix AAC compatibility CD-R/-RW Media AVIC-X710BT File extension .m4a Bit rate 16 kbps to 320 kbps (CBR) 11 kHz to Sampling frequency 44.1 kHz Notes: ! The navigation system plays back AAC files encoded by iTunes. ! The navigation system is not compatible with the following:... - Page 199 Appendix AVI compatibility CD-R/-RW Media AVIC-X710BT File extension Compatible video codec Compatible audio AVI files cannot be played on the built-in drive. codec Recommended video specifications MPEG-4 compatibility CD-R/-RW Media AVIC-X710BT File extension Compatible video codec Compatible audio MPEG-4 files cannot be played on the built-in drive.
-
Page 200: Bluetooth
READY Logo Level 3 Level 4 The SAT RADIO READY logo indicates that the Satellite Radio Tuner for Pioneer (i. e., XM tuner and Sirius satellite tuner which are sold separately) can be controlled by this naviga- tion system. Please inquire with your dealer or... -
Page 201: Sd And Sdhc Logo
This unit plays back AAC files en- coded by iTunes version 4.6. Detailed information regarding connectable iPods CAUTION ! Pioneer accepts no responsibility for data lost from an iPod, even if that data is lost while using the navigation system. Appendix... -
Page 202: Ipod
Appendix Appendix ! Do not leave the iPod in direct sunlight for ex- tended amounts of time. Extended exposure to direct sunlight can result in iPod malfunc- tion due to the resulting high temperature. ! Do not leave the iPod in any location with high temperatures. -
Page 203: Liquid Crystal Display (Lcd) Screen
! If the LED backlight reaches the end of its product lifetime, the screen will become dimmer and the image will no longer be visible. In that case, please consult your dealer or the nearest authorized PIONEER Service Station. Appendix... -
Page 204: Display Information
Appendix Appendix Display information Destination Menu [Address] [POI] [Around Current GPS Location] [Around Destination] [Around Cursor] [Along Route] [Around entered address] [Saved Criteria] [Register Search Criteria] [Favorites] [History] [USB/SD] [Return Home] [Delete Route] [Saved Routes] [Route Function] [Route info] [Itinerary] [Edit Route] [Save Route] [Coordinate]... -
Page 205: Settings Menu
Appendix Settings Menu Navi Settings [GPS & Time Settings] [Time Settings] [Map Visual] [POI Settings] [3D Settings] [Map Settings] [Displayed Info] [Smart Zoom] [Overview Mode] [Manage Track Logs] [Route] [Method:] [U-turn penalty:] [Unpaved Roads] [Highways] [Ferries] [U-turns] [Permit Needed] [Toll Roads] [Warnings] [Warn When Speeding] [Regional Settings]... -
Page 206: System Settings Menu
Appendix Appendix System Settings menu [Language] [Splash Screen] [Back Camera] [Screen Calibration] [Picture Adjustment] [Illumi Color] [Service Information] [Restore/Delete] [Restore Factory Settings] [Delete user information] [Screen Off] AV System Settings menu Page [AV1 Input] [AV2 Input] [Ant CTRL] [Wide Mode] [MUTE Input/GUIDE] [Rear SP] [VR Catalog Mode]... -
Page 207: Shortcut Menu
Appendix AV Sound Settings menu [FAD/BAL] ([Balance]) [EQ] [Loudness] [Sub Woofer] [HPF] [SLA] [Bass Booster] Shortcut menu Map Confirmation Screen Page [Map] [Save as...] [Add Pin] [Add POI] [Add Favorite] [Route...] [Go Here Now] [Add Via] [Continue] [Starting Point] [Info] [Call] Appendix Page... -
Page 208: Dvd Setup
Appendix Appendix DVD Setup [Language] [Multi Angle] [TV Aspect] [Parental] [DivX VOD] [Auto Play] [Subtitle File] Page... -
Page 209: Glossary
Appendix Glossary AAC is short for Advanced Audio Coding and refers to an audio compression technology standard used with MPEG-2 and MPEG-4. Aspect ratio This is the width-to-height ratio of a TV screen. A regular display has an aspect ratio of 4:3. Wide screen displays have an aspect ratio of 16:9, providing a bigger picture for exceptional presence and atmosphere. - Page 210 Appendix Appendix ID3 tag This is a method of embedding track-related information in an MP3 file. This embedded in- formation can include the track title, the ar- tist’s name, the album title, the music genre, the year of production, comments and other data.
- Page 211 Appendix Packet write This is a general term for a method of writing individual files to a CD-R, etc. whenever re- quired, just as is done with files on floppy or hard disks. Parental lock Some DVD-Video discs with violent or adult-or- iented scenes feature parental lock which pre- vents children from viewing such scenes.
-
Page 212: Specifications
Nose ... 171 mm × 97 mm × 8 mm (6-3/4 in. × 3-7/8 in. × 3/8 in.) Weight: AVIC-X910BT ... 2.1 kg AVIC-X710BT ... 2.1 kg NAND flash memory ... 2 GB Navigation GPS Receiver: System ... L1, C/Acode GPS... - Page 213 .m4a DivX decoding format ... Home Theater Ver.3.11, Ver.4.X, Ver.5.X, Ver.6.X : .avi, .divx CD drive (AVIC-X710BT) System ... CD, MP3, WMA, AAC sys- Usable discs ... CD, MP3, WMA, AAC Signal-to-noise ratio ... 94 dB (1 kHz) (IHF-A net- work) MP3 decoding format ...
- Page 214 TEL: (03) 9586-6300 PIONEER ELECTRONICS OF CANADA, INC. 300 Allstate Parkway, Markham, Ontario L3R 0P2, Canada TEL: 1-877-283-5901 TEL: 905-479-4411 PIONEER ELECTRONICS DE MEXICO, S.A. de C.V. Blvd.Manuel Avila Camacho 138 10 piso Col.Lomas de Chapultepec, Mexico, D.F. 11000 TEL: 55-9178-4270 先鋒股份有限公司...
Need help?
Do you have a question about the Super Tuner IIID AVIC-X710BT and is the answer not in the manual?
Questions and answers