MikroTik RBmAP2nD Quick Setup Manual And Warranty Information
Hide thumbs
Also See for RBmAP2nD:
- Quick manual (23 pages) ,
- Quick manual (62 pages) ,
- Quick manual (26 pages)
Table of Contents
Advertisement
Quick Links
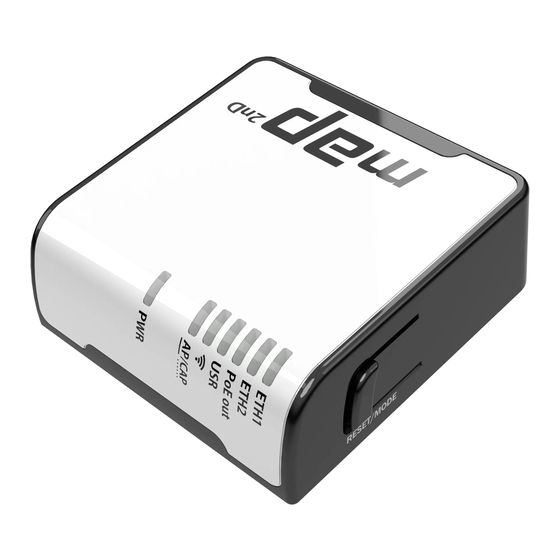
RouterBOARD mAP
Quick Setup Guide and Warranty Information
The mAP 2nD is a small wireless AP device with 2 ethernet ports, Ether1 supports powering by PoE, Ether2 supports PoE output
for powering another device.
Connecting
1.
Connect your Internet cable to Ether1, and your PC to Ether2. If using the mAP to power another router using the PoE
output feature, connect the router to Ether2, and use the built in wireless AP to configure the mAP
2.
Set computer/router IP configuration to automatic (DHCP)
3.
Wireless AP mode is enabled by default, you can connect to the SSID "MikroTik". Log into your router from your web
browser by opening 192.168.88.1 in the address bar
4.
The Ether2 port suports PoE output, with auto detection feature. This means you can connect Laptops and other non-
PoE devices without damaging them. The PoE on Ether2 outputs approximately 2V below input voltage, and supports up
to 0.5A (So provided 24V PSU will provide 22V/0.5A output to the Ether2 PoE port).
Powering
The device accepts powering from the power jack or from the first Ethernet port (Passive PoE):
DC power jack (5.5mm outside and 2mm inside diameter, female, pin positive plug) accepts 8-57V DC
The first Ethernet port accepts passive Power over Ethernet 11-57V DC.
mAP can also be powered with the built in microUSB port, using the USB 5V power
Under maximum load, the power consumption of this device is 4W (when not using PoE output)
Booting process
The device is preinstalled with MikroTik RouterOS software. It can be configured in several ways.
This device doesn't come fitted with a Serial Port connector, so initial connection has to be done via the Ethernet
cable. Connect to wireless SSID "MikroTik" and open 192.168.88.1 in your web browser. Username is admin and
there is no password. In case IP connection is not available, Winbox can be used to connect to the MAC address of
the device. More information here:
In case you wish to boot the device from network, for example to use MikroTik Netinstall, hold the RESET button of
the device when starting it until the LED light turns off, then release the button and the device will start looking for
Netinstall servers.
By default, the device is preconfigured with a simple firewall on the WAN port, this configuration can be viewed when
first connecting to the Router via Winbox. It will ask whether to keep this configuration or clean it to use your own.
LAN/WLAN ports have DHCP server enabled.
Extension Slots and Ports
Two 10/100 Ethernet ports, supporting automatic cross/straight cable connection (Auto MDI/X), so you can use either
straight or cross-over cables for connecting to other network devices.
One Integrated Wireless 2.4GHz 802.11b/g/n 2x2 dual chain MIMO, Onboard PIF antennas, max gain 1.2dBi
One microUSB 2.0 port
Resetting the device
In case you wish to return the device to its original configuration, you can use the RESET button which is located to
the left of the Ethernet ports. Hold this button during boot time until LED lights start flashing, then release the button
t o reset RouterOS configuration. You can use this procedure if you have forgotten the password to access the
device, or simply wish to return the unit to its default configuration state.
See
www.routerboard.com
for more information. Contact
http://wiki.mikrotik.com/wiki/First_time_startup
support@mikrotik.com
for support questions.
27-Oct-15
Advertisement
Table of Contents

Related Manuals for MikroTik RBmAP2nD


Summary of Contents for MikroTik RBmAP2nD
- Page 1 Ether2, and use the built in wireless AP to configure the mAP Set computer/router IP configuration to automatic (DHCP) Wireless AP mode is enabled by default, you can connect to the SSID “MikroTik”. Log into your router from your web browser by opening 192.168.88.1 in the address bar The Ether2 port suports PoE output, with auto detection feature.
- Page 2 Out-of-warranty devices and devices not covered by warranty sent to Mikrotik will be returned to the sender at sender's cost. If the customer has not organized return of such rejected devices within 12 months from the day of arrival, MikroTik has the right to discard them.
- Page 3 23 cm minimum distance has to be maintained between the antenna and the occupational user and 75 cm to general public. Under such configuration, the FCC radiation exposure limits set forth for an population/uncontrolled environment can be satisfied. www.routerboard.com for more information. Contact support@mikrotik.com for support questions. 27-Oct-15...
- Page 4 EN. Instruction manual: Connect the power adapter to turn on the device. Open 192.168.88.1 in your web browser, to configure it. More information on http://wiki.mikrotik.com B G . Инструкция: Свържете адаптера на захранване, за да включите устройството. Отворете 192.168.88.1 в уеб браузър, за да настроите продукта. Повече информация в...
Need help?
Do you have a question about the RBmAP2nD and is the answer not in the manual?
Questions and answers