Table of Contents
Advertisement
Quick Links
Advertisement
Table of Contents

Related Manuals for BenQ DC C740i


Summary of Contents for BenQ DC C740i
- Page 1 DC C740i Digital Camera User Manual Welcome...
- Page 2 Further, BenQ Corporation reserves the right to revise this publication and to make changes from time to time in the contents hereof without obligation of this company to notify any person of such revision or changes.
-
Page 3: Table Of Contents
Table of Contents .............. 1 1. Touring Your Camera ..........1 1.1 Checking the package contents ............1 1.2 Camera components ............1 1.2.1 Front view ............. 2 1.2.2 Rear view ............. 2 1.2.3 LED indicators ..........3 2. Preparing Your Camera for Use ............ - Page 4 ..........12 3.7.2 Setting the metering ........13 3.7.3 Setting the white balance ........... 13 3.7.4 Setting the ISO ..........13 3.7.5 Setting the Exposure ..........14 3.7.6 Setting the AEB ..........14 3.7.7 Setting the highlight ........... 14 3.7.8 Setting the sharpness ........
-
Page 5: Touring Your Camera
• All electronic accessories (such as USB, AV cable, adapter, charger, and battery) are designed to work with this BenQ Digital Camera only. Do not use them with other Digital Camera?to avoid possible damage. 1.2Camera components 1.2.1 Front view... -
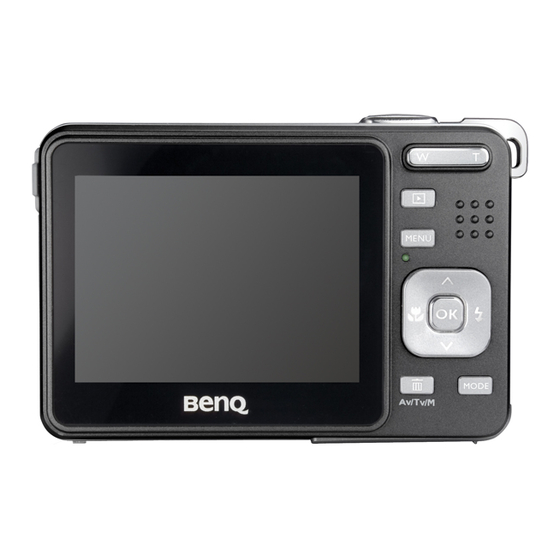
Page 6: Rear View
If your BenQ camera’s lens remains extended after an involuntary shutdown, simply replace the batteries with new ones and restart your camera. Never forces the lens inwards since this action will damage the camera and void the BenQ Warranty. 1.2.2 Rear view... -
Page 7: Preparing Your Camera For Use
Preparing Your Camera for Use Installing the batteries You can use two AA batteries to power up the camera. Make sure that the power of the digital camera is off before inserting or removing the batteries. To insert the batteries: 1. -
Page 8: Using The Camera
Using the Camera Navigator You can use the Navigator with four-way control and one button to access numerous controls of your camera. or Play (video playback only) Focus mode or left Down Flash mode or right LCD monitor information (REC mode) 9999 9999 -1.0... -
Page 9: Getting Started
Getting started 3.3.1 Turning the power on / off • Press the [ ] button until the digital camera turns on. Or, you can press the [ button when the camera is off to turn on the camera. • To turn the power off, press the [ ] button again. -
Page 10: Using The Flash
• To review the last captured image, press the button. Press the button to return to Snapshot mode. • The LCD monitor darkens in strong sunlight or bright light. This is not a malfunction. • To prevent your images from being blurred while pressing the shutter button, always hold the camera steady. -
Page 11: Using The Zoom Function
Icon Flash mode Description Record a single image. 2 sec. The shutter release will be delayed for 2 seconds. 10 sec. The shutter release will be delayed for 10 seconds. Double Record two images in a shot after pressing the shutter release button 10 and 12 seconds. -
Page 12: Selecting The Scene Mode
3.4.1.2 Selecting the Scene mode 1. Set the camera to the REC mode. 2. Press the button to show the scene mode palette. MODE 3. Use the four-way control to select a desired mode and press to confirm the setting. Icon Mode Description... -
Page 13: Using The Menus
3.4.2 Using the menus When a menu is displayed, the four-way control and the button are used to make the desired settings. 1. Turn the power on, and set the camera to the REC mode. 2. Press the MENU and then press the [ ] / [ ] to select the REC menu. -
Page 14: Setup Menu
Menu item Available settings Metering White Balance 3.4.3 Setup menu 1. Turn the power on, and set the camera to the REC or PLAY mode. 2. Press the MENU , and then press the [ ] / [ ] to select the Setup menu. 3. -
Page 15: Recording Movie Clips
Menu item Functions File No. Use this function if the camera experiences a "Folder cannot be created" error or if you want to restart numbering, for example, after erasing all files. [Series] Store the latest used file number no matter deleting files or inserting a new memory card. -
Page 16: Recording Audio Clips
2. Compose the subject on the monitor. • Aim the focus area to the subject that you want to take. • The LCD monitor displays the available recording time 3. Start recording. • Press the shutter button to start recording. •... -
Page 17: Setting The White Balance
Icon Mode Description Multi Selects an exposure based on readings from multiple points in the subject area Spot Selects an exposure based on a single reading taken from the center of your picture. 3.7.3 Setting the white balance Adjust the white balance to match different light sources such as sunlight, incandescent (tungsten) lighting or, fluorescent lighting. -
Page 18: Setting The Aeb
3.7.6 Setting the AEB Sets the auto exposure bracketing (AEB) to shoot 3 continuous images, each with a different exposure setting: correctly exposed, underexposed, and overexposed. 3.7.7 Setting the highlight Make the subject stand out from its surroundings. The subject will be in focus in three different ranges: 3.7.8 Setting the sharpness You can select whether you want the image to have sharp or soft outlines. -
Page 19: Setting Face Tracking
3.7.12 Setting Face tracking After initializing face tracking function, the lens will lock the main character in the picture and follow the movements. Also use auto digital zoom technology to retract and extract zoom lens that allows you to become the focus of lens. 3.7.13 Setting Photo Frame You can add 10 kinds of frames to still images, making them more interesting. -
Page 20: Playing Back Movie Clips
• Press [ ] to stop the movie clip, or press [ ] to pause it. When the movie paused, press [ ] again to resume. • During movie playing back, press [ ] to fast forward or press [ ] to rewind it. -
Page 21: Deleting A Single File Or All Files
3. Change the slide show settings. • Use the four-way control to set the slideshow interval, music, transiton and repeat. Protect... Protect... • You can set the interval between 1~10 Start Delete... Delete... seconds. Interval: Interval: 4. Playing the slide show. Slideshow... -
Page 22: Setting The Dpof For Printing
5. Delete images. • Press the button, then select and press the button. All selected images MENU [Yes] will be deleted. • To cancel delete, press the MENU button in this step. 3.8.8 Setting the DPOF for printing The Digital Print Order Format (DPOF) setting allows you to select images on the memory card for printing and specify the number of print copies in advance using the camera. -
Page 23: Pc Dependent Features
PC Dependent Features Bundled software The camera is supplied with the following software. To install the software, refer to the information supplied with respective CDs. Ulead Photo Ulead® Photo Explorer™ 8.0 SE Basic provides an efficient way to Explorer transfer, browse, modify and distribute digital media. It is an all-in- one tool for owners of digital cameras, webcams, DV camcorders, scanners, or for anyone who strives to effectively handle digital media. -
Page 24: Step 1: Connect The Digital Camera To Your Computer
4.2.1 Step 1: Connect the digital camera to your computer 1. Connect the supplied USB cable to the computer USB port and turn on the camera. 2. The LCD screen turns off when the connection to the computer has been successfully completed. -
Page 25: Troubleshooting
Troubleshooting Refer to the symptoms and solutions listed below before shipping your camera for service. If the problem persists, contact your local reseller or service center. Symptom Cause Solution The camera cannot be There is no battery or the battery is Insert the battery correctly. - Page 26 Symptom Cause Solution I cannot download The free space on the hard disk of Ensure that the hard disk has enough images. your computer is insufficient. space for running Windows and that the drive for loading image files has free space equal to or greater than the memory card in the camera.
-
Page 27: Specifications
Specifications Image Sensor 1/2.5-inch CCD Effective Pixels: 7.0 Mega pixels LCD Display 2.5" LTPS TFT LCD Lens Focal Length: f = 6.2 -18.6 mm (35 mm film equivalent: 37.5-112.5 mm) F No.:F2.8/F5.2 Focusing TTL Auto Focus Range: Macro: 15 cm, Normal: 40 cm ~ infinity Shutter Mechanical shutter: Up to 1/2000 sec. -
Page 28: Service Information
Service Information Technical Support For free driver updates, product information and news releases, visit the following web site: http://www.BenQ.com Service Information...
Need help?
Do you have a question about the DC C740i and is the answer not in the manual?
Questions and answers