Table of Contents
Advertisement
Quick Links
Advertisement
Table of Contents

Related Manuals for Wasp WPL4M Series


Summary of Contents for Wasp WPL4M Series
- Page 1 WPL4M Series Direct Thermal Portable Bar Code Printer USER’S MANUAL...
- Page 2 Information in this document is subject to change without notice and does not represent a commitment on the part of Wasp Barcode Technologies. No part of this manual may be reproduced or transmitted in any form or by any means, for any purpose other than the purchaser’s personal use, without the expressed...
- Page 3 Agency Compliance and Approvals EN 55022/24, IEC 61000-3-3, IEC 61000-3-2 EN 300328, EN 301489 Part 15B/C EN 60950-1 GB 9254 GB 4943.1 GB 17625.1 Wichtige Sicherheits-Hinweise 1. Bitte lesen Sie diese Hinweis sorgfältig durch. 2. Heben Sie diese Anleitung fűr den späteren Gebrauch auf. 3.
- Page 4 CAUTION Risk of explosion if battery is replaced by an incorrect type. Dispose of used batteries according to the instructions. “VORSICHT” Explosionsgefahr bei unsachgemäßen Austaush der Batterie. Ersatz nur durch denselben oder einem vom Hersteller empfohlenem ähnlichen Typ. Entsorgung gebrauchter Batterien nach Angabren des Herstellers.
- Page 5 The exposure standard employs a unit of measurement known as the Specific Absorption Rate, or SAR. The SAR limit set by the FCC is 1.6 W/kg. Tests for SAR are conducted using standard operating positions accepted by the FCC with the EUT transmitting at the specified power level in different channels.
- Page 6 Informations concernant l'exposition aux fréquences radio (RF) La puissance de sortie émise par l’appareil de sans fil Dell est inférieure à la limite(1.6W/Kg) d'exposition aux fréquences radio d'Industry Canada (IC). Utilisez l’appareil de sans fil Dell de façon à minimiser les contacts humains lors du fonctionnement normal.
- Page 7 Equipment name WPL4M Type designation (Type) Restricted substances and its chemical symbols Hexavalent Polybrominate Polybrominated Lead Mercury Cadmium Unit chromium d biphenyls diphenyl ethers (PBDE (Pb) (Hg) (Cd) (PBB) Inner and Outer ○ ○ ○ ○ ○ ○ Plastic Parts Inner and Outer ○...
-
Page 8: Table Of Contents
Contents 1. Introduction ....................... 0 1.1 Product Introduction .................... 0 1.2 Product Features ....................1 1.2.1 Printer Standard Features ....................1 1.2.2 Printer Optional Features ....................2 1.3 General Specifications ..................4 1.4 Print Specifications ....................4 1.5 Media Specifications ..................... 4 2. - Page 9 3.7 Install the Belt Strap (Option/ Standard for linerless model) ......28 4. Power-on Utilities ....................29 4.1 Power-on Utility for Standard Panel ..............29 4.1.1 Media Sensor Calibration ....................30 4.1.2 Self-test and Dump Mode ....................30 4.1.3 Printer Initialization ......................31 4.2 Power-on Utility for LCD Panel (Option) ............
- Page 10 6.5.1 Print Config ........................55 6.5.2 Dump Mode ........................55 6.5.3 Battery ..........................55 6.5.4 Print Head ........................... 56 6.6 Language ......................57 6.7 Service ......................... 57 7. Troubleshooting ....................... 58 8. Maintenance ......................60 Revise History ........................ 61 - ix -...
-
Page 11: Introduction
1. Introduction 1.1 Product Introduction Thank you very much for purchasing WASP bar code printer. Enjoy WASP’s reputation for cost-efficient, high durability printers with the WPL4M economical receipt printer. The WPL4M is a comfortable, light-weight printer capable of working with any mobile receipt printing application where you need quick, simple receipts on demand. -
Page 12: Product Features
1.2 Product Features 1.2.1 Printer Standard Features The printer offers the following standard features. Product standard feature Direct thermal printing Black mark reflective sensor (center position , black mark in back side) Gap transmissive sensor (Fixed, center of offset 2.75 mm to right from center) Head open sensor Peeler sensor 2 operation buttons (On/off and feed) -
Page 13: Printer Optional Features
Code page Codepage 437 (English - US) Codepage 737 (Greek) Codepage 850 (Latin-1) Codepage 852 (Latin-2) Codepage 855 (Cyrillic) Codepage 857 (Turkish) Codepage 860 (Portuguese) Codepage 861 (Icelandic) Codepage 862 (Hebrew) ... - Page 14 ○ Mini USB to RS-232 (serial) converter cable IP54-rated environmental case with shoulder strap (for ○ standard model) ○ IP54-rated environmental case (for standard model) IP54-rated environmental case with shoulder strap (for ○ linerless model) ○ IP54-rated environmental case (for linerless model) ○...
-
Page 15: General Specifications
1.3 General Specifications General Specifications Physical 160 mm (W) x 191.6 mm (H) x 79 mm (D) dimensions Mechanism Plastic with rubber over molded Weight 0.945 kg (w/o battery) External power adapter Power Input: AC 100-240V Output: DC 12V 1A Operation: -10 ~ 50˚C (14 ~ 122˚F) Storage: -40 ~ 60 ˚C (-40 ~ 140˚F) Environmental... - Page 16 Media Specifications Media roll capacity Max. 2.65” (67.3 mm) OD Media core diameter 12.7 mm ~ 25.4 mm (0.5” ~ 1”) ID core Continuous, die-cut, black mark, External fan- Media type fold, receipt, Linerless label (w/ linerless kit) Media wound type Outside wound Media width 50.8 mm ~ 112 mm...
-
Page 17: Operations Overview
2. Operations Overview 2.1 Unpacking and Inspection This printer has been specially packaged to withstand damage during shipping. Please carefully inspect the packaging and printer upon receiving the bar code printer. Please retain the packaging materials in case you need to reship the printer. -
Page 18: Printer Overview
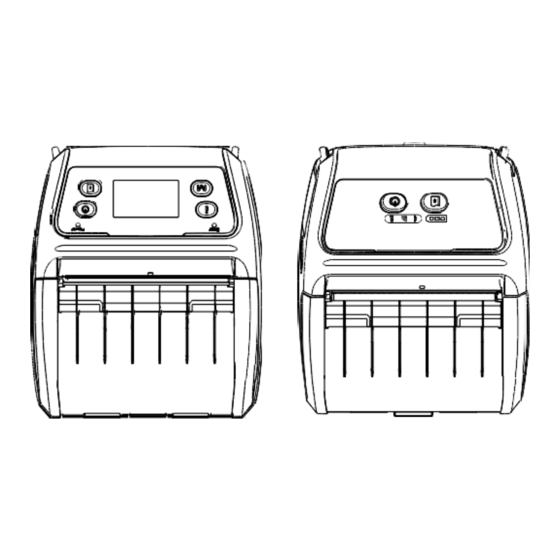
2.2 Printer Overview 2.2.1 Front View Power on/off button Feed button Printer status LED indicator Battery status LED indicator Media cover release button Peel-off sensor (Without for linerless model) Print head Transmissive sensor – Gap sensor Media holder lock switch Media holder Media cover Reflective sensor –... -
Page 19: Rear View
2.2.2 Rear View Li-ion battery Belt chip Battery open clasp Hanger for shoulder strap External label entrance chute USB interface * MicroSD card socket Power jack ote: * Recommended MicroSD card specification. SD card spec SD card capacity Approved SD card manufacturer V1.0, V1.1 MicroSD 128 MB Transcend, Panasonic... -
Page 20: Operator Control
2.3 Operator Control 2.3.1 LED Indication and Keys Keys Function − Press and hold for 2-3 seconds to turn on the printer − Press and hold for 2-3 seconds to turn off the printer − Ready status: Feed one label −... - Page 21 - 10 -...
-
Page 22: Led Indication And Keys For Lcd (Option)
2.3.2 LED Indication and Keys for LCD (Option) Keys Function − Display the printer information − Button for LCD setting menu − Enter the printer setting menu − Button for LCD setting menu − Press and hold for 2-3 seconds to turn on the printer −... - Page 23 Note: Please refer to the section 6 for more details about LCD. - 12 -...
-
Page 24: Setup
3. Setup 3.1 Install the Belt Clip and Battery Insert the belt clip first. Insert the left side to install the battery at the rear of the printer. Push the right side of the battery. Battery safety warning: DO NOT throw the battery in fire. DO NOT short circuit the contacts. DO NOT disassemble the battery. -
Page 25: Charge The Battery
3.2 Charge the Battery It takes 5~6 hours to fully charge the battery before the first time usage. The lifetime of the battery is 300 times for charge/discharge cycles. 3.2.1 Charge the Battery The battery is installed into the printer. Open the interface cover and plug the power cord to the power jack. -
Page 26: Loading The Media
3.3 Loading the Media 3.3.1 Loading the Media 1. Open the printer media cover by pressing the media cover release button. 2. Pull the media holders apart to fit the label roll width. 3. Place the roll between the media holders and close them onto the core. - Page 27 4. Press each side of media cover to close the media cover and make sure the media cover closed correctly. Note: * Please calibrate the gap/black mark sensor when changing media. Turn on the printer and open/close the media cover then it will calibrate the sensor automatically.
-
Page 28: Loading Media In Peel-Off Mode
3.3.2 Loading Media in Peel-off Mode 1. Please refer to subsection 3.3.1 to loading the media roll into the printer. Note: Please calibrate the gap/black mark sensor after loading media in peel-off mode. Turn on the printer and open/close the media cover then it will calibrate the sensor automatically. - Page 29 4. Feed the liner go through the peeler module. (as figure shown) 5. Pull the liner tightly. 6. Move the peeler module to near the peeler bar by pushing each side of peeler module. (cover the platen roller) - 18 -...
- Page 30 7. Press down the peeler module to lock it. Loose the peeler module in the reverse procedures: - 19 -...
-
Page 31: Loading The Fan-Fold/External Media
3.3.3 Loading the Fan-fold/External Media 1. Open the printer media cover by pressing the media cover release button. Pull the media holders apart to fit the media width. 2. Push down each side of media holder lock switch to fix the media holder. - Page 32 4. Press each side of media cover to close the media cover and make sure the media cover closed correctly. Note: Please calibrate the gap/black mark sensor when changing media. Turn on the printer and open/close the media cover then it will calibrate the sensor automatically.
-
Page 33: Loading The Linerless Media (Option)
3.3.4 Loading the Linerless Media (Option) 1. Please refer to subsection 3.3.1 to loading the media roll into the printer. 2. Push down each side of media holder lock switch to fix the media holder for using linerless media. 3. Place the paper, printing side face up, and pull out enough paper over the print head. -
Page 34: Connecting The Printer
3.4 Connecting the Printer The printer must establish communication with a host terminal which sends the data to be printed. There are three ways to connect for WPL4M series, * By a cable between the printer and its host terminal... - Page 35 You should set the WLAN settings via the cable for first using. Please refer to section to setting the Wi-Fi module. If your printer supports the LCD, please refer the section 6.3.4 to set the WLAN settings. - 24 -...
-
Page 36: Install The Ip54-Rated Environmental Case With Shoulder Strap (Option)
3.5 Install the IP54-rated Environmental Case with Shoulder Strap (Option) 1. Open the case top cover. 2. Put the printer into the case. 3. Close the case top cover. The outside cover should be opened while printing. - 25 -... -
Page 37: Install The Adapter For 0.75" And 1" Paper Core (Option)
3.6 Install the Adapter for 0.75” and 1” Paper Core (Option) 1. Check the parts. Adapter x 2 Screw x 2 Nut x 2 2. Put the nut on the media holder. 3. Make the arrow direction is as fig. to install the adapter. - Page 38 4. Pull the media holders apart. Push down another side of media holder lock switch to keep the media holder in max width. 5. Tighten the screw on nut for fixing the adapter on media holder. Note: Press the nut with hand when tighten the screw.
-
Page 39: Install The Belt Strap (Option/ Standard For Linerless Model)
3.7 Install the Belt Strap (Option/ Standard for linerless model) 1. Tighten 2 screws on the printer. For linerless model 2. Pull up the belt strap to lock it on the screws. For standard model 3. Open the belt strap for using. - 28 -... -
Page 40: Power-On Utilities
4. Power-on Utilities There are three power-on utilities to set up and test printer hardware. These utilities are activated by pressing FEED button ( ) then turning on the printer power ( simultaneously and release the button at different positions of LED indicator. 4.1 Power-on Utility for Standard Panel Please follow the steps below for different power-on utilities. -
Page 41: Media Sensor Calibration
4.1.1 Media Sensor Calibration Please follow the steps below to calibrate the media sensor. 1. Turn off the printer power switch. 2. Hold on the FEED button ( ) then turn on the power switch ( 3. Release the power switch ( ) when LED color turn on amber. -
Page 42: Printer Initialization
The LEDs will be changed as following figures: Beep sound twice (5 blinks) (5 blinks) (5 blinks) Turn on the printer 4.1.3 Printer Initialization Printer initialization is used to clear DRAM and restore printer settings to defaults. -
Page 43: Media Sensor Calibration
Power on utilities The LCD will be changed as following. for LCD panel Calibrate….. Self Test….. Initialize….. (5 dots) (5 dots) (5 dots) Release FEED Media sensor Media sensor calibration calibration, self-test and Printer initialization button ( ) for (Please refer to 4.2.1) enter dump mode (Please refer to 4.2.3) different functions... -
Page 44: Printer Initialization
2. Hold on the FEED button ( ) then turn on the power switch ( 3. Release the power switch ( ) when “Error” LED color turn on red. Note: In this moment, you should still hold on the FEED button. 4. - Page 45 - 34 -...
-
Page 46: Self-Test
4.3 Self-test Printer will print the printer configuration after media sensor calibration. Self- test printout can be used to check if there is any dot damage on the heater element, printer configurations and available memory space. Note: Self-test printout requires 4” wide paper width. Printer model name &... -
Page 47: Dump Mode
4.4 Dump mode Printer will enter dump mode after printing printer configuration. In the dump mode, all characters will be printed in 2 columns as following. The left side characters are received from your system and right side data are the corresponding hexadecimal value of the characters. -
Page 48: Printer Defaults
4.5 Printer defaults Printer configuration will be restored to defaults as below after initialization. Parameter Default setting Speed 50.8 mm/sec (2 ips) Density Media Width 4” (101.5 mm) Media Height 4” (101.5 mm) Sensor Type Gap sensor Print Direction Reference Point 0,0 (upper left corner) Gap Offset Post-Print Action... -
Page 49: Diagnostic Tool
5. Diagnostic Tool WASP’s Diagnostic Utility is an integrated tool incorporating features that enable you to explore a printer’s settings/status; change a printer’s settings; download graphics, fonts and firmware; create a printer bitmap font; and send additional commands to a printer. With the aid of this powerful tool, you can review printer status and setting in an instant, which makes it much easier to troubleshoot problems and other issues. - Page 50 1. Connect the printer and computer with a cable. Note: * The printer connects with the computer via USB to USB cable or USB to RS-232 cable (option). 2. Select the PC interface connected with bar code printer. USB to USB cable USB to RS-232 cable The default interface setting is USB interface.
-
Page 51: Setting Bluetooth By Diagnostic Tool
5.3 Setting Bluetooth by Diagnostic Tool 1. Connect the printer and computer with a cable. Note: * The printer connects with the computer via USB to USB cable or USB to RS-232 cable (option). 2. Turn on the printer power switch. 3. -
Page 52: Setting Wi-Fi By Diagnostic Tool (Option)
9. Remove the cable to print a data for test. 6. LCD Menu Function (Option) The WPL4M series offer the LCD panel for selection to further enhance its capabilities to meet the demands of a wide range of printing solutions. This option feature includes LCD... -
Page 53: How To Use The Lcd To Set The Printer
control panel, 4 buttons and 2 LED display. Please press the “M” button to enter the setting menu. 6.1 How to use the LCD to set the printer Press the “M” button to display the function menu screen as following shown. You can use this 4 buttons to scroll, select, enter or return the menu, depend on the icons from 4-sides of LCD. - Page 54 2. Press button to enter the “Print Setup” item. Select the “WPL” item. Enter the “Speed” setting mode. At this status, you can scroll up or scroll down to select the value of print speed. Then press button to save the selected value into the printer. Press “ ”...
-
Page 55: Main Menu Overview
Print Config. English Initialization ↓ ↓ ↓ Sensor FLASH Dump Mode ↓ ↓ Serial Battery ↓ ↓ *Wireless Print Head ↓ Bluetooth ↓ Date Time ↓ Display Note: * The Wireless LAN function is optional for WPL4M series. - 44 -... -
Page 56: Setup
6.3 Setup This “Setup” category can set up the sensor, serial comm., wireless, Bluetooth, date time and display settings. 6.3.1 Printer Setup 6.3.1-1 Printer setup for WPL Speed Density Direction Print Mode Offset Shift X Main Menu Setup Shift Y Reference X Reference Y Code Page... - Page 57 This item is used to set the print mode. There are 3 modes as below, Printer Mode Description Batch Next label top of form is aligned to the print Print mode None Mode head burn line location. (Tear Off Mode) Once image is printed completely, label gap/black mark will be fed to the tear plate Batch Mode...
-
Page 58: Printer Setup For Zpl2
6.3.1-2 Printer setup for ZPL2 Density Print Speed Tear Off Print Mode Print Width List Fonts List Images Main Menu Setup ZPL2 List Formats List Setup Control Prefix Format Prefix Delimiter Char Media Power Up Head Close Left Position Item Description Default Use this item to setup printing darkness. - Page 59 Flash or optional memory card. This feature is used to print current printer available List Images images list to the label. The images stored in the printer’s DRAM, Flash or optional memory card. This feature is used to print current printer available List Formats formats list to the label.
-
Page 60: Sensor
6.3.2 Sensor Auto Black Mark alibrat Continuous Scan Scan Backing Paper Scan Manual Setup Black Mark Scan Mark Paper Scan Remove Continuous Label Paper Main Setup Sensor Menu Auto Threshold Fixed Maximum Length Advanced Min. Paper Max. Gap/Mark Item Description Default This item is used to set the media sensor type and Auto Calibration... -
Page 61: Serial Comm
6.3.3 Serial Comm. 1200 bps 2400 bps 4800 bps 9600 bps Baud Rate 19200 bps 38400 bps 57600 bps 115200 bps None Main Menu Setup Serial Comm. Parity Even Data Bits Stop Bit(s) Item Description Default Baud Rate 9600 This item is used to set the RS-232 baud rate. Parity This item is used to set the RS-232 parity. -
Page 62: Wireless Lan
6.3.4 Wireless LAN Infrastructure Operating Mode Ad-hoc Main Menu Setup Wireless LAN Scan AP DHCP Item Description Default This item is used to set the operating mode of wireless local area networks to connect devices to the networks. Note: Operating Mode Infrastructure Infrastructure mode requires the use of an access point for this communication to take... -
Page 63: Bluetooth
6.3.5 Bluetooth Local Name Main Menu Setup Bluetooth PIN Code Item Description Default This item is used to set the local name for Local Name BT-SPP Bluetooth. This item is used to set the local PIN code for PIN Code 0000 Bluetooth. -
Page 64: Display
6.3.7 Display Always On Always Off 5 Seconds 10 Second Contrast 30 Second Main Menu Setup Display Backlight 1 Minute 5 Minutes 10 Minutes 30 Minutes 1 Hour 5 Hours Item Description Default Contrast This item is used to set the contrast for display. Backlight This item is used to set the backlight time for display. -
Page 65: File Manager
6.4 File Manager This feature is used to check the printer available memory and file list. DRAM Saved file list (Available memor y) FLASH Saved file list Main Menu File Manager (Available memor CARD (Avail Saved file list able memor Item Description Use this menu to show available memory space and run (.BAS) -
Page 66: Diagnostics
6.5 Diagnostics Main Menu Diagnostics Print Config. Dump Mode Battery Print Head 6.5.1 Print Config. Main Menu Diagnostics Print Config. This feature is used to print current printer configuration to the label. On the configuration printout, there is a print head test pattern, which is useful for checking if there is any dot damage on the print head heater element. -
Page 67: Print Head
Main Menu Diagnostics Battery This feature is used to check the printer battery voltage. 6.5.4 Print Head Main Menu Diagnostics Print Head This feature is used to check the printer temperature, resistance, and bad dots for print head. - 56 -... -
Page 68: Language
6.6 Language Main Menu Language English This option is used to setup the language on LCD display. 6.7 Service Main Menu Service Initialization This feature is used to restore printer settings to defaults. Please refer to section 4.5. Note: When printer initialization is done, please calibrate the gap or black mark sensor before printing. -
Page 69: Troubleshooting
7. Troubleshooting The following guide lists the most common problems that may be encountered when operating this bar code printer. If the printer still does not function after all suggested solutions have been invoked, please contact the Customer Service Department of your purchased reseller or distributor for assistance. - Page 70 * Reload the supply. * Clean the print head. * Media is loaded incorrectly * Clean the platen roller. * Dust or adhesive accumulation * Adjust the print density and print on the print head. Poor Print Quality speed. * Print density is not set properly. * Run printer self-test and check the * Print speed is not set properly.
-
Page 71: Maintenance
8. Maintenance This session presents the clean tools and methods to maintain your printer. 1. Please use one of following material to clean the printer. Cotton swab Lint-free cloth Vacuum / Blower brush 100% Ethanol or Isopropyl Alcohol 2. -
Page 72: Revise History
Revise History Date Content Editor 2013/10/4 Modify section 2.3.2 Camille 2013/10/31 Modify section 1.3 and 3.2 Camille * Modify section 1.2.2 2014/1/8 * Add section 3.6 (Install the adapter for 0.75” and 1” paper Camille core) 2014/1/23 Modify section 1.3 Camille 2014/4/30 Add section 3.7 (Install the belt strap) - Page 73 Wasp Barcode Technologies 1400 10 Street Plano, Texas USA 75074 © 2013-2018 Wasp Barcode Technologies www.waspbarcode.com - 62 -...
Need help?
Do you have a question about the WPL4M Series and is the answer not in the manual?
Questions and answers