
Related Manuals for SeeEyes SC-MICP1001


Summary of Contents for SeeEyes SC-MICP1001
- Page 1 Release Version 1.1 QHD Analog (AHD/TVI) VIDEO/POWER/UTC(4M/5M) SC-MICP1001 User Manual SC-MITP1001 SC-MIRP1001...
- Page 2 Release Version 1.1 Precaution and Safety Guidelines The content of this guideline is to protect the safety of users and prevent property damage. Be sure to read this user’s manual thoroughly and use the device correctly. Warning (If you do not keep any of the below guidelines, you may get seriously injured or cause somebody’s death.) ■...
- Page 3 Release Version 1.1 Caution (If you do not keep any of the below guidelines, you may get injured or suffer property loss.) ■ Proper ambient temperature and humidity are recommended. - Avoid extremely high temperatures(over 50°C) or low(below -10°C), and humid conditions. ■...
- Page 4 Release Version 1.1 1. Introduction 1-1. Summary SC-MICP1001 is a kit capable of long-distance transmission of AHD and TVI signals and consists of SC-MITP1001 (transmitter) and SC-MIRP1001 (receiver). It can transmit power, video, and UTC via 1 coaxial cable up to 350m(RG-59).
-
Page 5: Names And Functions Of Each Part
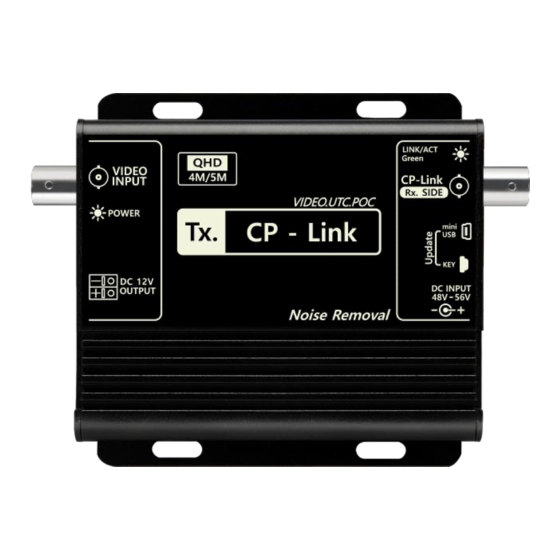
Release Version 1.1 3. Names and functions of each part 3-1. SC-MITP1001(Transmitter) Supports UTC function to control the camera's menu. ⚫ Up to 10W cameras can be connected depending on coaxial cable conditions. ⚫ ① VIDEO INPUT: HD-Analog video input terminal ②... - Page 6 Release Version 1.1 3-2. SC-MIRP1001(Receiver) It supplies power to the transmitter and receives video signal from the transmitter. ⚫ IT transmits UTC data from DVR to transmitter. ⚫ ① CP-LINK INPUT(Tx SIDE): Terminal for connecting transmitter via coaxial cable ② LINK, ACT status LED indicator Function Status...
- Page 7 Release Version 1.1 4. Installation guide 4-1. Check list before installation Supply SC-MICP1001 with power after confirming once again that the transmitter and receiver are properly installed. • Installation Order: Connect the DC12V output of the transmitter to the power input of the camera → Connect the transmitter and the receiver with a coaxial cable →...
-
Page 8: Transmission Distance
Release Version 1.1 ※ Cautions when installing cables • When connecting coaxial cables and working with connectors, it is recommended to use BNCs with low connection resistance. • When installing, pay attention to cable deformation due to pressure (Squashed cable). •... -
Page 9: Troubleshooting
Release Version 1.1 5. Troubleshooting Symptoms Check list • Check that the DC adapter is properly connected. • Check if the dedicated DC adapter (DC 48V to DC 56V) is used. No power • After connecting the DC adapter, check if the RED LED of the transmitter/receiver is on when power is applied. -
Page 10: Specifications
Release Version 1.1 6. Specifications MODEL SC-MITP1001 SC-MIRP1001 Input signal AHD, TVI CP-Link(Digital Signal) Signal Output signal CP-Link(Digital Signal) AHD, TVI Resolution 2MP, 4MP, 5MP Transmission distance(RG-59) Up to 300m Resolution supported with UTC AHD/TVI : 2MP, 4MP, 5MP External Interface(For only update) MIIN USB 1Port Power input PoC or DC 48V - 56V... -
Page 11: Warranty Certificate
Release Version 1.1 7. Warranty Certificate This product has passed thorough quality control and test, and if this gets broken during normal use, we provide the two-year warranty service. Model No. Serial No. Distributor Date you purchased Place you purchased Warranty Period Two (2) year from the date of purchase Name... - Page 12 Release Version 1.1 #503~509 Sunil Technopia, 555 Dunchon-daero, Jungwon-gu, Seongnam City, Gyeonggi Province, Korea (Zip Code: 13215)
Need help?
Do you have a question about the SC-MICP1001 and is the answer not in the manual?
Questions and answers