Table of Contents
Advertisement
Quick Links
Advertisement
Table of Contents

Subscribe to Our Youtube Channel
Related Manuals for Electrolux EOD4P46H


Summary of Contents for Electrolux EOD4P46H
- Page 1 EN User Manual | Oven EOD4P46H KODDP66H...
-
Page 2: Table Of Contents
Access your full user manual at electrolux.com/manuals Get usage advice, brochures, trouble shooter, service and repair information at electrolux.com/support For more recipes, hints, troubleshooting download My Electrolux Kitchen app. Subject to change without notice. CONTENTS 1. SAFETY INFORMATION................2 2. - Page 3 the use of the appliance in a safe way and understand the hazards involved. Children of less than 8 years of age and persons with very extensive and complex disabilities shall be kept away from the appliance unless continuously supervised. •...
-
Page 4: Safety Instructions
• WARNING: The appliance and its accessible parts become hot during use. Care should be taken to avoid touching heating elements or the surface of the appliance cavity. • Always use oven gloves to remove or insert accessories or ovenware. •... - Page 5 2.2 Electrical connection Cable types applicable for installation or re‐ placement for Europe: WARNING! Risk of fire and electric shock. H07 RN-F, H05 RN-F, H05 RRF, H05 VV-F, H05 V2V2-F (T90), H05 BB-F • All electrical connections should be made For the section of the cable refer to the total by a qualified electrician.
- Page 6 • Clean the appliance with a moist soft WARNING! cloth. Use only neutral detergents. Do not use abrasive products, abrasive cleaning Risk of damage to the appliance. pads, solvents or metal objects. • To prevent damage or discoloration to the •...
-
Page 7: Installation
• This product contains a light source of appliance. energy efficiency class G. • Use only lamps with the same specifications. 3. INSTALLATION 3.1 Building in WARNING! Refer to Safety chapters. www.youtube.com/electrolux www.youtube.com/aeg How to install your AEG/Electrolux Oven - Column installation ENGLISH... - Page 8 (*mm) min. 550 min. 560 (*mm) min. 550 min. 560 3.2 Securing the oven to the cabinet ENGLISH...
-
Page 9: Product Description
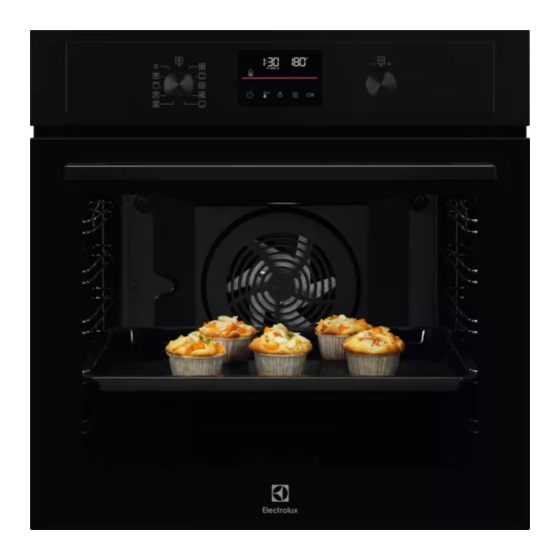
4. PRODUCT DESCRIPTION 4.1 General overview Control panel Knob for the heating functions Display Control knob Heating element Lamp Cavity embossment Shelf support, removable Shelf positions 4.2 Accessories • Grill- / Roasting pan To bake and roast or as pan to collect fat. •... -
Page 10: Before First Use
5.3 Display Display with key functions. Display indicators Basic indicators Lock Assisted Cooking Cleaning Settings Fast Heat Up Timer indicators Minute minder Time Delay Uptimer End time Progress bar - for temperature or time. The bar is fully red when the appliance reaches the set tem‐ perature. -
Page 11: Daily Use
Step 2 Set the maximum temperature for the function: Let the oven operate for 1 h. Step 3 Set the maximum temperature for the function: Let the oven operate for 15 min. The oven can emit an odour and smoke during preheating. Make sure that the room is ventilated. 7. - Page 12 7.2 Heating functions Heating function Application To bake on up to three shelf positions at the same time and to dry food. Set the tem‐ perature 20 - 40 °C lower than for Conventional Cooking. True Fan Cooking To bake and roast food on one shelf position. Conventional Cooking To add humidity during the cooking.
- Page 13 7.4 How to set: Assisted Cooking Every dish in this submenu has a recommended heating function and temperature. Use the function to prepare a dish quickly with default settings. You can also adjust the time and the temperature during cooking. For some of the dishes you can also cook with: •...
- Page 14 Dish Weight Shelf level / Accessory Fillet, rare (slow cook‐ ing) 2; baking tray Fillet, medium (slow 0,5 - 1.5 kg; 5 - 6 Use your favourite spices or simply salt and fresh groun‐ cooking) cm thick pieces ded pepper. Fry the meat for a few minutes on a hot pan. Insert to the appliance.
- Page 15 Dish Weight Shelf level / Accessory Whole fish, grilled 0.5 - 1 kgper fish 2; baking tray Fill the fish with butter and use your favourite spices and herbs. Fish fillet 3; casserole dish on wire shelf Use your favourite spices. Cheesecake 28 cm springform tin on wire shelf Apple cake...
-
Page 16: Clock Functions
Dish Weight Shelf level / Accessory Baguette / Ciabatta / 0.8 kg 150 ml; baking tray lined with baking pa‐ White bread More time needed for white bread. All grain / rye / dark 1 kg 150 ml; baking tray lined with baking pa‐ bread all grain in loaf per / wire shelf 8. -
Page 17: Using The Accessories
How to set: Minute minder Step 1 Step 2 Step 3 The display shows: 0:00 Set the Minute minder Press: Press: Timer starts counting down immediately. How to set: Cooking time Step 1 Step 2 Step 3 Step 4 The display shows: 0:00 Choose a heating... -
Page 18: Additional Functions
Wire shelf: Push the shelf between the guide bars of the shelf support and make sure that the feet point down. Deep pan: Push the tray between the guide bars of the shelf support. 10. ADDITIONAL FUNCTIONS 10.1 Lock This function prevents an accidental change of the appliance function. Turn it on when the appliance works - the set cooking continues, the control panel is locked. -
Page 19: Hints And Tips
10.3 Cooling fan When the appliance operates, the cooling fan turns on automatically to keep the surfaces of (°C) the appliance cool. If you turn off the 250 - maximum appliance, the cooling fan can continue to operate until the appliance cools down. The Automatic switch-off does not work with the functions: Light, Time Delay. - Page 20 (°C) (min) Shashlik, 0.5 kg baking tray or dripping pan 25 - 30 Cookies, 16 pieces baking tray or dripping pan 20 - 30 Macaroons, 24 pieces baking tray or dripping pan 25 - 35 Muffins, 12 pieces baking tray or dripping pan 30 - 40 Savory pastry, 20 baking tray or dripping pan...
- Page 21 ( °C) (min) Small Conventional Baking tray 20 - 35 cakes, 20 Cooking per tray Small True Fan Baking tray 150 - 160 20 - 35 cakes, 20 Cooking per tray Small True Fan Baking tray 2 and 4 150 - 160 20 - 35 cakes, 20 Cooking...
-
Page 22: Care And Cleaning
12. CARE AND CLEANING WARNING! Refer to Safety chapters. 12.1 Notes on cleaning Clean the front of the appliance only with a microfibre cloth with warm water and a mild de‐ tergent. Use a cleaning solution to clean metal surfaces. Clean stains with a mild detergent. - Page 23 Step 1 Turn off the oven and wait until it is cold. Step 2 Pull the front of the shelf support away from the side wall. Step 3 Pull the rear end of the shelf support away from the side wall and remove Step 4 Install the shelf supports in the oppo‐...
- Page 24 When the cleaning ends: Turn off the oven and wait until it Clean the cavity with a soft cloth. Remove the residue from the bottom of is cold. the cavity. 12.5 Cleaning Reminder The oven reminds you when to clean it with pyrolytic cleaning. To turn off the reminder enter the Menu and select Set‐...
- Page 25 Step 5 Hold the door trim (B) on the top edge of the door at the two sides and push inwards to re‐ lease the clip seal. Step 6 Pull the door trim to the front to remove it. Step 7 Hold the door glass panels by their top edge and carefully pull them out one by one.
-
Page 26: Troubleshooting
12.7 How to replace: Lamp Always hold the halogen lamp with a cloth to prevent grease residue from burning on the lamp. WARNING! Risk of electric shock. The lamp can be hot. Before you replace the lamp: Step 1 Step 2 Step 3 Turn off the oven. -
Page 27: Energy Efficiency
......... Serial number (S.N.) ......... 14. ENERGY EFFICIENCY 14.1 Product Information and Product Information Sheet Supplier's name Electrolux EOD4P46H 949499664 Model identification KODDP66H 949499666 Energy Efficiency Index 81.2 Energy efficiency class Energy consumption with a standard load, conventional mode 0.93 kWh/cycle Energy consumption with a standard load, fan-forced mode 0.69 kWh/cycle... -
Page 28: Menu Structure
Volume 72 l Type of oven Built-In Oven EOD4P46H 30.3 kg Mass KODDP66H 30.7 kg IEC/EN 60350-1 - Household electric cooking appliances - Part 1: Ranges, ovens, steam ovens and grills - Meth‐ ods for measuring performance. 14.2 Energy saving the residual heat. -
Page 29: Environmental Concerns
Select the option Adjust the value and from Menu structure - select to enter - press to con‐ Select the setting. the Menu. firm setting. press and press Turn the knob for the heating functions to the off position to exit the Menu. Menu structure Assisted Cooking Cleaning... - Page 32 867376888-A-032023...
Need help?
Do you have a question about the EOD4P46H and is the answer not in the manual?
Questions and answers