Alpha Moisture Systems SADPmini2 User Manual
Dewpoint hygrometer
Hide thumbs
Also See for SADPmini2:
- Quick start manual (2 pages) ,
- Quick start manual (3 pages) ,
- User manual (57 pages)

Related Manuals for Alpha Moisture Systems SADPmini2


Summary of Contents for Alpha Moisture Systems SADPmini2
- Page 1 Alpha Moisture Systems Model SADPmini2 Dewpoint Hygrometer 2301 SADPmini2 User Manual...
- Page 2 Fax: +44 (0) 1274 733200 Email: info@amsystems.co.uk Web: www.amsystems.co.uk Office Opening Hours: Monday - Thursday 8.30am - 5.30pm (UK TIME) Friday 8.30am - 5.00pm Saturday and Sunday - Closed Authorised Distributor Contact Information © Alpha Moisture Systems 2017-2019 2301 SADPmini2 – Issue 2...
-
Page 3: Table Of Contents
SADPmini2 User Manual Contents Introduction ........................3 Explanation of Prohibition, Warning and Note Symbols used ......... 3 Warranty ........................3 Instrument Description .................... 4 General Arrangement ....................5 Functional Description of Desiccant Chamber ............6 Important Information ....................... 7 Symbols Table ......................7 Battery Information.................... - Page 4 D1: Firmware Update ..................45 D2: Loading User Tool Configured Files ............. 47 D3: Saving User Tool Configured Files ............... 49 D4: Downloading Settings to the SADPmini2 ............ 51 D5: SADPmini2 Report ..................52 D6: Configuring Instrument to Default Settings ..........53...
-
Page 5: Introduction
Additional information Warranty The SADPmini2 is supplied with a two-year warranty from the date of purchase. This warranty is subject to the proper operational use of the instrument and following the information provided in this User Manual. The instrument should not be repaired without prior inspection or authorisation by Alpha Moisture Systems or an authorised distributor. -
Page 6: Instrument Description
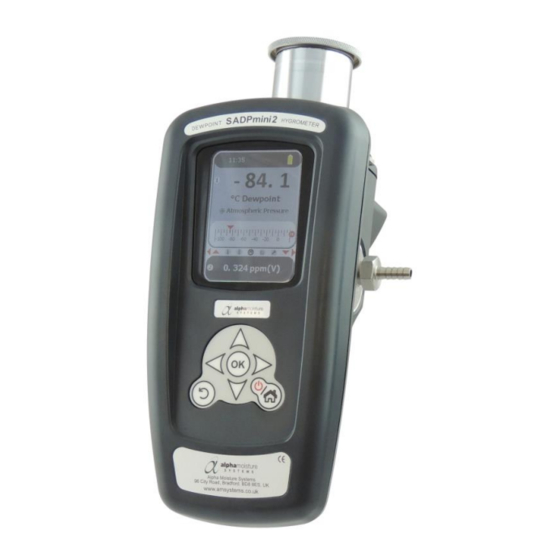
Analogue to Digital Converter (ADC), the SADPmini2 monitors dry industrial process gas and dry compressed air samples. Results are displayed on a colour Liquid Crystal Display. The SADPmini2 is controlled via the Navigation Keypad. The display screen has two sections: •... -
Page 7: General Arrangement
SADPmini2 User Manual General Arrangement... -
Page 8: Functional Description Of Desiccant Chamber
SADPmini2 User Manual Functional Description of Desiccant Chamber Keeping the sensor dry between tests makes sure that the SADPmini2 is ready to carry out rapid sample checks. The design of the Desiccant Head achieves this by surrounding the Aluminium Oxide Sensor with desiccant, keeping the sensor dry when not in use. -
Page 9: Important Information
Only use the USB power supply supplied with the instrument to charge the battery. It is recommended that the SADPmini2 be put on charge overnight prior to use Pressure Exposure The telescopic measuring head should not be exposed to more than 0.3 barg, 4 psig... -
Page 10: Battery Information
SADPmini2 User Manual Battery Information The SADPmini2 uses a single lithium-ion battery (3.65 V nominal). The battery cannot be removed or replaced by the user. The instrument must be returned to an authorised agent for battery replacement. When the battery charge is low and/ or the battery is charging, the instrument display will be dimmed. - Page 11 SADPmini2 User Manual NOTE Authorised distributor details will differ locally...
-
Page 12: Installation
SADPmini2 User Manual Installation This section details the sample specific SADPmini2 installation procedures and the instructions for obtaining the correct result from sample gas. 3.1 Gases to avoid Corrosive Gases: The Sensor should not be exposed to corrosive gases (or corrosive contaminants in the gas sample) as these can chemically attack the sensor, impairing calibration accuracy and/or damaging it beyond economic repair. -
Page 13: Gas Sampling System
SADPmini2 User Manual Gas Sampling System DO NOT Do not allow the sample pressure to exceed 0.3 bar / 4 psi above ambient NOTE To maintain sample integrity and minimise equilibration time the system should be as simple as possible and of minimum swept volume. - Page 14 SADPmini2 User Manual Clean Gas < 10 Bar Reduce positive pressure gas to atmospheric pressure. Use a needle valve at low pressures (<10 barg) to control flow and pressure drop. Clean Gas > 10 Bar Reduce positive pressure gas to atmospheric pressure.
-
Page 15: Installation And Sample
13. Close the sample Isolation Valve. 14. Press and hold the power button for two seconds to switch off the SADPmini2. 15. Disconnect the sample pipework from the SADPmini2. -
Page 16: Instrument Use
SADPmini2 User Manual Instrument Use The SADPmini2 is designed for quick start-up and ease of use. This section details how to power up the instrument and how to use the Navigation Keypad to access the different instrument displays and functions. -
Page 17: Navigation Carousel
SADPmini2 User Manual 4.3 Navigation Carousel The different instrument functions are accessed using the Navigation Carousel. Navigation icons on the carousel relate to the three different screen options available. The Navigation arrows displayed to the left and right of the Navigation Icons indicate the other screens that can be accessed after selecting one of the three Navigation icons. -
Page 18: Instrument Settings
SADPmini2 User Manual Instrument Settings The SADPmini2 is despatched with client specific factory settings pre-installed. However, it may be necessary to adjust these settings periodically. Settings can be adjusted by using either the: • Navigation keypad to directly input the setting changes into the instrument •... -
Page 19: Setting The Time, Date And Power Saving Mode (Eco): Navigation Keypad
Setting the Time, Date and Power Saving Mode (ECO): Navigation Keypad NOTE To save power and extend the battery life, the SADPmini2 has a power saving mode (ECO). When the ECO setting is enabled, the display will dim after 10 minutes and turn off after a further 30 minutes. -
Page 20: Notes On The Correct Use And Choices Of Moisture Measurement Units
SADPmini2 User Manual 5.3 Notes on the Correct Use and Choices of Moisture Measurement Units The SADPmini2 has two display screens: • A primary, upper screen ① providing numerical, scrolling strip chart and horizontal moving coil configuration sample readouts. •... - Page 21 Moisture concentration expressed as parts per million by weight when referencing the gas in which the moisture is being measured. The SADPmini2 default setting is for air (molecular weight 28.99) however, this function allows the molecular weight to be set appropriately for other gases.
-
Page 22: Setting The Main And Secondary Screen Units: Navigation Keypad
SADPmini2 User Manual 5.4 Setting the Main and Secondary Screen Units: Navigation Keypad 1. Select the Settings icon ① from the Navigation Carousel to display the Settings screen. 2. Using the navigation keys select either the main ② or secondary screen unit setting ③. -
Page 23: Instrument Settings Using Pc Tool
SADPmini2 User Manual 5.5 Instrument Settings using PC Tool NOTE The instrument settings may be changed by use of the supplied PC Tool software either over a USB communication channel. To install PC Tool please refer to Appendix C of this manual. -
Page 24: Setting The Time, Date, And Power Saving Mode (Eco): User Tool
SADPmini2 User Manual 5.7 Setting the Time, Date, and Power Saving Mode (ECO): User Tool Select the Date/ Time Set key ①. Using the arrows ② set the correct time. Using the arrow ③ select the drop-down calendar ④ and set the date. -
Page 25: Setting The Main And Secondary Screen Units: User Tool
SADPmini2 User Manual 5.8 Setting the Main and Secondary Screen Units: User Tool Select Display 1 ① or Display 2 ② as required. Select the required Moisture Units from the drop-down menu ③. If Dewpoint units are chosen (i.e. °C or °F) then the required pressure dewpoint must be selected. -
Page 26: Setting The Gas Type: User Tool
SADPmini2 User Manual 5.9 Setting the Gas Type: User Tool Select the Gas tab ①. Select, In Natural Gas ② or In Ideal Gas ③ as required. Select the Gas Molecular Weight drop down menu ④. Select the required gas type ⑤. NOTE: The User Tool software automatically sets the Molecular Weight parameter for the selected gas ⑥. - Page 27 SADPmini2 User Manual...
-
Page 28: Calibration
For example, a SADPmini2 with a full-scale value of 0 °C dewpoint will read 0 °C dewpoint when exposed to a gas with this moisture concentration and will continue to read 0 °C dewpoint as the moisture concentration rises above 0 °C dewpoint. - Page 29 SADPmini2 User Manual...
-
Page 30: Calset
10. The SADPmini will display the CalSet procedure in progress ⑦ and CalSet procedure complete screen ⑧ when finished. 11. Select OK ③. 12. Close the Desiccant Head of the SADPmini2 as shown ⑨. 13. Select BACK ⑩ to return to the Settings Screen. - Page 31 SADPmini2 User Manual...
-
Page 32: Single Point Calibration (Spc)
14. Select OK ③ to enable or disable SPC. NOTE the secondary screen reading changes. 15. Using the navigation keys display the blue tick ⑧. 16. Select OK ③ to save the SPC settings. The SADPmini2 defaults to the Settings screen ⑨. - Page 33 SADPmini2 User Manual...
-
Page 34: Appendix A Instrument Specification
SADPmini2 User Manual Appendix A Instrument Specification... -
Page 35: A1: Instrument Specifications
SADPmini2 User Manual A1: Instrument Specifications Description Specification Accuracy ±2 °C dewpoint Type Battery powered dewpoint hygrometer. Dimensions 108mm (4.252”) width 215mm (8.465”) height 127mm (5”) depth Weight 1.75 kg (3.8 lbs) Display Full colour graphics 240 x 320 resolution display. -
Page 36: Appendix B Trouble Shooting
SADPmini2 User Manual Appendix B Trouble Shooting... -
Page 37: B1: Trouble Shooting
Fails to connect PC Cable damaged or Change Cable on USB Channel cable too long. General Error in operation Send a SADPmini2 Report to your authorised distributor (See Appendix D5) -
Page 38: Appendix C User Tool Software Installation And Guidance
SADPmini2 User Manual Appendix C User Tool Software Installation and Guidance... - Page 39 SADPmini2 User Manual C1: User Tool Software Installation The SADPmini2 is supplied with dedicated User Tool software stored on the Micro SD Card. The software installation file may also be delivered by other means such as CD, DVD, flash drive, email attachment or internet download. The installation from the Micro SD card method is described here.
- Page 40 Select the SD Card icon ⑦ using the navigation keys. Press the OK key ⑥ to open the connection. The SADPmini2 USB to PC transfer screen will be displayed ⑧. NOTE: There may be a short delay as the PC installs the driver.
- Page 41 SADPmini2 User Manual Select the required operating system installation version ⑨ for your PC. Select the User Tool Setup icon ⑩ from the list. 10. Follow the SADPmini2 User Tool software installation prompts selecting the desired options ⑪ as required.
- Page 42 SADPmini2 User Manual NOTE A PC restart is not normally required. A SADPmini2 User Tool launch icon (shown below) will appear on the PC desktop at the end of the installation process Selecting the User Tool icon on the desktop opens the User Tool software.
-
Page 43: C2: User Tool Software Guide
(Microsoft font sizes/ desktop font sizes) NOTE The SADPmini2 keypad is locked when USB connected. All instructions are User Tool generated and can be downloaded to the SADPmini2 NOTE Removing the USB cable during download/ data transfer may result in lost and/ or... - Page 44 Unique Identification Number of Instrument Date and Time SADPmini2 connection status and SD Card access icon Main screen display: Live mirror display of SADPmini2 main screen with graph display function Second screen display: Live mirror display of SADPmini2 second screen with graph...
- Page 45 Setting the User Tool Language Select the language tab ① from the Headings Menu. Select the required language from the drop-down menu. The User Tool will now display information in the selected language. NOTE: The language on the SADPmini2 will not change.
-
Page 46: Appendix D Firmware Maintenance
SADPmini2 User Manual Appendix D Firmware Maintenance... -
Page 47: D1: Firmware Update
SADPmini2 User Manual D1: Firmware Update Instrument firmware updates may be distributed as email attachments. Users should save the firmware update file from the email to a location on their PC before updating their instrument. NOTE: Firmware files are Hex files (*.hex). - Page 48 User Tool Functions are disabled. Program Loader Connected will be displayed ⑤. The Program Loader screen will also be displayed on the SADPmini2 Instrument screen and the version of Program Loader software running on the instrument will be displayed ⑥.
-
Page 49: D2: Loading User Tool Configured Files
SADPmini2 User Manual D2: Loading User Tool Configured Files The User Tool software allows the user to load files into the SADPmini2 that contain already set parameters. This feature is particularly useful for multiple instrument set up. Select the Load tab ①. - Page 50 SADPmini2 User Manual...
-
Page 51: D3: Saving User Tool Configured Files
SADPmini2 User Manual D3: Saving User Tool Configured Files The User Tool software allows the user to save settings to a PC file to enable uploading for future use. Select the Save tab ①. A folder view will open ②. - Page 52 SADPmini2 User Manual...
-
Page 53: D4: Downloading Settings To The Sadpmini2
NOTE The instrument settings may be uploaded from a settings file stored on the PC to the User Tool software then modified if required and then downloaded to a SADPmini2. Select the Download tab ①. Select OK ② to confirm setting transfer to the SADPmini2. -
Page 54: D5: Sadpmini2 Report
D5: SADPmini2 Report The Report function provides the user with a real-time snapshot overview of the instrument status and settings. To view the SADPmini2 Report: Select the File tab from the headings menu ①. Select SADPmini2 Report ②. Select Save/ Print ③ as required. -
Page 55: D6: Configuring Instrument To Default Settings
Select the Reset tab ①. Select Yes/ No ② as required and If Yes select OK ③ to confirm. NOTE SADPmini2 will need to be disconnected form the User Tool and an AutoCal or CalSet performed as indicated ④. -
Page 56: D7: Downloading Calibration Files
SADPmini2 User Manual D7: Downloading Calibration Files Calibration files may be distributed as email attachments when a new sensor has been installed on the instrument. Users should save the file (.bin) from the email to a location on their PC before updating their instrument. - Page 57 SADPmini2 User Manual © Alpha Moisture Systems 2017 2301 SADPmini2 – Issue 1...
Need help?
Do you have a question about the SADPmini2 and is the answer not in the manual?
Questions and answers