Table of Contents
Advertisement
Quick Links
Advertisement
Table of Contents

Related Manuals for KitchenAid POWER PLUS 5KSB8270


Summary of Contents for KitchenAid POWER PLUS 5KSB8270
- Page 1 POWER PLUS BLENDER 5KSB8270 PRODUCT GUIDE W11499120A...
-
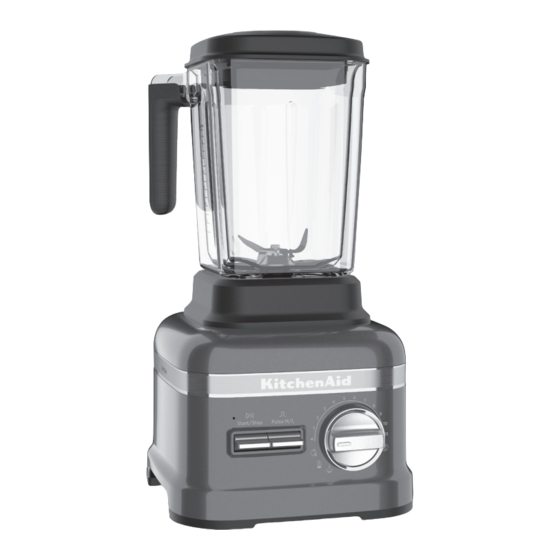
Page 2: Parts And Features
PARTS AND FEATURES 1. Base 8. Jar Handle with Soft Touch Handle Grip 2. Power Switch (not shown) 9. Removable Blender Jar Pad 3. Detachable Power Cord (not shown) 10. Control Dial 4. Blade 11. Pulse Toggle Switch 5. Thermal Control Blender Jar 12. -
Page 3: Product Safety
PRODUCT SAFETY Your safety and the safety of others are very important. We have provided many important safety messages in this manual and on your appliance. Always read and obey all safety messages. This is the safety alert symbol. This symbol alerts you to potential hazards that can kill or hurt you and others. - Page 4 SAVE THESE INSTRUCTIONS For complete details on product information, instructions and videos, including Guarantee information, visit www.KitchenAid.co.uk or www.KitchenAid.eu. This may save you the cost of a service call. To receive a free printed copy of the information online, call 00 800 381 040 26.
-
Page 5: Electrical Requirements
ELECTRICAL REQUIREMENTS Voltage: 220-240 V WARNING Frequency: 50-60 Hz Power (Wattage): 1800 W NOTE: If the plug does not fit in the outlet, contact a qualified electrician. Do not modify the plug in any way. Do not use an adapter. Do not use an extension cord. - Page 6 BLENDING SUGGESTED ITEMS TO TIME (in SETTING DESCRIPTION BLEND min:sec) Frozen Blended ice chopped Gradually ramp up to full drinks fruit (defrost power to completely blend SMOOTHIES Crushed ice slightly until hard foods such as ice, 0:40 Whole fruits it can be whole fruits or vegetables, or probed with frozen fruits.
-
Page 7: Product Assembly
PRODUCT ASSEMBLY PREPARING THE BLENDER FOR Before using the Blender, be sure the countertop beneath the Blender and surrounding areas are dry and clean. Then, plug the Blender into an earthed outlet. WARNING Electrical Shock Hazard Plug into an earthed outlet. The main Power Switch is on the back of Do not remove earth prong. - Page 8 Make sure that the Lid is fully secured on Utilize the Flex Edge Tamper* accessory the Blender Jar. Next, place the Blender as needed for optimal blending Jar on the Base, making sure that it is performance. Remove the Ingredient- fully aligned on the Jar Pad.
-
Page 9: Care And Cleaning
After blending, flip the (Start/Stop) Toggle Switch up or down. Allow the Blender to come to a complete stop before removing the Lid and pouring your blended ingredients. CARE AND CLEANING CLEANING THE BLENDER AND Make sure to clean the Blender Jar, Lid, and Ingredient-Measuring Cap after each ACCESSORIES use. -
Page 10: Troubleshooting Guide
The Blender Jar, Lid, Flex Edge Tamper, NOTE: The Handle Grip can remain on and Ingredient-Measuring Cap are the Handle of the Blender Jar during dishwasher-safe; the Flex Edge Tamper, cleaning and dishwasher cycles. If Lid, and Ingredient- Measuring Cap needed, the Handle Grip can be removed should be placed in the top rack of the to run through the dishwasher separately,... -
Page 11: Electrical Equipment Waste Disposal
To avoid damage to the graphics, do not apply too much force or use abrasive cleansers. See the “Terms of KitchenAid Guarantee (“Guarantee”)” sections. If the problem cannot be Do not return the Blender to the retailer; retailers do not corrected: provide service. -
Page 12: Declaration Of Conformity
TERMS OF KITCHENAID GUARANTEE (“GUARANTEE”) Covering U.K. - Ireland - South Africa - UAE KitchenAid Europa, Inc., Nijverheidslaan 3, Box 5, 1853 Strombeek-Bever, Belgium (“Guarantor”) grants the end-customer, who is a consumer, a Guarantee pursuant to the following terms. FOR U.K.: The Guarantee applies in addition to and does not limit or affect the statutory warranty rights of the end-customer against the seller of the product. - Page 13 If the consumer wishes to make a claim under the Guarantee, the consumer has to contact the country specific KitchenAid service centres or the Guarantor directly at KitchenAid Europa, Inc. Nijverheidslaan 3, Box 5, 1853 Strombeek-Bever, Belgium;...
-
Page 14: Product Registration
Guarantor. The Guarantor shall also bear the postage costs for returning the defective product or product part if the Guarantor or the country specific KitchenAid customer service centre requested the return of the defective product or product part. - Page 15 ©2021 All rights reserved. 09/21 W11499120A...
Need help?
Do you have a question about the POWER PLUS 5KSB8270 and is the answer not in the manual?
Questions and answers