Table of Contents
Advertisement
Quick Links
Advertisement
Table of Contents

Related Manuals for John Lewis JLTDH14


Summary of Contents for John Lewis JLTDH14
- Page 1 JLTDH14 Tumble dryer Instruction manual...
-
Page 2: Important Safety Information
These warnings have been provided in the interest of safety. You MUST read them carefully before installing or using the appliance. If you are unsure of the meanings of these warnings contact the John Lewis branch from which you purchased the appliance. - Page 3 Installation cause an explosion. Only tumble dry items washed with water. • This appliance is heavy. Care should be • Risk of fire: items that have been taken when moving it. spotted or soaked with vegetable or • When unpacking the appliance, check that cooking oil constitute a fire hazard and it is not damaged.
- Page 4 • Garments which have been in contact • Make sure that children or pets do not with volatile petroleum products should climb inside the drum. not be machine dried. If volatile cleaning Environmental tips fluids are used, care should be taken to ensure that the fluid is removed from the •...
- Page 5 it should be taken to the appropriate Warning! When a unit is no longer collection point for the recycling of electrical being used: and electronic equipment. By ensuring this • Pull the plug out of the socket. product is disposed of correctly, you will •...
-
Page 6: Table Of Contents
Contents For the user For the installer Important safety information Technical information Description of the appliance Installation Transporting the appliance Control panel Appliance positioning Before first use Removing transport safety packaging Electrical connection Programme chart Door reversal Sorting and preparing laundry Repairs - after sales service Daily use Switching machine on... -
Page 7: Description Of The Appliance
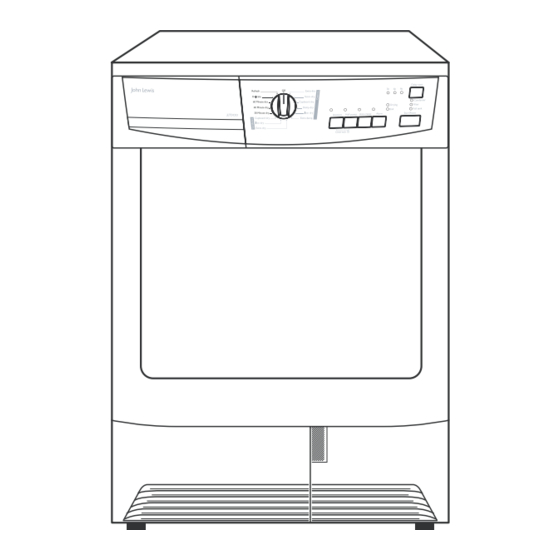
Description of the appliance Control panel Rating plate Water reservoir Course fluff filter Drum light Heat exchanger cover Fine fluff filter Push button for base door opening Fluff filter Ventilation grille Loading door (reversible) Adjustable feet... -
Page 8: Control Panel
Control panel 8 9 10 Programme selector and Off switch Delay start lights :3hr, 6hr, 9hr Half power button Start/Pause button Intensive button Warning lights: Condenser, Filter, Full tank Anti-crease button Delay start button Alarm button Cycle lights: Drying, End Before first use In order to remove any residues which may At the beginning of drying cycle (3-5 min.) -
Page 9: Programme Chart
Programme chart Additional functions/ options Programmes Application/properties Cottons Extra To dry thick or multi- layered fabrics, e.g. terry 7 kg • • • • towelling items, bathrobes, cottons. Cottons Store To dry thick fabrics, e.g. terry towelling items, 7 kg •... -
Page 10: Sorting And Preparing Laundry
Additional functions/ options Programmes Application/properties To refresh the clothes made of wool . The cloths Wool care 1 kg • • • become soft and cosy. We recommend to remove the cloths immediately after the programme end. Refresh 1 kg •... -
Page 11: Daily Use
Daily use Switching machine on Close loading door securely. Lock must audibly lock. Turn the programme selector to any programme. The machine switches on. Selecting the When the loading door is open, the internal programme lamp illuminates the drum. Door opening and laundry loading Open loading door: Push against the loading door (push... -
Page 12: Half Power
Press the Intensive button - the LED If this additional function is selected, the anti- above is on. crease phase at the end of the drying cycle is To deselect the function press the Intensive lengthened by 60 minutes. The laundry can button again. -
Page 13: Delay Start
Delay start Putting in extra items or taking items out before end of programme Open loading door. Warning! Laundry and drum can become hot. Risk of burns! Load or remove laundry items. Close loading securely. Lock must With the Delay start button, you can audibly lock. -
Page 14: Maintenance And Cleaning
Before removing the laundry, remove The drying cycles are automatically fluff from the micro-fine filter. It is best followed by an anti-crease phase to use a damp hand for this purpose. which lasts around 30 minutes. The (See “Maintenance and cleaning” drum rotates at intervals during this chapter.) phase. - Page 15 Remove the fluff from fine filter. It is best to use a damp hand for this purpose. Clean the entire filter area The filter area does not have to be cleaned after every drying cycle, but should be checked regularly and cleaned of fluff if necessary.
-
Page 16: Cleaning The Door Seal
Pour the condensed water out into a basin or similar receptacle. If the fine filter is not fitted, the large mesh filter will not snap into place and the loading door cannot be closed. Cleaning the door seal Wipe the door seal with a damp cloth immediately after the drying cycle has finished. -
Page 17: Cleaning Heat Exchanger Filters
Cleaning heat exchanger filters If the warning lamp Condenser lights, the heat exchanger fluff filters in the base of the appliance must be cleaned, i.e. after each 3 drying cycles. Both filters are located in the appliance base. Water can collect in the filter housing therefore it is normal for the heat Pull the filter housing out of the base by exchanger fluff filters to become wet. -
Page 18: Cleaning The Drum
When necessary, approx. once every 6 months, remove the fluff from the heat exchanger using the sponge supplied. When doing this, please use rubber gloves. Tip: The fluff can be removed more easily if it is first dampened (e. g. with a laundry dampener) or with help of vacuum cleaner. -
Page 19: Clean Operating Screen And Housing
Clean operating screen and housing Caution! Do not use furniture cleaners or aggressive cleaning agents to clean the machine. Use a damp cloth to wipe down the operating screen and housing. What to do if ... Possible cause Remedy Problem Plug in at mains socket. -
Page 20: Machine Settings
Fluff filters clogged. Clean fluff filters. To high loading volume. Respect max. loading volume. Drying cycle Laundry insufficiently spun. Spun adequately the laundry. to long Particularly high room temperature - no Lower the room temperature if possible. machine fault. 1) In case of error: switch the dryer off and on. Set programme. Press the Start/Pause button. Does not work? - inform local service 2) follow program recommendation - see Programme chart chapter 3) see Maintenance and cleaningchapter... - Page 21 Adjusting the level of the LED Condenser high conductivity >600 µS/cm conductivity To memorize setting press simultaneously the Anti-crease and Water contains, a variable quantity of Start/Pause buttons or turn knob to limestone and mineral salts of which Off position quantities vary according to geographical locations thus varying its conductivity values.
-
Page 22: Technical Information
Technical information height x width x depth 85 x 60 x 58 cm drum volume 108 l depth with the load door opened 109 cm adjustable height 1.5 cm the appliance weight 52 kg maximum load volume 7 kg voltage 230-240 V necessary fuse 13 A... -
Page 23: Appliance Positioning
Important! • The appliance should not be installed in an environment such as a unheated garage or outbuilding. The combination of high humidity and low ambient temperatures could affect the performance or the appliance and therefore invalidate your guarantee. • The hot air emitted by the tumble dryer can reach temperatures of up to 60°C. -
Page 24: Electrical Connection
Warning! THIS APPLIANCE MUST BE EARTHED. Should the appliance power supply cable need to be replaced, this must be carried out by a Service Force agent (see chapter: Repairs - after sales service). The manufacturer declines any liability should this safety measure not be observed. -
Page 25: Door Reversal
If you fit your own plug, the colours of the Warning! The manufacturer wires in the mains lead of your appliance declines any responsibility for may not correspond with the markings damage or injury through identifying the terminals in your plug. failure to comply with the Proceed as follows: above safety precautions. - Page 26 Use an appropriate tool and exert Unscrew door lock E, push down pressure to unfasten locking block C slightly and remove from the front of from the snap-on fixture, take out and the machine. re-insert on the other side having Press snap-in button F in and down, rotated the block through 180°.
-
Page 27: Repairs - After Sales Service
Before calling out an or serious malfunctioning. Contact your engineer, please ensure you have read the local John Lewis branch. details under the heading “Something not working”. When you contact your local service... - Page 28 John Lewis Partnership 171 Victoria Street London SW1E 5NN www.johnlewis.com 136916250-B-102011...