Troy-Bilt TB320BV Operator's Manual
2-cycle mulching blower/vacuum
Hide thumbs
Also See for TB320BV:
- Operator's manual (72 pages) ,
- Specification sheet (1 page) ,
- Operator's manual (56 pages)
Table of Contents
Advertisement
Available languages
Available languages
Quick Links
Quick Instructions to
Assemble The
Blower/ Vacuum
for complete instructions, refer to the
Assembly Instructions of the unit's
manual.
Quick Instructions
to Start Engine
for complete instructions, refer to the
Starting/ Stopping Instructions of the
unit's manual.
IMPORTANT: READ OPERATOR'S MANUAL THOROUGHLY AND FOLLOW THE SAFE OPERATION PRACTICES BEFORE OPERATING THE UNIT.
NEED HELP?
PART NO. 769-04959 P00
Operator's Manual
Read and understand all instruction, warning and danger labels on the unit.
Install the blower tube
Align the small arrow on the lower
over the blower outlet
vacuum tube with the arrow on
and push it on until both
the upper vacuum tube and push
tabs snap into place
the lower vacuum tube into the
upper vacuum tube. Turn the
lower vacuum tube clockwise until
it snaps into place.
Press primer bulb 10 times.
Move blue choke
lever to Position 2.
CALL 1–800–828-5500 IN U.S. OR 1–800–668–1238 IN CANADA
DO NOT RETURN THIS PRODUCT
For Assistance please call 1-800-828-5500 (U.S.) or 1-800-668-1238 (Canada)
or visit www.troybilt.com or www.troybilt.ca
Insert a flat head screwdriver
into the slot at the lower end
of the vacuum door and push
inward and upwards to open
the vacuum door and hold it.
Move blue choke
Place unit in starting
lever to Position 1.
position.
While checking that the
Pull starter rope 3 to 5 times
throttle control is still in
to start the unit. Run unit for
the fast postion, move
30-60 seconds to warm up.
choke lever to Position 3.
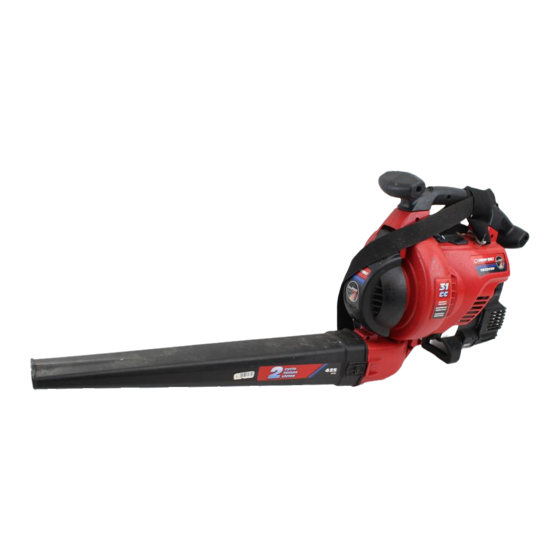
TB320BV
2-Cycle Mulching
Blower/ Vacuum
Install the vacuum bag tube over
the blower outlet and push it on
until both tabs snap into place.
Attach the vacuum bag to the
vacuum bag hook located at the
underside of the unit.
Align the small arrow on the
vacuum tube with the arrow on
the impeller intake and push the
vacuum tube in. Turn the tube
clockwise until it snaps into place.
Move the throttle control to
Pull the rope
the fast position
.
5 times.
Continue warming the
unit for an additional
DIDN'T START?
60 seconds, the unit
Repeat these instructions.
may be used during
this time.
For starting the unit as
If engine still fails to start,
a vacuum, refer to the
refer to the operator's
Starting/ Stopping
manual for additional
Instructions section in
starting and troubleshooting
the manual
5 X
information.
(5/09)
Advertisement
Table of Contents

Related Manuals for Troy-Bilt TB320BV


Summary of Contents for Troy-Bilt TB320BV
- Page 1 TB320BV 2-Cycle Mulching Blower/ Vacuum Operator’s Manual Read and understand all instruction, warning and danger labels on the unit. Quick Instructions to Assemble The Blower/ Vacuum for complete instructions, refer to the Assembly Instructions of the unit’s manual. Install the vacuum bag tube over the blower outlet and push it on until both tabs snap into place.
-
Page 2: Table Of Contents
SERVICE INFORMATION RULES FOR SAFE OPERATION TABLE OF CONTENTS WHILE OPERATING Service Information ..............2 •... -
Page 3: Rules For Safe Operation
RULES FOR SAFE OPERATION ASSEMBLY INSTRUCTIONS 6. Push the vacuum tube in firmly and grip it with SYMBOL MEANING Vacuum Flat both hands. Turn the tube clockwise as far as Door Slot Area Lock Clip • KEEP BYSTANDERS AWAY possible until it snaps into place and locks. Groove WARNING: Keep all bystanders, especially children and pets, at least 50 feet (15 m.) -
Page 4: Operating Instructions
OPERATING INSTRUCTIONS MAINTENANCE AND REPAIR INSTRUCTIONS 5. Squeeze the filter to spread and remove excess oil (Fig. 20). HOLDING THE BLOWER/VACUUM 6. Replace the air filter inside the air filter/ muffler cover (Fig. 17). Before operating the unit, stand in the operating position. Check for the following: NOTE: Operating the unit without the air filter and air filter/muffler cover assembly •... -
Page 5: Specifications
TROUBLESHOOTING SERVICE TECHNIQUE TABLE DES MATIÈRES ENGINE WILL NOT START Service technique ..............5 CAUSE ACTION Consignes de sécurité... -
Page 6: Consignes De Sécurité
CONSIGNES DE SÉCURITÉ CONSIGNES DE SÉCURITÉ AVERTISSEMENTS DE SÉCURITÉ CONCERNANT LES OUTILS À MOTEUR À ESSENCE • SYMBOLES DE SÉCURITÉ ET INTERNATIONAUX • Ce manuel de l'utilisateur décrit les symboles et pictogrammes de sécurité et internationaux pouvant AVERTISSEMENT: L'essence est extrêmement inflammable et ses vapeurs peuvent apparaître sur ce produit. -
Page 7: Instructions De Montage
INSTRUCTIONS DE MONTAGE INSTRUCTIONS DE DÉMARRAGE ET ARRÊT MONTAGE COMME SOUFFLEUSE Manette AVERTISSEMENT: n’utiliser l’outil qu’à l’extérieur, dans un endroit Haute des gaz Montage du tube de soufflage Ralenti bien aéré. Les émanations d’oxyde de carbone dans un endroit vitesse confiné... -
Page 8: Entretien Et Réparations
INSTRUCTIONS D’ENTRETIEN ET RÉPARATIONS INSTRUCTIONS D’ENTRETIEN ET RÉPARATIONS DÉGAGEMENT D’UN(E) TUBE/ HÉLICE BLOQUÉ(E) PROGRAMME D'ENTRETIEN 1. Appuyez sur la commande Marche/Arrêt Stop et maintenez-la en position ARRÊT (O) jusqu'à ce que le moteur L'entretien doit respecter la fréquence indiquée dans le tableau ci-dessous. Il doit également faire partie de toute mise s’arrête complètement (Fig. - Page 9 LLAMADAS A APOYO AL CLIENTE NORMAS PARA UNA OPERACION SEGURA INDICE DE CONTENIDOS ADVERTENCIAS DE SEGURIDAD PARA UNIDADES A GASOLINAS Llamadas a apoyo al cliente ............9 ADVERTENCIA: La gasolina es muy inflamable y sus gases pueden explotar si se Normas para una operación segura .
- Page 10 NORMAS PARA UNA OPERACION SEGURA INSTRUCCIONES DE ENSAMBLE • SIMBOLOS DE SEGURIDAD E INTERNACIONALES • ENSAMBLE DE LA UNIDAD COMO SOPLADOR Este manual del operador describe los símbolos y figuras de seguridad e internacionales que pueden Ensamble del tubo del soplador aparecer en este producto.
- Page 11 INSTRUCCIONES DE ARRANQUE Y APAGADO INSTRUCCIONES DE MANTENIMIENTO Y REPARACIÓN Control del PROGRAMA DE MANTENIMIENTO ADVERTENCIA: Use esta unidad sólo en un área exterior bien regulador Mínima Rápida Estos procedimientos requeridos para el mantenimiento deben ser realizados con la frecuencia indicada en la tabla. ventilada.
- Page 12 INSTRUCCIONES DE MANTENIMIENTO Y REPARACIÓN RESOLUCIÓN DE PROBLEMAS DESBROCE DE UN TUBO / PROPULSOR OBSTRUIDO EL MOTOR NO ARRANCA 1. Oprima y sostenga el control de Encendido/ Apagado en la posición de apagado (O) hasta que el motor se apague CAUSA ACCIÓN por completo (Fig.
- Page 13 NOTES...
- Page 14 NOTES...
- Page 15 NOTES...
- Page 16 B. Artículos de desgaste, perillas percusivas, carretes externos, línea de corte, carretes internos, polea de arranque, cuerdas de arranque, correas motoras. C. TROY-BILT no le ofrece ninguna garantía a los productos que sean vendidos o exportados fuera de los Estados Unidos de América, sus posesiones y territorios, excepto aquellos que se vendan a través de los canales de distribución para exportación autorizados por TROY-BILT.
Need help?
Do you have a question about the TB320BV and is the answer not in the manual?
Questions and answers