
Related Manuals for Troy-Bilt TB51BP


Summary of Contents for Troy-Bilt TB51BP
- Page 1 Operator’s Manual TB51BP 2-Cycle Backpack Blower SAVE THESE INSTRUCTIONS IMPORTANT: Read this manual thoroughly before using this product. Follow all instructions. 769-25751 / 00 08/20...
-
Page 2: Table Of Contents
TABLE OF CONTENTS SERVICE Service ..........2 DO NOT RETURN THIS UNIT TO THE RETAILER. - Page 3 • IMPORTANT SAFETY INSTRUCTIONS • READ ALL INSTRUCTIONS BEFORE OPERATING SAFETY WARNINGS FOR GAS UNITS WARNING: WARNING: When using the unit, all safety Gasoline is highly flammable and instructions must be followed. Please read these its vapors can explode if ignited. Take the following instructions before operating the unit in order to ensure the precautions: safety of the operator and any bystanders.
- Page 4 OTHER SAFETY WARNINGS • Turn the engine off and disconnect the spark plug for maintenance or repair. • Maintain the unit with care. Follow all maintenance instructions • Use only original equipment manufacturer (OEM) replacement in this manual. parts and accessories for this unit. These are available from your •...
- Page 5 • SAFETY & INTERNATIONAL SYMBOLS • This operator's manual describes safety and international symbols and pictographs that may appear on this product. Read the operator's manual for complete safety, assembly, operating and maintenance and repair information. SYMBOL MEANING SYMBOL MEANING •...
-
Page 6: Know Your Unit
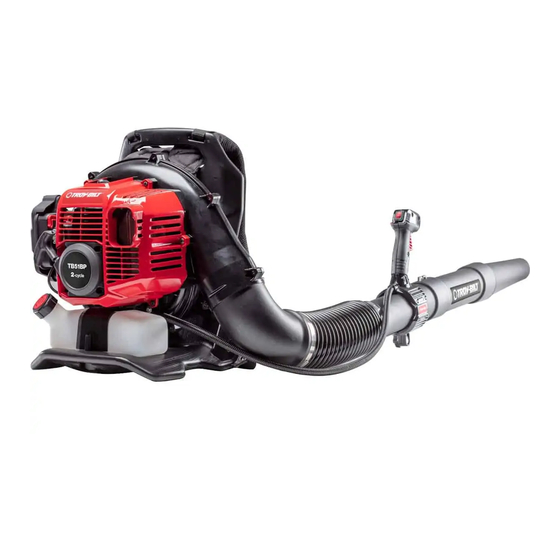
KNOW YOUR UNIT APPLICATIONS • Cleaning yards, driveways, porches, patios, around walls, fences and more Transport handle Spark Plug Harness ASSEMBLY TOOLS REQUIRED • Flat-head screwdriver Flex Tube Cables Air Filter Throttle Grip Cover On/Off Switch Fuel Cap Cruise Control Stand Throttle Control Lower... -
Page 7: Assembly
ASSEMBLY WARNING: To avoid serious personal injury and damage to the unit, shut the unit off before removing or Elbow Tube installing the blower tubes or the nozzle. WARNING: To prevent serious personal injury, never operate the unit without the upper blower tube firmly installed. - Page 8 Installing the Lower Blower Tube Upper Blower Tube 1. Set the unit on a flat, level surface. 2. Align the tab on the lower blower tube with the hole on the upper blower tube (Fig. 4). 3. Push the lower blower tube into the upper blower tube until the tab locks securely into the hole (Fig.
-
Page 9: Oil And Fuel
OIL AND FUEL OIL AND FUEL MIXING INSTRUCTIONS FUELING THE UNIT The use of old and/or improperly mixed fuel is the most common cause WARNING: Gasoline is extremely flammable. Ignited of performance problems. Use only fresh, clean unleaded gasoline. vapors may explode. Always stop the engine and allow it Follow the instructions carefully for the proper gasoline/oil mixture. -
Page 10: Starting And Stopping
STARTING AND STOPPING WARNING: Operate this unit only in a well-ventilated outdoor area. Carbon monoxide exhaust fumes can be LO (slow) On/Off Switch lethal in a confined area. (I = On / O = Off) Cruise Control WARNING: Avoid accidentally starting the unit. To avoid serious injury, the operator and the unit must be in a stable HI (fast) position when pulling the starter rope (Fig. -
Page 11: Operation
OPERATION WARNING: To prevent serious personal injury, never operate the unit without the blower tubes firmly installed. WARNING: Always wear eye, hearing, hand, foot and body protection to reduce the risk of injury when operating this unit. Wear a face mask or dust mask if the operation is dusty. Secure hair above shoulder level. - Page 12 HOLDING THE UNIT • Stand in the operating position (Fig. 13). Stand up straight. Do not bend over. • Keep feet apart and firmly planted. • Hold the throttle grip with the right hand. Keep the right arm slightly bent. •...
-
Page 13: Maintenance
MAINTENANCE MAINTENANCE SCHEDULE WARNING: To avoid serious personal injury, always stop the engine and allow it to cool before cleaning or maintaining Perform these required maintenance procedures at the frequency the unit. Never perform cleaning or maintenance while the stated in the table. These procedures should also be a part of any unit is running. - Page 14 ADJUSTING THE IDLE SPEED If the engine will not idle properly: 1. Start the engine. Refer to Starting and Stopping. Idle Speed Screw 2. Move the cruise control to the LO (slow) position and let the engine idle. • If the engine stops, increase the idle speed. Use a small Phillips screwdriver to turn the idle speed screw clockwise, 1/8 of a turn at a time, until the engine idles smoothly (Fig.
-
Page 15: Cleaning And Storage
CLEANING AND STORAGE CLEANING STORAGE • Never store a fueled unit where fumes may reach an open flame WARNING: To avoid serious personal injury, always stop or spark. the engine and allow it to cool before cleaning or maintaining • Allow the engine to cool before storing. -
Page 16: Troubleshooting
TROUBLESHOOTING PROBLEM SOLUTION THE ENGINE WILL NOT START The fuel tank is empty Fill the fuel tank with properly-mixed fuel The primer bulb was not pressed enough Press the primer bulb 10 times or until fuel is visible Move the cruise control to the HI (fast) position and the choke lever The engine is flooded to Position 2 (run) and pull the starter rope until the engine starts The fuel is old (over 30 days) and/or improperly mixed... -
Page 17: Warranty
Troy-Bilt for use with the product(s) covered by this manual will void your warranty as to any resulting damage. This warranty is limited to ninety (90) days from the date of original retail purchase for any Troy-Bilt product that is used for rental or commercial purposes, or any other income-producing purpose. - Page 18 NOTES...
- Page 19 NOTES...
- Page 20 NOTES...
- Page 21 Operator’s Manual TB51BP Souffleur á dos á 2 temps CONSERVEZ CES INSTRUCTIONS IMPORTANT : Lisez attentivement ce manuel avant d'utiliser ce produit. Respectez toutes les instructions. 769-25751 / 00 08/20...
-
Page 22: Service
TABLE DES MATIÈRES SERVICE Service ..........22 NE RAMENEZ PAS CET APPAREIL CHEZ LE DÉTAILLANT. - Page 23 • CONSIGNES DE SÉCURITÉ IMPORTANTES • VEUILLEZ LIRE TOUTES LES INSTRUCTIONS AVANT AVERTISSEMENTS DE SÉCURITÉ POUR LES APPAREILS À GAZ AVERTISSEMENT : AVERTISSEMENT : lorsque vous l’essence est utilisez l'appareil, toutes les consignes de sécurité doivent extrêmement inflammable et ses vapeurs peuvent exploser être respectées.
- Page 24 • N’utilisez pas l’appareil à une vitesse supérieure à celle • Faites attention lorsque vous travaillez à proximité de précieuses nécessaire pour réaliser le travail. Ne faites pas fonctionner plantes. La force de l'air soufflé peut endommager les plantes l’appareil à haute vitesse quand vous ne l’utilisez pas. délicates.
- Page 25 • SYMBOLES DE SÉCURITÉ ET INTERNATIONAUX • Le présent manuel de l’opérateur décrit les symboles et pictogrammes de sécurité et internationaux, susceptibles d’apparaître sur ce produit. Veuillez lire le manuel de l’opérateur pour connaître les informations complètes sur la sécurité, l’assemblage, l’utilisation, l’entretien et la réparation. SYMBOLE SIGNIFICATION SYMBOLE...
-
Page 26: Apprenez À Connaître Votre Appareil
APPRENEZ À CONNAÎTRE VOTRE APPAREIL APPLICATIONS • Nettoyer les cours, les entrées, les porches, les terrasses, Poignée de autour des murs, des clôtures, etc. transport Bougie Harnais OUTILS REQUIS POUR L’ASSEMBLAGE Tube Câbles • Tournevis à tête plate flexible Couvercle Poignée de du filtre à... -
Page 27: Assemblage
ASSEMBLAGE AVERTISSEMENT : pour éviter des blessures graves et d’endommager l'appareil, éteignez-le avant de retirer ou Tube coudé d'installer des tubes souffleur ou la buse. AVERTISSEMENT : pour éviter de subir de graves blessures, ne faites jamais fonctionner l'appareil sans le tube du souffleur supérieur bien installé. - Page 28 Installation du tube inférieur de la souffleuse Tube supérieur de la souffleuse 1. Posez l’appareil sur une surface plate et de niveau. 2. Alignez l'onglet sur le tube souffleur inférieur avec l'ouverture sur le tube du souffleur supérieur (Fig. 4). 3.
-
Page 29: Huile Et Carburant
HUILE ET CARBURANT INSTRUCTIONS DE MÉLANGE D’HUILE ET DE CARBURANT L’utilisation d’un carburant vieux et/ou mal mélangé est la cause la plus courante des problèmes de performance. Utilisez uniquement une essence sans plomb neuve et propre. Respectez ces instructions à la lettre pour mélanger correctement l’essence et l’huile. Essence sans plomb Huile 2-temps Définition des carburants mélangés... -
Page 30: Mise En Marche Et Arrêt
MISE EN MARCHE ET ARRÊT AVERTISSEMENT : utilisez cet appareil uniquement Interrupteur Marche/Arrêt dans une zone extérieure bien aérée. Des émanations de (I = Marche / O = Arrêt) LO (lent) monoxyde de carbone dans un endroit confiné peuvent Régulateur être mortelles. -
Page 31: Utilisation
UTILISATION AVERTISSEMENT : pour éviter de graves blessures, n'utilisez jamais l'appareil sans que les tubes de la souffleuse ne soient solidement installés. AVERTISSEMENT : portez toujours une protection pour les yeux, les oreilles, les mains, les pieds et le corps afin de limiter les risques de blessure pendant l’utilisation de cet appareil. - Page 32 TENUE DE L’APPAREIL • Placez-vous en position d’utilisation (Fig. 13). Tenez-vous bien droit. Ne vous penchez pas. • Gardez les pieds écartés et fermement posés sur le sol. • Maintenez la poignée de l'accélérateur avec la main droite. Le bras droit doit rester légèrement plié. •...
-
Page 33: Entretien
ENTRETIEN PROGRAMME D’ENTRETIEN AVERTISSEMENT : pour éviter toute blessure grave, arrêtez toujours le moteur et laissez-le refroidir avant de Effectuez ces procédures d’entretien obligatoires aux intervalles nettoyer ou de procéder à un entretien de l’appareil. indiqués dans le tableau. Ces procédures doivent également faire N'effectuez jamais de nettoyage ou d'entretien lorsque partie d’une mise au point saisonnière. - Page 34 RÉGLAGE DU RALENTI Si le moteur ne tourne pas correctement au ralenti : Vis de réglage 1. Démarrez le moteur. Consultez les sections Mise en marche et Arrêt. du ralenti 2. Déplacez le régulateur de vitesse en position LO (lent) et laissez le moteur tourner au ralenti.
-
Page 35: Nettoyage Et Entreposage
NETTOYAGE ET ENTREPOSAGE NETTOYAGE ENTREPOSAGE • Ne rangez jamais l’appareil quand le réservoir contient encore AVERTISSEMENT : pour éviter toute blessure grave, de l’essence dont les vapeurs pourraient entrer en contact avec arrêtez toujours le moteur et laissez-le refroidir avant de une flamme nue ou une étincelle. -
Page 36: Dépannage
DÉPANNAGE PROBLÈME SOLUTION LE MOTEUR NE DÉMARRE PAS Le réservoir de carburant est vide Remplissez le réservoir avec un carburant correctement mélangé La poire d’amorçage n’a pas été comprimée suffisamment Appuyez sur la poire à 10 reprises ou jusqu’à l’apparition du carburant Déplacez le régulateur de vitesse en position HI (rapide) et le levier Le moteur est noyé... -
Page 37: Garantie
États-Unis, ses possessions et territoires. Troy-Bilt garantit ce produit contre tout défaut de pièces et de main d’œuvre pendant une période de trois (3) ans à compter de la date d’achat initiale et s’engage à titre gratuit à réparer ou à remplacer, à sa discrétion, toute pièce présentant un défaut de pièces et de main d’œuvre. - Page 38 REMARQUES...
- Page 39 REMARQUES...
Need help?
Do you have a question about the TB51BP and is the answer not in the manual?
Questions and answers