Advertisement
Quick Links
ASSEMBLY AND INSTALLATION
T0599 / T0708
W W
WARNING: Turn off the main power at circuit breaker before installing fixture.
AVERTISSEMENT: Coupez la source d'alimentation principale au panneau
central de disjoncteurs avant d'installer le luminaire.
NOTE: 1. Before installing, consult local electrical codes for wiring and grounding requirements.
2. Read and save these instructions.
Important to Know
1. Read all instructions carefully before installation and
operation.
2. If you are not familiar with state and local electrical codes,
it is recommended that you consult with a qualified
electrician.
3. Before installation, shut off power at the main fuse or
circuit breaker box. Be aware that simply turning off the
wall switch is not sufficient to prevent an electrical shock.
4. This fixture requires a 120V AC, 60 Hz power source.
5. Do not attempt to take the lantern apart; there are no
serviceable parts inside.
6. To avoid sensor damage by lightning or electrical surge,
make sure the ground wire is securely connected.
7. For general safety and to avoid any possible damage to
the sensor, be sure the power is switched "off" before
replacing the bulb.
8. Compatible with most LED dimmable bulbs.
Maximum Wattage: 60W Incandescent Bulb
Work Temperature: -22ºF ~ 104ºF
Outlet Box
House Ground Wire
Green Ground Screw
Mounting Plate Unit (A)
Mounting Screw (B)
Fixture Ground Wire
Wire Connector (C)
Fixture Wire
Set Screw (D)
Glass Panel
Frame
Bottom Notch
INSTRUCTIONS
Glass Panel
Fig.1
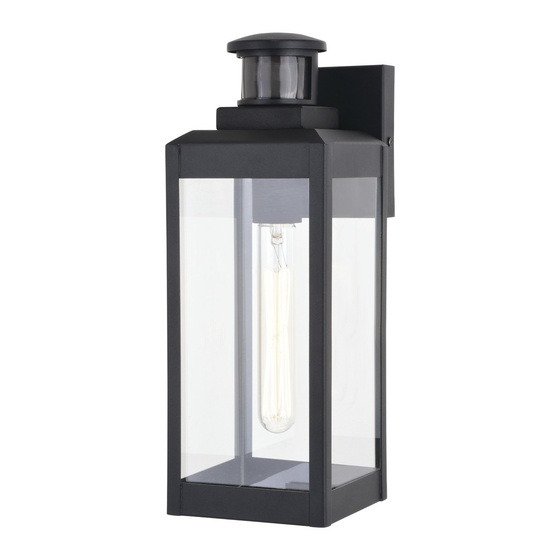
Features
1. Energy saving fixture.
2. Use dim-to-full brightness where dim-illumination
is preferred, such as your front entrance. Use
off-to-full brightness where off/on illumination is
preferred, such as your backyard.
3. When in manual override mode, use wall switch
to keep the light ON till dawn.
Hardware Package (included)
Mounting Plate Unit (A)
Wire Connector (C)
Backplate
Socket
Frame
Top Clip
Fixture
Fig.2
Page 1 / 5
Mounting Screw (B)
Set screw (D)
Max. 60W Type T10 Bulb
(not included)
Fig.1
230223
Glass Panel
Advertisement

Related Manuals for Vaxcel T0599


Summary of Contents for Vaxcel T0599
- Page 1 ASSEMBLY AND INSTALLATION INSTRUCTIONS T0599 / T0708 WARNING: Turn off the main power at circuit breaker before installing fixture. AVERTISSEMENT: Coupez la source d’alimentation principale au panneau central de disjoncteurs avant d’installer le luminaire. NOTE: 1. Before installing, consult local electrical codes for wiring and grounding requirements.
-
Page 2: Installation Steps
Installation Steps Turn off the power at fuse or circuit box 1. Unscrew the two set screws (D), remove the mounting plate unit (A) from the backplate. 2. Attach the mounting plate unit (A) to the outlet box by using two mounting screws (B). Note: Make sure that the two set holes are lined up horizontally to make the fixture level. -
Page 3: Function And Operation
Function and Operation MODES OF OPERATION Choose a mode by sliding the switch on the back of the sensor. When power is first applied, the light will turn on immediately. Wait for 30 seconds to allow the sensor to warm up. 1. -
Page 4: Troubleshooting
NOTE: 1. The sensitivity of the motion sensor will increase as the Where you install your lantern is important: environmental temperature gets cooler. For best performance, Be sure the light is mounted straight on the wall; gently clean the lens with a soft cloth every 1 or 2 months to otherwise, the detection distance may be limited. -
Page 5: Year Limited Warranty
Vaxcel reserves the right to repair, replace or issue a credit for any properly installed product, provided it is returned per RMA instruction. This warranty is limited to the cost of the product only and does not extend to transportation, installation or replacement costs.