Table of Contents
Advertisement
Advertisement
Table of Contents

Related Manuals for SKY-WATCHER Star Adventurer


Summary of Contents for SKY-WATCHER Star Adventurer
- Page 1 INSTRUCTION MANUAL Star Adventurer SA-F-150527V2-EN Copyright © Sky-Watcher...
- Page 2 For more details, please see page 27. For your Safety To prevent damage to your Sky-Watcher product or injury to yourself or to others, read the following safety precautions entirely before using this equipment. Keep these safety instructions available to all users of the product.
-
Page 3: Table Of Contents
CONTENT Features............................4 How the Star Adventurer Works for Astrophotography..............5 Introduction.............................6 The Sky-Watcher Star Adventurer Body.............6 The Optional Accessories...................7 Preparation.............................9 Setup Tripod......................9 Mount Star Adventurer..................9 Mount The Imaging Equipment ...............11 For Astrophotography.............11 For Time-Lapse Photography..........13 Provide Power Source..................14 Start Using Star Adventurer......................15 Quick Function Reference................15... -
Page 4: Features
Features: • High precision, portable and stable celestial tracking system • Supports solar tracking, lunar tracking and star tracking • Maximum payload up to 5 kg (11 lb) • Supports star-scape photography • Supports time-lapse photography • User-friendly Mode Dial with pre-programmed control setting •... -
Page 5: How The Star Adventurer Works For Astrophotography
1) are eliminated. Fig. 3 illustrates how rich and sharp your night sky pictures can be with Star Adventurer. In addition, Star Adventurer is also capable of tracking at solar and lunar speeds. -
Page 6: Introduction
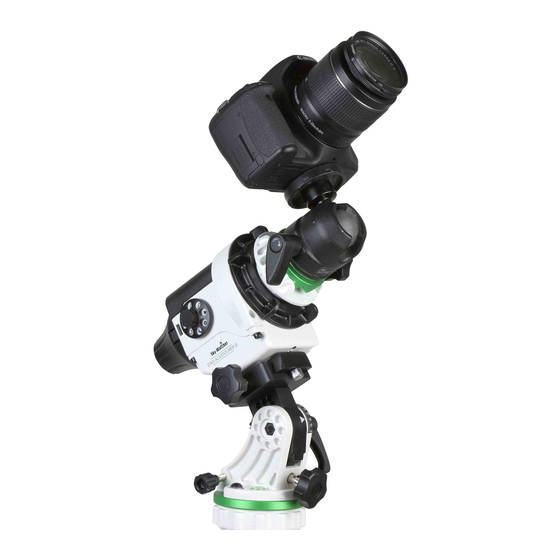
Introduction: The Sky-Watcher Star Adventurer Body 1:Mode Dial 13:Mounting Platform 2:Mode Index 14:Locking Knob 3:Polar Scope Cap 15:Knurled Ring of Polar Scope 4:Battery Case Cover 16:Polar Scope 5:Polar Scope Cover 17:Date Graduation Circle 6:Mini USB Port 18:Time Meridian Indicator 7:RJ-12 6-pins Auto-guider Interface 19:AAx4 Battery Case... -
Page 7: The Optional Accessories
(The default included accessories may vary. Please refer to local dealers for details). Polar Scope Illuminator - To provide lighting source for Polar Sky-Watcher EQ3, EQ5 EQ8. Scope. Also compatible with Fine-Tuning Mounting Assembly - To mount a telescope with Star Adventurer ¼”... - Page 8 DSLR Shutter Control Cable - To connect the DSLR Shutter Control Port of Star Adventurer to your DSLR's external shutter control port. This allows Star Adventurer to directly control the DSLR's shutter release with pre-programmed shutter interval. You can order an optional cable for your camera from your local resellers.
-
Page 9: Preparation
Tilt-head or Ball-head. Spread the legs and secure the tripod legs at the desired height to provide a stable support for your Star Adventurer as Fig 5. Fig 5 Mount Star Adventurer: With Equatorial Wedge: 1/4" to 3/8" Convert Screw Adapter Make sure the is not in the Star Adventurer. - Page 10 1/4" to 3/8" Convert Make sure the Screw Adapter is in the 3/8" threaded socket at the bottom of the Star Adventurer. If it is not, use an Slot Screwdriver to install it. Star Adventurer Mount the to the quick release plate on the tripod.
-
Page 11: Mount The Imaging Equipment
For Astrophotography: Star Adventurer +3/8” Ball Head Adapter + Ball head + Camera + Shutter Control Cable: Mounting Platform Note: Make sure the locking bolt of the has locked on the indentation on the 3/8"... - Page 12 Star Adventurer + Dovetail + Dual Ball Heads +Dual Cameras + Shutter Control Cable: Take the Dovetail from the Fine-Tuning Mounting Assembly to mount two Ball Heads Ball Head Fig 11 Star Adventurer + Fine-Tuning Mounting Assembly + Ball-Head + Camera+ Telescope (+ Auto-guider):...
-
Page 13: For Time-Lapse Photography
For Time-Lapse Photography: (For reference only: you can assemble very different configurations to create more interesting time-lapse photography) Horizontal Rotation Time-Lapse Photography: Fig 13 Vertical Rotation Time-Lapse Photography: Fig 14... -
Page 14: Provide Power Source
Provide Power Source: Star Adventurer allows two power source options. One is inserting 4 AA type batteries; the other is providing DC 5V through USB port (type mini-B). (Fig 15) insert 4 AA batteries plug in USB power Fig 15... -
Page 15: Start Using Star Adventurer
Start Using Star Adventurer Quick Function Reference: Shutter Interval (sec) Rotation Speed & Mode Dial Switch to Switch to Swing Angle TIMELAPSE N or S Turn off power Celestial tracking. 360° Solar tracking. 360° Lunar tracking. 360° 48Hr/rev. 0.5X 360°... -
Page 16: Mode Dial
Main Function: Mode Dial 3-Position Slide Switch Star Adventurer has a user-friendly to allow users easy selection of the pre-programmed movement pattern. At the other side of the Star Adventurer, the two buttons give direct access to higher speed movement for quick positioning. -
Page 17: Right/Left Buttons
Used to rotate the at the highest speed for easier positioning towards the desired object. When the Right Button is pushed, the Star Adventurer will rotate at 12-time sidereal rate and in the same direction as when sliding the switch to... -
Page 18: Auto-Guiding
ST-4 type interface. This function only works in . For other modes, the auto-guiding signal has no effect. USB Port: Star Adventurer contains a USB port (Type Mini-B) to support external USB power "Firmware Upgrade" and support firmware upgrade. Please refer to... -
Page 19: Motor Status Detection
Adventurer will indicate "Motor Error" by flashing the LED on the buttons, but it will not apply any change to the motor control. LED Indication: Star Adventurer has LEDs behind the buttons to indicating the current Star status. There are three different ways the LEDs will light up. If the LEDs don't light up, the Adventurer is not in working mode. -
Page 20: Polar Alignment
Polar Alignment: Before starting with the polar alignment procedure, please review the following figure to get familiar with the scales and dials of the Polar Scope. Time Graduation Circle Representing 1 day (24 hours) Each division is 10 minutes Date Graduation Circle Representing 1 year (12 month) Each division is roughly 2 days Standard Meridian Offset Scale... - Page 21 Polar Scope orientation of Polaris in the by simply entering the date, time, longitude and latitude of your observing location. Then move Polaris to that corresponding position in the Polar Scope Equatorial Wedge by using the fine-tuning movements of the or by moving the tilt-head on your tripod(Fig 24).
- Page 22 The Orientation of Polaris in The Polar Scope As Polaris is not located exactly at the North Celestial Pole, we can see it orbiting the North Celestial Pole in a Polar Scope. The large circle seen in the center of the pattern in the Polar Scope is a representation of Polaris’...
- Page 23 First, rotate the Wedge and adjust the latitude to bring Polaris within the field of view of the Polar Scope. Date Graduation Circle Time Graduation Then rotate the to align Oct 31 to the 0 of the Circle Time Meridian Indicator and turn the Eyepiece/Mounting Platform to align the to the Time Meridian Circle...
-
Page 24: Example
Example for Astrophotography for Celestial Tracking: Star Adventurer Assemble the tripod and according to your need. Then finish the polar alignment. Shutter Control Cable Mount the camera or telescope. Install the cables ( and auto-guiding) if needed. Slide Switch Slide the 3-Position if you are in Northern Hemisphere (Fig 32). - Page 25 Example for Time-Lapse Photography in Mode 12X: Star Adventurer Assemble the tripod and according to your need. Star Adventurer Shutter Assemble the camera and connect the camera and with the Control Cable. Slide Switch Mode Dial Mode 12X. Slide the...
-
Page 26: Firmware Upgrade
Download “ " V1.60 or higher and the newest firmware from www.skywatcher.com Star Adventurer Connect to the computer with the mini USB cable. If this is the first time the device is connected to this computer, please wait for a few minutes for the computer to load the driver. -
Page 27: Advanced Version Firmware
Advanced Version Firmware: Part of the advantage of Star Adventurer lies in its capability to evolve and adapt to your specific needs! If you want to maximize all the fun you can get from it while seeking for new challenges, the Advanced Version Firmware is for you. -
Page 28: Specification
Specification Sky-Watcher Star Adventurer Type Ultra compact equatorial tracking platform Tracking mode Astrophotography: Celestial Tracking rate, 1/2 celestial tracking rate, solar tracking rate, lunar tracking rate(mean lunar time). For both of northern and southern hemispheres. Time-lapse photography: 12 hr/rev, 4 hr/rev and 2 hr/rev... - Page 29 R.A. axis and no calibration is needed. If, during rotation, you see the object wandering off, calibration is needed. You should Star Adventurer rotate the to find the point where the object is at the longest distance from the crosshair center, and then you should move the crosshair halfway towards the object (Fig 35), using the 3 tiny adjustment screws on the side of the Polar Scope (Fig 34).
- Page 30 Repeat steps 1 to 4 a few times until the object remains at the center of the reticle when rotating the mount in R.A. axis. Date Graduation Circle Time Graduation Turn the to align Oct 31 to the 0 of the Circle.
- Page 31 • It is recommended to do this calibration at daytime, aiming at a point object (such as a distant rooftop) because the delicate operation with the tiny allen screws is even more delicate in the dark.
-
Page 32: Appendix
Fine-Tuning ¼’’ Mounting Element Fig 38 The Fine-Tuning Mounting Assembly connects a telescope to Star Adventurer and allows rotation in the other direction (at 90°, DEC direction). You can adjust the tightness of the rotation with the clutch knob. You also can fine-tune the camera or telescope orientation slightly in DEC direction by using the fine-tuning knob. - Page 33 Fig 39 Equatorial Wedge is a device to adjust the latitude for polar alignment. Rotate the Star Adventurer Latitude Adjustment Knob can adjust the latitude of the indicated by the Latitude Indicator. The range is from 0° to 90°. The Horizontal Adjustment Knob can adjust the Wedge to rotate to right or left horizontally.
Need help?
Do you have a question about the Star Adventurer and is the answer not in the manual?
Questions and answers