Table of Contents
Advertisement
Advertisement
Table of Contents

Related Manuals for SKY-WATCHER CQ350-PRO


Summary of Contents for SKY-WATCHER CQ350-PRO
- Page 1 INSTRUCTION MANUAL CQ350-PRO Mount CQ350-PRO-V1 Copyright © Sky-Watcher...
-
Page 2: Table Of Contents
CONTENT PART I : SETTING UP THE CQ350-PRO MOUNT 1.1 Setting Up the Tripod 1.2 Installing the CQ350-PRO Mount on the tripod 1.3 Installing the Counterweights 1.4 Operation of the RA and DEC clutch 1.5 Installing the Telescope 1.6 Balancingthetelescope PART II : POLAR ALIGNMENT 2.1 Prepare the Mount for Polar Alignment... - Page 3 CQ350-PRO Mount CQ350-PRO Mount x 1 Instruction Manual x 2 Azimuth Adjustment Knob x 2 INSTRUCTION MANUAL Packing List EQ8-R Mount INSTRUCTION MANUAL AZ-EQ6 GT Mount SynScan Mount Package Includes: EQ8-R-V1 Copyright © Sky-Watcher 021112V1 Copyright © Sky-Watcher Counterweight Shaft x 1...
-
Page 4: Part I : Setting Up The Cq350-Pro Mount
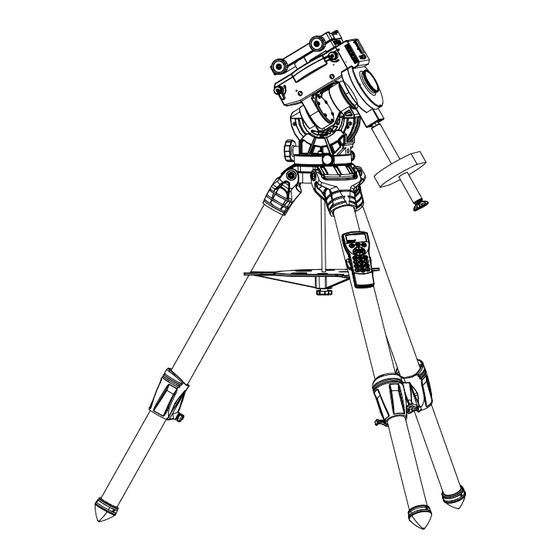
PART I : SETTING UP THE CQ350-PRO MOUNT 1.1 Setting Up the Tripod 1. Spread the three legs of the tripod(Fig 1.1a)(Fig 1.1b). Fig. 1.1a Fig. 1.1b Install the accessory tray and the lower knob on the central rod (Fig 1.1c). -
Page 5: Installing The Cq350-Pro Mount On The Tripod
1.2a) Engage the tripod central rod in the CQ350-PRO mount by turning the tripod upper knob. Turn the knob until it is moderately tightened (*) (Fig 1.2c) If necessary, re-adjust the tripod legs using the bubble level on the mount as a refer-ence. - Page 6 PART I: SETTING UP THE CQ350-PRO MOUNT *Fasten the upper knob enough for the mount to be stable, but not too tightly to still allow azimuth fine adjustment with the horizontal azimuth adjustment knobs when operating in polar alignment* Tighten the lower knob (Fig 1.2c).
-
Page 7: Installing The Counterweights
PART I: SETTING UP THE CQ350-PRO MOUNT 1.3 Installing the Counterweights Screw the counterweight rod into the mount as shown in Fig. 1.3a (**). Remove the stopper knob at the end of the counterweight rod. Loosen the counterweight’s thumb screw and slide the counterweight onto the counter- weight rod. -
Page 8: Installing The Telescope
(Fig. 1.4c). Fig. 1.4c (**) Important remark: the CQ350-PRO mount has the possibility of mounting the counter- weight rod under two different angles. One possibility is the straight position, and the other possibility is the forward angled position. When introducing the rod in the mount, the two locking screws of the mount must be aligned with the threaded holes in the rod. -
Page 9: Part Ii : Polar Alignment
Prior to operating the CQ350-PRO mount, it must be polar-aligned. 2.1 Prepare the Mount for Polar Alignment Set up the CQ350-PRO mount, counterweights, and telescope as described in PART I. It is recommended to polar-align the CQ350-PRO mount with all equipment installed. -
Page 10: Part Iii : Electronic Control Interface
PART III : ELECTRONIC CONTROL INTERFACE 3.1 Control Panel The control panel of the CQ350-PRO Mount is shown below: Fig. 3.1 3.2 Panel Interface Components: POWER: This is a connector from which the mount and the hand control get power supply. -
Page 11: Pinout Of The Interfaces
“Shutter“ and “Focus“ signals. • The camera control cable shipped with the DEC- DEC+ CQ350-PRO mount is for a Canon EOS series DSLR camera. Cable for other cameras is optional and can be ordered POWER AUTO GUIDE SNAP Fig. -
Page 12: Part Iv : Features Of The Cq350-Pro Mount
All the above options support ASCOM telescope control platform. 4.2 Batch Exposures Function The CQ350-PRO mount is equipped with a SNAP port which can control the shutter release of a camera. Working with the SynScan hand control’s “Camera Control” function, a user can take batch exposures when doing astrophotography. -
Page 13: Appendix Dimensions
APPENDIX: DIMENSIONS Dimensions: Mount Mount... -
Page 14: Specifications
APPENDIX: SPECIFICATIONS Specifications: Product Name CQ350-PRO Mount Mount Type German Equatorial Mount Payload 35kg (Rated for astrophotography; counterweights excluded) Latitude Adjustment Range 10º to 70º Azimuth Adjustment Range ±20 º Weight (Tripod excluded) 15 kg Counterweight 2 x 10kg/ea. Tripod 29.4kg... - Page 15 CQ350-PRO Mount...
Need help?
Do you have a question about the CQ350-PRO and is the answer not in the manual?
Questions and answers